
Vent Options for Plumbing Drains
See several time-tested solutions for safely venting kitchen and bathroom drains when remodeling a home.
When adding or modifying plumbing during a remodeling job, it’s difficult to know exactly how things will fit together until you expose the framing and actually run the pipe—especially vents. Because adding new plumbing vents in old walls and ceilings can be tricky, this article discusses several options. But first, here are a few terms to keep straight: A stack is a vertical pipe. If the stack carries wastes, it’s a soil stack. If the stack admits air and never carries water, it’s a vent stack.
Most of the venting options described next are examples of dry venting, in which a vent stack never serves as a drain for another fixture. But there are hybrids; for example, if a vent stack occasionally drains fixtures above it, it is a wet vent. Wet vents must never carry soil wastes, and many local codes prohibit all wet venting. But when it’s legal and the vent is one pipe size larger than normal to ensure a good flow, wet venting can be safe and cost-effective because it requires fewer fittings and less pipe.
Back venting
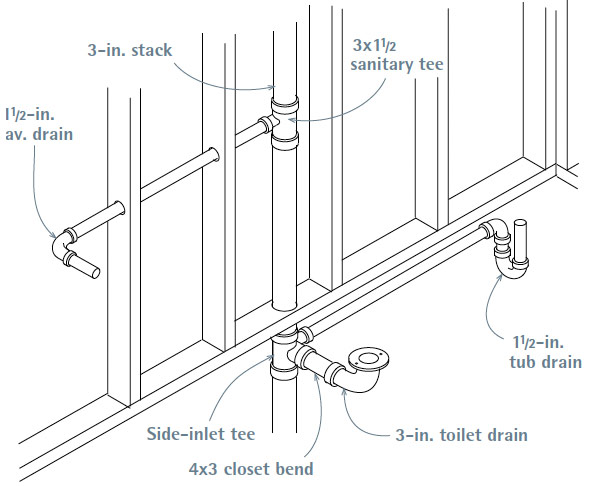
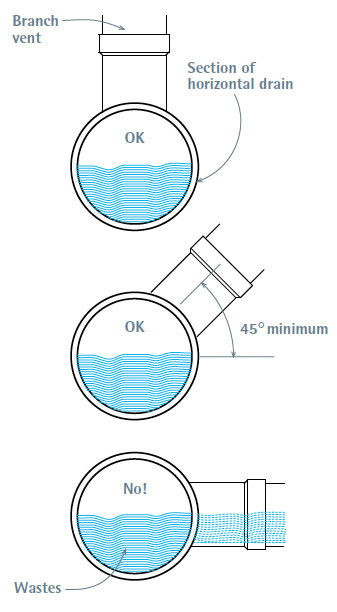
Back venting (also known as continuous venting) is the dry-venting method shown in “Back Venting (Continuous Venting)”, and it’s acceptable to even the strictest codes. All the fixtures in the drawing have a branch vent. In a typical installation, the trap arm of, say, a lavatory empties into the middle leg of a sanitary tee. The branch drain descends from the lower leg, the branch vent from the upper. When a branch vent takes off from a relatively horizontal section of drainpipe, the angle at which it departs is crucial. It may go straight up or it may leave at a 45° angle to work around an obstruction. But it must never exit from the side of a drainpipe: If it did, it could become clogged with waste.
Branch vents must rise to a height of at least 42 in. above the floor before beginning their horizontal run to the vent stack. This measurement adds a safety margin of 6 in. above the height of the highest fixture (such as a sink set at 36 in.), so there is no danger of waste flowing into the vent. Since branch vents run to a vent stack, they should maintain an upward pitch of at least 1⁄4 in. per ft., although the UPC allows a vent to be level if it is 6 in. above the flood rim of a fixture.
Stack venting
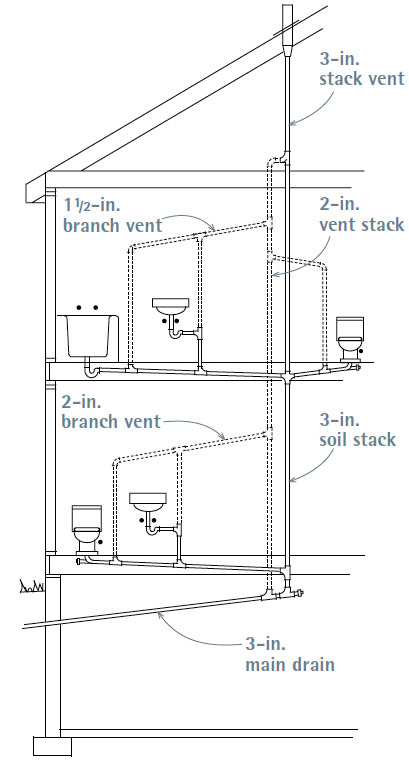
Clustering plumbing fixtures around a central stack is probably the oldest method of venting. In the early days of indoor plumbing, plumbers noticed that fixtures near the stack retained water in their traps while those (unvented) that were at a distance did not. You can vent three bathroom fixtures (lavatory, tub, and toilet) off a 3-in. stack vent, without additional branch vents—if you detail it correctly, as shown in “Stack Venting.”
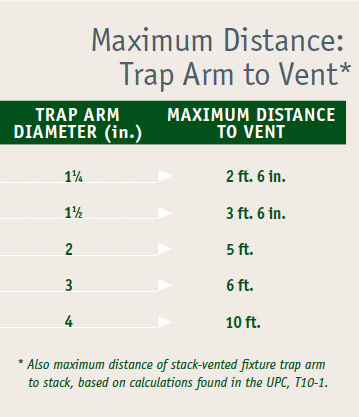
Note: When stack venting, never place a toilet above the other fixtures on the stack: Its greater discharge could break the water seals in the traps of small-dimension pipes. If you must add fixtures below those already stack vented, add (or extend) vent stacks and branch vents. The maximum allowable distance from stack-vented fixtures to the soil stack depends on the size of the pipe serving a particular fixture (see “Maximum Distance: Trap Arm to Vent”).
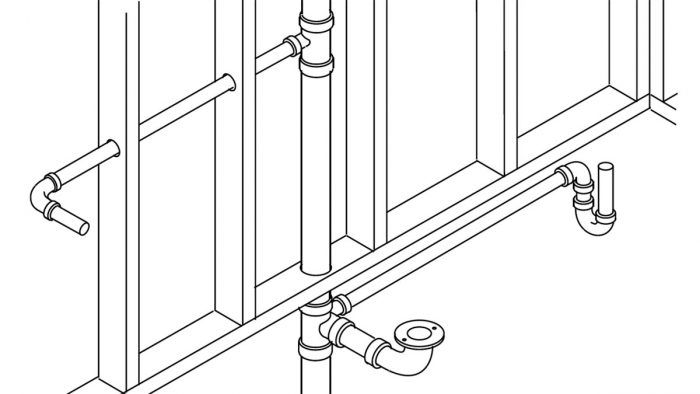
Venting toilets
Because they have the biggest drain and vent pipes of any fixture, toilets can be the trickiest to vent. When space beneath a toilet is not a problem, use a setup such as the one shown in “Venting a Toilet,” in which a 2-in. vent pipe rises vertically from a 3 by 2 combo, while the 3-in. drain continues on to the house main. The 3-in.-diameter toilet drain allows the vent to be as far as 6 ft. from the fixture, as indicated in the table.
Venting a Toilet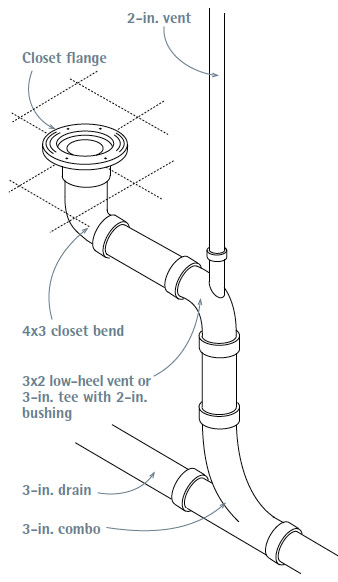 |
Constricted Spaces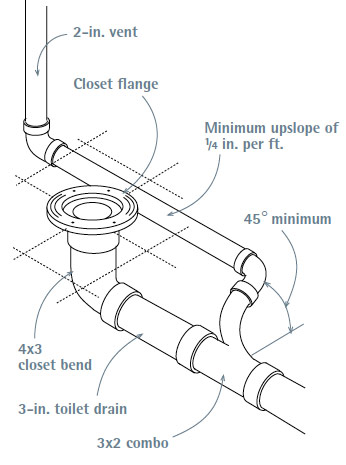 |
When space is tight, say, on a second-floor bathroom with finished ceilings below, the drain and vent pipes must descend less abruptly (see “Constricted Spaces”). Here, the critical detail is the angle at which the vent leaves the 3 by 2 combo: That vent takeoff must be 45° above a horizontal cross-section of the toilet drain. If it is less than that, the outlet might clog with waste and no longer function as a vent. As important, the “horizontal” section of the vent that runs between the takeoff and the stack must maintain a minimum upward pitch of 1⁄4 in. per ft.
Vent-Takeoff Cross Section
When you’ve got two toilets back to back, you can save some space by picking up both with a single figure-5 fitting (double combo). From the top of the fitting, send up a 2-in. or 3-in. vent; from the two side sockets use two 3-in. soil pipes serving the toilets; and use a long-sweep ell (or a combo) on the bottom to send waste on to the main drain. This fitting is about the only way to situate back-to-back water closets and is quite handy when adding a half bath that shares a wall with an existing bathroom.
Other venting options
Common vents are appropriate where fixtures are side by side or back to back. This type of vent usually requires a figure-5 fitting.
Loop vents are commonly installed beneath an island counter in the middle of a room. The sink drain is concealed easily enough in the floor platform, but the branch vent, lacking a nearby wall through which it can exit, requires some ingenuity. This problem is solved by the loop shown in the “venting an island-sink” illustration below.
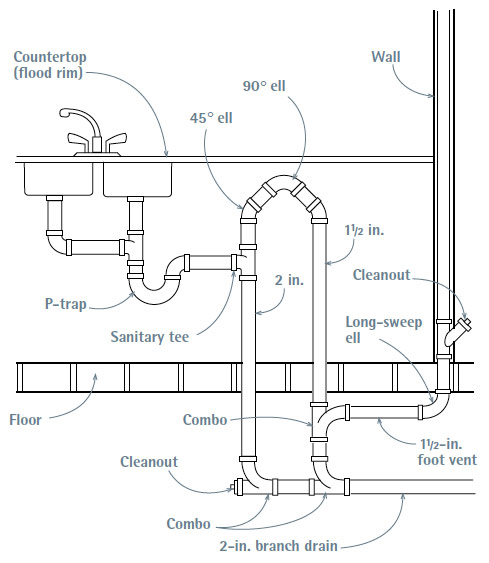
In addition to the fittings shown in the drawing, note these factors as well: The loop must rise as high under the counter as possible and at least 6 in. above the juncture of the trap arm and the sanitary tee to preclude any siphoning of wastewater from the sink. The vent portions may be 11⁄2-in. pipe, but the drain sections must be 2 in. in diameter, and drain sections must slope downward at least 1⁄4 in. per ft.
Air-admittance valves (AAV) are one-way mechanical vents designed to eliminate the need for conventional branch vents for fixtures too far from a wall. As water drains from a sink, it creates a partial vacuum within the pipes, depressing a spring inside the AAV and sucking air in. When the water is almost gone and the vacuum is equalized, the spring extends and pushes its diaphragm up, sealing off outside air once again and preventing the release of sewer gases. Because fixture drains with AAVs don’t need lateral vent runs or additional vent-stack penetrations in the roof, they allow greater design flexibility, while saving considerably on labor and materials. Mechanical vents were once intended to be only temporary, but their valve mechanisms have been improved so that air-admittance valves are now accepted by major building codes, including the IRC.
Vent termination
To reduce chances that vent gases will enter the home, stack tops must be at least 6 in. above the upslope side of the roof and at least 3 ft. above any part of a skylight or window that can be opened. A vent stack must be at least 12 in. horizontally from a parapet wall, dormer sidewalls, and the like. Finally, stacks must be correctly flashed to prevent roof leaks.
Excerpted from Renovation, 5th Edition (The Taunton Press, 2019) by Michael Litchfield and Chip Harley
Available at Amazon.com.
