Podcast 428: Why Radiant Heat?, Proper Construction Sequencing, and Waterproofing Mansard Windows
Kiley, Ian, and Patrick hear from listeners about water filters and opportunity costs before taking listener questions about in-floor radiant heat, deviating from the normal construction sequence, and flashing windows in Mansard roofs.
Follow the Fine Homebuilding Podcast on your favorite app. Subscribe now and don’t miss an episode:
 |
Help us make better episodes and enter for a chance to win an FHB Podcast T-shirt:
www.finehomebuilding.com/podcastsurvey
Walter makes water filter changes easier. Derek reminds us about opportunity costs. Craig has a shoutout for Green Glue. Dack wants to know why Ian chose radiant floors for his new house. Jerry asks about deviating from the normal construction sequence to keep things moving. Matt wonders about wonky floors. Kenneth seeks a solution to his leaky Mansard-roof windows.
 Editor Updates:

- Kiley’s water testing
- Ian’s pole barn
- Jeff’s mailbox
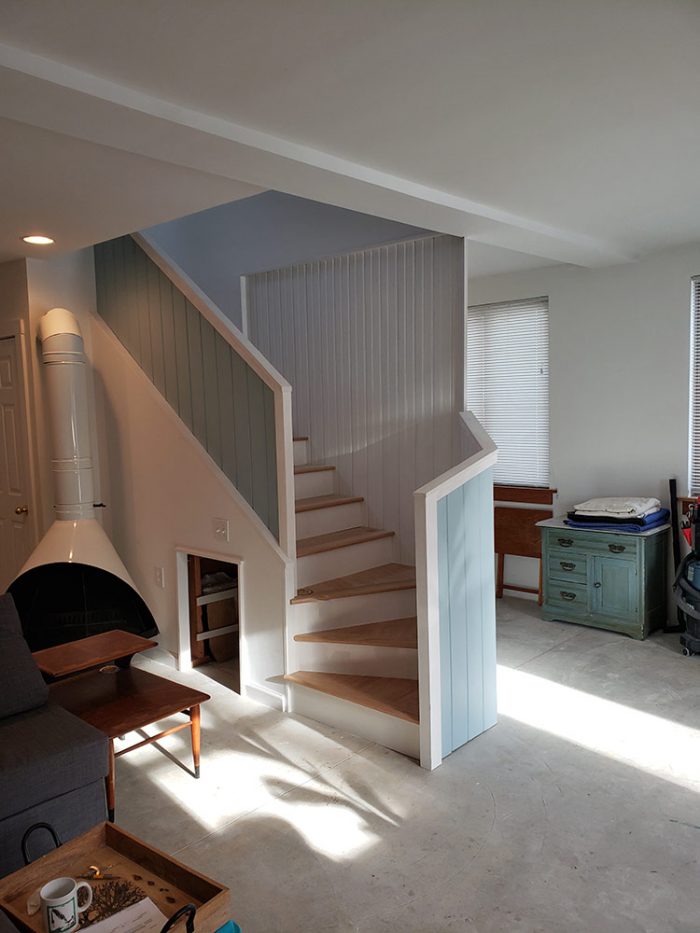
- Patrick’s stairs
Related Links:
Listener Feedback 1:
Walter writes: Patrick, On today’s (1/7) podcast (#422), you all agreed that getting the filter off was the worst part. I thought so to, and then one day, for no good reason, I opened a faucet after I had shut of the water but before I tried to get the filter off. Easy peasy.Try it.
Constant listener,
Walter
Listener Feedback 2:
Derek writes: Hello podcast crew, As a fellow builder who is about to embark on yet another large personal building project, I enjoyed listening to the discussion with Ian about what it costs to build your own house. Included in the equation were the “carrying costs,” or borrowing expenses for the loan, and rightly so. What is often missing from these conversations is what economists call “opportunity costs,” in other words, what you would have made if you were doing something else, like going to work. In Ian’s case, unless he routinely takes 3000 hours off of work each year to pursue a hobby or other unpaid ventures, those lost wages are a portion of the true cost of the project. Granted some of those hours were evenings, weekends, holidays, etc. but I’m sure the greater portion were during work hours when he could have been compensated for his time if he were on another project.
The reason I think it matters, is that aspiring owner builders (and seasoned builders who often don’t count all the costs, myself included) underestimate what it truly costs to build out a project, sweat equity is rarely free. In Ian’s case, let’s say his labor rate is $40 an hour, though I’m sure it’s higher. Not counting his labor, he had just under $342k into the project and it appraised for $460k, a difference of $118k. Now taking his 3000 hours of labor, multiplied by $40, is $120k, (or an additional $43.51 per sq ft for a total of $167.51 per ft) so his house is basically worth what he put into it. That’s not a bad place to be, but to say this house only cost $342k to build is a stretch. Love the show, it just keeps getting better and better.
Related Links:
- The Self Design-Builder Pt. 2: Estimating Construction Costs
- Calculating the True Cost of Construction
Listener Feedback 3:
Craig writes: I’ve heard of this product green glue for soundproofing. My brother mentioned it to me and I recalled Matt Risinger doing a review of this project a few years ago.
Related Links:
- How to Control Noise with Green Glue – Install steps & tips
- GreenGlueCompany.com
- GBA: Community and Q&A: Green Glue for Noise Reduction
Question 1: Is hydronic radiant floor heat the right choice for my project?
Dack writes: Hello Podcast People: On episode 420 (I think), Ian said he installed hydronic radiant floor heat in his recent build, defying Martin Holladay (not to mention Patrick McCombe). A couple of questions:
1. What led Ian to go with that option, despite building a Passive House? And knowing better?
2. On Ian’s sponsored mini-split video (Understanding Ductless Multi-Split Heat Pumps) he says the radiant is used as a backup, but on episode 420 (I think) he made it sound like it was the primary, and the mini-split was the secondary. Which is it?
Thanks for any info. I am trying to figure out how to heat and cool my forthcoming build in the same climate zone (6) (and really, really like hydronic radiant floor heat).
Thanks again,
Dack
Question 2: How do I manage a changing construction schedule in my home?
Jerry writes: Hi FHB Crew, Maybe I missed it, but someone asked about low maintenance black exterior trim. We are definitely seeing this trend in SE Michigan. We install a lot of Pella windows and they offer what they call frame expanders and other casing accessories. They are usually metal trim pieces that fit into a channel on the outside of a window. We typically only use L-shaped versions when we install windows in brick openings, but I think they have different profiles. We also work with a roofing contractor that does barn siding and metal roofs. They have a machine that bends the metal out of coil stock on site, and they can set their equipment up for different shapes and profiles. These companies may be able to make corner trim, casing and fascia set up with J channel edges or flanges. Dark aluminum trim seems to expand and contract a bit when installed, so maybe this kind of thing should be installed loose like vinyl siding. I have to admit, we tend to lean toward Boral TruExterior, and paint it after install.
Not really a question, but I’d like to hear some discussion of the construction process. Generally, we move from demo to framing, HVAC, plumbing, electrical, insulation, drywall, priming, flooring/tile, trim, paint, final electric, countertops, final plumbing, final hvac, appliances, final carpentry. Sometimes the schedule just breaks down. If we are replacing a kitchen, we may install cabinets as soon as the drywall is sanded so that we can have countertops measured, it usually takes 2 weeks to get them installed after that, and we can’t bring in the plumber or appliances until its done, so it’s usually a major slowdown in progress. That means our painter may be priming later than they’d like and our flooring installer may only be able to install up to the toekick and not to the wall. It may save a couple days or weeks, and when you’re living without a kitchen in your house that can feel like an eternity. Sometimes a trade may just not be available when you need them so you’re faced with a dilemma, do you wait or move on and leave them with a headache?
I would like to hear your opinions on this. Are there any tricks to keeping things moving along even when you’re out of sequence? Thanks as always!
Related Links:
- FHB Podcast: Window Expert Travis Eisenbarth of Pella
- How to Live in Your House During a Kitchen Remodel
Question 3: Why is the flooring in the second floor porch rooms humped up on one side?
Matt in Baltimore writes: I have noticed a strange thing on 3 houses I’ve looked at in the past 2 months. All 3 houses are roughly 100 years old and all 3 have a 2nd story room that extends over the porch. In all 3 houses, the floor of this 2nd floor room is humped up directly over where the exterior wall is (the back of the porch). These are all significant humps that you can easily notice as you’re walking in the room. Two of the houses had cedar shingle siding and one had asbestos siding but on all 3, the siding outside was still perfectly lined up suggesting there has been no movement, at least since the siding was installed, and none of the siding was very new. None of these rooms were ever exterior 2nd floor porches, which would account for a sloped floor. I haven’t actually opened up any of these floors to look at what’s going on. In all 3 cases I’ve suggested leaving it as it since nothing appears to be currently moving. However, I would like to be able to tell clients what’s happening. I’m not sure if they were built like this or if things have settled in the past. Have any of you encountered anything like this? Thanks!
Related Links:
Question 4: Best way to waterproof a basement? How to insulate a wall behind a mansard roof? How to cap and flash window bucks?
Kenneth from Acton Ontario, Canada, an hour west of Toronto (15 min north of Mike Holmes house) Experience: 2 year college course in cabinet making, 7 years framing houses, 14 years in residential high-rise writes:
 |
 |
 |
Hi Podcast crew!
I have been working through all the episodes as fast as I can, you all do an amazing job. I thoroughly enjoy listening and learning.
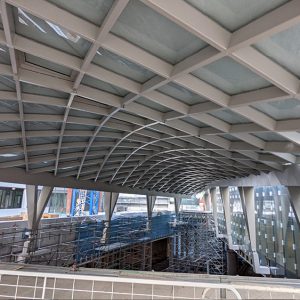
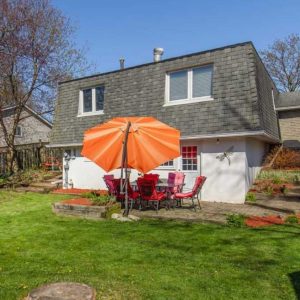
I have a 1970’s north facing 1300 sq ft mansard roof bungalow with a walk out. 8ft foot headroom mostly unfinished basement, concrete foundation walls and slab. The basement is fairly dry. (a heavy heavy rain will give me a wet slab in one area along the west wall.) These walls have no insulation or waterproofing. With the steep grade difference to the back of the house a lot of the foundation is exposed. The main floor cantilevers at the front of the house about two feet on a 2×4 knee wall that is insulated with paper faced batts. The knee wall is faced with brick on the outside.
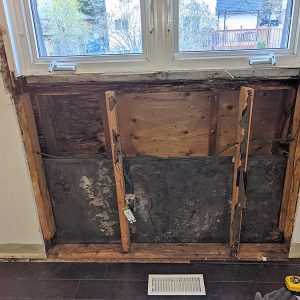
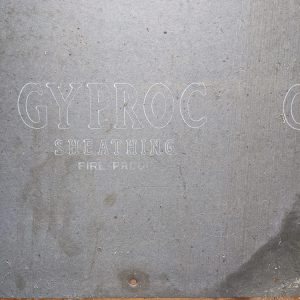
On the main floor, the outside walls are 2×4 with paper faced fiberglass batts. The sheathing is a type x style gypsum board. The roof is a 3/12 pitch truss, the mansard is simply a 2×4 tied from the tail of the truss to the soffit that returns to the mudsill/rim board. I’ve had the singles replaced this summer. I am also replacing the windows one by one as I update each room.
 |
 |
 |
 |
Question 1: How would you go about waterproofing /insulating the basement? I want to make it a livable area, radon mitigation would be an added bonus. I tested when I moved in last year and my levels were low, but in my head no radon is better than low.
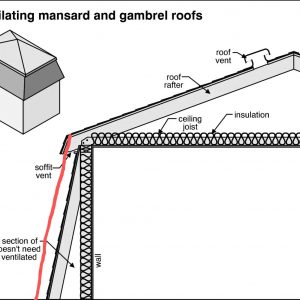
Question 2: Any ideas on how to insulate/ air seal the walls behind the mansard roof (this void is attic space, correct?)? I plan on redoing the soffit/evestrough. At that point I would have access, although not much. Can I glue/nail a polyiso/eps board to the gypsum wedging it under the connection of the truss to the mansard. I don’t know if I could get the joints taped to the top. I could caulk the face of each joint as I put each sheet up…. I really don’t like spray foam.
(If I had the time, I would rip the mansard off put a nice big overhang sistering to the trusses, Rockwool as a continuous insulation, wrb, rain screen and siding.) This may have to wait for retirement!
Question 3: The window bucks are quite deep as the window sits on the outside wall. The bucks are capped with aluminum. As I replace each window and the rotted bucks, I am adding a back dam and using blue skin as a WRB. What would be the best way to cap and flash these bucks? I would like to use something other than aluminum as I don’t have a break to bend it and it’s very loud when it rains. Would it look silly if I put a black evestrough at the top of the mansard to stop the drip? Right now, it is just a drip edge.
Any help on any of these questions would be greatly appreciated! Keep up the great work! If you would like other pictures or info please don’t hesitate to ask!
Related Links:
- Radon Mitigation
- Detail Library: Building Plans for Energy Efficient Basement Remodeling
- Study Finds OSB Sheathing Not a Reliable Air Barrier
- Podcast 364: Exposed Headers, Mansard Roofs, and Outdoor Rooms
- Flashing Window and Door Bucks
End Note: Favorite builders on social media.
Marty writes: Patrick, on your December 31 Podcast, towards the very beginning, Ian made reference to builders he follows on Instagram- do you mind sharing which ones he views (would recommend)? He made reference to the fact that “we all look at the same ones” — thank you in advance.
 |
 |
 |
 |
 |
 |
Steve Baczek • Matt Risinger • Ben Bogie • Benjamin Morton • Tim Uhler • Big Dog Construction • Squared Away Contracting • Trillum Architects • Trill Hill Farm • DiBlasi Painting • Drywall Shorty
Patrick, one more question. Any good camps in the Summer for high schoolers to attend where they can learn a trade, e.g., work on a home construction similar to the high-school classes I heard on one of your podcasts? Wish you a fabulous 2022.
The December 31 show was excellent (helpful, informative, at times fun).
Best Regards, Marty
Check out our latest Project Guide: Siding & Exterior Trim!
Check out our FHB Houses:
Visit the Taunton Store • Magazine Index • Online Archive • Our First Issues • All Access
Help us make better episodes and enter for a chance to win an FHB Podcast T-shirt: www.finehomebuilding.com/podcastsurvey

If you have any questions you would like us to dig into for a future show, shoot an email our way: fhbpodcast@taunton.com.
If we use your question we’ll send you a FHB Podcast sticker!
FHB Podcast T-shirts!
Represent your favorite podcast! Available in several styles and colors. Made from 100% cotton. Find the Podcast t-shirt and more cool products in the Fine Homebuilding Store.
Fine Homebuilding podcast listeners can now get 20% off anything in the Taunton store, including Insulate & Weatherize.
Use the discount code FHBPODCAST to take advantage of this special offer.
We hope you will take advantage of a great offer for our podcast listeners: A special 20% off the discounted rate to subscribe to the Fine Homebuilding print magazine. That link goes to finehomebuilding.com/podoffer.
The show is driven by our listeners, so please subscribe and rate us on iTunes or Google Play, and if you have any questions you would like us to dig into for a future show, shoot an email our way: fhbpodcast@taunton.com. Also, be sure to follow Fine Homebuilding on Instagram, and “like” us on Facebook. Note that you can watch the show above, or on YouTube at the Fine Homebuilding YouTube Channel.
The Fine Homebuilding Podcast embodies Fine Homebuilding magazine’s commitment to the preservation of craftsmanship and the advancement of home performance in residential construction. The show is an informal but vigorous conversation about the techniques and principles that allow listeners to master their design and building challenges.
Other related links
-
- All FHB podcast show notes: FineHomebuilding.com/podcast.
- #KeepCraftAlive T-shirts and hats support scholarships for building trades students. So order some gear at KeepCraftAlive.org.
- The direct link to the online store is here.

