Podcast 447: Combustion Safety, Drippy SIP Roofs, and Hiding AC Line Sets
Andrew, Ian, and Patrick hear from listeners about tightening a leaky house and protecting an add-a-level during construction before taking listener questions about improving the draft of combustion appliances, drips from an SIP roof, and an inexpensive way to hide exterior mounted line sets.
Follow the Fine Homebuilding Podcast on your favorite app. Subscribe now and don’t miss an episode:
 |
Help us make better episodes and enter for a chance to win an FHB Podcast T-shirt:
www.finehomebuilding.com/podcastsurvey
Jim reports that he tightened his leaky house. Dan has further thoughts on using rubber roofing to protect a house under construction. Andrew says think twice about appliance-software updates. Mike asks about improving the draft of his furnace and water heater. Seth is challenged with fixing a drippy ceiling in an SIP house. Jeff wants to hide his AC line sets. Gadge asks if you can put electrical outlets in baseboards.
Editor Updates:
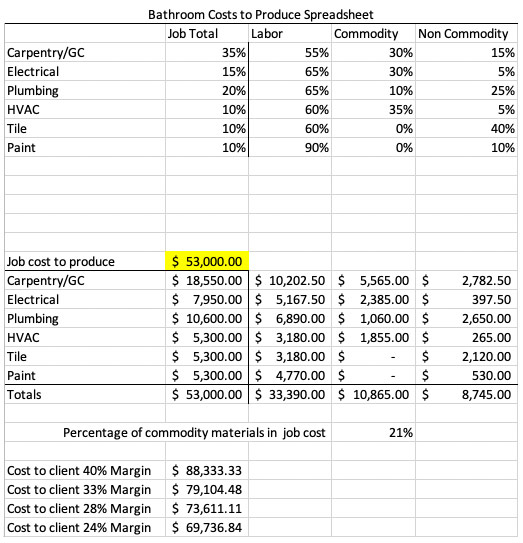
- Ian’s bathroom costs-to-produce spreadsheet
- Andrew’s favorite home improvement Reddits, backup sump pump
- Jeff’s new outbuilding?
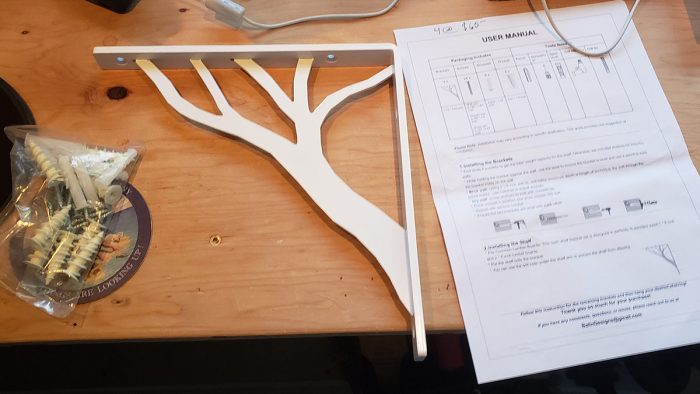
- Patrick’s tree-branch brackets
 |
 |
Listener Feedback 1:
Jim writes: I know that HVAC is one of your hot buttons. When I moved to Asheville into a giant leaky house, I contacted local green building consultants and had an inspection by Matt Vande. With his advice and, surprisingly, the advice from the FHB podcast, I was able to make some significant improvements to the home and basement.
From their website: Amy is co-founder and principal of VandeMusser Design, PLLC, founded in 2002. Amy received her Bachelors and Ph.D. degrees in Architectural Engineering and an M.S. degree in Mechanical Engineering from the Pennsylvania State University. She is an active member of the American Society of Heating, Refrigerating, and Air Conditioning Engineers (ASHRAE), and has previously held a faculty position in Architectural Engineering at the University of Nebraska-Lincoln and as a researcher in the Indoor Air Quality group at the National Institute of Standards and Technology (NIST) in Gaithersburg, MD.
Her partner Matt has a Bachelor’s in Architecture and an M.S. in Architectural Engineering. He was interviewed in a New Zealand podcast several years ago. Knowing the low rates they charge, they must do this out of love of green building and not of profit.
Either (or both) of these two might make a good guest on ProTalk.
Listener Feedback 2:
Dan writes: I took a significant hiatus (fortunately not a hiatal) from listening thanks to the 6,000 other things vying for my attention.
But did just catch the one where you talked about add-a-levels with Ian and Kiley and mentioned my job. A few thoughts/lessons:
First off – the job is dormering a cape. A big shed in the back, two doghouses in the front. Quickly became clear that tearing the roof off would be faster and cheaper and make for a much better job. We’d tried the EPDM covering before, but there were a couple of problems – there was a chimney in the middle of the house, and we taped the seams with zip. So while we kept probably 90% of the water out, we still had some drywall damage below.
On this house, we were getting rid of the chimney so we would have a nice flat surface. We tore it down by hand to below the 2nd fl deck before my excavation contractor came and demo’d the roof. We unfortunately got stuck in one of the windiest couple of days in a decade, which made everything more exciting. We had the machine drop the roll of rubber on the deck before leaving, and then rolled it out and went around the perimeter at top of 1st floor walls to hold it from lifting up. We had a couple of seams to tape, and we did them with contact cement and SA seam tape. It was about 14 degrees so we used a couple of heat guns to speed things up, but it all worked well.
The house had some waves so we set new plates and shimmed them level. This had the added benefit of providing scuppers to push any standing water out of. And since we had a structural ridge, we only needed a couple of posts in the interior. We cut out a little of the rubber, prepped where they sat, patched, then set posts and ridge.
We didn’t start framing interior walls til roof was on, so the rubber remained intact. And in the meantime, I realized the rubber would be perfect for moving our air barrier from the SA Hydrogap over the barn board sheathing on first floor to underside of rafters and wall interiors on 2nd floor. Where drywall and membranes over interior top plates will be air barrier. So, we cut out the rubber on the inside, leaving about a foot left to fold up. On the outside, we’ll lap over the Hydrogap and tape.
All in all, it worked perfectly. If we ever have a chimney to cover, I think we could either go over the whole thing and glue to the rest of the EPDM, or maybe run so caulk and band clamp a wrap of rubber w foot or two up the chimney. And then glue to base rubber.
I will also weigh in on excel – it’s pretty much all I use. I’ve got some fairly complex workbooks we’ve developed over the years. I haven’t done a great job of linking them like Ian has but we don’t have as much going on so keeping material prices up to date isn’t as critical.
Related links:
- Pretty Good House
- Installing a Rubber Roof
- Installing a Low-Slope EPDM Roof
- Seal an Unused Fireplace
Listener Feedback 3:
Andrew writes: Owners of a certain type of combi microwave from the German product AEG have had a device that no longer works for over two weeks. Due to a wrong software update, the microwave thinks it is a steam oven. The problem can only be solved on location, a spokesperson confirms to NU.nl. It already went wrong on March 2.
“An employee manually entered a wrong number somewhere, causing an incorrect update. As a result, all combi microwaves of this type no longer work in the Benelux,” says a spokesperson for the umbrella company Electrolux.
The combi microwave, the AEG KMK968000T, suddenly thinks it is a steam oven due to the wrong software update. Users get an error message when selecting a program, making the device unusable. The spokesperson cannot say how many combi microwaves are involved.
Electrolux has been trying to resolve the issue remotely for the past two weeks but has been unsuccessful. The ovens can no longer connect to Wi-Fi due to the wrong software update, so a new update cannot be performed. The problem must therefore be solved on location, the spokesperson confirms. “We are currently in the process of informing our customers about this. We will call them to make an appointment, so that service technicians can come by to perform the update on site.”
The appointment is “of course” free, says the spokesperson. “It’s a very awkward situation and it’s annoying that it has to take so long.”
Related link:
Question 1: My radon measurements went up when I started air sealing. What should I do?
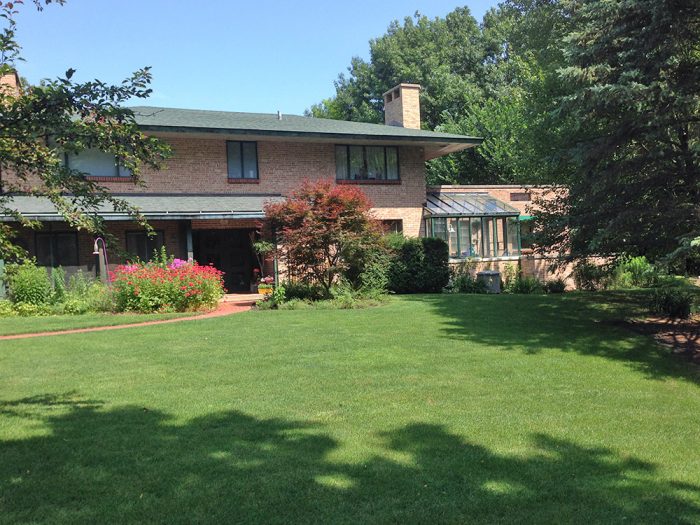
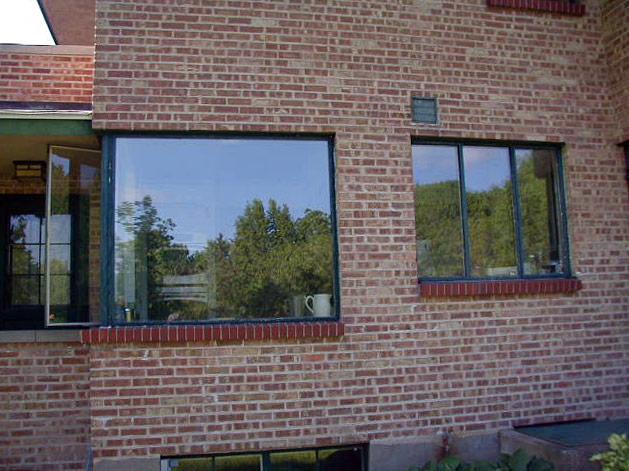
Mike writes: I’ve got a long history of owning and renovating old homes. The place I recently sold in Illinois was exceptionally cool architecturally and literally. It was designed in the Prairie style by a student of Frank Lloyd Wright who later went on to design more industrial buildings in Chicago. When he built his own home and the one I owned in the late 40s ,they both had two things I never understood nor could I figure out how to remediate them. I think they were artifacts of his design work building industrial buildings.
First, the homes had floors of pre-stressed concrete slabs with a 2″ float of concrete on top to create a smooth floor and to lock the keys between the slabs. All the neighbors said they would come to my place when the big one was going to drop. The houses also had radiant heat. Miles of copper pipe! but rather than embed it in the 2″ of concrete in the floor, it was in the ceiling. Beneath the bottom of the pre-stressed slab there was a 1″ air gap and then a plaster ceiling. The copper was placed in the air gap. Now I’m pretty sure physics was the same in 1949 as it is now and cold air falls and displaces warmer air so it rises. There was a 10-15 degree difference between floor and ceiling temperatures during the winter. You might say that the copper in the ceiling on the first floor would transfer some heat through to the floor on the second floor, but there was so much mass in the pre-stressed slab + 2″ concrete that it did nothing. Does anyone still design radiant systems to heat from the ceiling? Needless to say, to remediate this by adding radiant to the floors was not feasible.
 |
 |
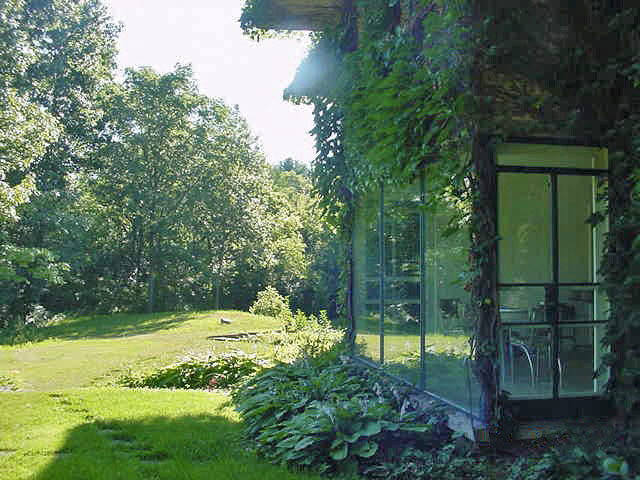 |
Second, he used steel framed windows everywhere, including the requisite FLW wall-of-windows in the dining room. Beautiful but…. There was no thermal break in the frames. The operative windows did not seal all that well. The casements only had single pane glass but the big picture windows were thermopane. The wall-of-windows had three 5×9 thermopanes mounted between steel columns that held up the beam/header across the whole wall. This was all very nice because it maintained very small frame profiles on the windows in keeping with the Prairie aesthetic, but jeez they were cold in the winter. Since the walls were all-masonry two brick thick with a 1″ airgap stuffed with insulation, there was really no way to air seal anything. I decided to pay the heating bills and enjoy the house (it was in a gorgeous wooded setting). It had no A/C for the summer but never needed it because of the shade, the Prairie overhangs, and the breezes. I suspect it would have been cheaper to push it over and rebuild it than to try to remediate the R-5 walls and R-0 windows. Thoughts?
I recently moved into a mid-90’s ranch in beautiful southwest Wisconsin that was attractive not because it’s a stunning architectural gem but because it’s going to be low maintenance. I’d like more of my time in retirement to be spent on blacksmithing and furniture making and not on home repair. But I can’t help myself and I decided to do some obvious air-sealing and as y’all have said, I started in the basement. All the rims and plates were sealed with foam. But be careful what you wish for. Suddenly my radon measurements went up to ~12 so I put in a remediation system to vent that. But that got me down to about 8. As I was diagnosing next steps, it struck me that all the ducts were not sealed so that each time the system kicked in, I suspect that there was negative pressure being created by the intakes. I suppose there was positive pressure from the supply ducts too. In any case, all the ducts were very accessible so I sealed them all up and then added insulation to the supply-side. Huge difference in airflow upstairs. Also, the furnace it a high-efficiency furnace that gets its combustion air from the basement, which I had just sealed up. So it was sucking harder for air. The hot water heater was also high-efficiency so it was doing the same thing, but it was compounding the problem with a pretty powerful fan pulling air from basement to drive the exhaust air out of the house. Neither the furnace nor that fan on the hot water heater look like they can be retrofitted to draw air from outside. Is there some solution I don’t know about to do this? Also, it would be so easy to seal ducts when they are installed. Why is that not a code requirement? Just ran another radon test to see how the latest fixes have worked. Stay tuned.
Love the podcast. I’ve listened to all of them. Keep up the great content!
Related links:
Question 2: How do I address the moisture issues of a SIP timber frame house?
Seth of Wintergreen Remodeling writes: Hello, I have been approached by some homeowners with a SIP timber frame house built in the 90’s which has black water dripping down from the beams in the late winter of every year. My thought is that the SIP seams are over the beams and were not properly sealed, and so warm moist air freezes on the underside of the tar paper and then thaws out and drips into the house in the spring. I proposed that we pull the metal roofing off, apply peel and stick underlayment to the entire roof and then install a new roof. This is not a cheap fix and so I’m looking for a second opinion on whether or not I have properly assessed the problem and if my solution will work.
Thank you!
Related links:
- GBA.com: Is This SIP Roof In Trouble?
- Moisture Issues with SIPs and How to Avoid Them
- Air-Sealing SIP Seams
Question 3: What is an economic way to cover two minisplit line sets?
Jeff from GBA writes: I’m looking for an economical way to cover two minisplit line sets, one around 17′, the other around 14′. My line sets need at least a 4″-wide cover. Here are the options I’ve considered:
1. A commercial product, which starts at around $80 per cover kit, but may not be quite long enough for my longer line set. $160 to cover two is pricey by my standards.
2. A so-called 5″ vinyl K-type gutter, which would cost around $65 for both line sets with the elbows, unions, and caps. I’m not sure it would be large enough, though, as the piece I have is only around 3″ wide in most of its interior. There’s a wider type of gutter available around an hour away, but it’s not worth the trip.
3. Someone posted on another forum that he wrapped his line sets in foam pipe insulation and then covered it with RV wheel cover material.
4. People whose line sets are more slender have done well using 2×3″ gutter downspouts.
5. Some have suggested forming a cover from aluminum coil stock, but I don’t have a brake, and getting a shop to do it would probably cost more than the commercial covers.
6. I haven’t seen anyone else propose this, but the solid 4″ Flex Drain that runs around $11 for 12 feet would provide ample room, pieces join easily, and it wouldn’t need any elbows. Caps for the top ends run around $6. It’s black and probably not meant to withstand years of UV, so it would need to be covered with a paint that sticks to polypropylene, which runs around $7. It would have to be slit open to go around the line set, but it could be reclosed with zip ties or something similar. Any comments on these ideas or suggestions for a better economical solution?
Question 4: Can I install electrical outlets in baseboards?
Gadge from FHB Forum writes: We’d like to have our electrical outlets installed in the baseboard rather than 18″ from the floor. We’re in Philly PA, can anyone tell me if that’s to code. They, to us, look unsightly in the wall. Any other solutions? Don’t really want them in the floor.
Related link:
END NOTES:
Pro Talk Live — Thursday, April 21st in Portland, Ore.
Redd East Event Space • 831 Southeast Salmon Street • Portland, OR
 |
Check out our latest Project Guide: Siding & Exterior Trim!
Check out our FHB Houses:
Visit the Taunton Store • Magazine Index • Online Archive • Our First Issues • All Access
Help us make better episodes and enter for a chance to win an FHB Podcast T-shirt: www.finehomebuilding.com/podcastsurvey

If you have any questions you would like us to dig into for a future show, shoot an email our way: [email protected].
If we use your question we’ll send you a FHB Podcast sticker!
FHB Podcast T-shirts!
Represent your favorite podcast! Available in several styles and colors. Made from 100% cotton. Find the Podcast t-shirt and more cool products in the Fine Homebuilding Store.
This episode of the Fine Homebuilding podcast is brought to you by Bilco.

And also brought to you by JOBBER

If you run a home service business like – painting, contracting, lawn care or cleaning, your to-do list is endless. From hiring staff to mountains of paperwork, not to mention, doing the actual work that pays the bills! Jobber is a mobile and online app that helps you organize your business and look professional. With Jobber, you can quote jobs, schedule your crew, invoice and get paid all in one place. Try it free today at GetJobber.com/FineHomebuilding.
Fine Homebuilding podcast listeners can now get 20% off anything in the Taunton store, including Insulate & Weatherize.
Use the discount code FHBPODCAST to take advantage of this special offer.
We hope you will take advantage of a great offer for our podcast listeners: A special 20% off the discounted rate to subscribe to the Fine Homebuilding print magazine. That link goes to finehomebuilding.com/podoffer.
The show is driven by our listeners, so please subscribe and rate us on iTunes or Google Play, and if you have any questions you would like us to dig into for a future show, shoot an email our way: [email protected]. Also, be sure to follow Fine Homebuilding on Instagram, and “like” us on Facebook. Note that you can watch the show above, or on YouTube at the Fine Homebuilding YouTube Channel.
The Fine Homebuilding Podcast embodies Fine Homebuilding magazine’s commitment to the preservation of craftsmanship and the advancement of home performance in residential construction. The show is an informal but vigorous conversation about the techniques and principles that allow listeners to master their design and building challenges.
Other related links
-
- All FHB podcast show notes: FineHomebuilding.com/podcast.
- #KeepCraftAlive T-shirts and hats support scholarships for building trades students. So order some gear at KeepCraftAlive.org.
- The direct link to the online store is here.

