Podcast 463: The Best of the Fine Homebuilding Podcast, Volume 3
Hear highlights from past episodes in this compilation of some of our favorite discussions and listener questions.
Follow the Fine Homebuilding Podcast on your favorite app. Subscribe now and don’t miss an episode:
 |
 |
Help us make better episodes and enter for a chance to win an FHB Podcast T-shirt:
www.finehomebuilding.com/podcastsurvey
The editors discuss straw-bale construction, corded vs. cordless tools, gas space heaters, repairing shrinking molding, and much more in these clips from episodes 150-154.
Question from Episode 150: What is an acceptable vapor retarder under a straw-bale wall?
Anthony writes: Hey guys, I’m designing a straw bale house and it’s going to be to code. According to the “2015 IRC-AS105.6.5 Separation of bales and concrete”, there needs to be a sheet or liquid-applied Class II vapor retarder installed between the bales and the concrete foundation I’m designing. I have 4×4 pressure-treated toe-ups on the vapor retarder which holds up the bales.
My question is related to this vapor retarder. I found that really the only sheet Class II vapor retarder is tar paper. The problem with that is that I’m also seeing it could also be a Class III vapor retarder as well. Am I right to assume that the Class II is a #30 tar paper and Class III is a #15 tar paper? I’m having a little difficulty finding a manufacturer that states the vapor retarder’s perm rating, yet I’m not giving up from looking yet.
So, let’s say I do go with tar paper; this leads to another question. Straw bales typically have steel “imbalers”, which I currently have as 1/2″ rebar that is 18″ long and extends 6″ into the foundation and which is placed so that each bale has two. This means that the tar paper would have to be cut through to allow these imbalers to go into the bales. How would I go about sealing this joint between the tar paper and the steel to keep the moisture from the foundation from coming through? Can I cut tar paper accurately enough to allow a 1/2″ hole? I guess that would depend on how I would patch the hole. This problem makes me think of using a liquid applied vapor retarder instead; yet, I haven’t even tried looking into those yet.
A new technique that I have seen instead of using imbalers is using tons of nails nailed into the toe-ups which would act like Velcro. Do you guys have any opinions on nails or imbalers? Apparently the nails are easier to work with than the imbalers. Still even with the nails, there are anchor bolts going through the toe ups into the foundation which also would need sealing too.
The idea of using a liquid applied vapor retarder also got me thinking of possible off-gassing VOC’s from it. I’m trying to go green here and I really don’t want possible off-gassing VOC’s either if I can help it. I would also like the product to be sourced in my state or close to it.
I’m still researching, yet I love to listen to the podcast, so I thought I’d ask you guys a question and see what you guys think. I’ve learned a lot already from the podcast, so I’m excited to hear what you guys have to say about my questions.
Related Links
- HOUSES by Design: The Case for Straw-Bale Houses
- Off-The-Grid Straw Bale Getaway
- What’s the Difference: Vapor Barriers and Vapor Retarders?
- Podcast Short: Building a Straw-Bale Home to Code
Question from Episode 151: Are cordless miter saws just as good as the old plug in models?
John writes: I love your podcast and magazine. I am a home do-it-yourself-er with a few projects under my belt over the years such as replacing my windows, doors, siding, and flooring. I had a question regarding miter saws. I am looking to replace my old miter saw and considering the option of corded vs cordless 10″ miter saws. I mainly use the saw in a garage workshop but do take it outside for the occasional project or to a neighbors.
I am considering a Kapex corded miter saw and the new Makita XSL06PT 36v 10″ saw. They both have great dust collection, cutting power, and accuracy which is why I am considering these two different animals. I am really interested in the battery powered version but I am very leery since it is uncharted territory for me. I am hoping your staff can shed their more experienced input and first-hand knowledge on this topic. Thanks!
Related Links
- Tool Test: Cordless Sliders
- Metabo HPT 36V MultiVolt 10″ Miter Saw
- Compact Cordless Miter Saw
- Podcast Short: Why You Should Use a Cordless Saw
Question from Episode 153: How can I keep my crown-molding scarf joint from opening up?
Steve writes: Hi guys, Long time listener here, been with you all since day one.
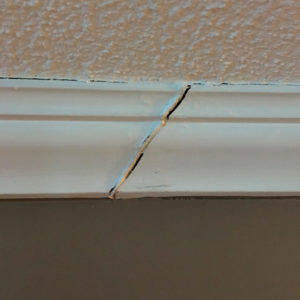
When I installed it (probably in the spring, if I remember correctly), the scarf joint was reasonably tight, and I filled it with a painter’s caulk (Alex Plus).
It’s about a 40’ run of crown, so there are two joints in the run.
Once the heating season got here, the lower indoor humidity caused the molding to shrink along its length, resulting in some ugly open joints, as shown in the photo attached.
(Yeah, I know the molding is installed upside down — the wife liked the look better that way. Sigh…)
I’ve tried reapplying the caulk, using a more elastic caulking (Big Stretch), but it still opens up during the heating season, as you can see in the photo.
What’s the trick to getting these joints to stay tight during all seasons? Thoughts I’ve had:
- Re-install during the winter, when the moldings are already shrunken from the lower humidity? (maybe this will cause the joints to slide by each other when the lengths swell in summer…)
- Maybe I should be reinforcing the joint with a biscuit or dowel?
- Or maybe it’s due to the cheap quality of the moldings?
- Maybe I should have primed the back sides of the moldings, to minimize moisture absorption/loss during seasonal changes in humidity?
Any tips? Or ideas for other approaches that will work to make these look less horrible?
Related Links
- Touching Up Stain-Grade Crown Molding Joints
- How to Install Built-Up Crown Molding
- Bendable Trim for Curved Walls and Doorways
- Podcast Short: How to Repair Shrinking Crown Molding
Question from Episode 154: What should I do about the lead paint on my wood siding?
Luke from Virginia writes: Hi, I’m a huge fan of you guys, so thank you for doing what you’re doing! I just finished podcast 148 and I have a similar decision ahead of me as did Dan from Podcast 148: What to do about peeling clapboards with lead paint.
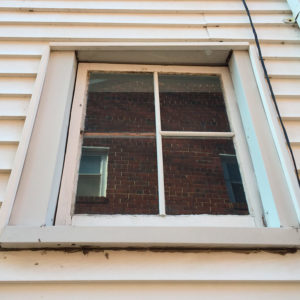
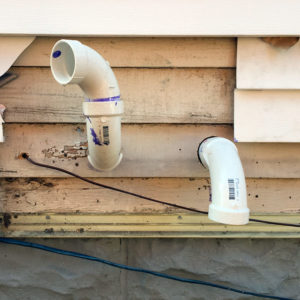
My Situation: In July, we bought a 1920 farmhouse that I’ve been fixing up and restoring its original charm (my dad was a carpenter for 25 years, so I’m leaning heavily on him … and you guys!). We’re not currently living in the house, which makes things a bit easier. I’d intended to restore the original (lead-painted) wood clapboard, but the lead paint is giving me a little pause. Currently, the house has 30+-year-old vinyl siding on it. (No insulation anywhere in the house, by the way.) The siding is damaged in places and failing in other areas such as around windows, so I believe something needs to be done. I also think the siding is ugly, so that’s another motivator. I wouldn’t hesitate to rip it all off, sand/repair/prime/paint the wood (I don’t mind painting the house every X years), except for the fact that it has (who knows how many) coats of lead paint on it (see pics). We have three kiddos from one to seven years old, so the lead is a concern.
 |
 |
 |
QUESTION: What are your recommendations? Here’s my current thinking:
Option 1) get a company to remove the siding in a lead-safe manner, and if in not-terrible condition, to also prime/paint the original clapboard. (total estimate ~$8k)
Option 2) hire out the siding removal only (~$2k) Then assess the clapboard myself, rent scaffolding(?), and prime/paint as safely as possible.
Option 3) forget about restoring the original wood clapboard, remove the siding and install new siding (and get a third job to pay for the HardiePlank!).
Related links:
- Lead-Paint Safety, At Home And On The Job
- Best Practices for Lead-Safe Remodeling
- Lead-Safe Remodeling
- Environmental Protection Agency: Lead
- EPA: Steps to LEAD SAFE Renovation, Repair and Painting
- Podcast Short: Removing Lead Paint, DIY or Hire a Contractor?
Question from Episode 152: What type of gas heater is best for a garage?
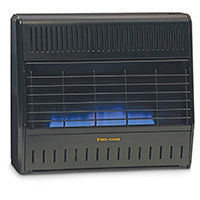
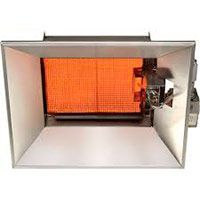
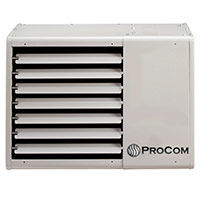
F Ponzani writes: I want to add some heat to my garage. I’m looking at the Procom brand ventless gas heaters sold by Northern Tool and Harbor Freight, amongst others. These are sheet-metal units that can be mounted on the wall. They come in two flavors: radiant (heats objects) and “Blue Flame” (heats the air in the room). I generally understand the difference between the two, but I have been unable to find anybody who can tell me the pros and cons of each type as related to heating an attached garage. I want to keep the temp in the 40’s or low 50’s and just turn it up when I’m working on a project in the garage. Which is preferred?
 |
 |
 |
Related links
- 7060 Overhead Quartz Radiant Heater Review
- How to Keep a Garage-Shop Toasty Warm
- Heating Options for a Small Home
- Podcast Short: Vented vs. Ventless Gas Heater
Check out our latest Project Guide: Siding & Exterior Trim!
Check out our FHB Houses:
Visit the Taunton Store • Magazine Index • Online Archive • Our First Issues • All Access
Help us make better episodes and enter for a chance to win an FHB Podcast T-shirt: www.finehomebuilding.com/podcastsurvey

If you have any questions you would like us to dig into for a future show, shoot an email our way: [email protected].
If we use your question we’ll send you a FHB Podcast sticker!
FHB Podcast T-shirts!
Represent your favorite podcast! Available in several styles and colors. Made from 100% cotton. Find the Podcast t-shirt and more cool products in the Fine Homebuilding Store.

Fine Homebuilding podcast listeners can now get 20% off anything in the Taunton store, including Pretty Good House.
Use the discount code FHBPODCAST to take advantage of this special offer.
We hope you will take advantage of a great offer for our podcast listeners: A special 20% off the discounted rate to subscribe to the Fine Homebuilding print magazine. That link goes to finehomebuilding.com/podoffer.
The show is driven by our listeners, so please subscribe and rate us on iTunes or Google Play, and if you have any questions you would like us to dig into for a future show, shoot an email our way: [email protected]. Also, be sure to follow Fine Homebuilding on Instagram, and “like” us on Facebook. Note that you can watch the show above, or on YouTube at the Fine Homebuilding YouTube Channel.
The Fine Homebuilding Podcast embodies Fine Homebuilding magazine’s commitment to the preservation of craftsmanship and the advancement of home performance in residential construction. The show is an informal but vigorous conversation about the techniques and principles that allow listeners to master their design and building challenges.
Other related links
-
- All FHB podcast show notes: FineHomebuilding.com/podcast.
- #KeepCraftAlive T-shirts and hats support scholarships for building trades students. So order some gear at KeepCraftAlive.org.
- The direct link to the online store is here.


