10 Steps to Install Crown Molding on Cabinets
A combination of mitering and coping ensures a tight fit on inside and outside corners.

Synopsis: Remodeler Tyler Grace discusses the process of capping built-in cabinets with crown molding, including considering the molding profile and the need to scribe to out-of-level surfaces, and when to cope vs. miter inside corners.
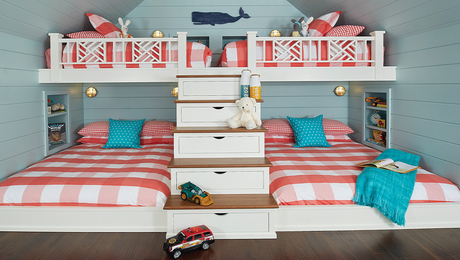
Typically for me the last step of installing cabinetry of any kind is to cap the assembly with a crown molding. In my opinion, it is also the most rewarding aspect of the job and truly transforms the project. Your cabinets go from a grouping of boxes that stand shy of the ceiling to a completed cohesive cabinet assembly that looks like built-in furniture. As with any carpentry task, this cannot be done without careful consideration and planning. There are a handful of ways to complete this portion of the job, and I am going to dig into them below.
Choosing the right molding profile
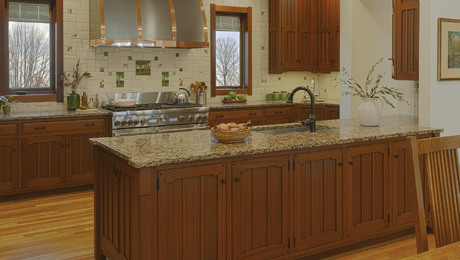
When working in an existing space, you must select materials and methods that fool the eye into appearing perfect even when they are not. For this application, I opted to go with a basic cove crown molding to tie my cabinets to the ceiling. The cove profile fits well with the style of the home and the aesthetic of the cabinetry. It also afforded me some wiggle room at the ceiling. These built-ins were fabricated off-site and then fit into the existing space, which was slightly out of level, out of plumb, and not quite square. I had quickly gauged the space during cabinet design for level, but not flatness. Since I was not remodeling this space, I did not have an opportunity to fix the walls, floor, or ceiling. For that reason, I selected a crown molding that had a decent amount of mass at the top of the profile which would allow me to slightly scribe it to potential inconsistencies in the ceiling.
Fortunately, the only place I ended up having to scribe to the ceiling was a small area on the right-hand inside corner of this built-in. I had to remove a tiny bit of material to shift the molding toward the ceiling so that it sat in the correct nested position to form my inside corner. Other than this small area, the ceiling ended up being relatively flat, which is often not the case.
When I do come across a ceiling that is extremely bad or wavy and our crown molding cannot be scribed, I will take a slightly different approach. Rather than adjusting and scribing our molding to our ceiling, I adjust and feather the ceiling to our molding. I install the crown where I want it, creating the correct exposure on the face frame of our cabinetry or frieze molding, and then use a joint compound to float the ceiling flat in the problem areas. This alleviates the need to scribe the crown molding, maintains an even reveal across the front of the cabinetry, and does not showcase or highlight how far off the ceiling might actually be.
Mitering versus coping
Typically when I am installing molding on cabinets, I miter all of my trim, including inside corners. There are a few reasons why. Often these moldings are prefinished, and mitered inside corners allow for a stronger and less noticeable glue joint. Also, during a remodel where we know cabinets are going to the ceiling, we typically level that ceiling or at the least flatten it, which allows for a tight miter joint. And cabinets should be built square with 90° inside and outside corners, making it easy to miter on a 45° angle. (Coping is a great technique when an inside corner is slightly over or slightly under 90°, because you do not need to fool around with guessing the angle—simply cope the joint and be done with it.) The only time mitering is not faster is when you are fooling around with inconsistent wall planes or ceilings that are not flat, or cutting compound angles. Again, when it comes to cabinetry, the goal is to build an assembly that is plumb, level, and square, and if you establish this basis, your trim should all be cut plumb without the need for compound miters.
All of that said, I chose to cope the crown molding on this installation for a few reasons. First, I knew that this ceiling had not been reframed and so was not going to be perfectly flat, so I wanted to anticipate running into varying ceiling planes. And because I only had two inside corners, I knew there would not be too much coping to do. Given those considerations, coping these inside corners made the most sense to me.
These cabinets and trim were unfinished when I installed the molding, so I was able to back-caulk the trim (apply enough caulk to fill any gaps in the joint) and not have to worry about squeeze-out because it will be sanded before it’s finished.
1. Map Your Profile
Start by using a framing square to represent the wall and ceiling planes and determine the projection of the crown molding from the corner to the furthest point at the ceiling and down on the wall. In a perfect world, this is where your crown molding will sit on your cabinets and ceiling in your space. But not all ceilings, walls, and corners are perfect, so you have to use this as a guideline and not a steadfast rule. The molding you choose should fit closely within these projections while allowing you enough material to scribe for any surfaces that aren’t level, which is most noticeable at the corners.
2. Mark layout lines
Once you’ve determined the projections, make a gauge block to transfer these measurements onto the walls, cabinets, and ceilings.
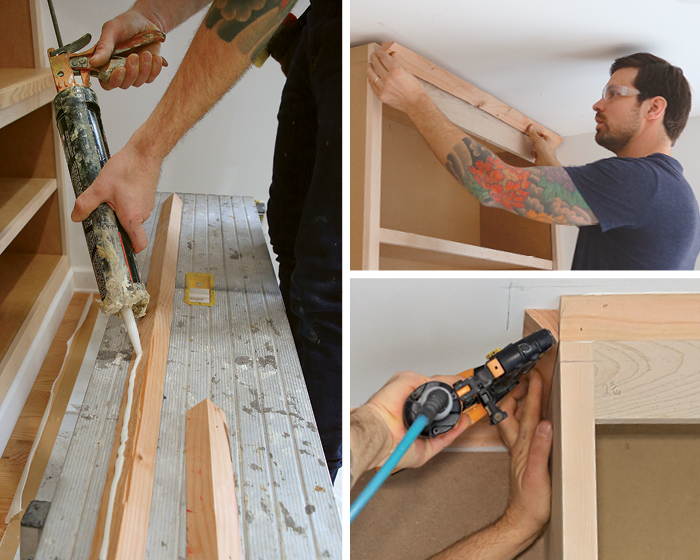
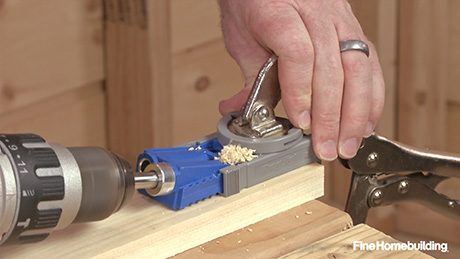
3. Install blocking
Next, mark all of the wall studs and ceiling joists where the molding can be fastened. In any places where I cannot hit a stud or joist, I install triangular-shaped blocking. This blocking is ripped out of 2×4 lumber and then either fastened to the top plate on the walls or to the face of the cabinetry. Be careful not to blow through your face frame with fasteners. I also like to apply some general-purpose construction adhesive to the back of the blocking. One thing to note here is that just as with all of your actual trim, you should ensure your blocking is acclimated to the moisture content of the space. If I acclimate my trim and cabinets, and then the day of installation I install wet blocking, there is a chance that the blocking may warp and twist, which will cause the molding that is nailed to the blocking to move with it.
4. Add a third hand
If you have long lengths of molding that you are installing by yourself, you can pin a few blocks of wood onto your face frame to help hold the trim in place. Be sure to leave them a touch below your reference lines in case you have to roll or adjust the way the crown molding is sitting on your ceiling, cabinet, or wall.
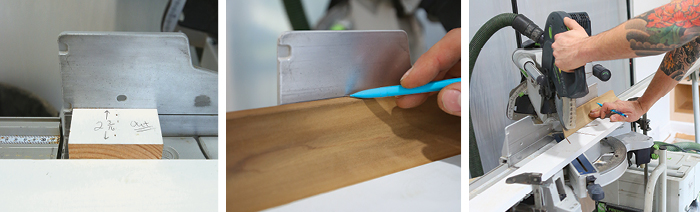
5. Set up the saw
An auxiliary front fence holds the crown molding at the right projection so that you can cut miters on a workpiece using only the saw’s miter settings, as opposed to cutting a compound angle (which requires the saw’s miter and bevel settings). To set up a front fence, place your gauge blocks flat on the saw table against the fence. Push your auxiliary front fence against the gauge blocks and clamp it tightly. Add a pencil line on the miter-saw fence to help keep your molding in the right orientation. You can now cut the molding without adjusting the saw’s bevel. You’ll be cutting with the crown upside-down, so visualize the front fence as the ceiling plane, and the miter-saw fence as the wall or cabinet plane.
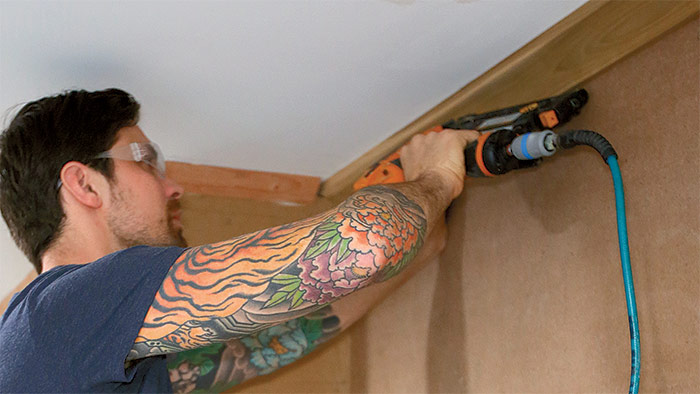
6. Start in the middle
I prefer to end my installations on an outside corner, so I put up the first piece in the center of the wall between two cabinets, with a square cut on both ends. Use a laser measurer to measure between cabinets, and cut the molding slightly long. This yields a tight fit that helps spring the molding into place. After the piece of molding is fit, nail it to the wall studs and to any ceiling joists you can catch. Do not nail within 12 in. to 18 in. of the inside corner, to allow for tweaks as you install neighboring pieces of molding. If there are no ceiling joists, dial down the pressure on your nailer and nail into the center of the crown molding into the blocking. Don’t turn the pressure all the way up, because typically this is the thinnest portion of the crown molding and you don’t want to overdrive the nails in order to give them sufficient holding power.
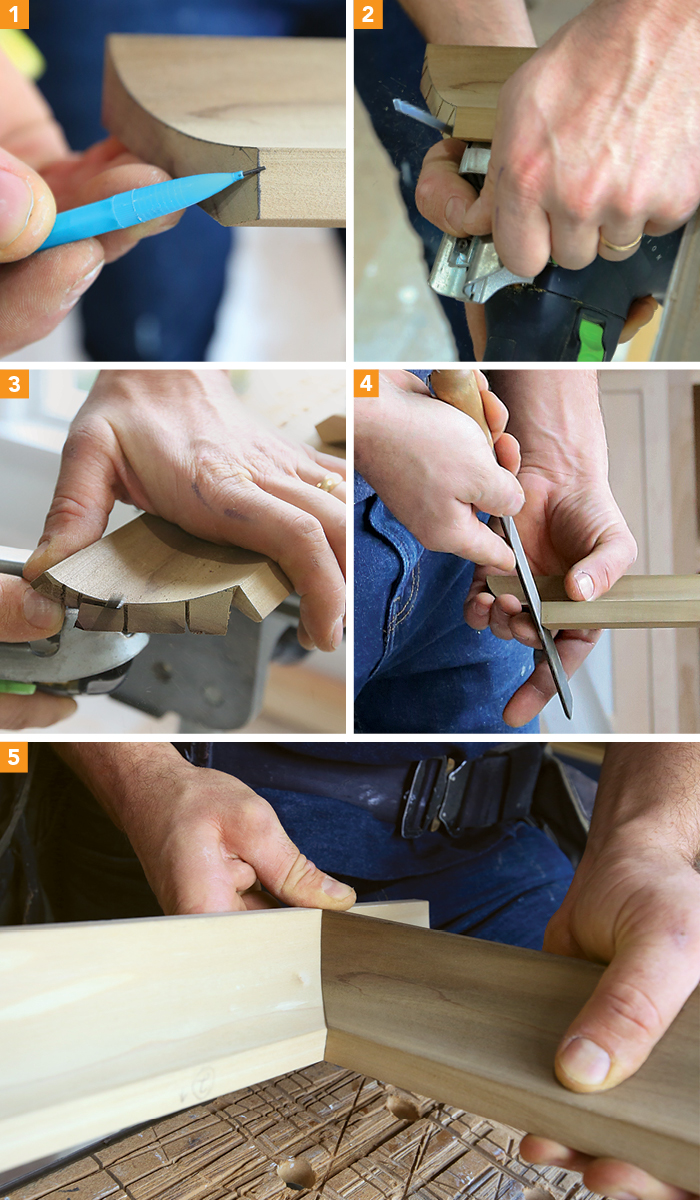
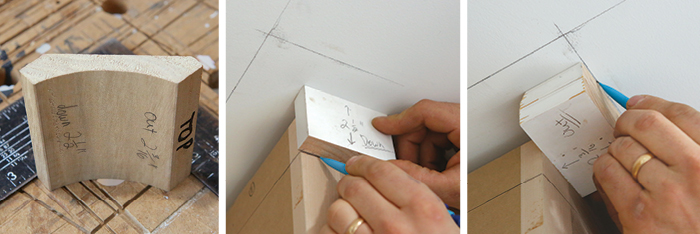
7. Cope inside corners
Coping inside corners (instead of mitering) makes it easier to get a tight fit when cabinets are mounted on out-of-square walls. Leave the side molding long to account for the joinery. Start by cutting the inside corner of the crown molding at a 45° miter, and then highlight the cut edge by rubbing it with a pencil (1). Make a series of relief cuts along the pencil marks to reduce binding during the next step (2). Use a jigsaw to back-cut along the line until you’re left with a crisp edge that follows the molding profile (3). Then, finetune the fit with a rasp (4). You may need to remove more material for a tight fit (5).
8. Fit the front molding
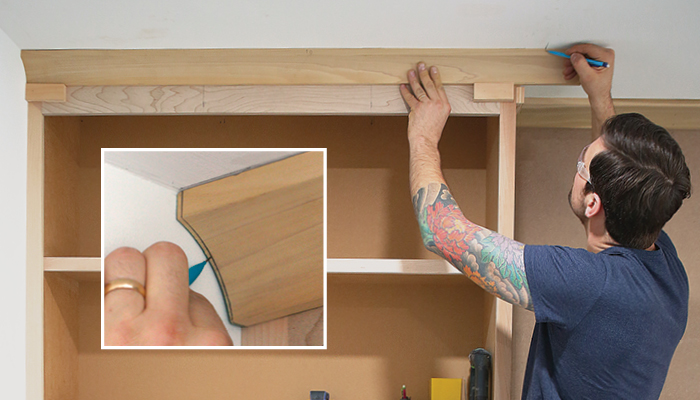
Like the side molding, I cut the front molding slightly long, knowing I’ll need to scribe one end to match an out-of-plane wall. Use a pencil as a scribing tool, pushing it flat against the wall to transfer the exact plane of the wall to the workpiece. Cut the end to match the scribe marks using a jigsaw (or miter saw if the cut is straight). Once the wall end is fit, mark the opposite end at the outside corner for a mitered joint, using the layout lines on the ceiling and cabinet face.
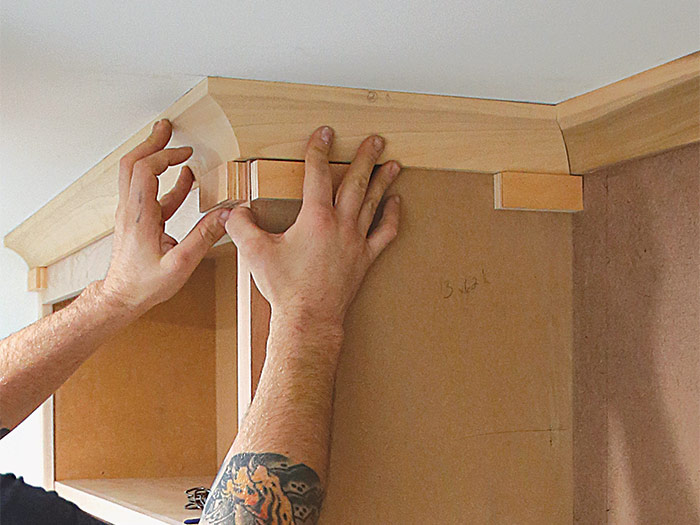
9. End on an outside corner
I dry-fit the side piece by first coping the inside corner, and then driving the nails I left out earlier on the inside corner of the piece of crown installed between the cabinets. Then I mark the side piece to length using the layout lines on the ceiling and cabinet. Cut the 45° miter on the front piece first, and then the miter on the side piece, leaving it 1⁄16 in. long to ensure a tight fit.
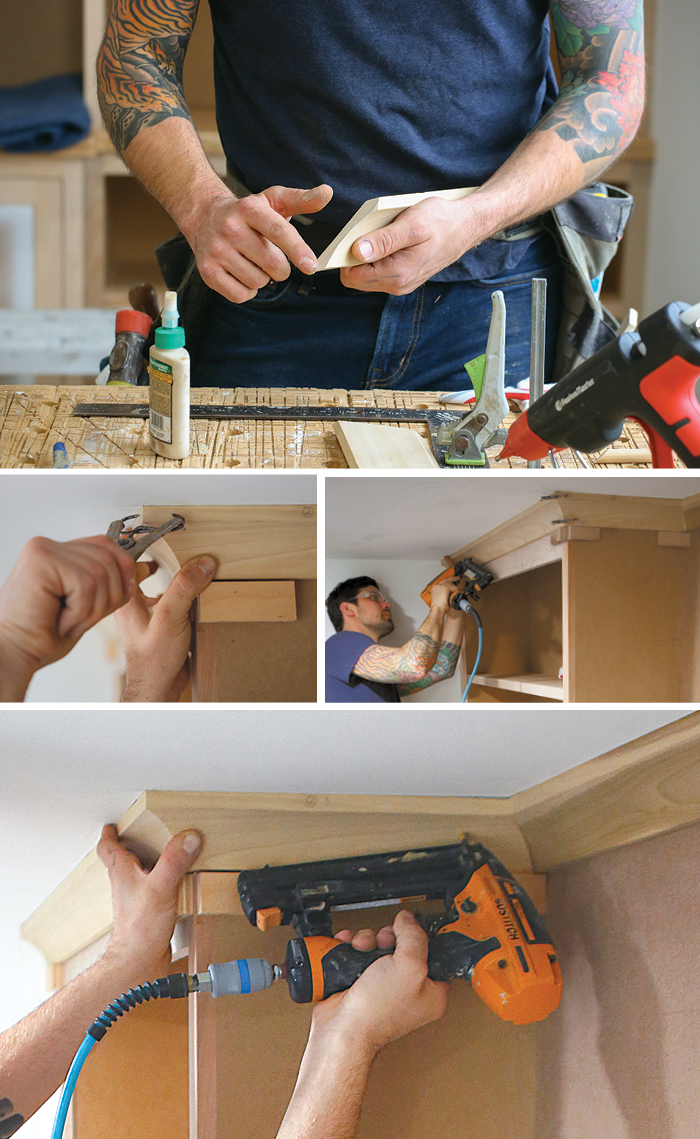
10. Glue, clamp, and nail
I now dry-fit both pieces of the outside corner, adjusting the length until the pieces sit tightly on the face frame of the cabinet and the miter is tight before nailing. I glue both sides of the outside corner with wood glue, pushing the glue into the end grain to ensure a strong joint; back-glue the cope with adhesive; and then fit the pieces to the cabinets. Use miter clamps to hold outside corners in place until the glue dries. Make sure that you clean off any glue or adhesive squeeze-out with water (and be careful not to weaken the joint by flooding it with water). Only place a few nails in locations that will not pop the miter loose until the glue is cured, and then go back and finish nailing the pieces into the cabinet, blocking, and ceiling.
Remodeler Tyler Grace is owner of TRG Home Concepts in Haddon Heights, N.J. Photos by Brian McAward.
RELATED STORIES