How to Remediate A Damp Exterior Wall Cavity
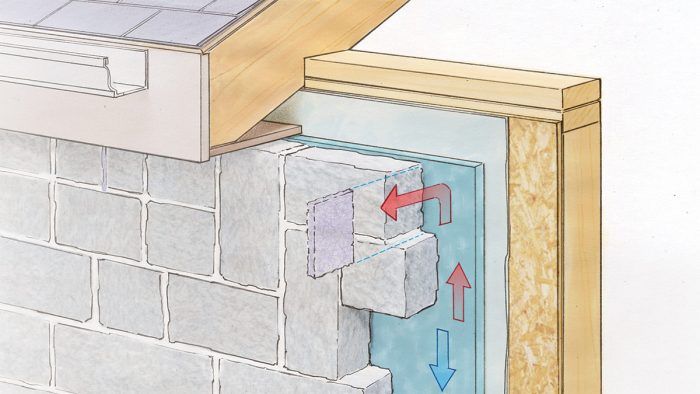
Weep vents at both the top and bottom of a wall increase the drying potential in masonry walls.
We completed a build near Nashville at the end of 2020. I recently discovered damp conditions in an exterior wall cavity when I mounted some floating shelves. There’s no liquid water, but the drywall is moist, as if high-humidity air is trapped and is condensing in the wall. From outside to inside, here’s the makeup of the wall: 4 in. to 6 in. limestone cladding, 1 in. CavClear (a nonwoven polyester drainage mat), housewrap, 1/2-in. OSB sheathing, batt insulation, and drywall. The exterior faces south-southwest and heats up in the summer. It clearly also absorbs moisture. Thoughts on remediation?
—Marco Cohen via FHB forum
Steven Fechino, engineering and construction manager at Mortar Net Solutions, replies: Given that the problem is occurring on a south-facing wall, it sounds like you may have a vapor-driven moisture problem. As sunlight and warm temperatures heat up the cavity between the stone and the sheathing, the moisture in the cavity can change from water droplets to vapor as the evaporation process takes place. This vapor can be driven into the home if it has nowhere else to go, because the warmer air seeks equilibrium and will be drawn to the cooler air in the structure. At the very least, weep vents should have been installed in the mortar joints at the bottom of the wall directly on the surface of the flashing when it was constructed.
You see gaps in the mortar that are filled with a mesh or corrugated plastic material, those are weep vents. Weep vents located at the bottom of a facade allow a path for moisture to escape, but weep vents located at both the top and the bottom of the wall greatly increase the drying and evaporation performance in the cavity, reducing the chance of moisture reaching the indoors.
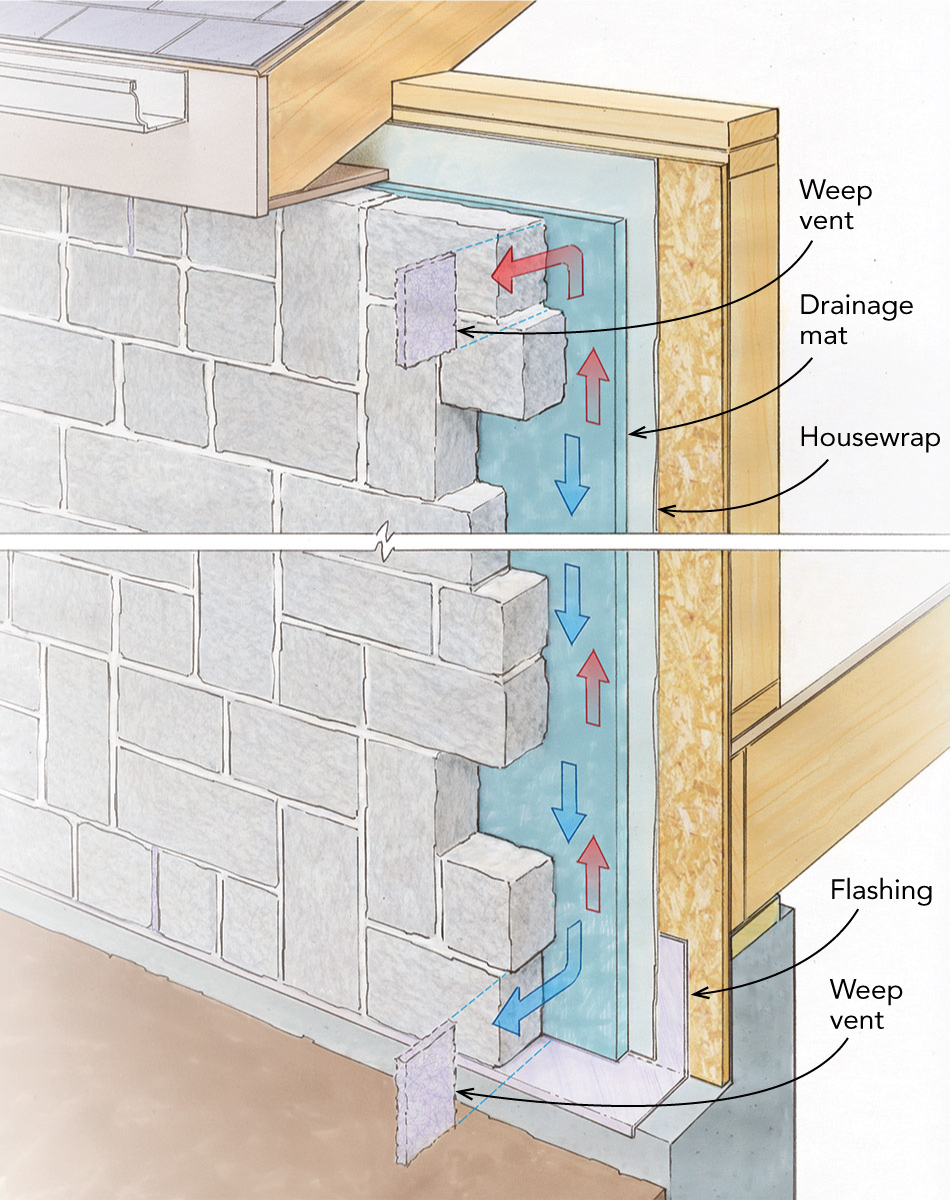
If your stone facade was constructed with weep vents only at the bottom—or worse, none at all—new weep vents can be added by drilling and/or chiseling out sections of mortar and filling the head joints with a weep vent designed for that purpose.
Installing weep vents where the cladding meets the flashing is a building-code requirement in most parts of the United States. Typically, the maximum spacing allowed for weep vents is 33 in., but I recommend spacing them every 16 in. to 24 in. And while it’s not yet mandated by code, I also recommend installing weep vents at the top of the wall spaced the same distance as those at the bottom to encourage drying of the assembly. Weep vents are available in several colors to match the mortar. Keene Building Products and Hohmann & Barnard are two manufacturers of widely available products.
Drawing: Dan Thornton
RELATED STORIES






View Comments
Hi. Can you install those weeps in an old brick faced home even if you don't know whether it has those flashing details at the base behind the brick as I see in the illustrations?