FHB Logo Facebook LinkedIn Email Pinterest Twitter X Instagram Tiktok YouTube Plus Icon Close Icon Navigation Search Icon Navigation Search Icon Arrow Down Icon Video Guide Icon Article Guide Icon Modal Close Icon Guide Search Icon Skip to content
Subscribe
Log In
  • How-To
  • Design
  • Tools & Materials
  • Restoration
  • Videos
  • Blogs
  • Forum
  • Magazine
  • Members
  • FHB House
  • Podcast
Log In

Fine Homebuilding Project Guides

Tiling

Guide Home
  • Selecting Tile
  • Tools & Techniques
  • Installation Materials
  • Preparation
  • Tiling Floors
  • Tiling Walls & Backsplashes
  • Tiling Showers
  • Grouting, Sealing & Caulking
  • Maintenance & Repair
How-To

Choosing a Tile-Leveling System

The best levelers are easy to insert and tighten without tools, apply enough pressure to keep adjacent tiles level, and break away cleanly when the thinset cures.

By Joshua Oduin Issue 310 - October 2022
  • X
  • facebook
  • linkedin
  • pinterest
  • email
  • add to favorites Log in or Sign up to save your favorite articles

Synopsis: Joshua Oduin, a custom home builder, tilesetter, and remodeler, explains what makes a great tile-leveling system and takes a closer look at the four different types of systems available on the market, putting them to the test on real-world jobs and a mockup floor and wall assembly before determining the best overall and best budget options.


Large-format tile that looks like stone, marble, wood, or metal is ubiquitous in today’s bathrooms. To enhance the popular seamless look, grout lines have also slimmed, sometimes to 1⁄16 in. or less. All of this makes lippage—unevenness between adjacent tiles—more obvious and harder to prevent. Unlike smaller tile, large-format tile doesn’t follow undulations in the substrate, so it needs a thicker layer of thinset to bring tile edges flush.

Making matters worse, most of today’s large porcelain tiles have sharp edges and are bowed at least slightly; this is especially true for the long, plank-shaped floor tiles that simulate wood. When you run large-format tile or long planks in the usual staggered pattern, the lippage is even worse because the hump in the center of the tile lines up with the dips at the tile ends in the adjacent row.

Leveling systems are not created equal

When tile levelers first hit the market, I thought they were for inexperienced tilesetters, but as tiles began trending larger (and consequently became more increasingly bowed), I decided to give them a try. I now rely on them for installations of long floor planks and large-format tile (any size larger than 2 ft. by 4 ft.).

I have a lot of experience with the systems available at my local supply house, but I wanted to look at the other products out there, so I teamed up with Fine Homebuilding to test almost every tile-leveling system available. I took a close look at dozens of systems, put the top contenders to use on real-world jobs, and then built a backyard floor and wall assembly to test my favorites head-to-head. Along the way, I realized what I value most in these devices.

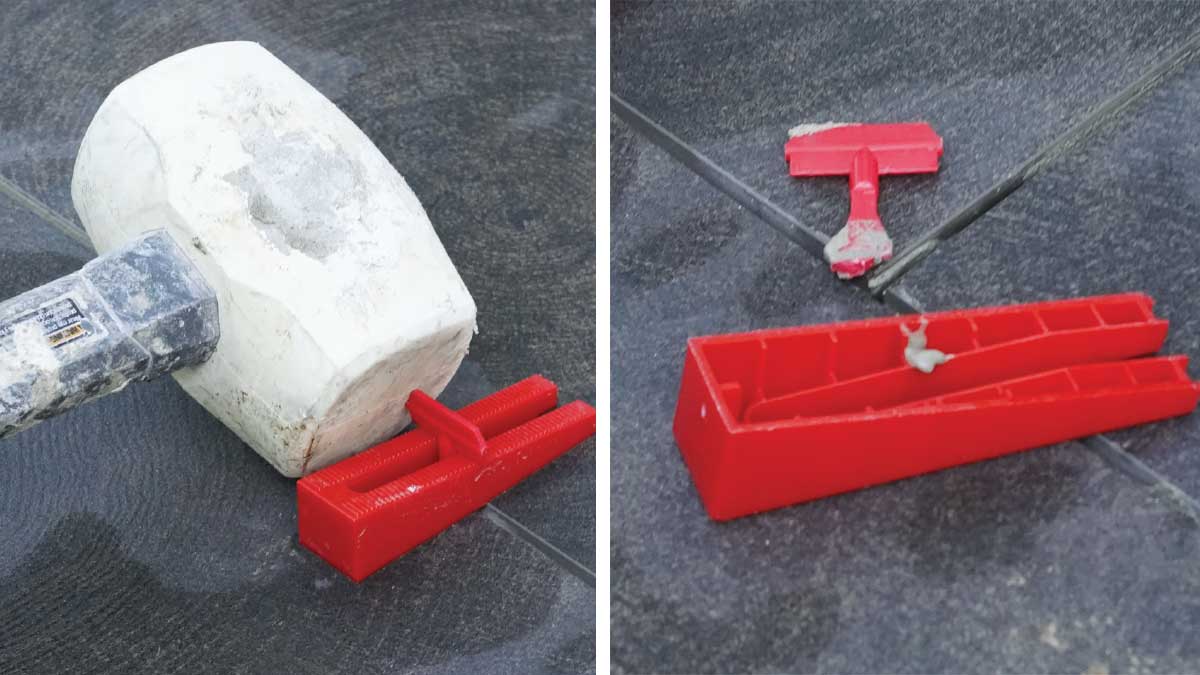
1. They need to be able to apply a lot of pressure without the stem and cap breaking off of the base. Then after the thinset cures, you need to be able to reliably break off the cap and stem with a boot kick or mallet blow.

2. Whether it’s a spinner-, wedge-, or strap-type leveler, it needs to be quick and easy to tighten. You’ll use scores of these on a big tile job, and time adds up quickly with fiddly systems. Some can also leave your hands and fingers sore.

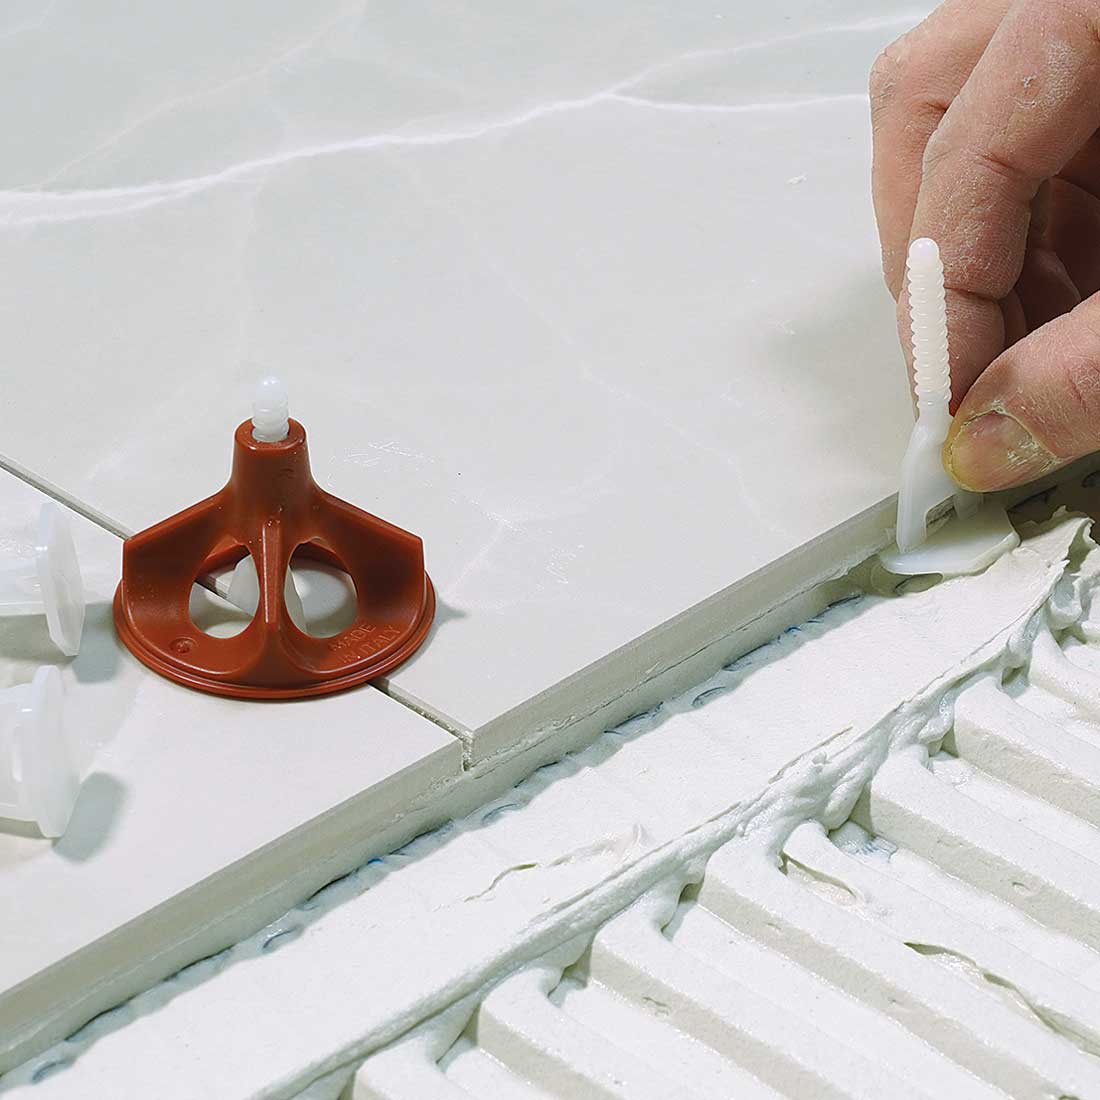
3. I like levelers that let me see through them as I tighten the cap. I want to make sure the grout lines are tight and the tile hasn’t shifted. Levelers also act as tile spacers, and some offer bases for three- and four-way junctions, ensuring perfect grout lines in all directions. Those with a flat spacer, designed to sit between two tiles, require more levelers, because you need them on the tile sides and corners. The spacer section of the bases come in different thicknesses for different-sized grout lines. I almost always use the 1⁄16-in. size, but I like systems that also include bases for 1⁄32-in. grout lines.

The solution for keeping large tile flat

Thin, durable, large-format porcelain tile can simulate almost any other material, but it’s prone to warping during manufacturing. Tile-leveling systems pull pieces flat and flush during installation, making it easy to minimize lippage. 

Help with large porcelain Extra-large-format porcelain tile is tricky to set without unevenness at the edges. Grout lines are commonly 1⁄16 in., which makes discrepancies more obvious. Levelers make it much easier to eliminate lippage.
Help with large porcelain. Extra-large-format porcelain tile is tricky to set without unevenness at the edges. Grout lines are commonly 1⁄16 in., which makes discrepancies more obvious. Levelers make it much easier to eliminate lippage.

fix for wavy planks Porcelain floor tiles meant to look like wood have excellent durability, but they’re notorious for bowing significantly along their length. Levelers decrease the amount of lippage between staggered rows.
Fix for wavy planks. Porcelain floor tiles meant to look like wood have excellent durability, but they’re notorious for bowing significantly along their length. Levelers decrease the amount of lippage between staggered rows.

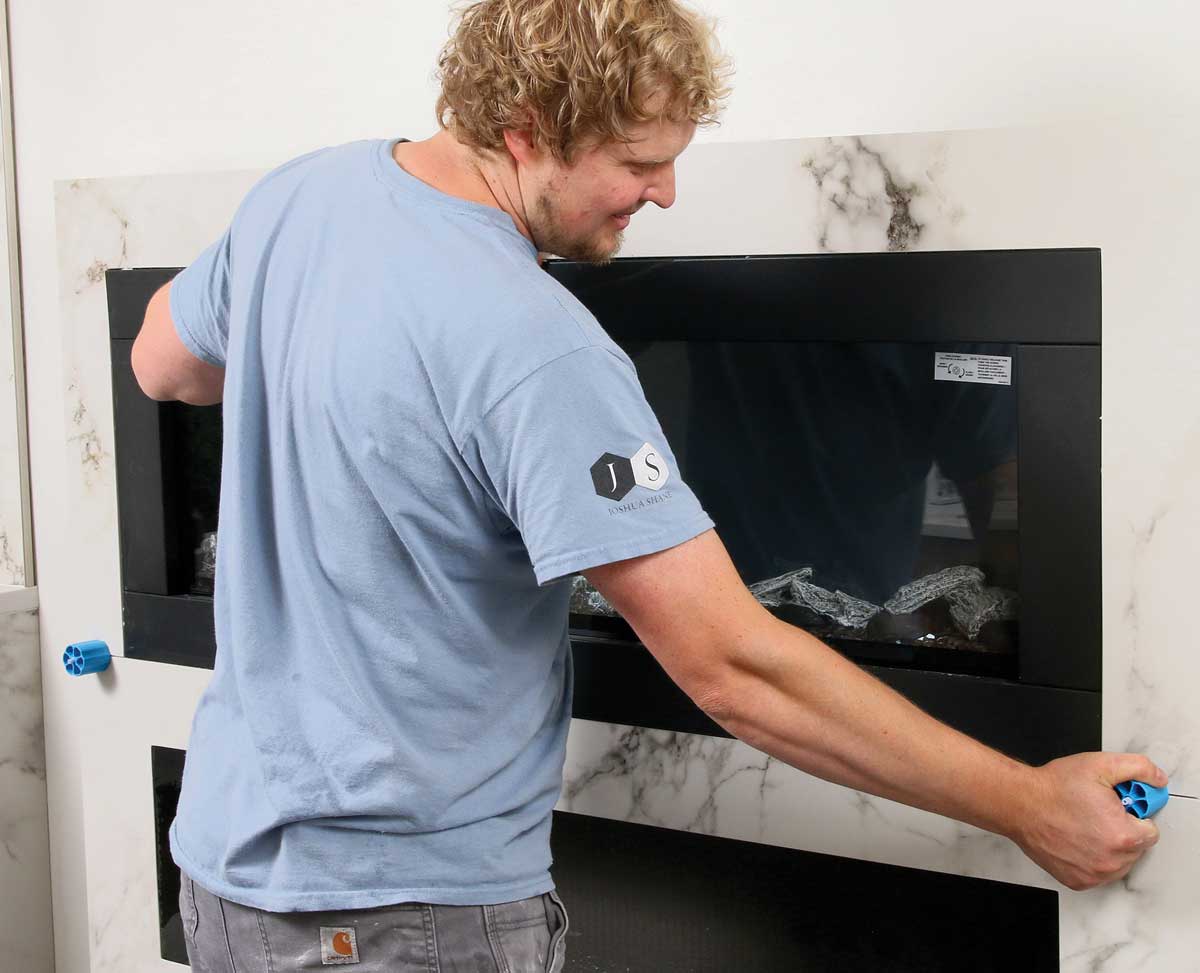
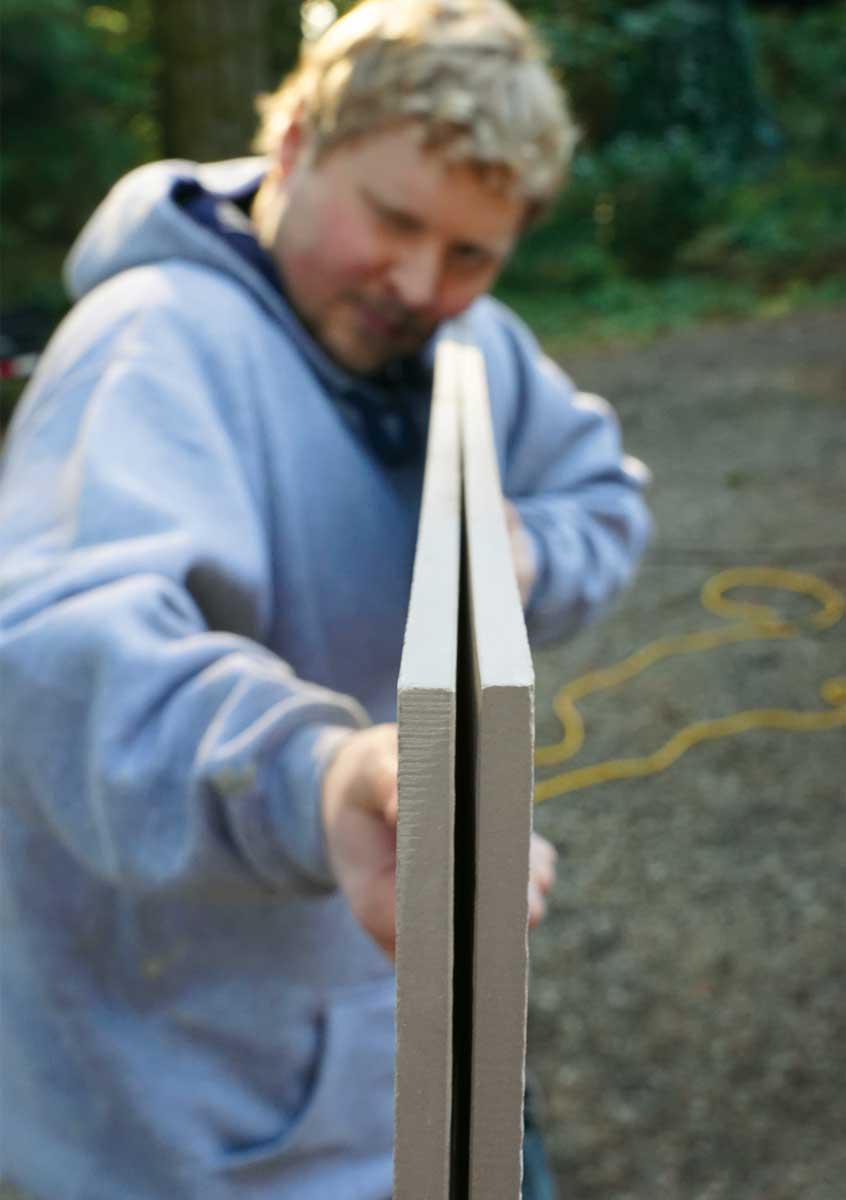
Why levelers are so helpful

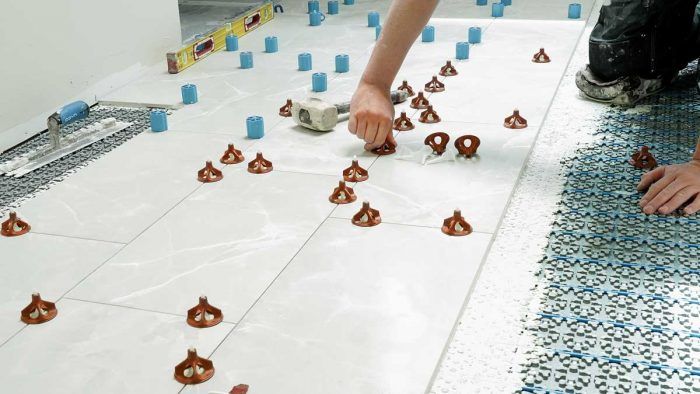
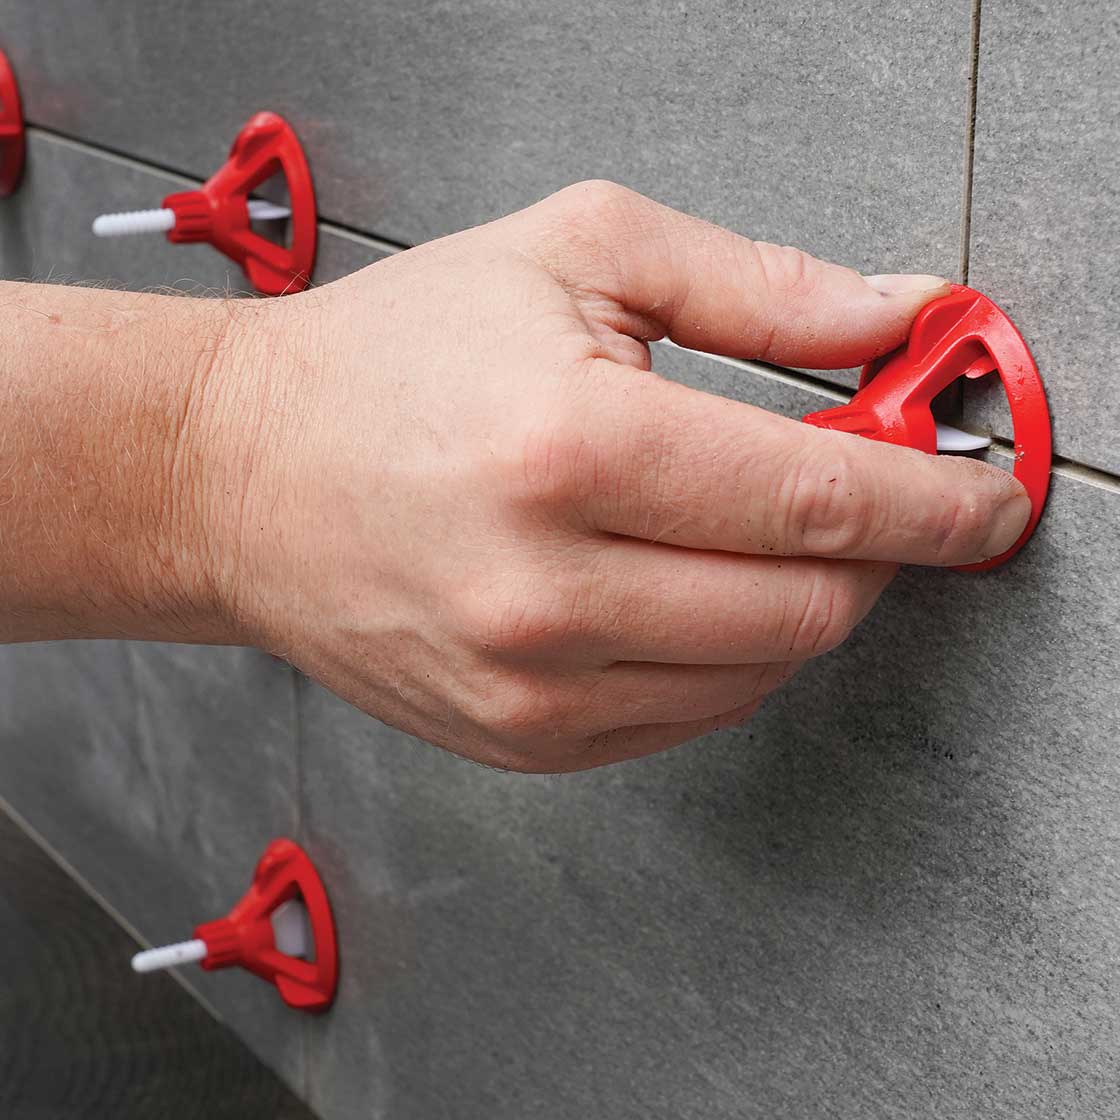
All tile levelers have some sort of base or wire that extends behind the tiles and a wedge or cap that presses down on adjacent tiles to bring their tops flush. With most systems, you set one tile, slide in the base of the leveler behind it, and then set the adjoining tile, which locks the base in place. Then you tighten the cap or wedge to bring the tile edges flush.

If the substrate is flat and you apply the right amount of thinset in a uniform layer, varying the thickness based on the size of the tile and the flatness of both the tile and substrate (a good subject for another article), these leveling systems will do the alignment, helping you work faster and resulting in consistent grout lines and virtually no lippage. As the thinset cures and shrinks, the levelers hold the tile flush and the built-in spacers prevent sagging and shifting. After the thinset cures, you knock off the wedge or cap with a mallet, leaving the grout line clear. The caps or wedges can be used indefinitely, making the bases the only ongoing expense.

What makes a good tile leveler?

Starts with a sturdy base The base provides the backing for the cap or wedge that levels the tiles, and also spaces the tiles evenly. Bases are available for different grout-line thicknesses.
Starts with a sturdy base. The base provides the backing for the cap or wedge that levels the tiles, and also spaces the tiles evenly. Bases are available for different grout-line thicknesses.

Effectively controls lippage This is a tile levelers primary job. Running a loose wedge across the joints shows if the tops of tiles are in alignment.
Effectively controls lippage. This is a tile levelers primary job. Running a loose wedge across the joints shows if the tops of tiles are in alignment.
Secures corners and sides Most systems also offer bases designed for three- or four-way tile junctions, helping you use fewer levelers for a faster setting process.
Secures corners and sides. Most systems also offer bases designed for three- or four-way tile junctions, helping you use fewer levelers for a faster setting process.
Prevents scratches Some systems offer shields for preventing scratches on softer stone tile or tile with a high polish. If yours doesn’t, sponge away the excess thinset before tightening the cap or wedge
Prevents scratches. Some systems offer shields for preventing scratches on softer stone tile or tile with a high polish. If yours doesn’t, sponge away the excess thinset before tightening the cap or wedge
Tightens easily Some levelers tighten by hand while others require specialty pliers. Either way, you want one that doesn’t fatigue your hands and makes it easy to apply even pressure.
Tightens easily. Some levelers tighten by hand while others require specialty pliers. Either way, you want one that doesn’t fatigue your hands and makes it easy to apply even pressure.
Breaks off Cleanly After the thinset cures, a quick mallet blow or boot kick should break off the leveler at the bottom of the grout joint so it’s ready for grout without additional scraping or cutting
Breaks off. Cleanly After the thinset cures, a quick mallet blow or boot kick should break off the leveler at the bottom of the grout joint so it’s ready for grout without additional scraping or cutting

How we tested

Backyard test rig The author built this setup with replaceable substrates in order to test his favorite leveling systems head to head on a wide variety of tile types.
Backyard test rig. The author built this setup with replaceable substrates in order to test his favorite leveling systems head to head on a wide variety of tile types.

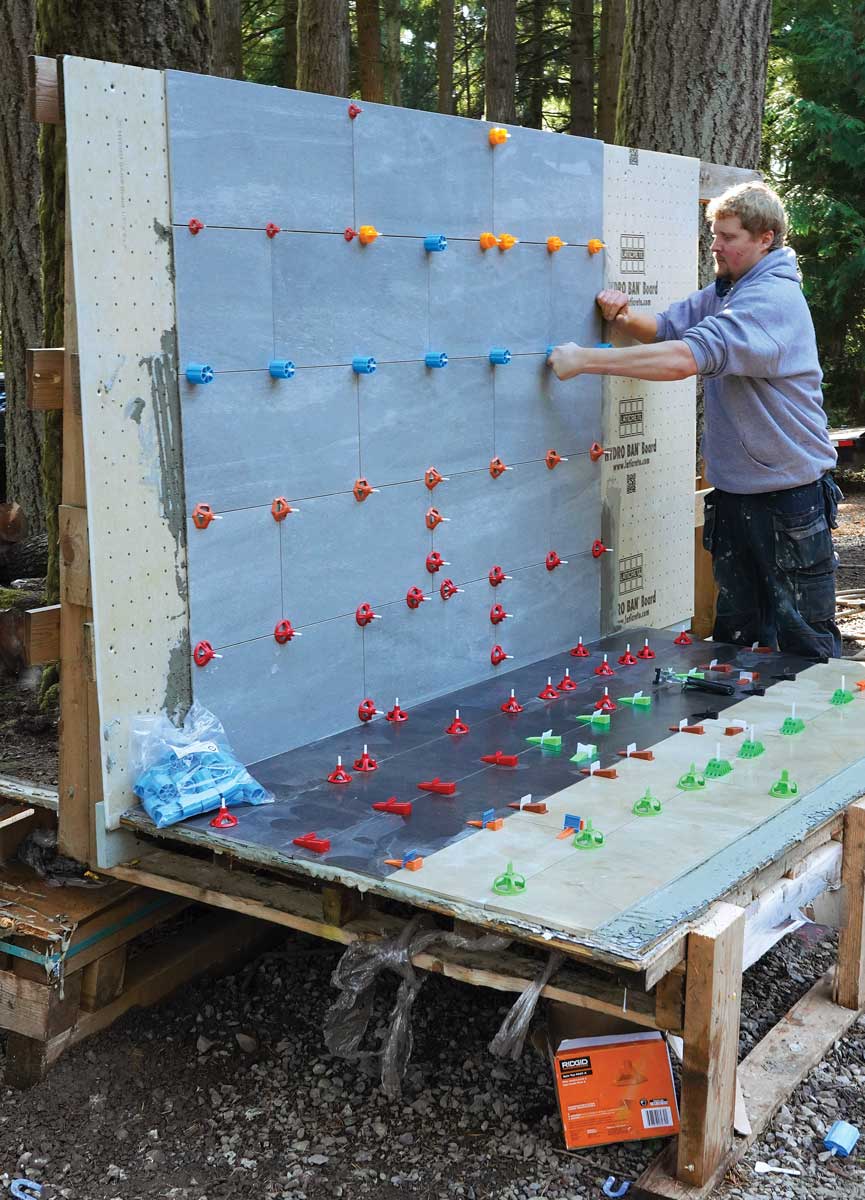
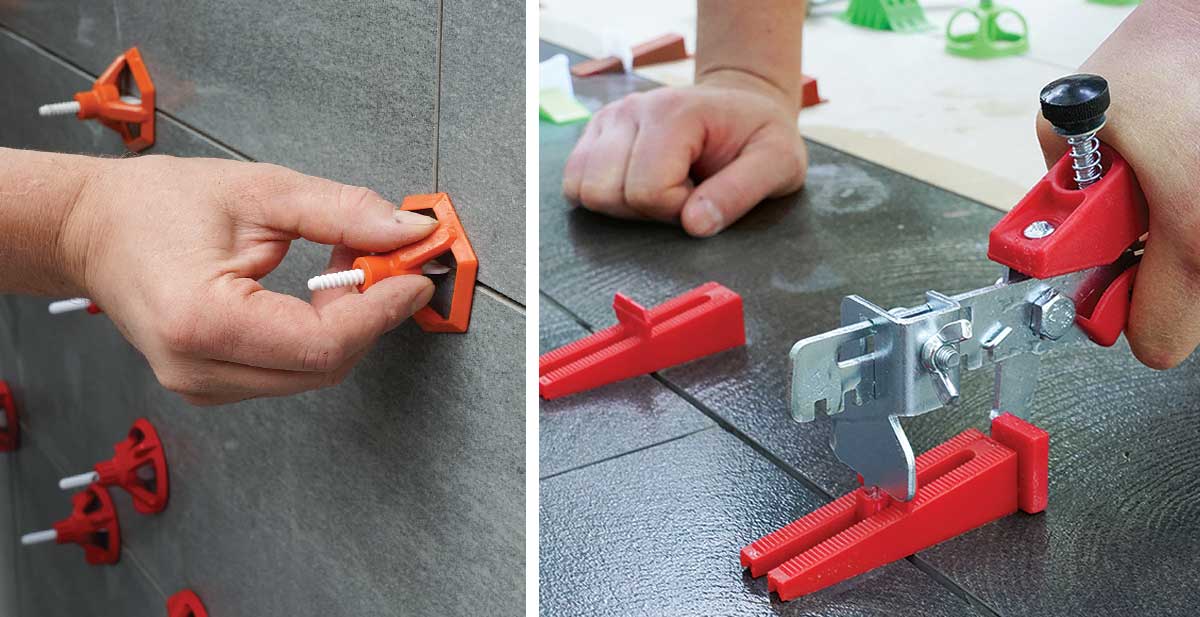
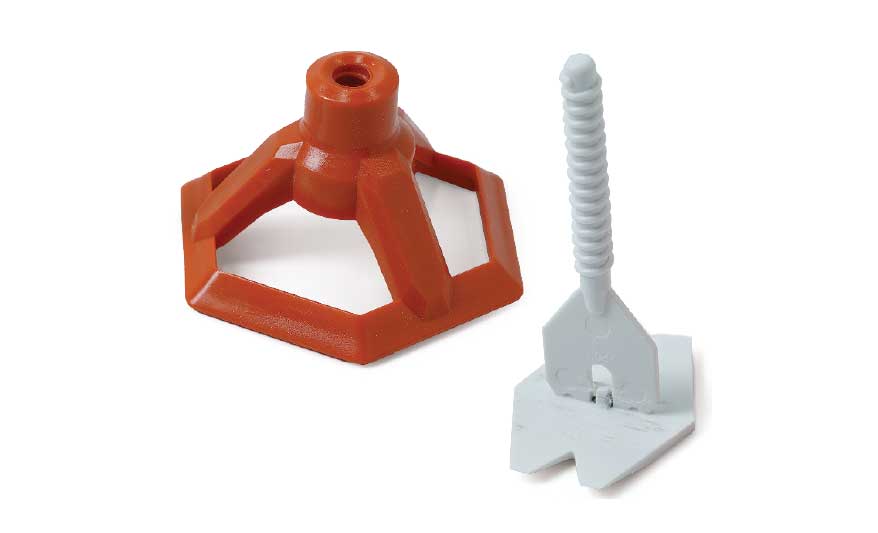
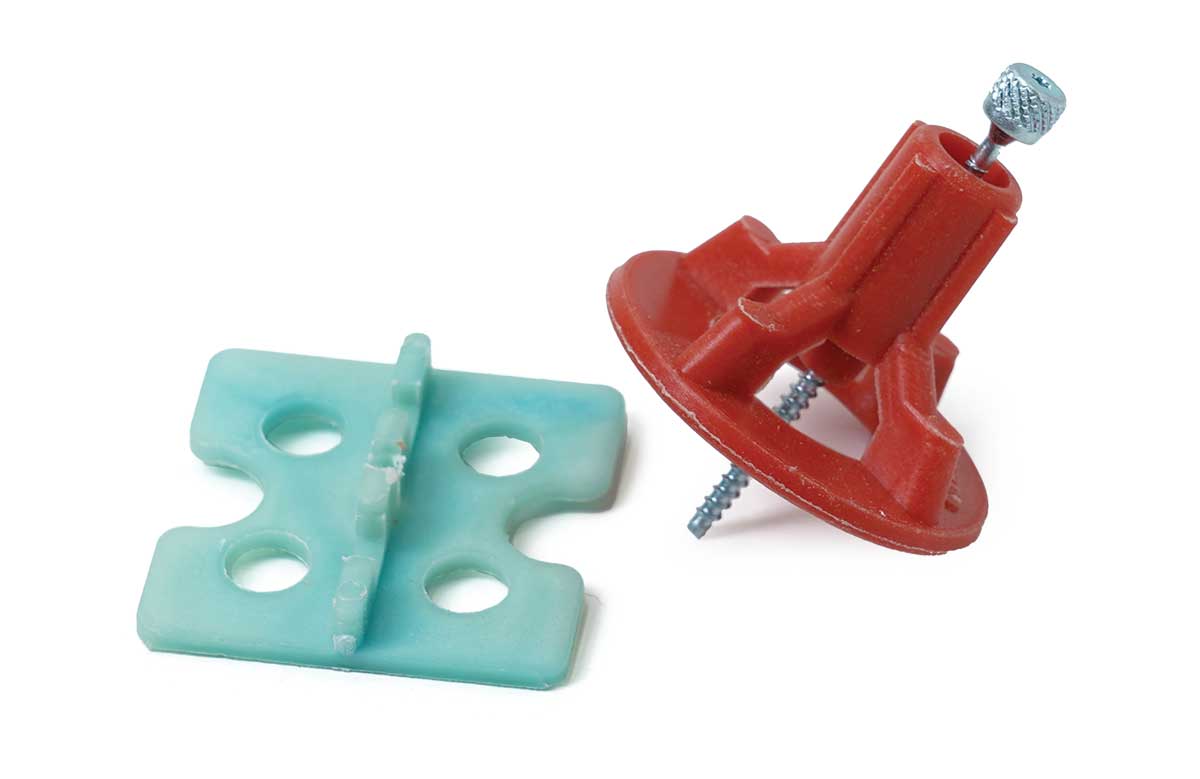
Spinning levelers do everything well

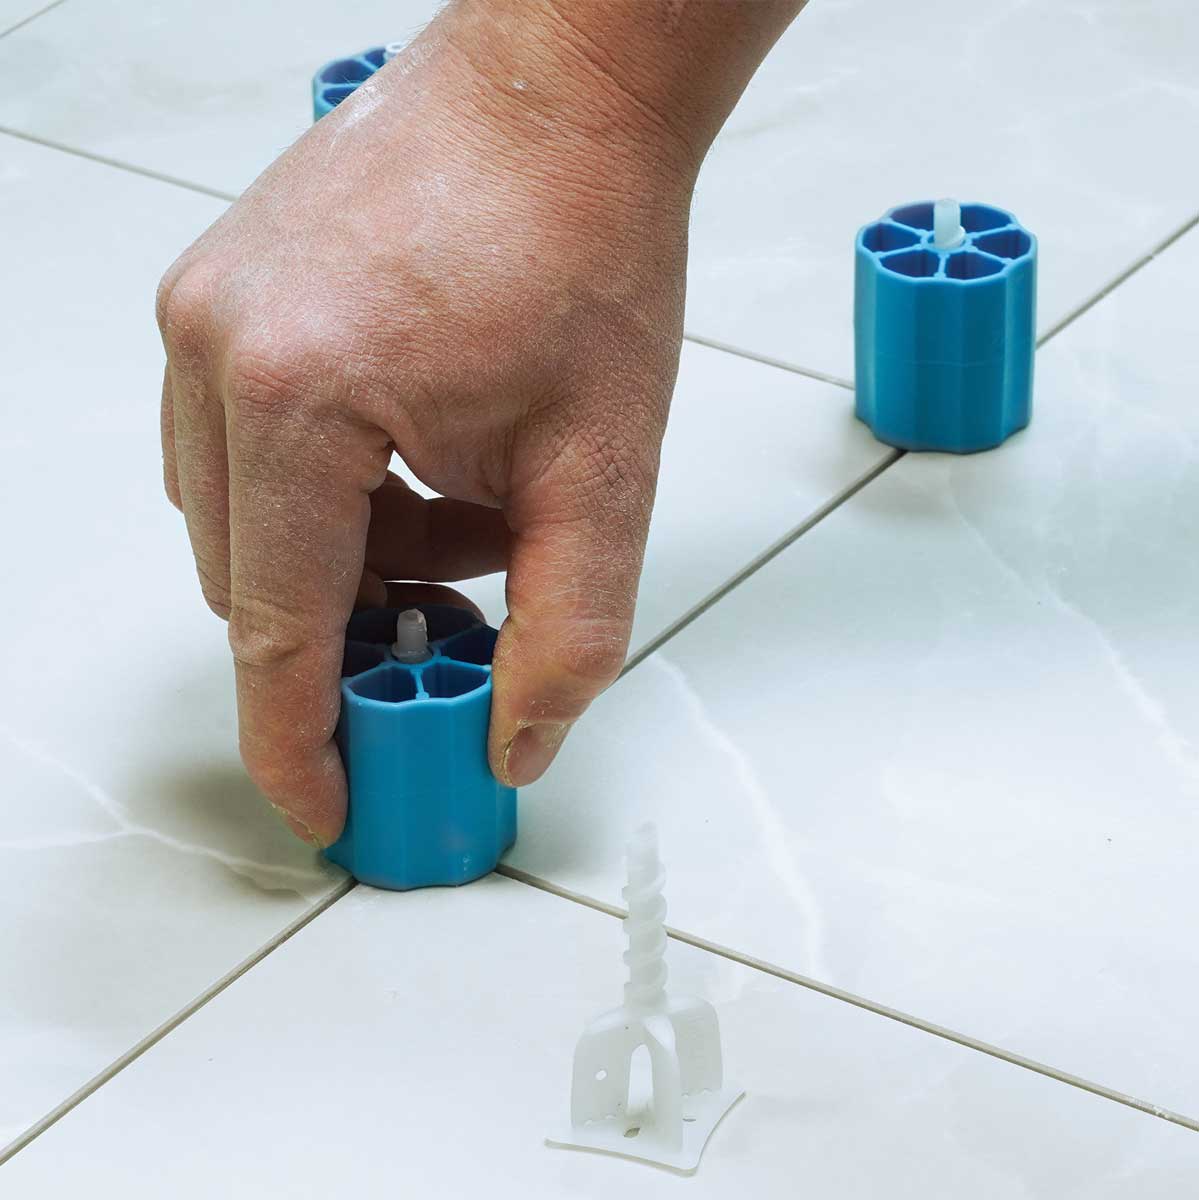
My favorite type of system has a small threaded post with a knob or cap that twists down to apply pressure. I preferred this category before I wrote this article, and after testing all the different types, I still do. I find spinners to be the easiest, most ergonomic type of leveler to use—and highly effective in all situations, with all types of tiles. I especially like the feel they provide. While most other types work best with a special tightening tool, you can tighten spinners easily and firmly by hand, which gives you a more direct feel for torque and pressure. This is important because too much pressure can break a base or crack a tile.

Unlike the wedge systems, which are my second-favorite type, the spinners have knobs that come straight down on the joint and are less likely to shift the tiles as you tighten them. Also, the spinning caps stick up farther than the wedges do, making them easier to knock free after the thinset cures. Most importantly, all of the tile I set for this article with spinning levelers—both on the job and on my test platform, from long floor planks to large-format wall tile—had zero lippage.

Like wedges, spinners can pick up a little bit of thinset and scratch softer stone tile, glass tile, or any other type with high polish. But most spinners offer reusable shields or caps that go under the cap to prevent this. If you don’t want to bother with the shields, just be sure to clean the tile and caps before tightening them down on soft tile.

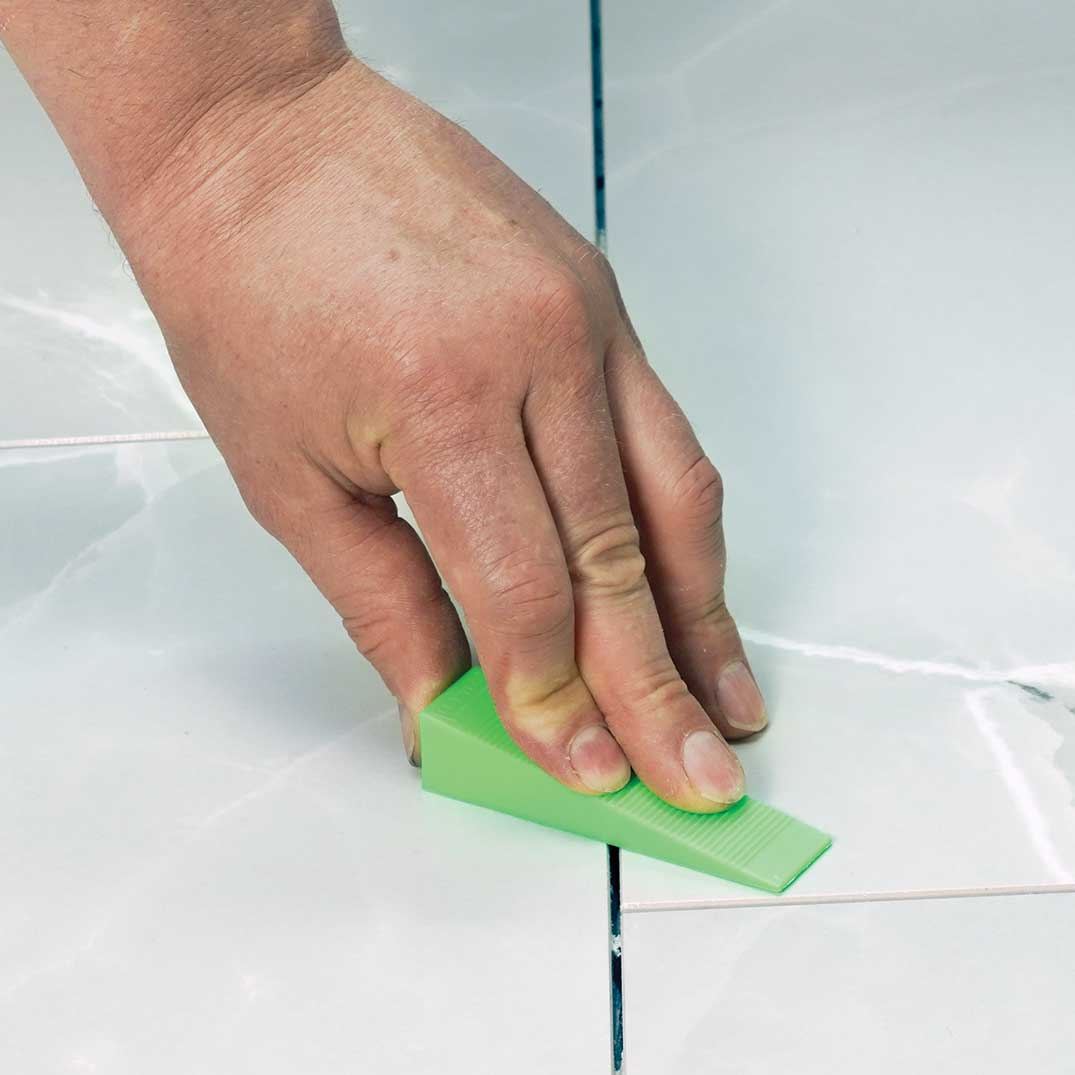
Wedge systems are a close second

Wedges have a few disadvantages compared to spinning levelers, but none are deal-breakers. Their main advantage over spinners is price. Also, the wedges separate freely once you break off their bases, so they’re ready to reuse with no fiddling. The disadvantages are important if you set a lot of tile. First, wedges are a little more prone to shifting the tile as they are tightened, so keep a close eye on your joints and adjust the tile if needed. Second, all wedge systems, even those that promise hand-tightening, require special pliers to exert full pressure. It takes a few seconds to use the pliers and they don’t give as much feel for the pressure you’re applying. With the wider wedges recommended on the facing page, you can often get adequate pressure by hand-tightening alone, but a large project is tough on your hands.

Wedges apply their pressure in a narrow line compared to spinners, so you need a few more of them to get the job done. Like spinners, wedges can get a little grit under them and scratch highly polished tile and soft natural stones, but some systems offer accessory shields for combating this problem. If yours doesn’t, be sure to wipe the wedges (and tile) clean before use if scratches might be a problem.

Newer types are a mixed bag

With sales skyrocketing for leveling systems, new designs have proliferated. A couple won my approval, but most were disappointing in one way or another. One promising type pulls the cap down with a notched strap that works like a cable tie. The main advantage of this type over spinners is how the caps come straight down onto the tile, with very little chance of leaving scratches, even on the softest or glossiest material. The main downside is that the strap requires a special tensioning tool for tightening, which makes it hard to feel exactly how much pressure you’re applying.

I also tried a new type of leveler with a fishhook-style wire base that you wiggle down into the thinset after setting the tiles and then twist to grab the tile backs. This type of leveler is unique for its ability to be inserted into a wall or floor of tile after it’s already been set, making it helpful for problem areas. This type of leveler is also reusable; you have to wiggle the hooks out of the thinset before it fully cures, so you’ll only need to keep a few on hand.

After dozens of hours spent trying almost every tile leveler on the market, I came to a simple conclusion: Use the spinning levelers if you can afford them, or one of the better wedge systems if you’re on a budget.

Choosing a standout system

Spinners are the best

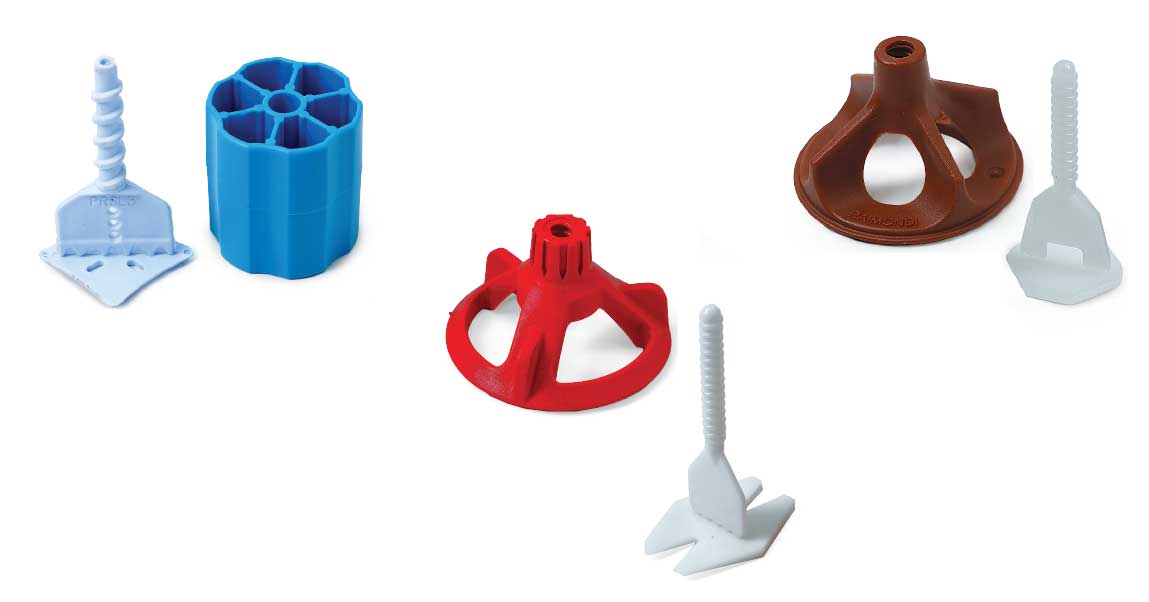
Spinners are the best

Levelers with a threaded stem and spinning cap are the most effective type for eliminating lippage, and unlikely to shift tile as you tighten them. The best tighten easily by hand and break away cleanly after the thinset has cured. Most offer bases for a variety of tile junctions and grout-line thicknesses.

Spinners


A solid backup Ridgid’s LevelMax spinning leveler offers bases for all types of tile junctions and works just fine. On the downside, its caps aren’t as comfortable to tighten or as durable as those on my three favorites, and the system is only available for 1⁄16-in. grout lines.
A solid backup. Ridgid’s LevelMax spinning leveler offers bases for all types of tile junctions and works just fine. On the downside, its caps aren’t as comfortable to tighten or as durable as those on my three favorites, and the system is only available for 1⁄16-in. grout lines.
One to avoid The ATR Tile Leveling Alignment System attaches its spinning cap to the base with a threaded screw that is removable and reusable, like the cap. But the screw is troublesome to tighten—whether you use a drill or your hand—and its threads get filled with thinset, making it difficult to reuse.
One to avoid. The ATR Tile Leveling Alignment System attaches its spinning cap to the base with a threaded screw that is removable and reusable, like the cap. But the screw is troublesome to tighten—whether you use a drill or your hand—and its threads get filled with thinset, making it difficult to reuse.

Wedges are an affordable alternative

Wedge-style tile-leveling systems were the first on the market. They can’t do three- and four-way joints, they have a smaller contact area than spinning caps, and they require pliers to apply max pressure, but they can be very effective if used properly and are less expensive than the spinner systems.
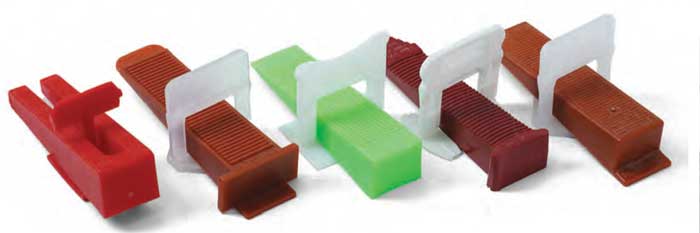
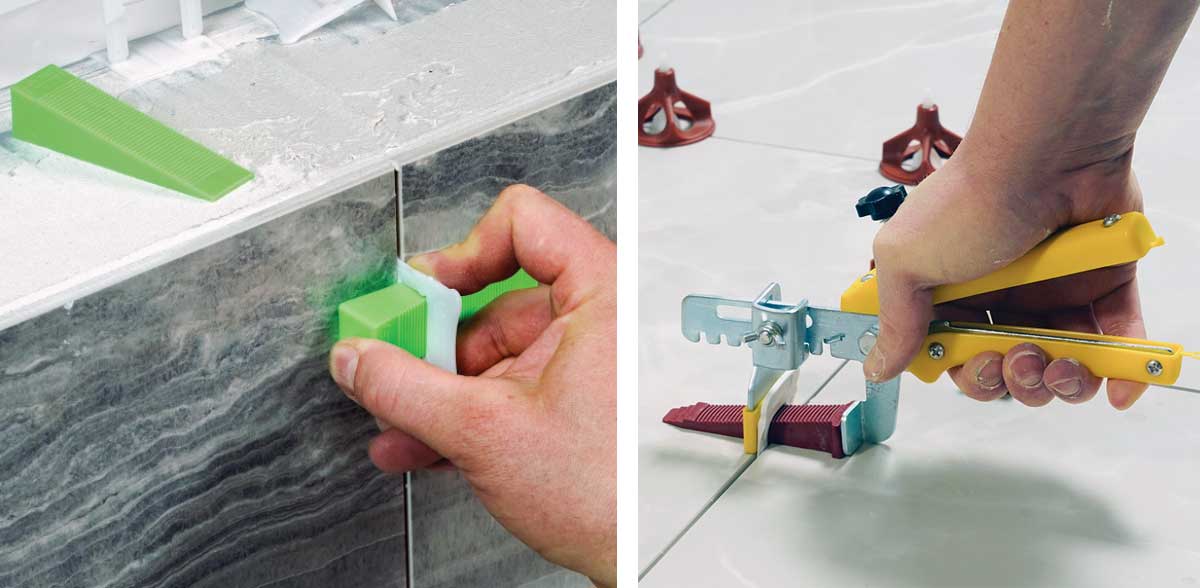
wider wedges The wedges pictured here (from left: DTA, Frosch, Levtec, Perfect Level Master, and Raimondi) provide a broad contact area, are relatively easy to tighten by hand, and break away cleanly after the thinset cures.
Wider wedges. The wedges pictured here (from left: DTA, Frosch, Levtec, Perfect Level Master, and Raimondi) provide a broad contact area, are relatively easy to tighten by hand, and break away cleanly after the thinset cures.
Hand vs. pliers In many cases, you’ll be able to get enough pressure by hand-tightening the wedges, but that method can leave your hands sore. For the trickiest tile, you’ll need a pair of specialized pliers to apply full pressure, but the tool will slow you down a bit and makes it tougher to tell exactly how much force you are applying.
Hand vs. pliers. In many cases, you’ll be able to get enough pressure by hand-tightening the wedges, but that method can leave your hands sore. For the trickiest tile, you’ll need a pair of specialized pliers to apply full pressure, but the tool will slow you down a bit and makes it tougher to tell exactly how much force you are applying.

Serrated straps need special tools

Strap-type systems have a cap that slides down a serrated strap. While they won’t scratch tile, they require specialized tensioning tools to tighten them fully.
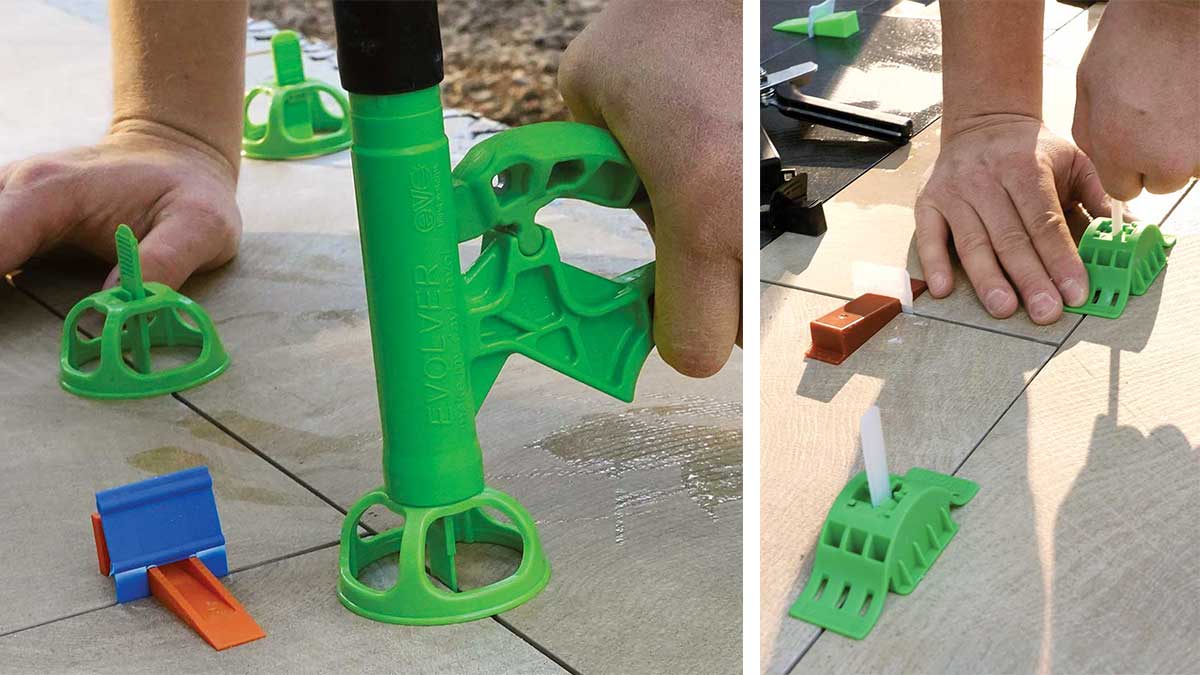
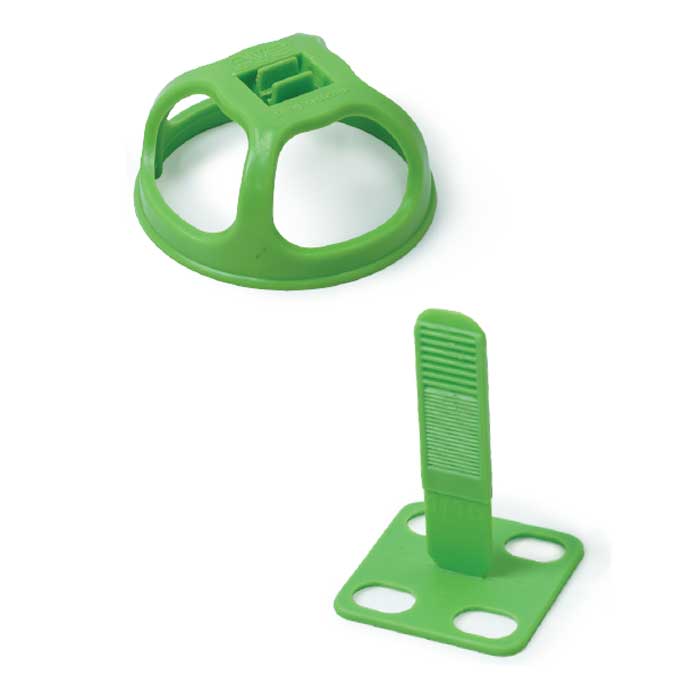
Tools required Hand-tightening isn’t enough for strap-type systems. Their hand-powered tensioning tools apply plenty of pressure, but will make your hand start to ache on a big tile job.
Tools required. Hand-tightening isn’t enough for strap-type systems. Their hand-powered tensioning tools apply plenty of pressure, but will make your hand start to ache on a big tile job.
A favorite strap-type leveler Levolution, made by Miracle Sealants, offers a broad cap with large viewing windows, breaks away cleanly, and has an affordable tensioning tool. Spacer bases are available for all types of tile junctions, in thicknesses down to 1⁄16 in.
A favorite strap-type leveler. Levolution, made by Miracle Sealants, offers a broad cap with large viewing windows, breaks away cleanly, and has an affordable tensioning tool. Spacer bases are available for all types of tile junctions, in thicknesses down to 1⁄16 in.

Wires work for rescue operations

Wire-type systems aren’t the best for general use, but they can be inserted after tile is set, making them useful for addressing lippage you missed earlier.

Wire tip is a plus … These levelers can be inserted after tile is already set but the thinset is still soft, helping level stubborn areas.
Wire tip is a plus. These levelers can be inserted after tile is already set but the thinset is still soft, helping level stubborn areas.
Wire levelers are largely the same Generic wire-type levelers are all over Amazon, and all worked about the same in the author’s tests. This one is sold under the brand TR Toolrock.
Wire levelers are largely the same. Generic wire-type levelers are all over Amazon, and all worked about the same in the author’s tests. This one is sold under the brand TR Toolrock.

… and a minus The wire tip is tricky to engage under the tile and requires two hands to tighten, and you have to remove the wire before the thinset is fully cured.
… and a minus. The wire tip is tricky to engage under the tile and requires two hands to tighten, and you have to remove the wire before the thinset is fully cured.

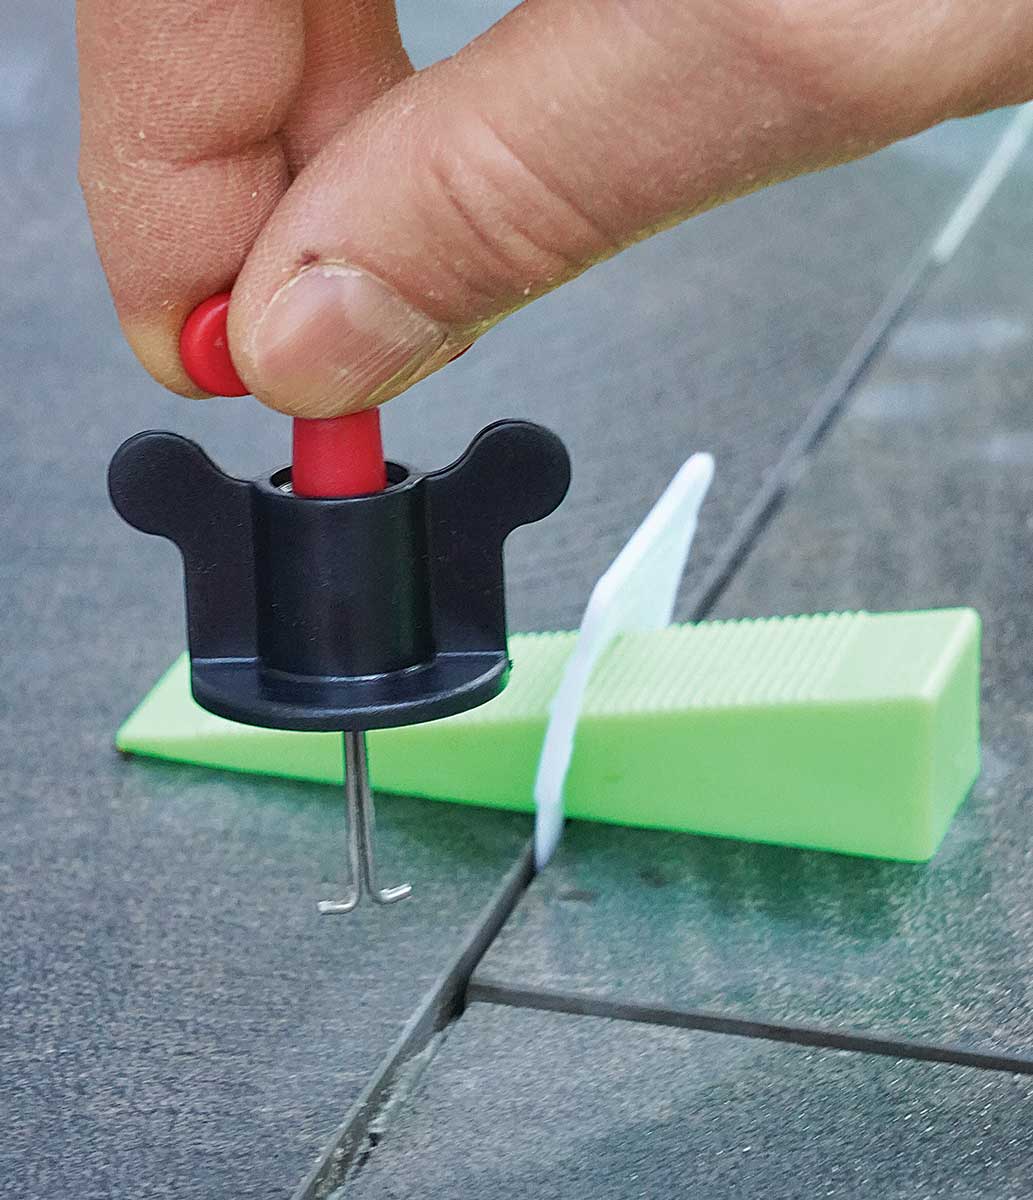
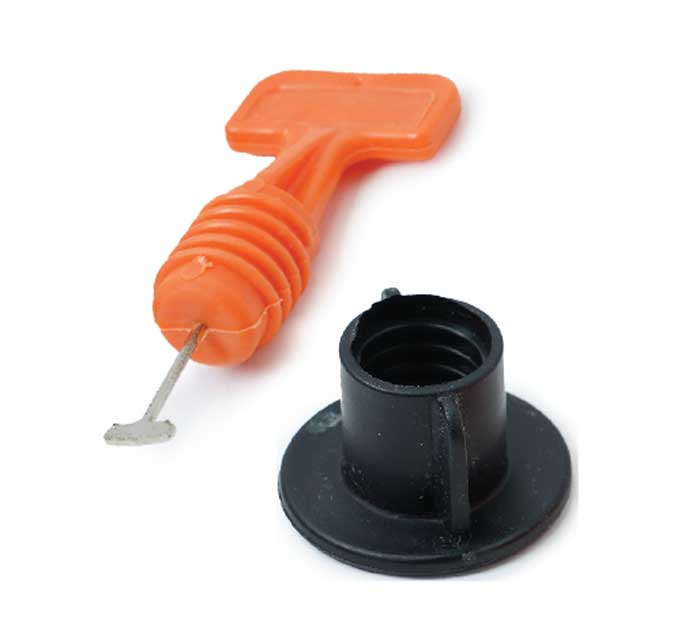
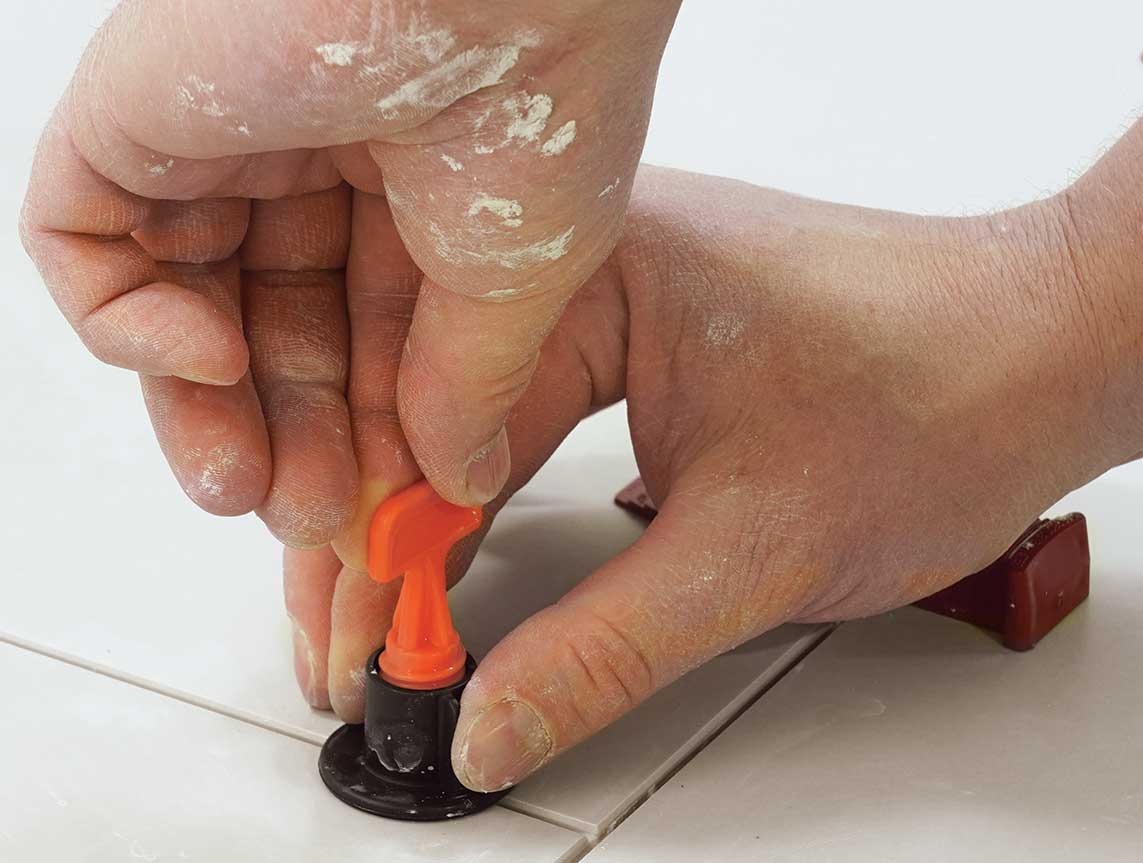
Josh Oduin is a custom home builder, remodeler, and tilesetter in Portland, Ore. Photos by Asa Christiana.

From Fine Homebuilding #310


RELATED STORIES

  • Using Tile Leveling Systems
  • Levels and Miscellaneous Tile-Setting Tools
  • Finishing Touches for a Porcelain-Slab Shower
Previous: Edge Trim for Tile Transitions

Guide

Tiling

Chapter

Installation Materials

Sign up for eletters today and get the latest how-to from Fine Homebuilding, plus special offers.

Signing you up...

This site is protected by reCAPTCHA and the Google Privacy Policy and Terms of Service apply.
See all newsletters
See all newsletters

View Comments

  1. rdy4trvl | Jan 27, 2023 12:53am | #1

    Does anyone make a system to level tiles with contours (ie 3D or non-flat surface)?

    1. user-6800663 | Jul 28, 2024 08:10pm | #3

      I have use wedges a lot and I found that , sometimes, it increase the gap between the tiles. Is-it me or it is really a negative effect of this "tool" ?

  2. PeterHewitt | Jul 18, 2024 06:16pm | #2

    Ok good article but you did not disclose what types and brands of spinners you use???

Log in or create an account to post a comment.

Sign up Log in

Become a member and get full access to FineHomebuilding.com

Tiling

Tiling

Trusted, comprehensive guidance from the pros for a great-looking tile job in any room of the house

View Project Guide

View All Project Guides »

Become a member and get unlimited site access, including the Tiling Project Guide.

Start Free Trial

Selecting Tile
  • The Basics
  • Tile Options
Tools & Techniques
  • Job-Preparation Tools
  • Cutting Tiles
  • Setting & Grouting Tools
Installation Materials
  • Membranes & Substrates
  • Adhesives & Mortars
  • Grout
  • Sealers & Caulk
  • Spacers, Hardware & Trim
Preparation
  • The Prep Job
  • Repairs & Surface Prep
  • Installing Backerboard
Tiling Floors
  • Layout & Installation
  • Setting Specialty Tiles
Tiling Walls & Backsplashes
  • Preparation
  • Backsplashes
  • Walls
Tiling Showers
  • Tile Shower Basics
  • Waterproofing
  • Shower Pans
  • Shower Drains
  • Shower Niches
  • Video Series: Tile a Shower
  • Video Series: Tile a Barrier-Free Bathroom
Grouting, Sealing & Caulking
  • Grouting
  • Caulking
  • Sealing
Maintenance & Repair
  • Maintenance
  • Tile Repair
  • Grout Repair

Fine Home Building

Newsletter Sign-up

  • Fine Homebuilding

    Home building tips, offers, and expert advice in your inbox.

  • Green Building Advisor

    Building science and energy efficiency advice, plus special offers, in your inbox.

  • Old House Journal

    Repair, renovation, and restoration tips, plus special offers, in your inbox.

Signing you up...

This site is protected by reCAPTCHA and the Google Privacy Policy and Terms of Service apply.
See all newsletters

Follow

  • Fine Homebuilding

    Dig into cutting-edge approaches and decades of proven solutions with total access to our experts and tradespeople.

    Start Free Trial Now
    • Facebook
    • Instagram
    • X
    • LinkedIn
  • GBA Prime

    Get instant access to the latest developments in green building, research, and reports from the field.

    Start Free Trial Now
    • Facebook
    • YouTube
  • Old House Journal

    Learn how to restore, repair, update, and decorate your home.

    Subscribe Now
    • Facebook
    • Instagram
    • X

Membership & Magazine

  • Online Archive
  • Start Free Trial
  • Magazine Subscription
  • Magazine Renewal
  • Gift a Subscription
  • Customer Support
  • Privacy Preferences
  • About
  • Contact
  • Advertise
  • Careers
  • Terms of Use
  • Site Map
  • Do not sell or share my information
  • Privacy Policy
  • Accessibility
  • California Privacy Rights

© 2025 Active Interest Media. All rights reserved.

Fine Homebuilding receives a commission for items purchased through links on this site, including Amazon Associates and other affiliate advertising programs.

  • Home Group
  • Antique Trader
  • Arts & Crafts Homes
  • Bank Note Reporter
  • Cabin Life
  • Cuisine at Home
  • Fine Gardening
  • Fine Woodworking
  • Green Building Advisor
  • Garden Gate
  • Horticulture
  • Keep Craft Alive
  • Log Home Living
  • Military Trader/Vehicles
  • Numismatic News
  • Numismaster
  • Old Cars Weekly
  • Old House Journal
  • Period Homes
  • Popular Woodworking
  • Script
  • ShopNotes
  • Sports Collectors Digest
  • Threads
  • Timber Home Living
  • Traditional Building
  • Woodsmith
  • World Coin News
  • Writer's Digest
Active Interest Media logo
X
X
This is a dialog window which overlays the main content of the page. The modal window is a 'site map' of the most critical areas of the site. Pressing the Escape (ESC) button will close the modal and bring you back to where you were on the page.

Main Menu

  • How-To
  • Design
  • Tools & Materials
  • Video
  • Blogs
  • Forum
  • Project Guides
  • Reader Projects
  • Magazine
  • Members
  • FHB House

Podcasts

  • FHB Podcast
  • ProTalk

Webinars

  • Upcoming and On-Demand

Podcasts

  • FHB Podcast
  • ProTalk

Webinars

  • Upcoming and On-Demand

Popular Topics

  • Kitchens
  • Business
  • Bedrooms
  • Roofs
  • Architecture and Design
  • Green Building
  • Decks
  • Framing
  • Safety
  • Remodeling
  • Bathrooms
  • Windows
  • Tilework
  • Ceilings
  • HVAC

Magazine

  • Current Issue
  • Past Issues
  • Magazine Index
  • Subscribe
  • Online Archive
  • Author Guidelines

All Access

  • Member Home
  • Start Free Trial
  • Gift Membership

Online Learning

  • Courses
  • Project Guides
  • Reader Projects
  • Podcast

More

  • FHB Ambassadors
  • FHB House
  • Customer Support

Account

  • Log In
  • Join

Newsletter

Get home building tips, offers, and expert advice in your inbox

Signing you up...

This site is protected by reCAPTCHA and the Google Privacy Policy and Terms of Service apply.
See all newsletters
See all newsletters

Follow

  • X
  • YouTube
  • instagram
  • facebook
  • pinterest
  • Tiktok

Join All Access

Become a member and get instant access to thousands of videos, how-tos, tool reviews, and design features.

Start Your Free Trial

Subscribe

FHB Magazine

Start your subscription today and save up to 81%

Subscribe

You have 1 free article remaining.

Get complete site access, including thousands of videos, how-to tips, tool reviews, and design features.

Start your FREE trial

Already a member? Log in

We hope you’ve enjoyed your free articles. To keep reading, become a member today.

Get complete site access to expert advice, how-to videos, Code Check, and more, plus the print magazine.

Start your FREE trial

Already a member? Log in

Privacy Policy Update

We use cookies, pixels, script and other tracking technologies to analyze and improve our service, to improve and personalize content, and for advertising to you. We also share information about your use of our site with third-party social media, advertising and analytics partners. You can view our Privacy Policy here and our Terms of Use here.

Cookies

Analytics

These cookies help us track site metrics to improve our sites and provide a better user experience.

Advertising/Social Media

These cookies are used to serve advertisements aligned with your interests.

Essential

These cookies are required to provide basic functions like page navigation and access to secure areas of the website.

Delete My Data

Delete all cookies and associated data