Podcast 519: Budget-Minded Designers, Insulating Paint, and Roof Details
The crew hear from listeners about radon, termites, and home workshops.
Follow the Fine Homebuilding Podcast on your favorite app. Subscribe now and don’t miss an episode:
 |
Help us make better episodes and enter for a chance to win an FHB Podcast T-shirt:
www.finehomebuilding.com/podcastsurvey
James tells us how he dealt with radon. Doug reports on termites in the DC area. Jonathan shows us his shop. A GBA poster needs help finding a budget-minded designer. Ron asks about insulating paint. Chris enquires about an ’80s-era fireplace with a fan. James wants more details about roofs.
Editor Updates:
- Mike: Deck Expo in Vegas
- Andrew: Stockpiling building materials
- Patrick: Ian wants to know if any listeners have installed their own PV system
Listener Feedback 1:
James in Hamilton, Ontario writes in response to Nick in episode 509: Hey Patrick and podcast team. I recently discovered our 1962 ranch house had moderate radon levels, 600 becquerels per metre cubed, which is 3-4 times the recommended maximum level. So, we needed to mitigate. Three years earlier I had sealed our crawlspace with 6mil poly and 2” of EPS on the walls and floor. Like Nick I had nightmares of the radon mitigation company telling me I’d have to rip out all the work I had done to seal the crawlspace. My knees and back shuddered at the thought of redoing it all again. Thankfully in my case the sealed crawlspace worked in my favour. Since there was enough air communication through the gravel under the rat slab the only intrusion, the installers needed to make in the sealed floor was 5 or 6 1/2” inspection holes and one 6” hole for the radon exhaust fan. The sealed crawlspace was a benefit in my case because there was less work for the mitigation installers to do, saving me money. Our radon levels are now around 30 becquerels per metre cubed, well below the max recommendation. We have a cold air return in our crawlspace and no worries about radon spreading through the house.
Related Link:
Listener Feedback 2:
Doug Horgan writes: First of all, five hundred and nine episodes?!?!? Wow. And I still enjoy every one!
Termites…ran into two of them this week…one in my garden where I used untreated 2x4s for parts of our “groundhog-proof” six-sided box enclosure. Most of the 2x4s are way above ground but I put some within a few inches of the dirt, the termites found one and were really enjoying it. The other is on a project where we found a double joist under a bearing wall is about 1/3 air, 2/3 wood and will need replacing. I would never use exterior foam insulation at or below grade here. Any assembly that can allow concealed access between dirt and wood is definitely going to be a problem.
I’ve worked on a few houses with termite tunnels through foam insulation or behind fiberglass or whatever, one was three years old and the foam was riddled with tunnels. My spouse was a little surprised that I was very excited to bring some of this foam home to our house. Virginia (and I think several other southern states) require an ‘inspection gap’ at the sill plate area in crawl spaces—we typically use fiberglass installed so it’s easy to lift to inspect, which is allowed. R408.3.1 Termite inspection.
Where an unvented crawl space is installed and meets the criteria in Section R408, the vertical face of the sill plate shall be clear and unobstructed and an inspection gap shall be provided below the sill plate along the top of any interior foundation wall covering. The gap shall be a minimum of 1 inch (25.4 mm) and a maximum of 2 inches (50.8 mm) in width and shall extend throughout all parts of any foundation that is enclosed. Joints between the sill plate and the top of any interior wall covering may be sealed.
Exceptions:
1. 1.In areas not subject to damage by termites as indicated by Table R301.2(1).
2. 2.Where other approved means are provided to inspect for potential damage.
Where pier and curtain foundations are installed as depicted in Figure R404.1.5(1), the inside face of the rim joist and sill plate shall be clear and unobstructed except for construction joints, which may be sealed.
Exception: Fiberglass or similar insulation may be installed if easily removable.
I was also interested in the large-hole-in-masonry discussion. I recently put two 8” holes in my brick & block foundation for an ERV which I swear I will install one of these days. My plan was to drill twelve little holes and chisel the rest, but we have a 4-1/4” core bit and I used that to drill four big holes instead of lots of little ones, it worked really well, did both holes in just over an hour including dust collection setup in the basement. Also, a guy I work with, Frank Sis, showed me something really cool, he has a 6” diamond core bit he runs on a normal cordless drill, he uses some kind of water setup, he says it’s not fast but it’s a surprisingly smooth and cheap process—bits can be found for under $200. Having said that, we normally hire these out to a core drilling company as suggested.
Related Links:
- Cover for Exposed Foundation Insulation
- Accurate Holes in Masonry
- Hammer-Action Drills vs. Rotary Hammers: What is the Difference?
Listener Feedback 3:
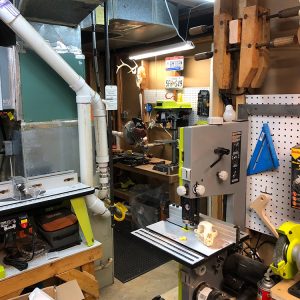
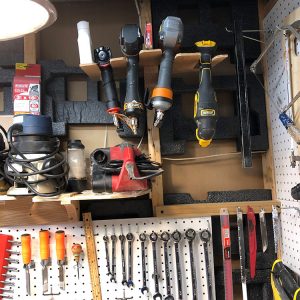
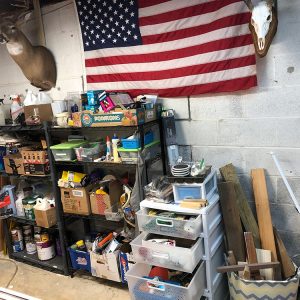
Jonathan writes: Last month, you asked listeners to share their workshop setup and supplies. At a minimum, I like to keep materials on hand to operate all my power tools. For example, if you’ve got an air tool, you must have fasteners for it. I always keep tapes, glues, batteries, nails and screws in good supply. I find boxes to be an efficient way to organize materials for different jobs. If I’m working on an electrical project, I grab my “Electrical” box. I keep conduit, junction boxes, wall plates, switches and receptacles on hand. I also have “boxes” for plumbing, doors and windows, wall repair, sanding etc. Shelf space has a section for glues, lighting, tapes, and paint. I secure the door to the workshop and keep chemicals on the top shelf. I keep scrap wood organized with a separate bin for small offcuts.
 |
 |
 |
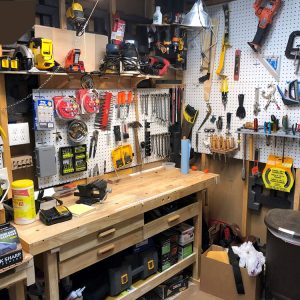 |
I use drawers for screws and nails; batteries; baby proofing, personal safety gear and so on. Precious wall space is covered with pegboard for clamps, hand tools and the like. Power tools sit on a shelf with some more stored below. It all makes sense to me.
Fixed tools include a drill press, miter and band saws, router table, planer, and grinder. I could use a table saw but don’t have space. The central HVAC and big water heater (see episode 141) compete for the space. Most fixed tools have dedicated dust collection or I can attach a flexible hose from my main dust collector. I could have organized it better, but I had to add storage solutions incrementally as the collection grew. My wife will tell you 10% of my tools are in the living area at any given time. It’s my way of showing her I’m working on something.
Related Links:
Question 1: How do I find an architect or designer who will work with my small addition?
From the GBA Community and Q&A Finding a good architect/designer thegiz writes: Hope everyone is doing well, just want to see if I can get a little advice. Looking to add an additional bedroom, and have talked to several architects. So far, I have not met a single designer that was able to look at my layout and give me an opinion on what is the most economical way to add space. Or they want to add on to the project to make it bigger than it actually needs to be (telling me I must make my kitchen bigger as well to get approval for work). I also feel they don’t have the skills for more creative ways such as bumping out or a cantilever over the existing foundation to save on the overall cost. Are there experts in this line of work, maybe resources I can read, or architects that may not be local but can provide online services? Maybe I’m skeptical but I feel that the architects I meet are chasing after the larger jobs, maybe because they will have more work to do and can charge a larger fee. This is also based on locality but with a bump out is the permit process less extensive. I’m getting a minimum architectural fee of 13,000 to add one room.
Related Links:
- Matriarchy Build – Built by Women. Built for Everyone
- Pretty Good House
- Tying in an Addition to an Existing Home
- Designing an Addition That Looks Right
Question 2: Does insulating paint actually work?
Ron writes: Hi, I’ve written in a couple times and appreciated your thoughtful responses. This isn’t really a question, but I wanted to pass on a product I just became aware of from the Greenbuild Expo that just finished in San Francisco (I don’t have any connection to this product). The product is a thick paint, which both waterproofs and insulates walls and floors. It’s hard to believe, but they claim that a thick paint coating provides R-8 insulation, and waterproofing, and can function as a floor. Here’s the link: nanobarrera-us.com/product
I’m a little unclear on coverage and paint thickness, but think the cost is around $2 per SF? The reason I wanted to share this is as a potential product for the endless number of questions related to treating cold, wet basements. The website shows a bright white color, but this is to reflect sun. It can be tinted for indoor use or to absorb more sun.
I’m considering this as a roofing product for the concrete house I’ll be building.
Related Links:
- An ‘Insulating’ Paint Salesman Is Tripped Up By His Own Product?
- ‘Insulating’ Paint Merchants Dupe Gullible Homeowners
- FTC Cracking Down on False R-Value Claims
Question 3: Does this 80s technology make a fireplace more efficient?
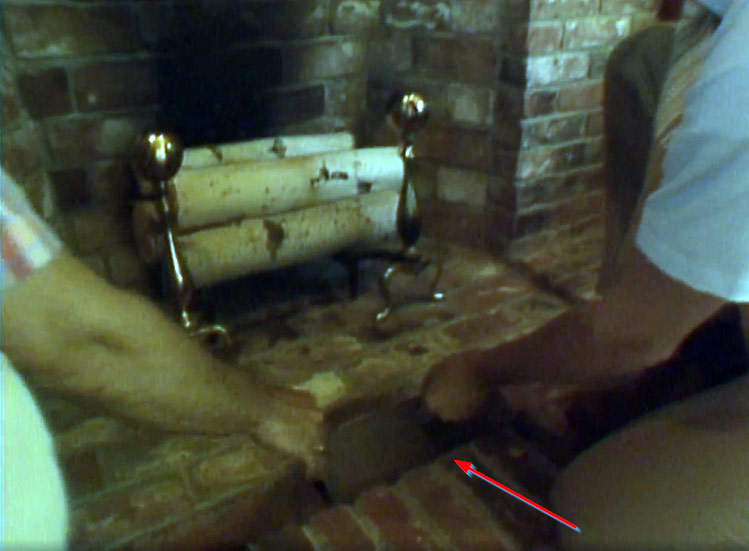
Do you know if this is still around? Was it actually helpful in increasing efficiency? I’d think the blower fan maintenance and the fact that you’re just blowing air in the general direction of the fire and not in a closed system would be the main drawbacks. What are your thoughts?
Thanks for what you do! -Chris
Show was This Old House season 5 episode 4 around minute 17.
Related Links:
Question 4: What are the best methods and products for roof waterproofing?
James from Kelowna, British Columbia writes: Dear FHB Podcast, Your podcast is an excellent ambassador for the FHB brand. I love listening to the banter and appreciate the collegiality of the group. The building science world, your show included, regularly emphasizes the need to manage bulk water. You also highlight the roof as the most important part of the structure for this purpose. The peel and stick competition is heating up with Huber and their ZIP peel-and-stick membrane for the entire roof deck. Is there a consensus that these membranes are the gold standard? I propose that for every time you discuss a sand-point well, the aesthetics of ICF foundation walls at grade, or back up generators, you could give us some tidbits on competent roof waterproofing. I’d love to hear more about material costs, the different methods for waterproofing penetrations, practical benefits of different pitches, why anyone thinks that a flat-pitched roof is a good idea, overhangs…my list is lengthy. For today’s show, could you kindly discuss one question: is there any reason not to use a peel-and-stick ice-and-water shield product on your entire roof, other than the cost?
Thank you for all you do and a special shout out to Jeff for his benevolence every time Patrick drags him into the conversation.
Related Links:
END NOTES:
Members-only Aftershow Podcast 519: Tools, Tools, Tools — Mike, Andrew, and Patrick talk about their favorite tools, tools that miss the mark, and a few tools you’ve probably never heard of.
Check out one of our Project Guides: Siding & Exterior Trim!
Check out our FHB Houses:
Visit the Taunton Store • Magazine Index • Online Archive • Our First Issues • All Access
Help us make better episodes and enter for a chance to win an FHB Podcast T-shirt: www.finehomebuilding.com/podcastsurvey

If you have any questions you would like us to dig into for a future show, shoot an email our way: [email protected].
If we use your question we’ll send you a FHB Podcast sticker!
FHB Podcast T-shirts!
Represent your favorite podcast! Available in several styles and colors. Made from 100% cotton. Find the Podcast t-shirt and more cool products in the Fine Homebuilding Store.
| Fine Homebuilding podcast listeners can now get 20% off anything in the Taunton store, including Pretty Good House.
Use the discount code FHBPODCAST to take advantage of this special offer. |
 |
“Finally, knowledgeable people talking about building reasonably-sized, high-performance houses for normal people with real budgets!” — DanD, VA, 8/19/22, Amazon.com review |
We hope you will take advantage of a great offer for our podcast listeners: A special 20% off the discounted rate to subscribe to the Fine Homebuilding print magazine. That link goes to finehomebuilding.com/podoffer.
The show is driven by our listeners, so please subscribe and rate us on iTunes or Google Play, and if you have any questions you would like us to dig into for a future show, shoot an email our way: [email protected]. Also, be sure to follow Fine Homebuilding on Instagram, and “like” us on Facebook. Note that you can watch the show above, or on YouTube at the Fine Homebuilding YouTube Channel.
The Fine Homebuilding Podcast embodies Fine Homebuilding magazine’s commitment to the preservation of craftsmanship and the advancement of home performance in residential construction. The show is an informal but vigorous conversation about the techniques and principles that allow listeners to master their design and building challenges.
Other related links
-
- All FHB podcast show notes: FineHomebuilding.com/podcast.
- #KeepCraftAlive T-shirts and hats support scholarships for building trades students. So order some gear at KeepCraftAlive.org.
- The direct link to the online store is here.


