Podcast 525: Low-Budget Builds, Artificial Intelligence, and Trade School Curriculum
The crew answers questions about affordable new-house builds, AI in construction, and trade school education.
Follow the Fine Homebuilding Podcast on your favorite app. Subscribe now and don’t miss an episode:
 |
Help us make better episodes and enter for a chance to win an FHB Podcast T-shirt:
www.finehomebuilding.com/podcastsurvey
Brendan shows us a house where all the framing is visible on cold mornings. Justin explains power tool batteries. Doug Horgan has thoughts on fireplace doors and roofs.
 Editor Updates:

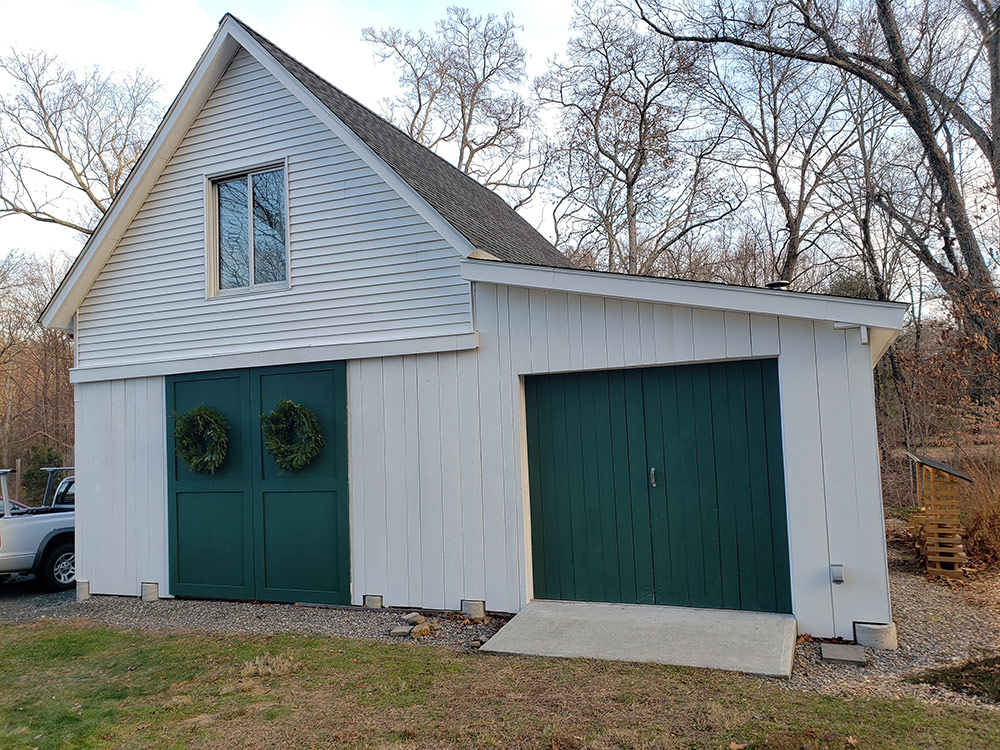
- Patrick’s: barn overhangs
- Jeff’s: Christmas decorating
- Andrew’s: cat’s first Christmas
- Mike’s: free Charlie Brown Christmas trees and limbs
Listener Feedback 1:
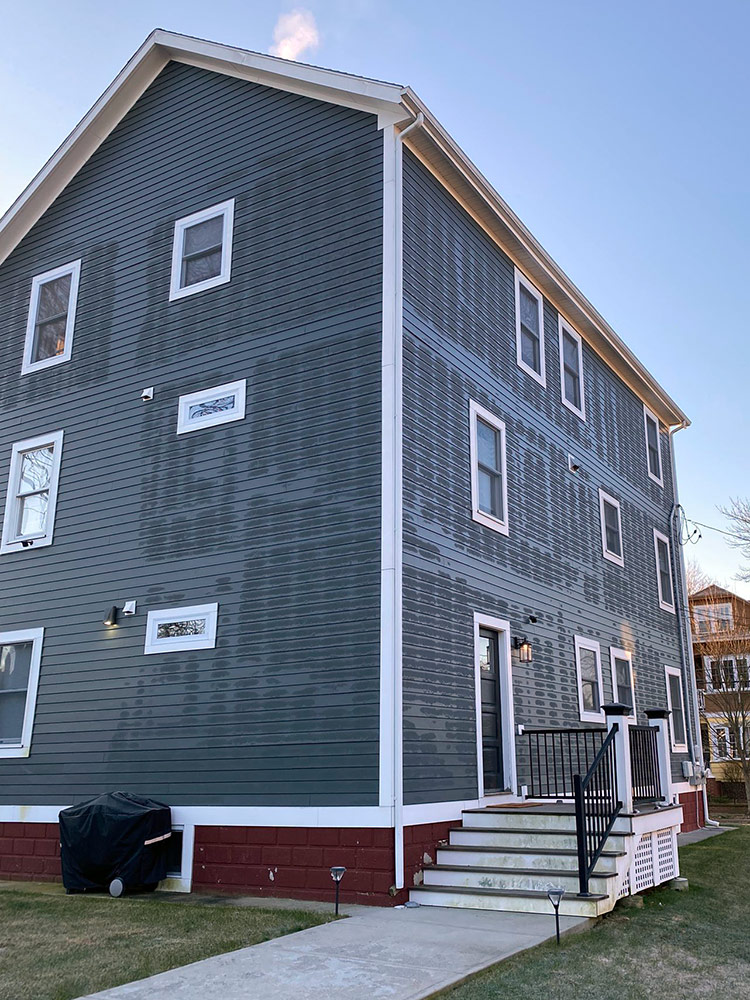
Brendan in Providence, RI writes: Hello Pod, wanted to send you this picture I took while walking the dog around the neighborhood on a recent morning. It was one of those mornings after a heavy frost when you can look up at every roof and see the location of the rafters outlined in the frost. I couldn’t believe this building. You can see the outline of all the wall framing in the frost/condensation on the exterior wall surface. Rim boards, wall studs, stair stringers, locations of windows that were removed, and rooms with little or no exterior wall insulation. This triple-decker got a moderate renovation a few years ago with new cladding, and presumably some sort of new WRB. I don’t think there is anything wrong with this building, besides inadequate insulation. At work, we were discussing this and trying to figure out why the condensation was so apparent on this building and why we don’t see this more often. I think it is simply because the building is clad in a smooth-finish lap siding. You would probably just be unable to see this on a rougher siding material. And if the siding has some sort of back-ventilation, the condensation would not form or would form in the hidden ventilation space. Hope you enjoy this as much as I did!
Related Link:
Listener Feedback 2:
Justin writes: Hey Team, As I was listening to episode #519 today, the comments about power tool batteries stood out to me. Until recently (by choice), I was an electrical design engineer at Milwaukee Tool and thought I might weigh in on the risk to batteries. Broadly speaking, if you’re using one of the major brands that contractors lean on (Think Red, Teal, Yellow) and you’re using that brand’s battery, circuitry is indeed included to prevent damage from too much power draw or a temperature rise that would degrade the batteries at any sort of accelerated rate. If you buy a “compatible” third-party battery, that lower cost is generally in the reduced battery cell quality and the monitoring circuitry.
Not all batteries are created equal within the Lithium-Ion “family”. The chemistry of the battery helps determine how much power can be delivered by any individual cell within the battery pack and it becomes a matter of matching the battery to the application. If you try to power an SDS-Max rotary hammer with the compact battery (of any brand, mind you), you will get disappointing, possibly damaging results. If you use the High Output or Heavy Duty batteries, you will get peak performance and have effectively zero risk to the battery. In order to get an “18 volt” tool, there are 5 battery cells in series. In the compact batteries (usually the1.5/2.0/3.0 Ah sizes), there is a single string of cells to deliver usually around 20-30 amps of DC current. When you step up to a 4.0+ Ah battery, you get multiple sets of battery cells that join forces to push out a lot more amps in peak demand, reducing degradation and improving performance.
With modern batteries, peak current levels of 120+amps on 18 volts is possible (HO/HD batteries). This is beyond the wattage a 15A plug-in circuit can provide, at least for whatever amount of time the limited bucket of energy a battery has. As batteries step up to 36/48/72/80 volts, the current levels (and consequently the heat levels) go down. This becomes another economic tradeoff of battery cost/weight with power delivery and performance. I realize I’ve rambled a bit (as engineers are want to do)
For the Too Long: Didn’t Read version, if you are pairing a proper battery with the demand of a tool, there is very little risk to the battery or the tool, even in the demanding operations of concrete and cutting worlds. Of course, abuse scenarios are the caveat to this declaration.
Regards, Justin
Listener Feedback 3:
Doug Horgan writes: Another great conversation. Mike is a terrific guest. Another 33 years and I might know 80% of what he does, if I’m lucky! On the fireplace doors question, I remember this well…in the 2009 I-codes, a section was added to the residential energy code (N1102.4.3): “New wood-burning fireplaces shall have gasketed doors and outdoor combustion air.”
I learned on internet forums that people who studied fireplaces thought this was a terrible idea, and that adding tight-sealing doors to a standard masonry fireplace & chimney could cause it to operate at much higher temperatures and increase fire hazards. One rating agency wrote a letter to the ICC stating that it would be hazardous to add gasketed doors (attached). In 2012 and subsequently, the section was changed to read “New wood-burning fireplaces shall have tight-fitting flue dampers and outdoor combustion air”. Obviously, this doesn’t affect performance while you have a fire going, while preventing air leakage during use, so it seems like a better way to go.
You guys also discussed installing solar. I put up my panels in 2003 (with help from an electrician to do some of the connections in the house), and it was one of the simpler projects I’ve done. The hardware is straightforward, the components are easy to handle (including the panels which don’t weigh much), most of the wiring (especially on the roof) is plug connections, all in all it was very straightforward. Getting all the parts you need and ensuring they’re the right ones does require expertise, but the parts for mine all came from a distributor in one truck. I had worked with a local solar installer at the time and they specified all the stuff, but I would guess there are companies who can do this for you. The electrician who helped me said he had seen systems where people didn’t know you need special disconnects for high voltage DC (regular AC electricity doesn’t arc as far, so standard AC disconnects are dangerous with DC), so there are things to be careful about, but as long as you have the right parts, putting them together is not that complicated.
I liked James’s question about roofs. Getting roofs right, especially the complexities with remodeling & additions, has been a huge part of my job over decades. With the amount of water that hits roofs, in all forms (dew, rain, windblown rain, snow, ice…), any flaw can cause an expensive problem. We created two presentations about it for our in-company trainings, and there’s an older version of that on youtube in our “Best Practices Video Series” (Steep Slope Roofing – Troubleshooting in Advance and Low Slope Roofing – Troubleshooting in Advance).
I’m actually doing an updated version at JLC Live this year, it’s called “37 Ways to Build a Roof Wrong—and How to Avoid Them” and is based on the many problems we’ve found over the years, mainly with work we’ve been asked to diagnose & fix, but plenty of our own mistakes as well.
Related Links:
- Dealing With Fireplaces and Energy Efficiency
- Rules for Rooftop Solar
- Evaluating the State of the Roof
Question 1: What do you think of my insulating, framing, and heating plan for building my new home?
Jeff in NH writes: Hi FHB gurus! First of all, the podcast keeps getting better and better. I love the rotation of super qualified and interesting contributors. Keep it up! This spring I am fulfilling a dream that I’m sure many of the listeners have—to build a home from scratch and take 6-9 months off work to do as much as I can myself. I’m obviously hiring out dirt work, utility work, and a crew to work with me to frame the shell and get it dried in. I obviously have a million questions and would love to hear you riff on any or all of my ideas.
I have an ambitiously low budget— so I am keeping it as simple as possible without creating a boring vinyl box. So, I am starting with a boring vinyl box! Simple rectangular two story with 9 pitch truss roof. Black asphalt roof. 2000 square feet (28’x36’) with a walkout basement that will have a “2 under” garage and big mud room. White vinyl siding with black vinyl windows with integral j channel. A farmer’s porch will hopefully dress up the exterior and create a modern farmhouse look that my wife likes.
I’m planning to use zip sheathing and air seal properly. I will hire out dense pack cellulose for the walls, spray foam sill boxes, and loose fill the attic with a 1’ raised heel on the truss and airtight drywall ceiling and access only from the outside. Questions:
1. What do you think? Any issues with the insulation in climate zone 6?
2. The insulation contractor puts poly on the interior side of the BIPs on top of the mesh. Is this normal? Safe? Should I have him leave it off or use a smart vapor barrier?
3. Traditional framing would require LVL beams and 2×12 floor joists to span the 28’ width. Floor trusses cost about $5000 per floor. Would that be smart use of budget? TJIs would be a little cheaper but have more bounce. Traditional framing would probably be $3000 after beams, hardware and footers are factored in.
4. I am planning to use Mr. Cool DIY mini splits. One 5-zone unit and 1 single zone I have left over from a project. Mr. Cool now has forced air system that looks appealing because I could run registers to each room— especially easy if I have floor trusses. I’ve never run ducts before… bad idea? Can I piggyback an ERV on the system?
This is a super long email and I know it’s probably too much to put on air. I’d appreciate you guys tackling whatever might be of interest to other listeners!
Thank you so much for your help over the years. You got me through two whole house renovations— now time for new construction!
Related Links:
Question 2: Is there a place for AI in the trades?
Carson from Oregon writes: Hi FHB crew, My field over the past decade has seen an exponential rise in the number of not only research publications on practical uses of deep neural networks, but on released products already showing a rate of progression that even stuns those of us in that industry. Has artificial intelligence affected the trades at all yet? Here are a few building questions thrown at ChatGPT.
ChatGPT is a prototype artificial intelligence chatbot developed by OpenAI that specializes in dialogue. The chatbot is a large language model fine-tuned with both supervised and reinforcement learning techniques. The base model that was fine-tuned was OpenAI’s GPT-3.5 language model, an improved version of GPT-3.
Obviously, any answers need to be taken with a grain of salt and errors can cost thousands, but even now the replies are impressive, if a bit off. The Chat GPT bot incorrectly states the amount of spray foam thickness for a vaulted ceiling at 4″ (many could get away with 3 or 3.5″ depending on the foam) as well as the reason for the minimal thickness (thermal performance instead of condensate prevention). It also says the minimum header size for a 6′ window is a staggering 6×12 instead of a 4×10. The minisplit question is a good answer, but unfortunately lacking any real numbers.
The answers are nonetheless close, and perhaps even more importantly all repeatedly point out to check with your local building codes and/or HVAC contractors. In a few years this could be revolutionary for your average owner/builder to not have to wade through hours of building codes and forum posts and get in situ answers to detailed technical questions. What about you? Can the experts completely stump the AI overlords?
Examples of ChatGPT questions and answers:
How to fix a leaky lg frontloading washer?
If your LG front-loading washer is leaking, there are a few possible causes and corresponding solutions. Here are some steps you can try to fix a leaky LG front-loading washer:
1. Check the door seal: Over time, the rubber seal around the door of your washer can become worn or damaged, which can cause leaks. To check the door seal, remove any excess debris or build-up and inspect it for any tears or cracks. If the seal is damaged, it will need to be replaced.
2. Check the drain hose: The drain hose is the tube that carries water from the washer to the drain, and it can sometimes become clogged or kinked, which can cause leaks. To check the drain hose, first unplug the washer and then locate the hose. Carefully inspect the hose for any signs of clogs or kinks, and if you find any, use a pliers or plumber’s snake to clear the obstruction.
3. Check the water inlet valve: The water inlet valve is the part of the washer that controls the flow of water into the machine, and it can sometimes become clogged or damaged, which can cause leaks. To check the water inlet valve, first unplug the washer and then locate the valve. Carefully inspect the valve for any debris or blockages, and if you find any, use a pliers or plumber’s snake to clear the obstruction.
If these steps do not fix the leak, it is possible that there is a more serious issue with your washer, and you may need to call a professional appliance repair technician to diagnose and fix the problem. It is also a good idea to consult your owner’s manual for specific instructions on how to troubleshoot and repair your particular model of LG front-loading washer.
What is the minimum spray foam depth required for an unvented vaulted ceiling for climate zone 5b?
It is important to consult your local building codes to determine the minimum spray foam depth required for an unvented vaulted ceiling in your climate zone. In general, however, the minimum spray foam depth for an unvented vaulted ceiling in climate zone 5b is likely to be at least 4 inches.
Spray foam insulation is a type of insulation that is applied as a liquid and then expands to fill the space where it is applied. It is commonly used in unvented vaulted ceilings because it provides a high level of insulation and air sealing, which can help to improve the energy efficiency of the building.
The depth of the spray foam insulation is an important factor in determining its effectiveness. In general, a minimum depth of 4 inches is recommended for unvented vaulted ceilings in climate zone 5b because it provides sufficient insulation to keep the building warm in the winter and cool in the summer. However, the actual minimum depth required may vary depending on the specific characteristics of the building and the local building codes. It is always best to consult a professional contractor or building code official to determine the appropriate depth of spray foam insulation for your particular situation.
Header size requirements for framing a 6-foot-wide window?
The size of the header required for framing a 6-foot-wide window will depend on several factors, such as the weight of the window, the type of framing used, and the building codes in your area. In general, however, a 6-foot-wide window will typically require a header that is at least 6 inches tall and 12 inches deep.
A header is a structural element that is used in framing to support the weight of the window and distribute the load evenly across the wall. It is typically made of dimensional lumber, such as 2×6 or 2×8, and it is installed above the window opening to provide the necessary support.
The size of the header is determined by the width of the window and the type of framing used. For a 6-foot-wide window, a header that is 6 inches tall and 12 inches deep will typically provide adequate support when used with standard stick framing. However, if the window is particularly heavy or if the framing is more complex, a larger header may be required to provide sufficient support.
It is always best to consult your local building codes and a professional contractor to determine the appropriate size of the header for your particular situation.
What is the average runtime cost comparison in climate zone 5 of a minisplit compared to a gas fired furnace?
It is difficult to determine the average runtime cost comparison between a minisplit and a gas-fired furnace in climate zone 5, as it will depend on a number of factors, such as the size and efficiency of the units, the cost of electricity and natural gas in your area, and your individual usage patterns.
A minisplit is a type of heating and cooling system that uses an outdoor unit to compress and circulate refrigerant, and one or more indoor units to distribute the cooled or heated air throughout the building. It is generally more energy-efficient than a traditional central heating and cooling system, and it is well-suited to climate zone 5, which experiences cold winters and hot summers.
A gas-fired furnace is a type of heating system that uses natural gas as a fuel source to generate heat. It is typically less expensive to install than a minisplit system, but it may be less energy-efficient, particularly in climates with mild winters, such as climate zone 5.
In general, a minisplit system is likely to have a higher average runtime cost than a gas-fired furnace in climate zone 5, due to the higher cost of electricity compared to natural gas. However, the actual cost difference will depend on factors such as the size and efficiency of the units, the cost of electricity and natural gas in your area, and your individual usage patterns. It is always best to consult a professional HVAC contractor to determine the most cost-effective heating and cooling solution for your particular situation.
Related Link:
Question 3: Blending trades learning with general education courses?
James writes: Hi Mike, I’m a carpentry/construction trades instructor at a technical high school. We incorporate a lot of your videos and articles from Fine Homebuilding and JLC in our program and they’re indispensable – Thank you! Like many career tech schools, students spend part of the day in the trades program and most of the day in their general education classes. We’ve been discussing ways to blend the general education high school coursework into the trades programs. One idea I’m championing is grounding some traditional general education topics within the trades program. Teachers on both sides of the school (trades side and general side) think we can do it and we’re looking for models that overcome some of the hurdles we are bumping up against. I’m hoping you have some insights.
One of our worries is how standardized testing metrics will be impacted. When we harbor some of the instruction in the construction trades realm some teachers are afraid students’ test performance will suffer. I believe students will perform better on tests because we construction instructors teach via meaningful applications where students solve construction problems daily (think mathematics and building science physics). The other main concern is how to grant students credit for general education coursework that are delivered within the trades program. Here’s an example: my teaching credentials don’t permit me to teach math even though we cover geometry and trigonometry throughout our carpentry program. We’re hoping that by team-teaching with the general instruction teachers students will be able to receive credit. But we’re getting push-back from school administration who are concerned about accreditation and state education officials.
Do you know of any construction career programs that have tried blending or centering general education courses within the construction classwork?
I appreciate any ideas or referrals.
Related Links:
END NOTES:
Podcast 525: Members-only Aftershow: New Year, New Projects — Mike, Andrew, and Patrick talk about the value of self-reflection and expectations for the new year as well as Andrew’s home projects.
Check out one of our Project Guides: Siding & Exterior Trim!
Check out our FHB Houses:
Visit the Taunton Store • Magazine Index • Online Archive • Our First Issues • All Access
Help us make better episodes and enter for a chance to win an FHB Podcast T-shirt: www.finehomebuilding.com/podcastsurvey

If you have any questions you would like us to dig into for a future show, shoot an email our way: fhbpodcast@taunton.com.
If we use your question we’ll send you a FHB Podcast sticker!
FHB Podcast T-shirts!
Represent your favorite podcast! Available in several styles and colors. Made from 100% cotton. Find the Podcast t-shirt and more cool products in the Fine Homebuilding Store.
| Fine Homebuilding podcast listeners can now get 20% off anything in the Taunton store, including Pretty Good House.
Use the discount code FHBPODCAST to take advantage of this special offer. |
 |
“Finally, knowledgeable people talking about building reasonably-sized, high-performance houses for normal people with real budgets!” — DanD, VA, 8/19/22, Amazon.com review |
We hope you will take advantage of a great offer for our podcast listeners: A special 20% off the discounted rate to subscribe to the Fine Homebuilding print magazine. That link goes to finehomebuilding.com/podoffer.
The show is driven by our listeners, so please subscribe and rate us on iTunes or Google Play, and if you have any questions you would like us to dig into for a future show, shoot an email our way: fhbpodcast@taunton.com. Also, be sure to follow Fine Homebuilding on Instagram, and “like” us on Facebook. Note that you can watch the show above, or on YouTube at the Fine Homebuilding YouTube Channel.
The Fine Homebuilding Podcast embodies Fine Homebuilding magazine’s commitment to the preservation of craftsmanship and the advancement of home performance in residential construction. The show is an informal but vigorous conversation about the techniques and principles that allow listeners to master their design and building challenges.
Other related links
-
- All FHB podcast show notes: FineHomebuilding.com/podcast.
- #KeepCraftAlive T-shirts and hats support scholarships for building trades students. So order some gear at KeepCraftAlive.org.
- The direct link to the online store is here.
