Synopsis: Roofer Andrew Grace discusses working with copper, from the specifics of the material and its aging and handling processes to the step-by-step installation of a field-locked standing-seam copper roof over a bay window.
Snap-lock standing-seam metal panels like those we commonly use on homes and outbuildings have, as the name implies, snap-together standing seams that are put together without tools up on the roof. Because snap-lock panels are premade and can’t be field-seamed, they require sealants for detailing. Sealants have improved over the years, but even the best will fail decades before a metal roof reaches its minimum 100-year lifespan.
To eliminate sealant-reliant details and give our clients a longer-lasting, more resilient roof, we started to incorporate traditional field-lock flashing details into our snap-lock standing-seam roofs a few years ago. Field-lock seams don’t snap together—the panels are fastened to the roof with clips and are rolled or folded together to create a waterproof joint that joins panels together. The transitions are also less bulky and better-looking than those that aren’t field-seamed.
Dependable and long lasting
Copper as a roofing material has a long history; early examples include the Lowa Maha Paya Temple in Sri Lanka in the 3rd Century BC and the Pantheon built by the ancient Romans. Further examples span centuries and the entire globe. Aged copper’s distinctive verdigris finish makes it recognizable even to those without an interest in architecture. My crew and I find copper work satisfying because the skills, tools, and training it takes to be proficient puts us in a small group of specialized contractors who do this work.
Flat copper for roofing and flashing used to be a standard item at my local lumberyards and roofing suppliers, but more recently it’s been harder to find as global demand has made it increasingly scarce. In addition, roofers have largely turned to cheaper materials like coated steel and coated and plain aluminum for mainstream roofing and flashing work. Compared to aluminum and steel, copper is far more malleable, and can be formed into curves and other complex shapes without cracking or tearing as it’s manipulated.
Copper is sold in sheets, small rolls, and large rolls. Both soft and half-hard copper are available at specialty suppliers; half-hard is the better material for valleys, flashing details, and hip and ridge caps. Soft copper is a better choice for small curved flashing and other areas that require an easy-to-form material. The 2-ft. wide, 1000-lb. rolls I buy annually are delivered on a tractor trailer, and I unload the roll from the truck with my skid steer. Copper prices follow the commodities market and at the time of writing is selling for about $5 per lb.
The distinctive green finish you see on copper often takes years or decades to develop. Before it gets there, copper goes from a shiny penny stage to blotchy light and dark browns, to fully brown, before a gradual switch to its final dusty green. I make sure clients know that the aging process takes a long time and the transition can be blotchy and unpredictable. We wear gloves to prevent obvious hand prints from showing up in the finished work. The marks left by finger- and handprints won’t harm the material, but they can be obvious and unsightly until the copper takes on its dark brown color that obscures them.
Field-lock seams come in two flavors: single-lock and double-lock. As you might guess, single-lock panels are rolled together once; double-lock twice. A double-lock roof can be watertight at very low slopes (1:12) without any sealants. The magic of the field lock is the pocket fold. A pocket fold allows you to form one panel to meet two planes without the pinhole created by lapping panels.
Although field-lock panels can be roll-formed for larger projects by metal roofing producers, the short panels needed for this small elevation can be made on-site with a sheet-metal brake. Since we use copper for our flashing on all our roofs and most of our siding projects, I buy a master coil of 16-oz. copper every year. (Copper sheet is sold by weight; 16-oz. copper weighs 16 oz. per sq. ft.)
As you might imagine, field-seaming is labor-intensive work, which is why most clients will save a project like this for an elevation that needs something special (and also why we use a mix of snap-lock and field-seamed details on larger projects). This fully field-seamed three-sided bay-window roof took two skilled roofers almost four days to finish. Almost all of the tools you see in this feature, excepting the few I found at yard sales, can be found at John Stortz & Son, which is pretty much the only game in town for some of the more specialized tools. We’ve spent about $3000 to $4000 in metal roofing tools that make it easier to do the work and that make the finished product look better.
Working on a project like this this allows us to show off our skills and give our clients a beautiful detail for their home. And it’s even more rewarding to think that in the following centuries, builders and roofers may still be admiring our work on this long-lasting little roof.
Cut and form the center panels
First we make a custom copper drip edge. It’s a standard profile but with a 1-in. projection that fits into the hem on the copper panels above. We nail the drip edge to the sheathing with copper roofing nails.
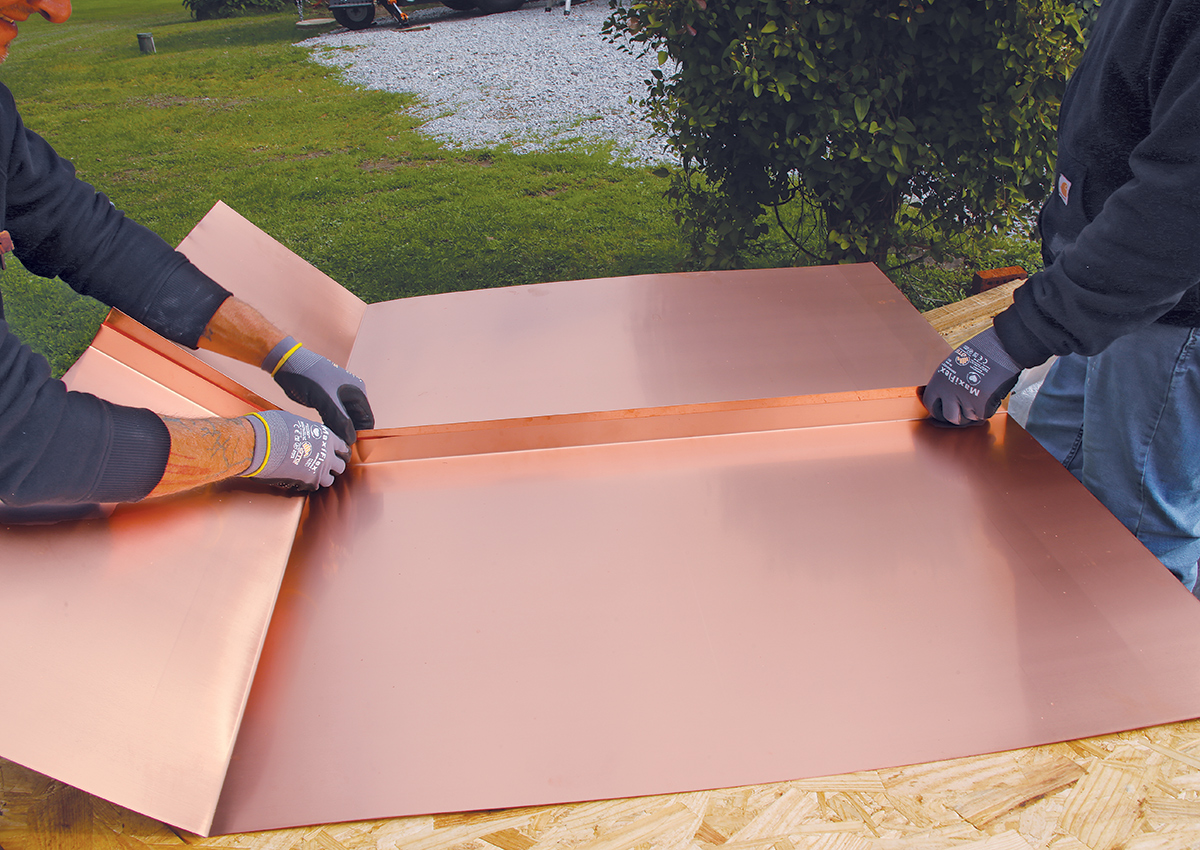
Cut and bend the center rib. The coil is cut to the length of the roof plane plus 10 in. to allow for the bottom hem and the roof-to-wall flashing. We form two panels with a bend at the top where they meet the wall and a rib on one edge—a 1-3/4-in. rib on one panel, which will be bent over the 1-3/8-in. rib on the other.
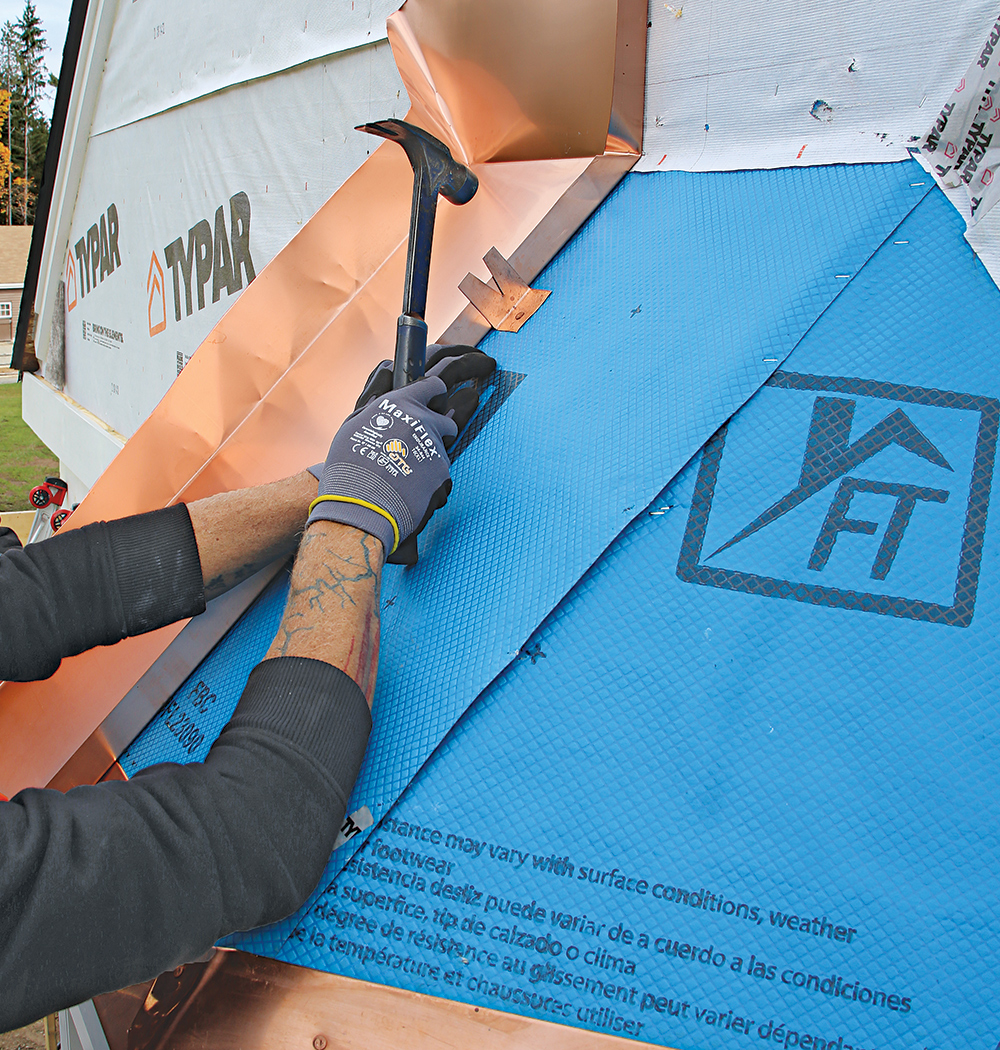
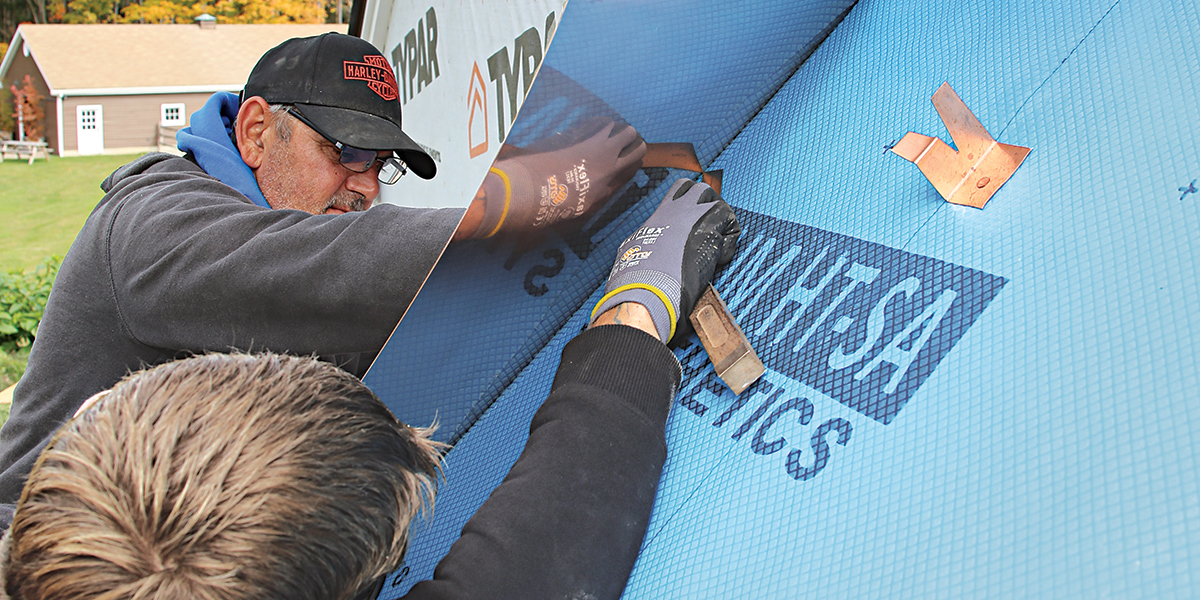
Make hold-down clips. Small clips cut from scraps of copper hold the panels in position on the roof as they are cut and formed. The clips are spaced about every 2 ft. and fastened to the roof with copper nails. Later they will be folded into the seams to help hold down the roof.
Mark the hem. With the first panel’s right edge aligned to the centerline of the roof facet, we scribe the roof edge on the bottom of the panels and then add 1 in. for the hem on the bottom of the panel that will later lock onto the drip edge.
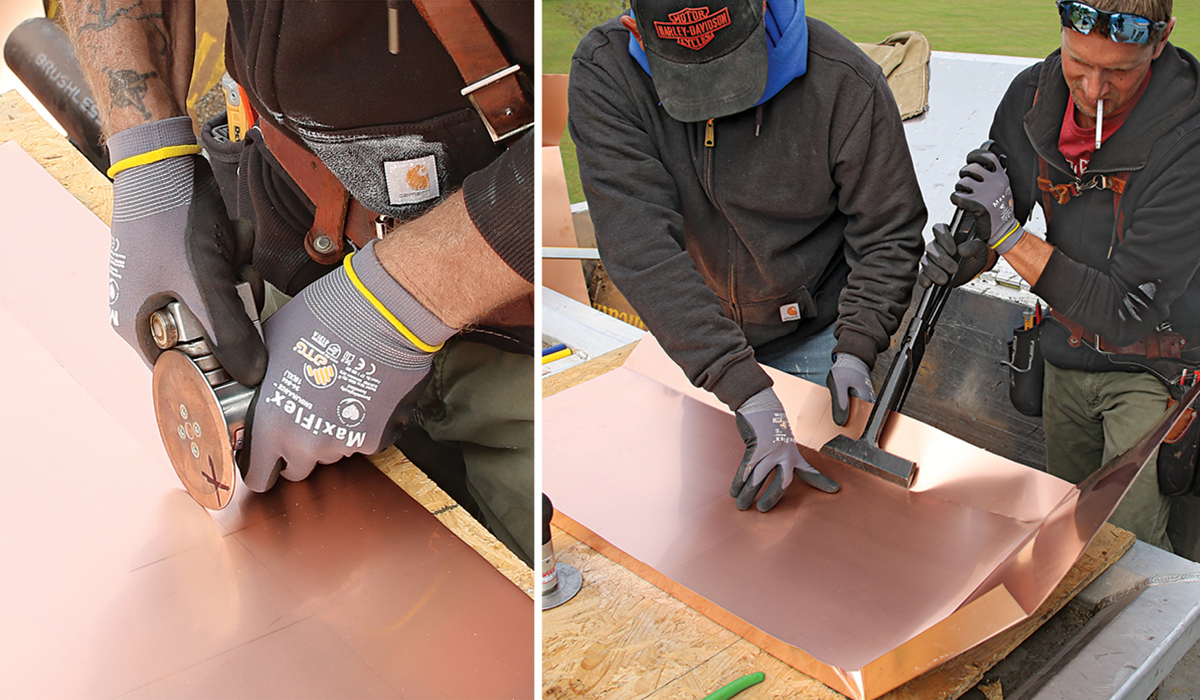
Form the hip ribs. The panel edges that meet the side panels are formed to follow the hip. We use a skinny roller made for the task to start the hip bends. After a few passes we switch to folding tongs.
Cut and form the side panels
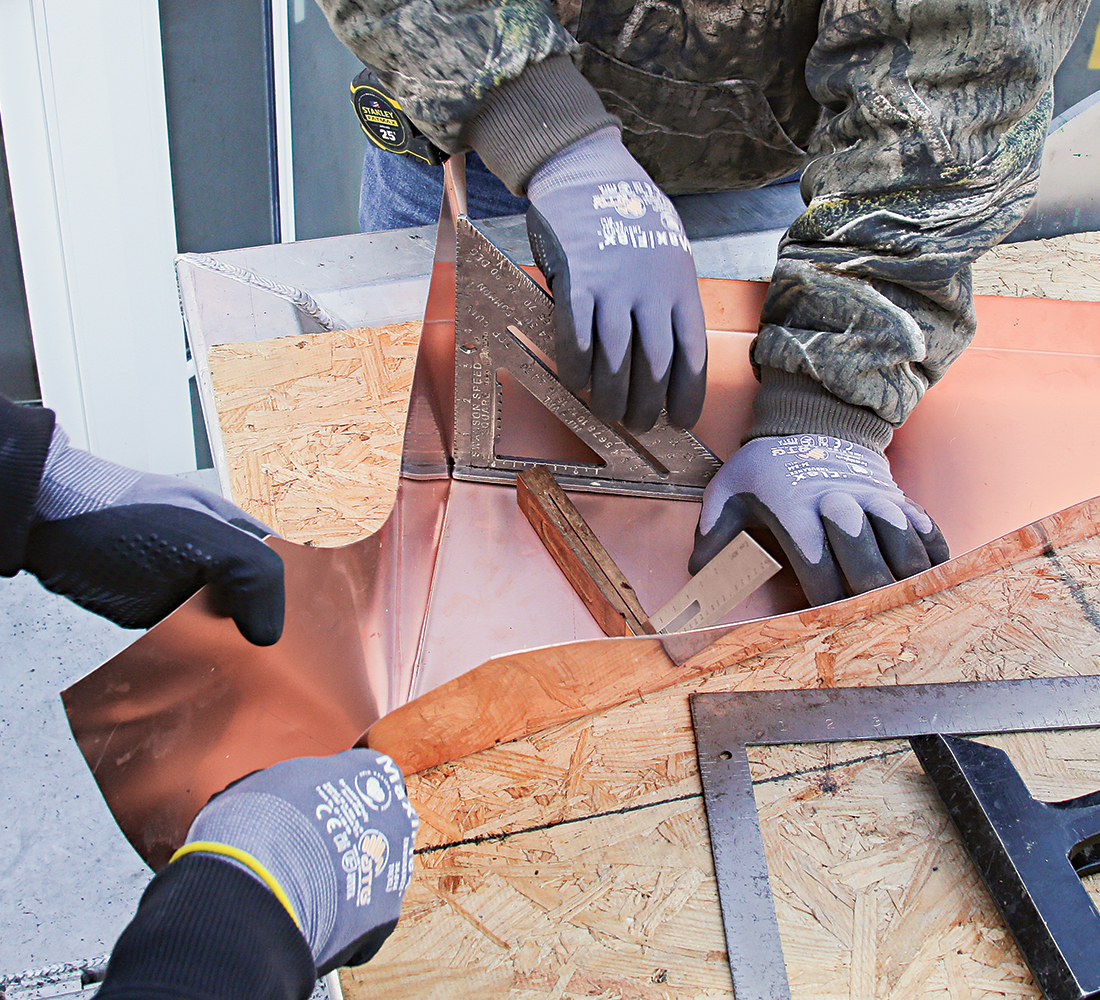
Find the center. The center seam where the pairs of side panels meet should be located in the center of the side roof facet for the best finished look. We mark the center on the drip edge and continue the line up the roof using a framing square. The panels edges are aligned to the mark.
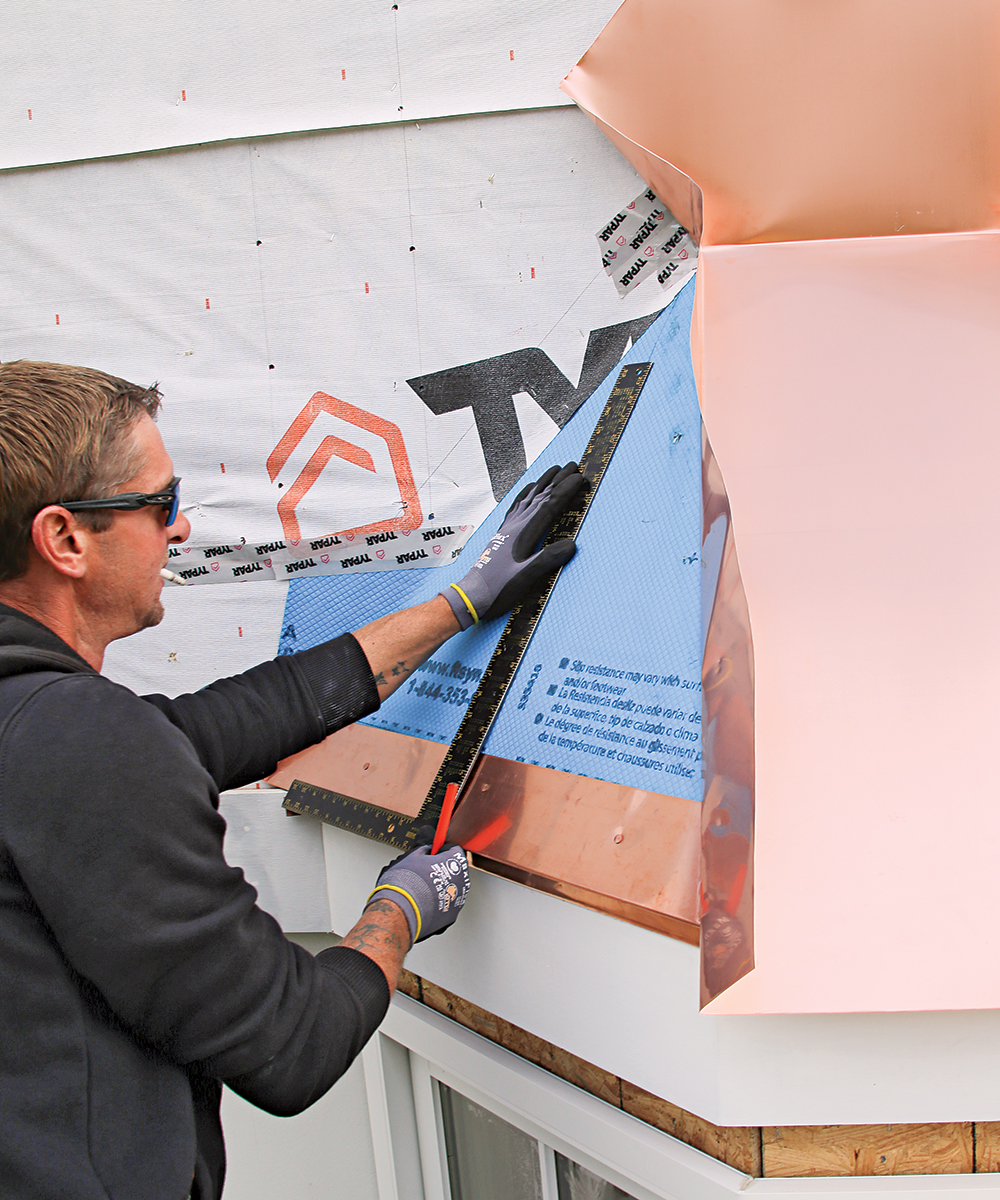
Mark and bend the hip. With the side panel held on the roof, we scribe the location of the hip onto the back side of the panel.
Wall panels are last. The panels that abut the wall have an extended rib that’s flashed onto the wall. To determine the size of the panel and where it will be formed, we measure along the rib on the adjacent panel and along the drip edge to the wall and then connect the dots.
Form the ribs. We use a bevel gauge to measure the angle where the edge of the roof meets the wall and use it to transfer the angle to the extended rib. A rafter square helps maintain correct angles at the standing seam and kickout flashing at the bottom of the roof.
Join the center seams
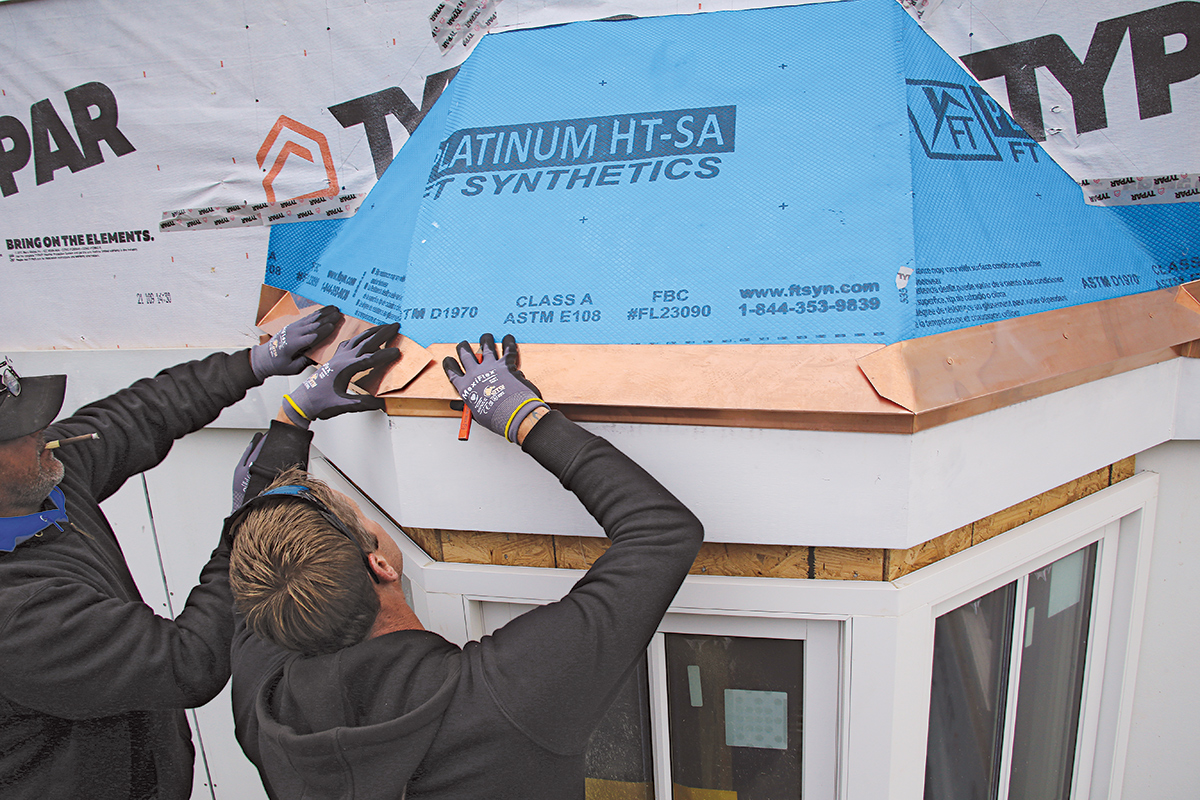
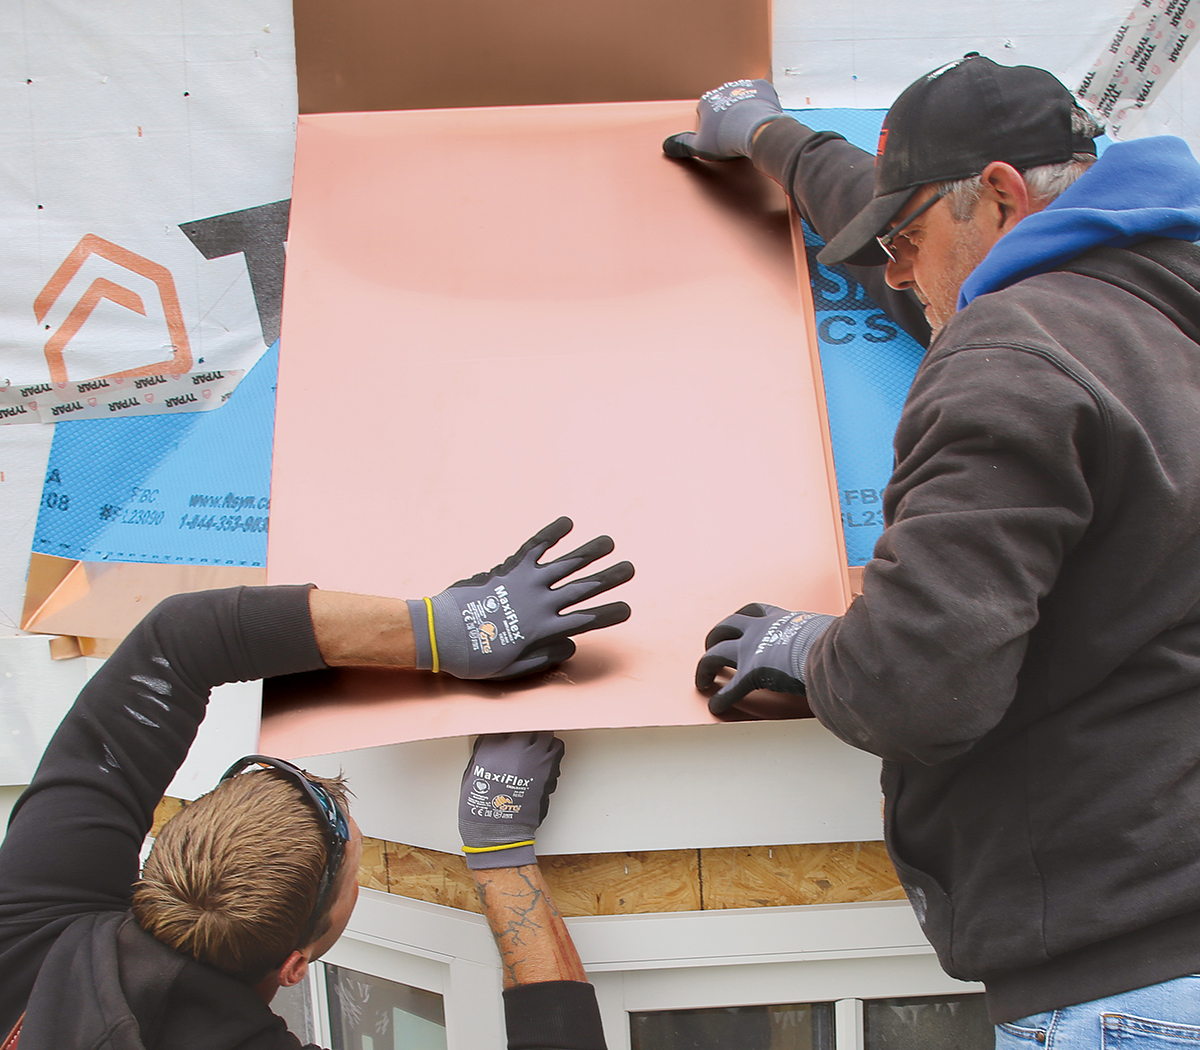
For a multiday project like this one, we take the expensive and labor-intensive panels off the roof at the end of the day so they don’t blow away. We hold off on lapping the panels under the water-resistive barrier (WRB) until we’re done, because the panels will be on and off the roof several times before the roof is completed.
Cut the curve. One of signature details we learned from Joe Jenkins in a one-day course on traditional copper roof details is how to make a sloping curve at the ends of the ribs. We make a template that suits the height of the seams and scale of the roof and use it for marking the ends of the seams for cutting.
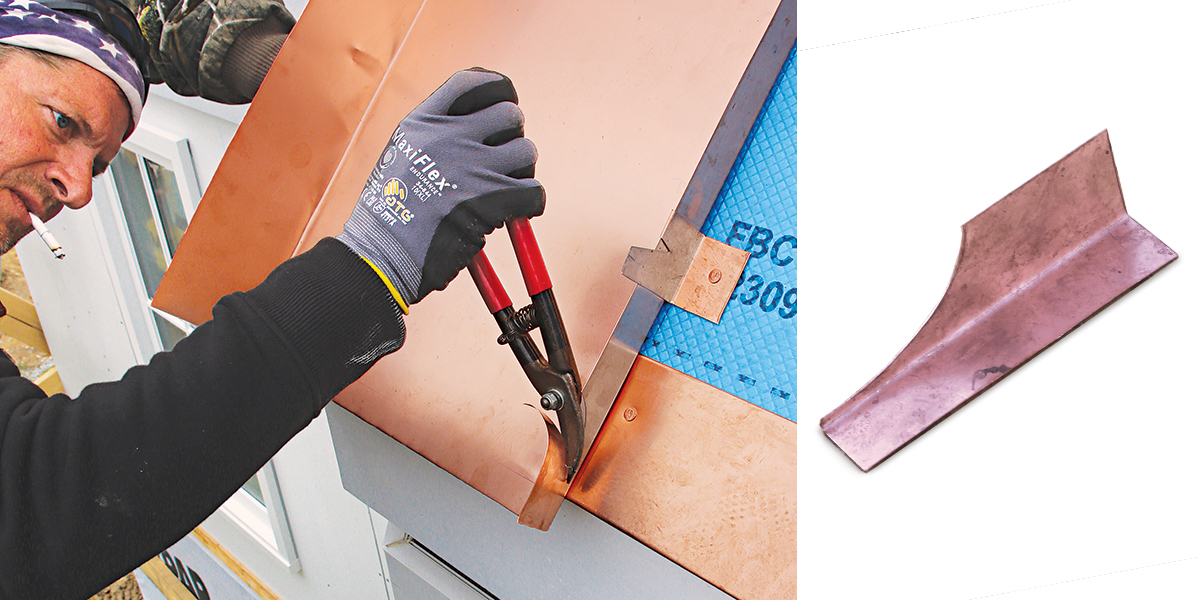
Snip the hem. Once all the panels are formed, we can start installing them permanently on the roof. We transfer the roof-edge scribe line to the top side of the panel using a framing square held against the rib. Then we snip the ends to separate the hem from the ribs.
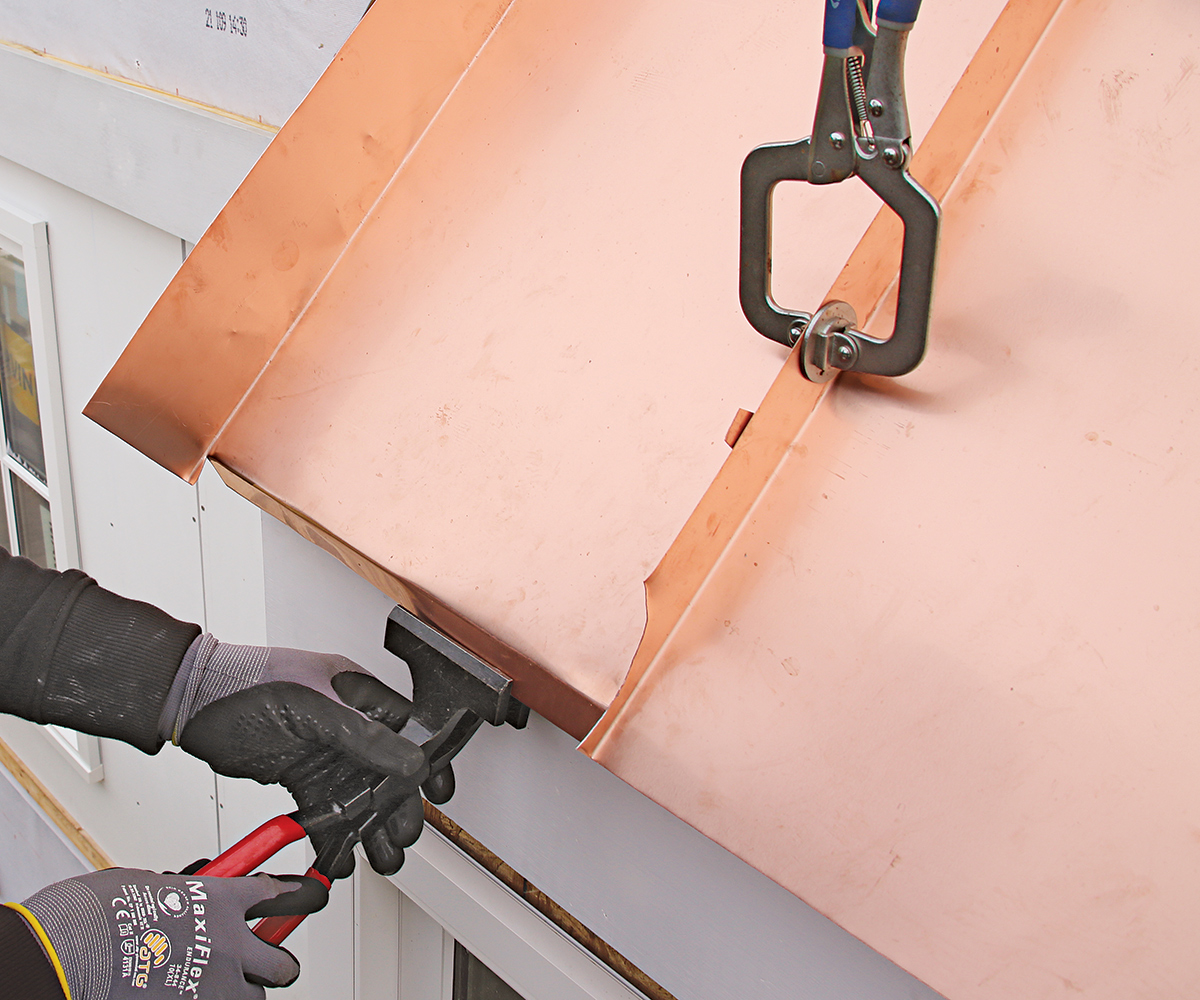
Bend the hem. We create the hem by holding the panel tight to the roof and, through a series of about six smaller downward bends, we fold the hem over so it tightly grips the drip edge, working from one side to the other. Locking pliers for pocket-hole joinery are great for holding panels during hemming, forming, and seaming.
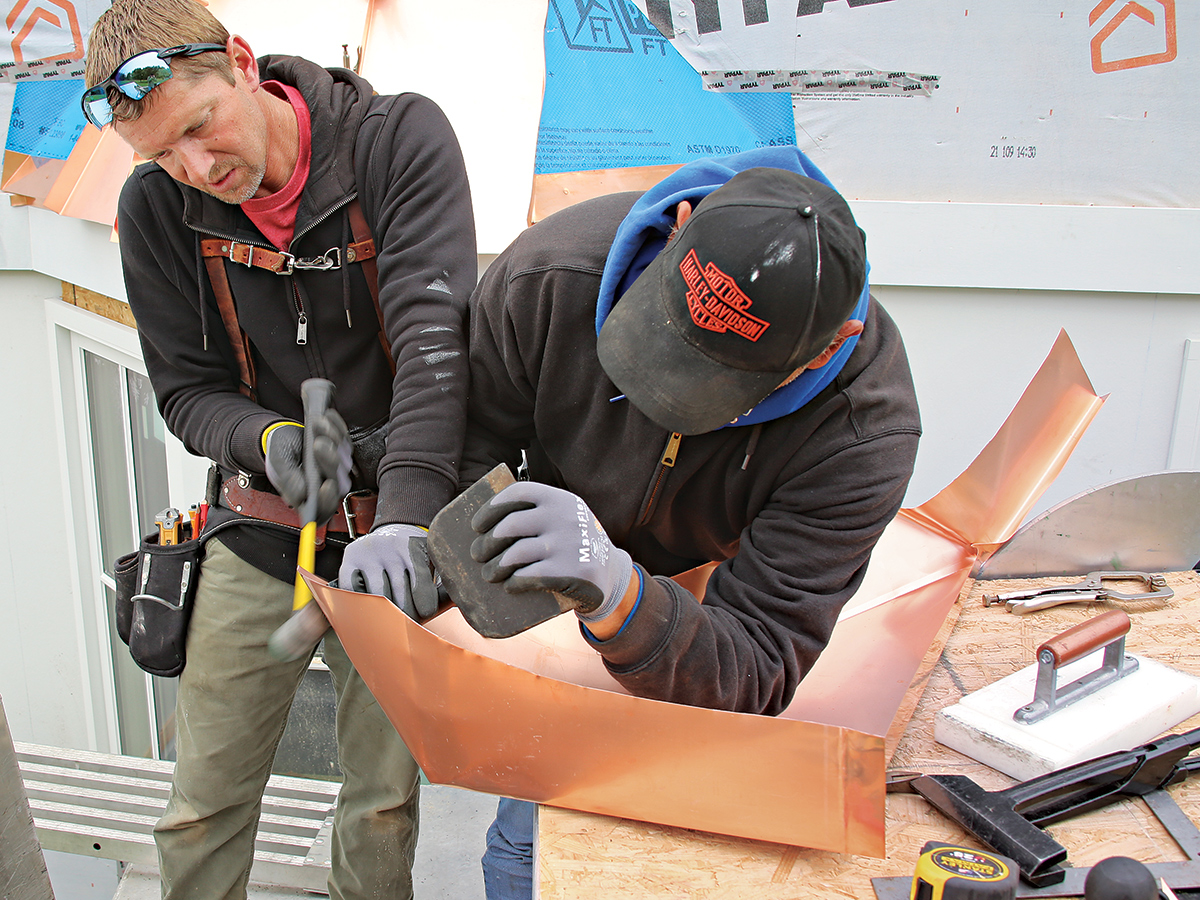
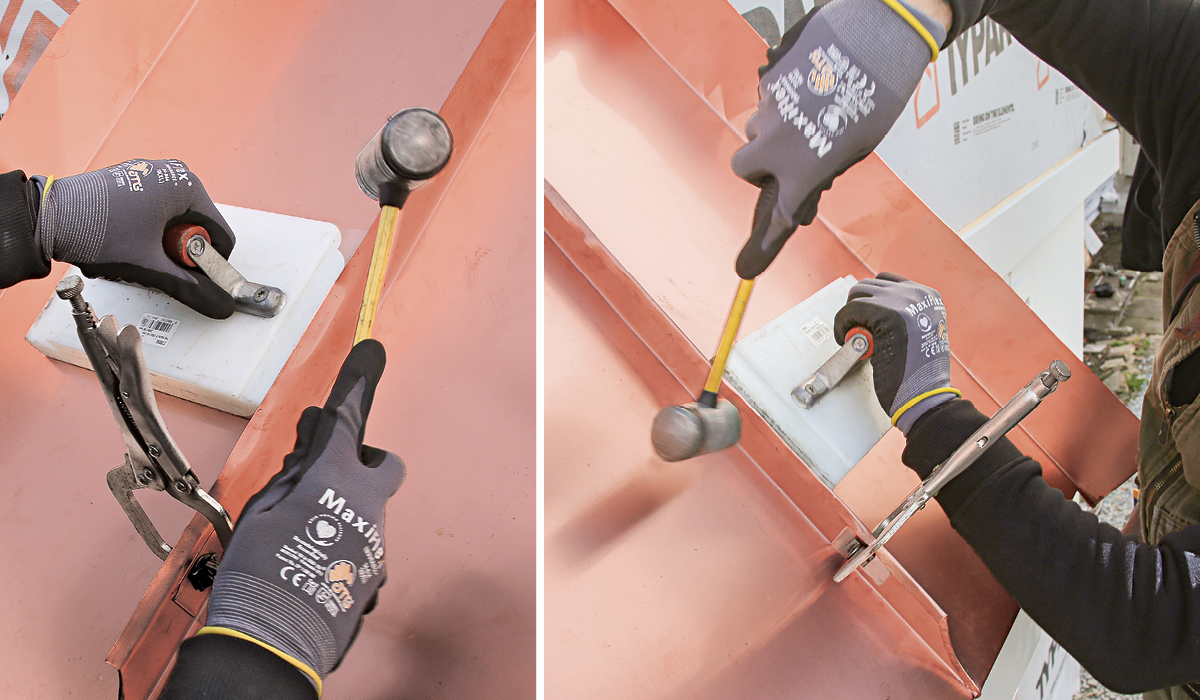
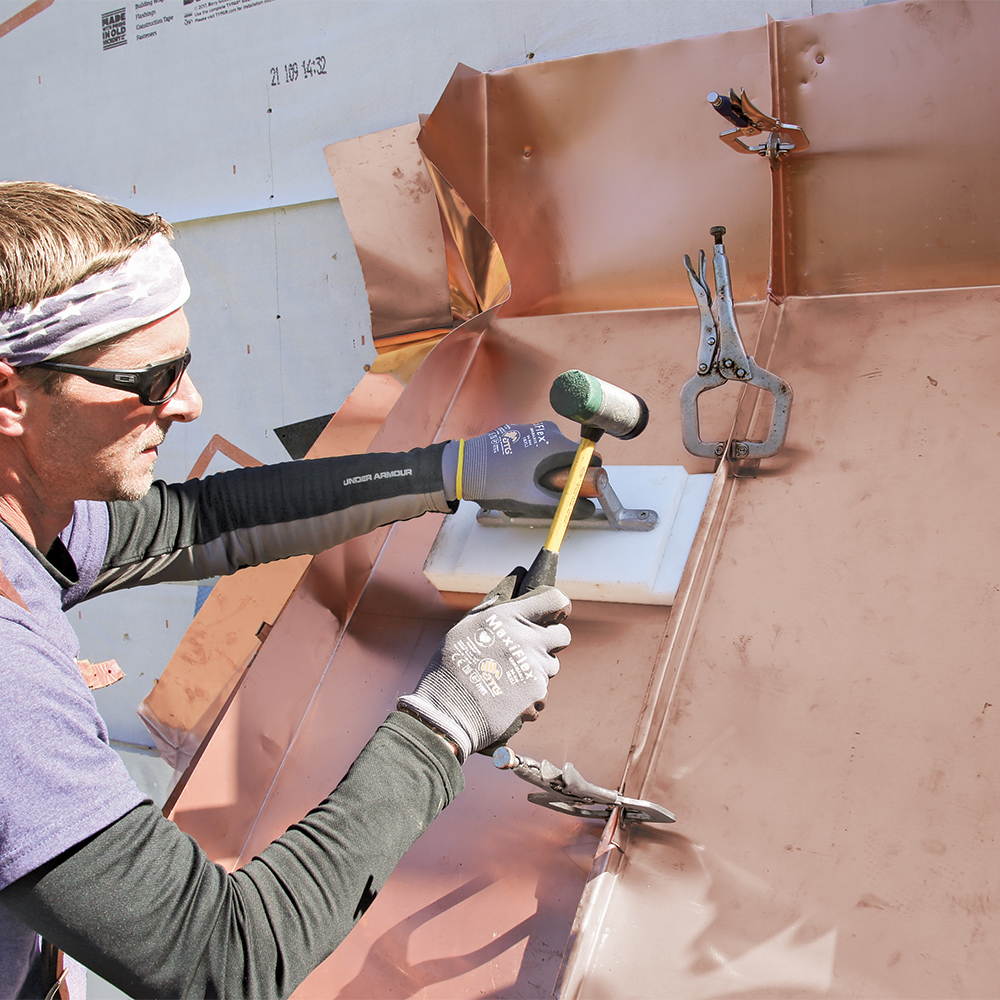
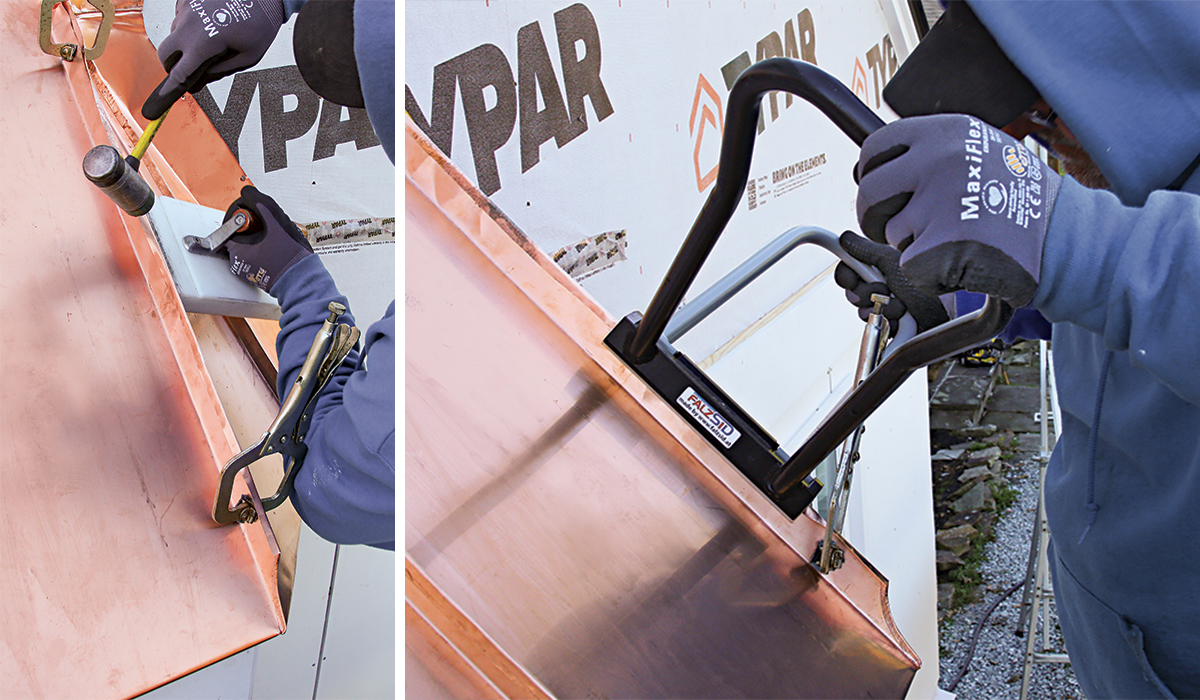
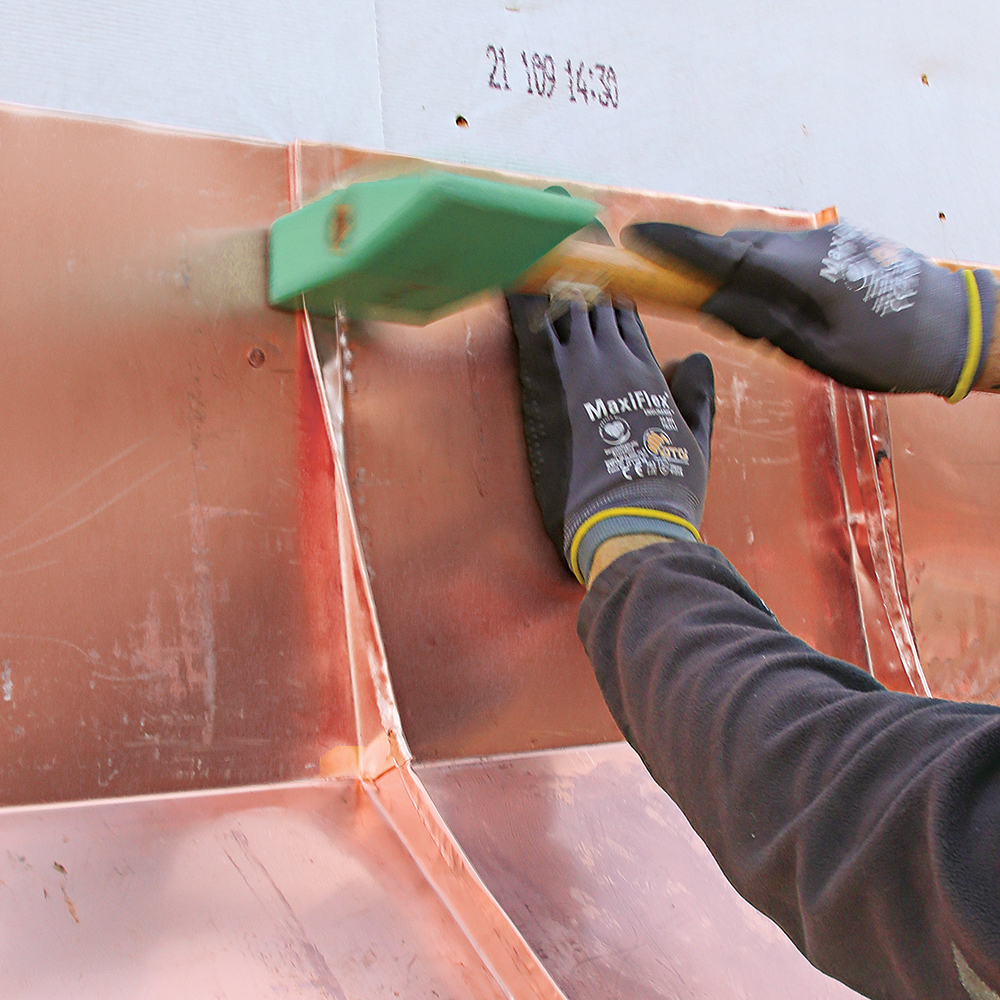
Start the first lock. We start the double-lock seams with the pair of center panels. For the first lock, we bend the tall rib over the short rib and squeeze the seam, then pound it flat (the second lock repeats the fold-and-pound process). For this work, this PVC seamer from Stubai (stortz.com) is non-negotiable. It’s notched at the proper height for all the seaming stages—it has a 1-3/8-in. notch used to create the first lock (shown right) and a 1-in. notch for the double-lock—and it keeps the panel ribs standing straight. This non-marring hammer from Nupla with its fiberglass handle is another favorite tool for forming and seaming.
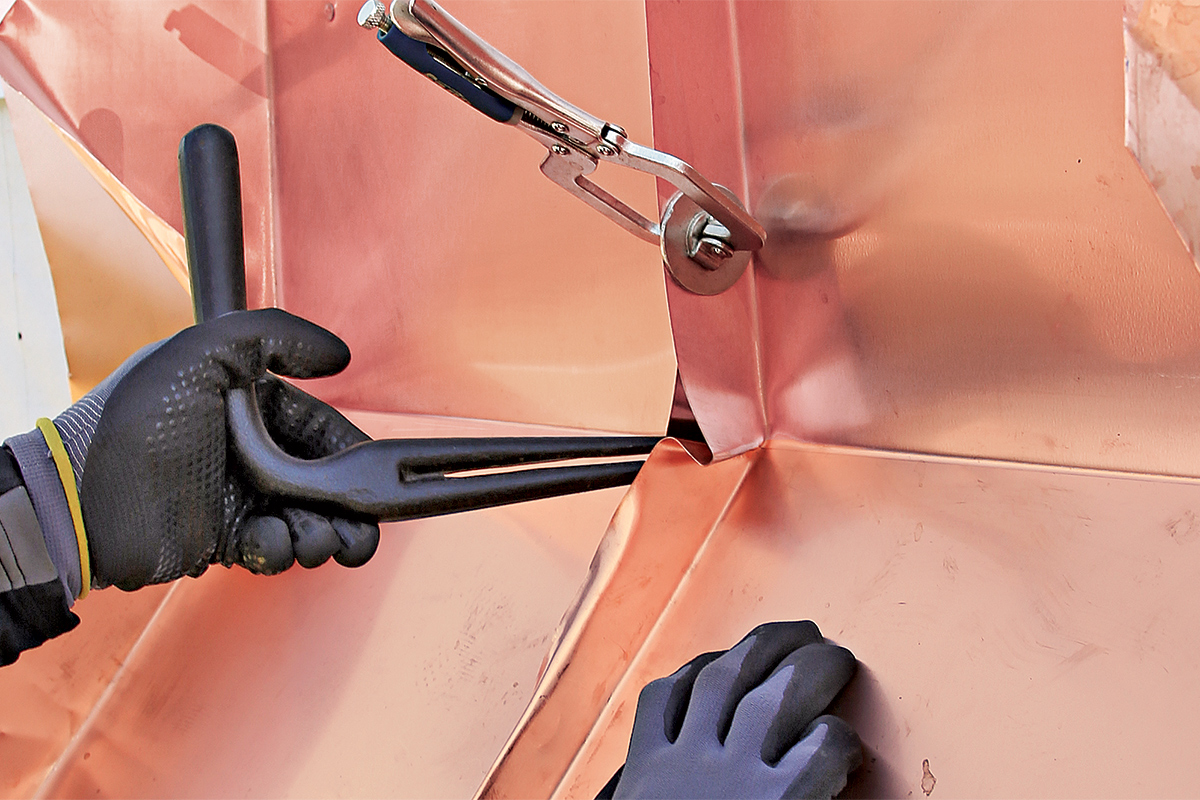
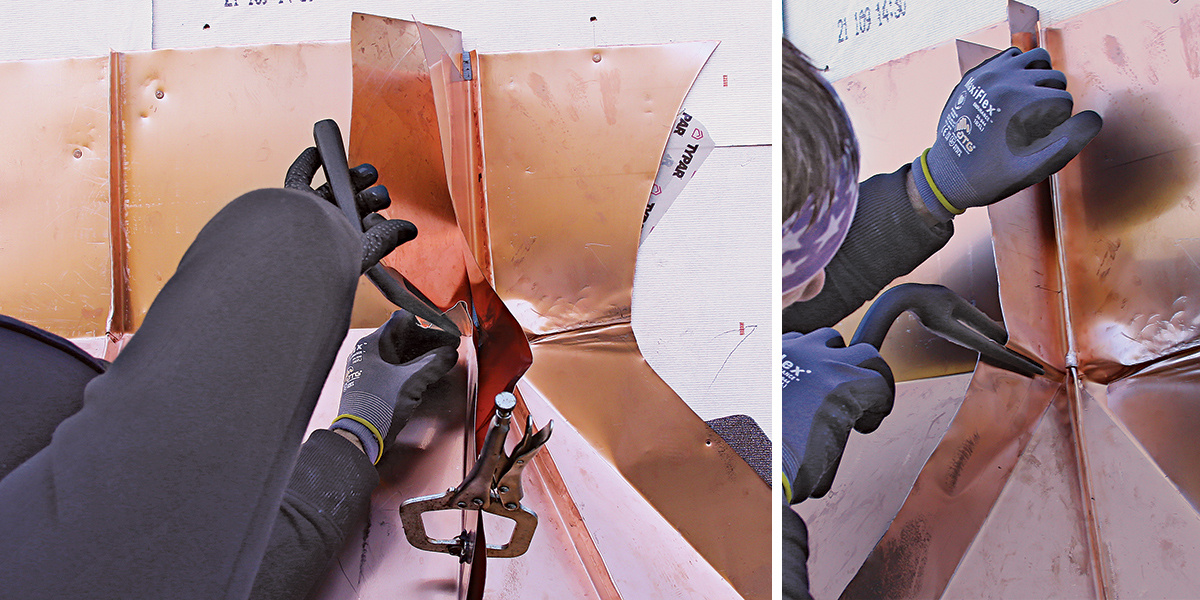
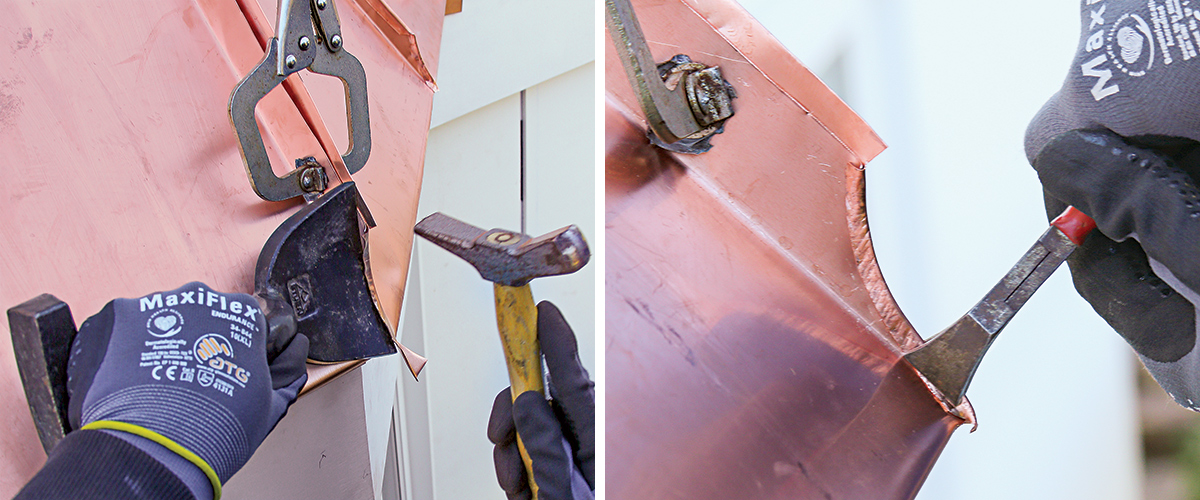
Pocket folds change planes. Where the roof panels meet the wall and where the kickout flashing projects we make pocket folds with a forked tool.
Pound it flat: After the pocket folds are tightened and trimmed, we pound the thick folds flat with a hammer and a steel dollie before following up with the PVC seamer.
Make it a double. Once the taller rib is fully folded over the shorter one and pounded flat along its entire length, the seam is folded a second time for the double-lock. Using the seaming tool’s 1-in. notch, we pound over the seam, first 90° from vertical and then 180°, fully flattening the ribs for a second time and creating the double lock.
Join the hip seams
Fold the Hip pockets. The pocket folds at the hip seams are left long until they are fully tightened; the extra copper provides grip for the fork and the additional surface area prevents tearing the copper. Once the folds are tightened with the forked tool, they’re ready for trimming.
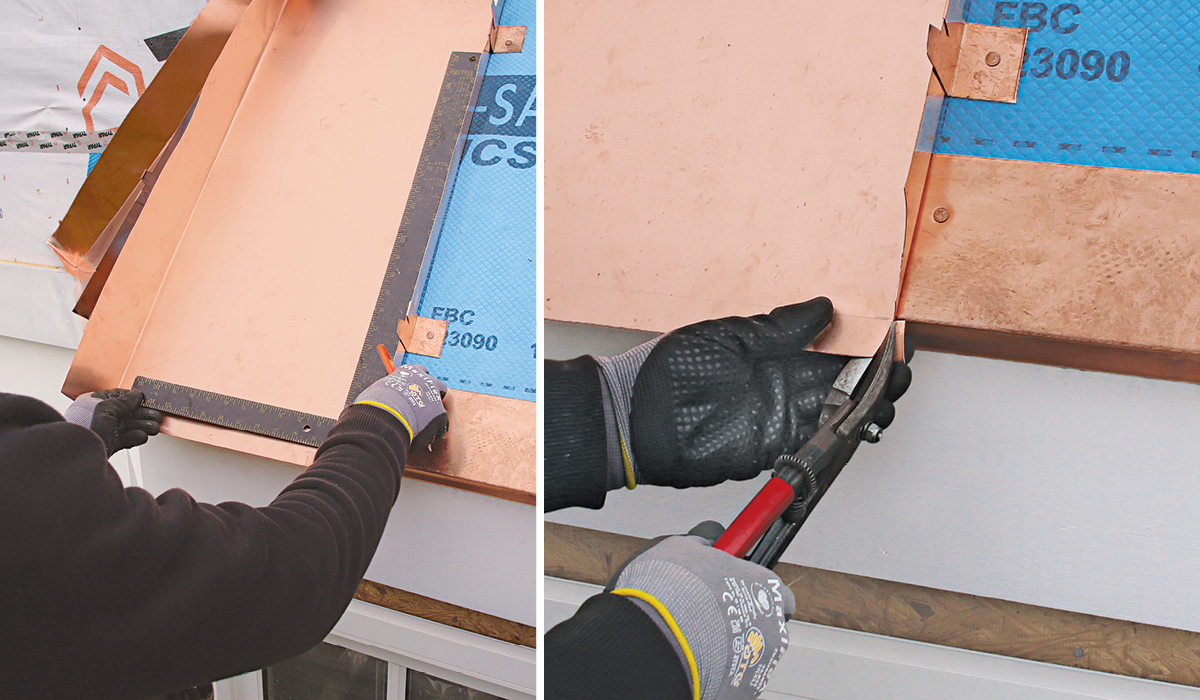
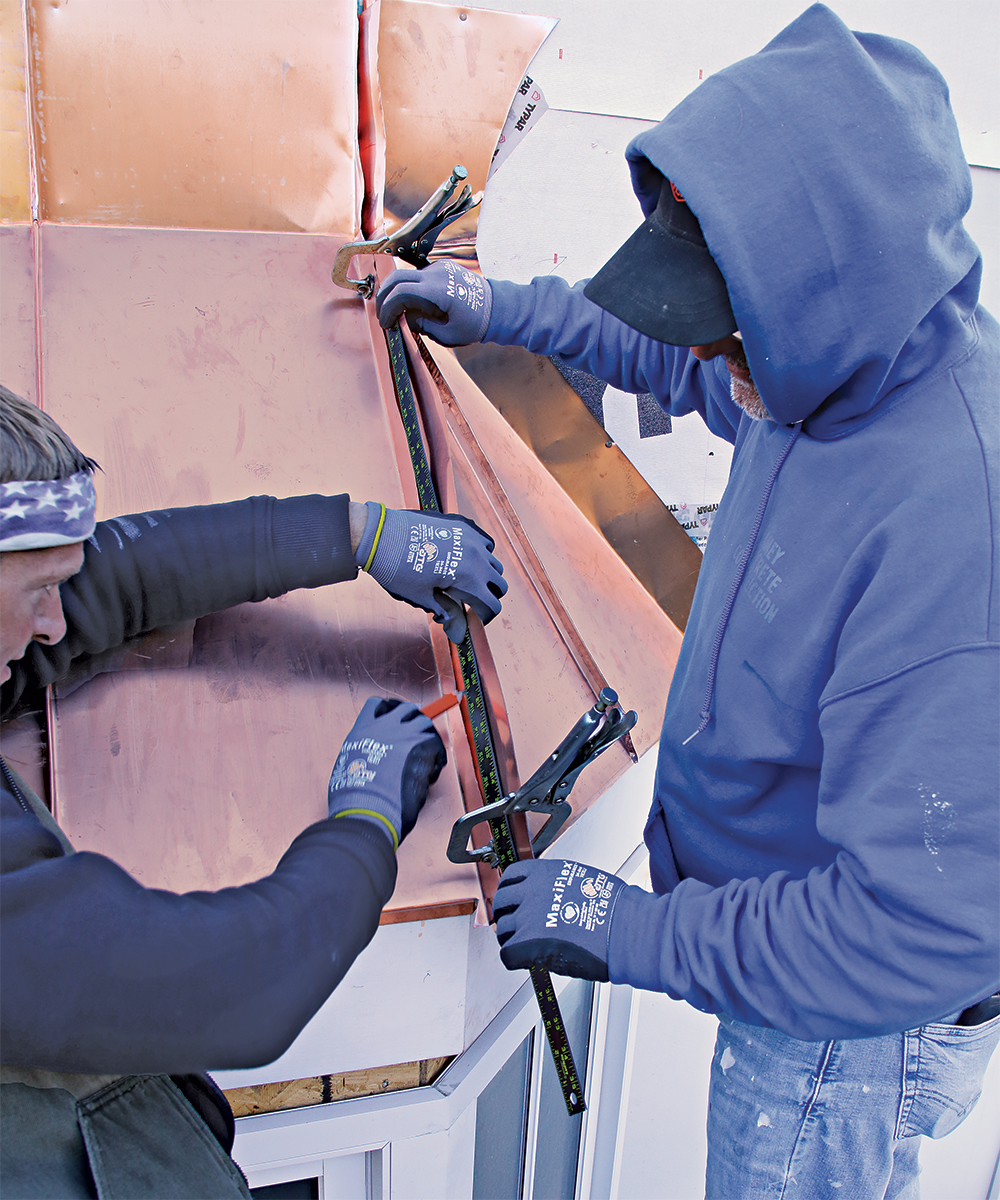
Mark the tops. We mark a 1-3/8-in. rib on one side of the hip seam with the panels clamped together and held tight to the roof. Then we trim the rib, moving the clamps as needed.
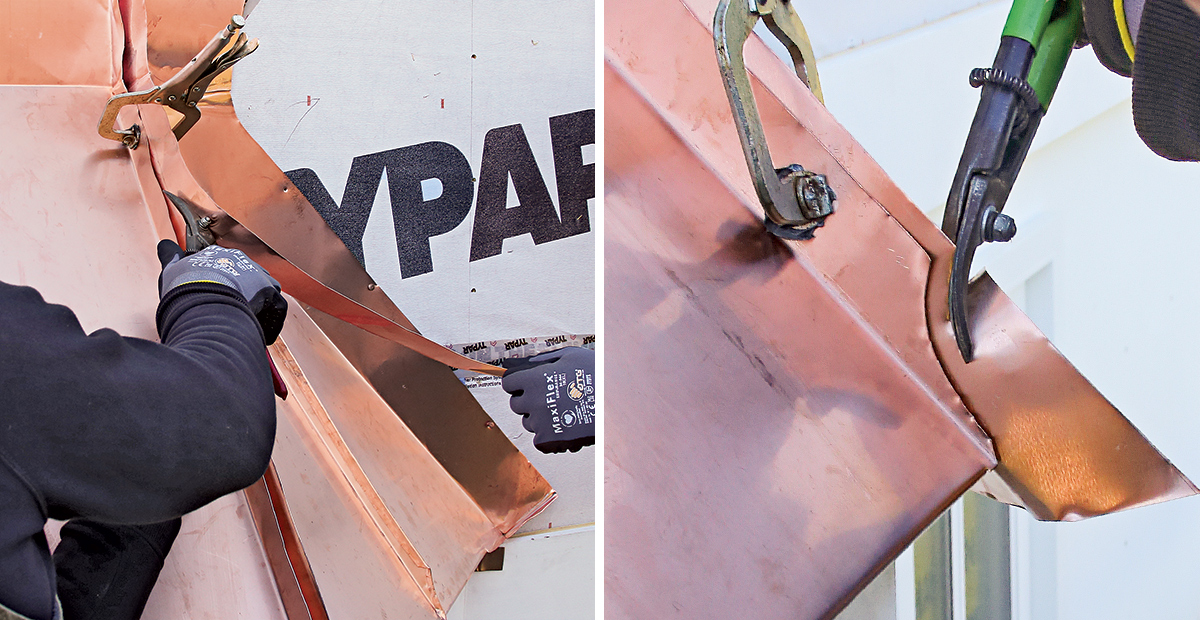
Trim with snips. (Left) After the lower rib is marked and trimmed, we clamp the panels back together and mark the 1-3/4-in. rib on the adjacent panel, then unclamp and trim the rib. (Right) Good snips are a must for cutting the curves at the end of the ribs and through the thick buildup of copper at the pocket folds.
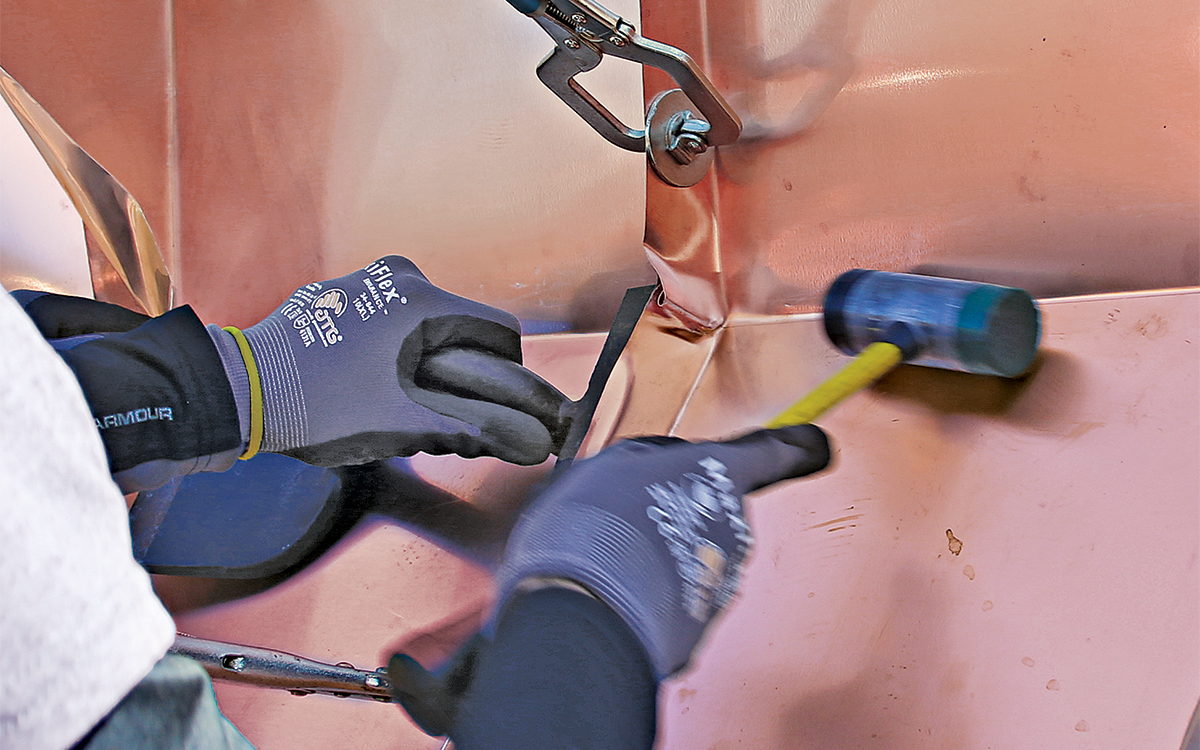
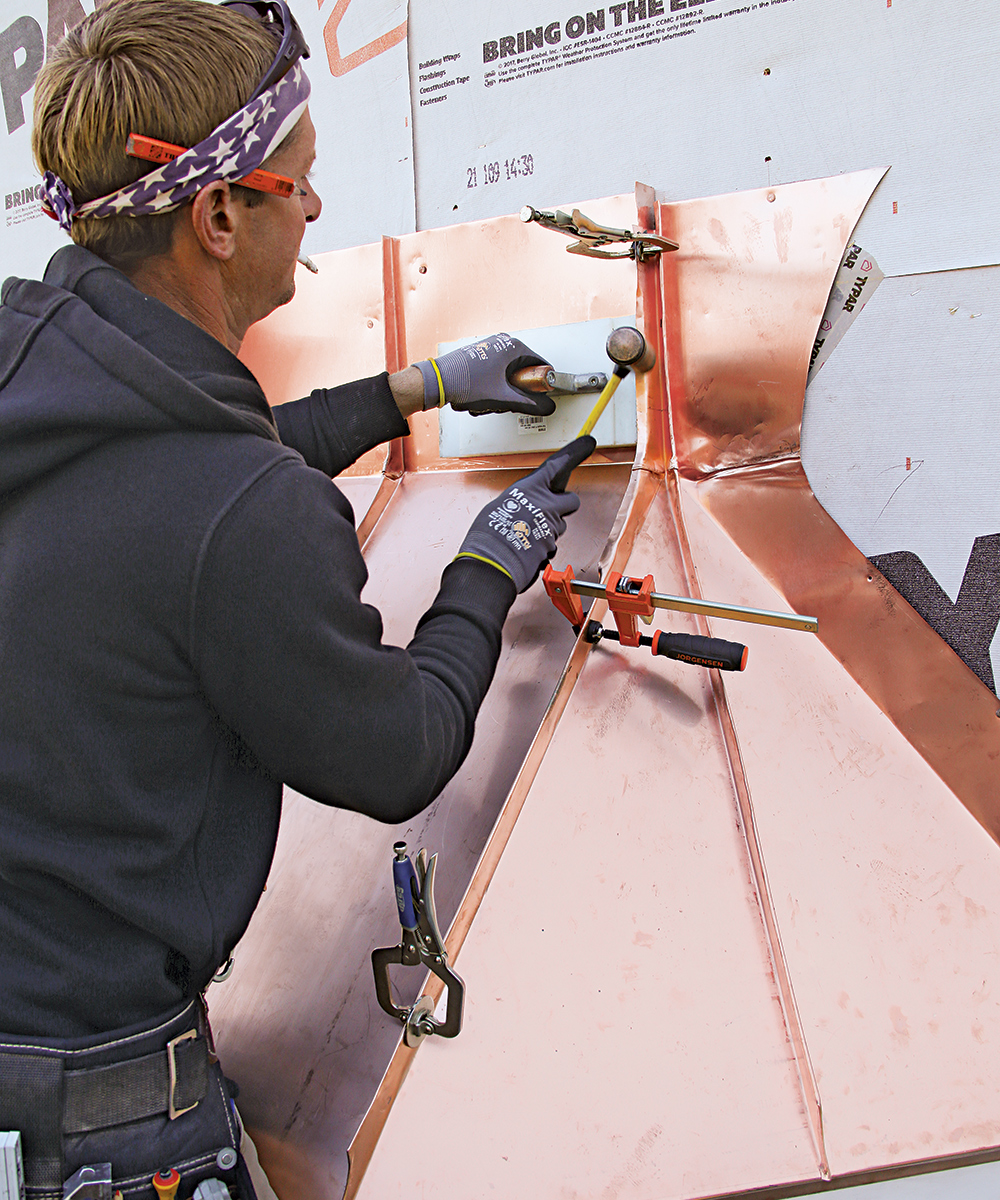
Tighten the curves. At the bottom of the roof, a curved steel dollie (left) provides enough mass to keep the seam upright while the longer rib is folded over the shorter one. We pinch the seam fully closed using special pliers (right).
First, lock the hip. With the seam overlapped and folded, we pinch it fully closed using a seaming tool. This step helps straighten the seam, making it easier to accomplish the first lock.
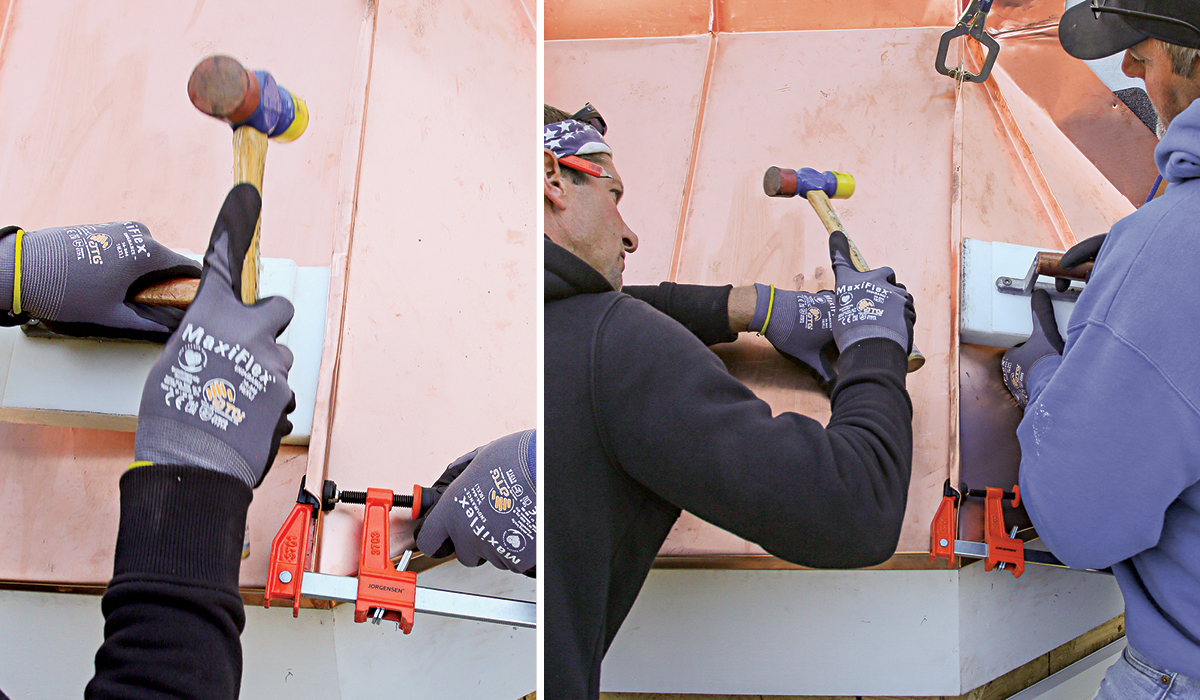
Work your way up. We work upward with the seaming block to create the first lock. At the pocket folds we flatten the seam above and below before flattening the pocket fold.
Double-lock the hip. Once again, we use the plastic seaming block’s 1-in. side to accomplish the double-lock. We first beat the seam 90° against the 1-in. notch (left), and then flatten it using the block as a dolly (right).
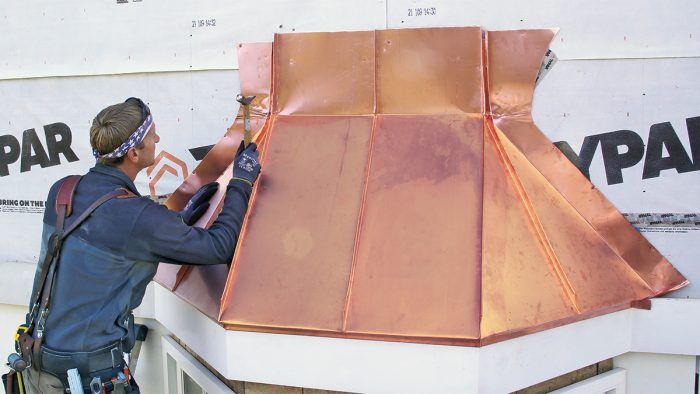
Flatten for siding. The last step is to flatten the seam where the copper panels meet the wall so the siding can be installed on top. When we’re staged for siding, we’ll cut the WRB and integrate the roof’s vertical leg. We put a housewrap seam in the center of the roof to make it easier when the time comes.
Andrew Grace is a builder and roofer in Ligonier, Pa. Photos by Patrick McCombe.
Fine Homebuilding receives a commission for items purchased through links on this site, including Amazon Associates and other affiliate advertising programs.
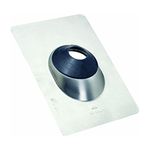
Peel & Stick Underlayment
Often required by code, this durable, slip resistant, self-sealing, and self-adhered roofing underlayment is easy to install and ensures maximum protection along roof eaves, rakes, and valleys.
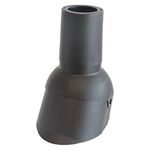
Prolonged exposure to the sun and weather can compromise the rubber gasket on standard vent flashing. Use this to quickly and permanently fix failed seals or to help protect the gasket in new-construction applications.
This is a dialog window which overlays the main content of the page. The modal window is a 'site map' of the most critical areas of the site. Pressing the Escape (ESC) button will close the modal and bring you back to where you were on the page.
We use cookies, pixels, script and other tracking technologies to analyze and improve our service, to improve and personalize content, and for advertising to you.
We also share information about your use of our site with third-party social media, advertising and analytics partners.
You can view our Privacy Policy
here and our Terms of Use here.