Podcast 563: Caulking Old Siding, Tearing Into Leaky Walls, and HVAC in Unconditioned Attics
Universal batteries, gas light fixtures, caulking wood siding, opening up walls, and plaster repairs.
Follow the Fine Homebuilding Podcast on your favorite app. Subscribe now and don’t miss an episode:
 |
Help us make better episodes and enter for a chance to win an FHB Podcast T-shirt:
www.finehomebuilding.com/podcastsurvey
Preston uses tool-battery adapters. Doug says to get a second opinion on problem chimneys. Brian shares history about lighting. Evan asks about caulking gaps in wood siding. Andrew worries about opening up his leaky wall. Samantha wants to know what to do about her unconditioned attic and how to patch holes in plaster.
Editor Updates:
- Samantha’s introduction
- Mike’s barn, hike
- Jeff’s spring cleaning
- Patrick’s concrete floor waxing
Listener Feedback 1:
Preston writes: Hi FHB podcast,
Love listening to you ramble about building science and your projects at home. Speaking as a project manager for a GC, you are a bright light for the industry and homeowners. I wanted to follow up about episode 551.
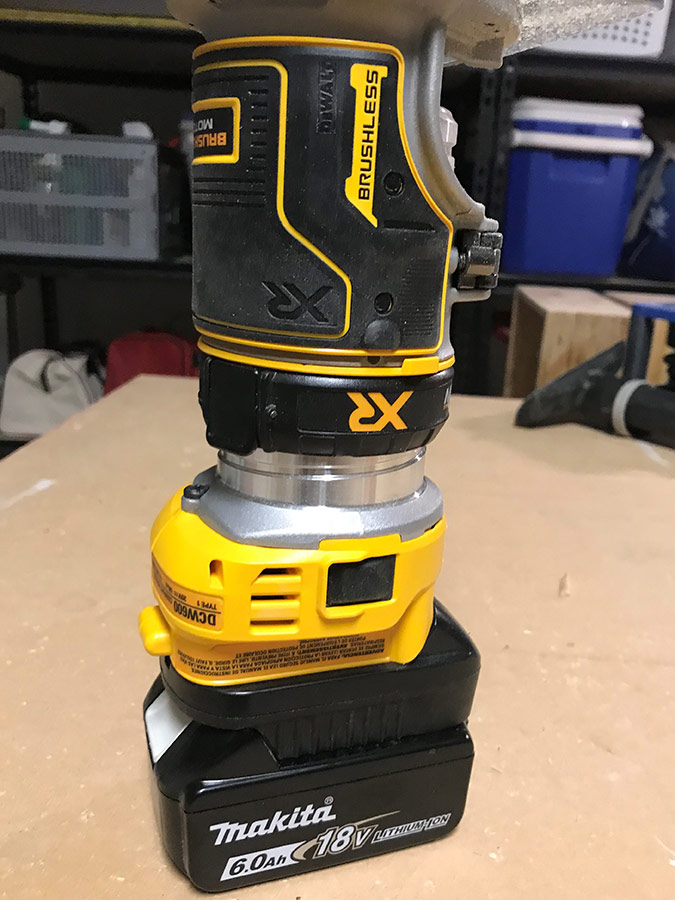
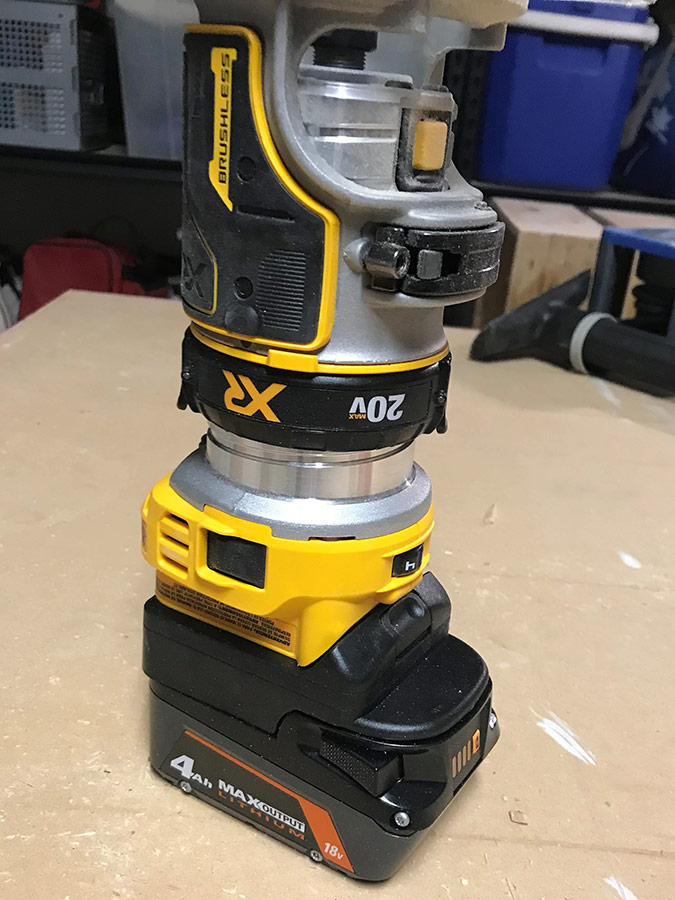
1) A) Universal Battery – There are battery adapters on the market that allow you to use one brand of battery on another brand’s tool for $20. See attached pictures and Amazon link. I’m sure this voids warranties but most of my tools are inexpensive or used. Example: I use my Ridgid or Makita batteries on my newly purchased Dewalt router and/or Dewalt impact I found on the side of the road and replaced the hog ring on so the bits stay in (that’s a $3 part people throw drills away for. I have Ridgid batteries but I preferred the options and adjustability of the Dewalt router. I can easily pop on any fully charged battery and stay more productive using the same platform, rather than having to invest in additional batteries from a different brand.
 |
 |
 |
 |
 |
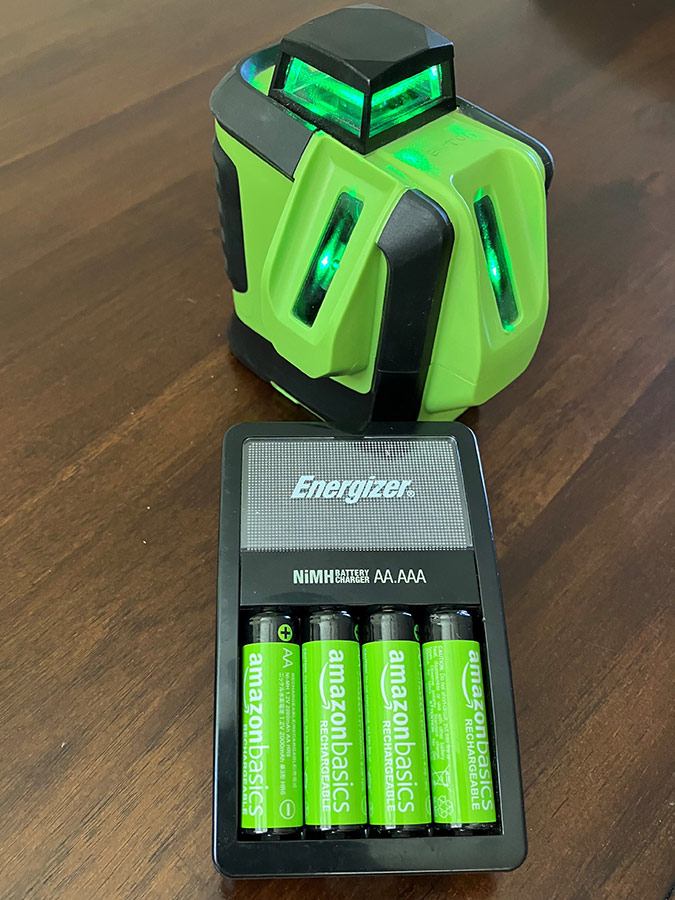
- B) Rechargeable – Also, I have been trying to steer away from disposable AA or AAA batteries over the last 3 years. I use Rechargeable batteries in everything at home: TV remotes, flameless candles, Automatic faucet battery pack and at work: my computer mouse and even job site Laser. It’s easy to keep them charged and rotated.
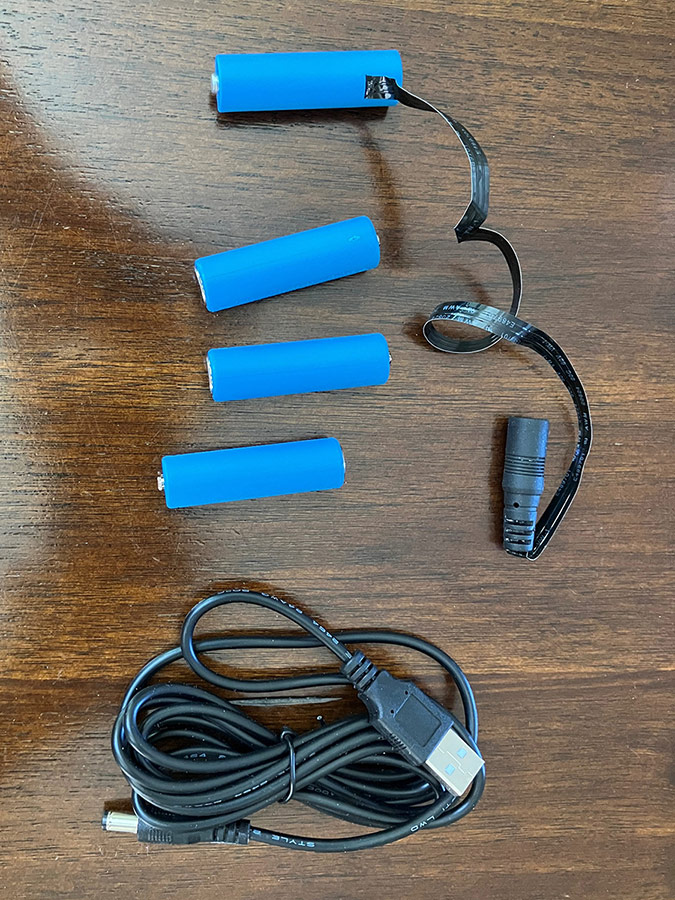
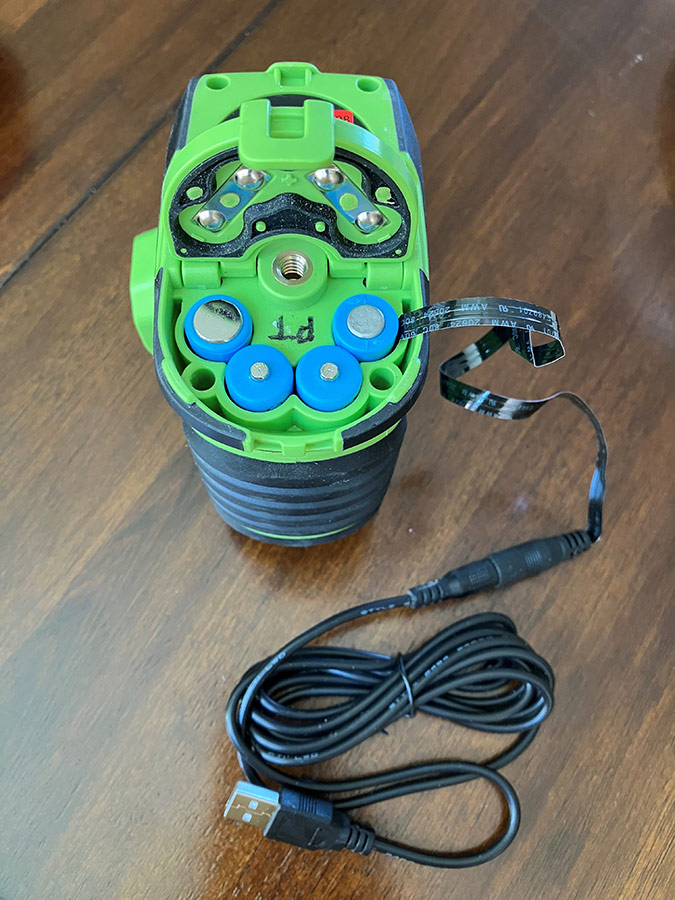
- C) Battery Power Supply – I recently found an adapter that allows you to use a USB cord with a transformer dongle to power a device and bypass the batteries all together. Being on a job site and not having AA batteries for your laser is the worst reason to run to the store. Now you can plug into the house power or plug the USB into a power tool battery inverter and keep things moving. You can even get some with a transformer to adjust the voltage 2-12V Amazon link.
2) The guy building carriage doors was worried about sagging. I’m sure he is a DIY guy but there is a manufacturer we used for some large Carriage doors. Singcore doors utilize Foam with steel mesh to keep them ridgid. They are sandwiched with marine grade plywood to paint or stain. Even though they are foam, they are pretty heavy.
Thanks for letting me ramble.
Listener Feedback 2:
Doug Horgan in response to a discussion we had about chimneys in podcast episode 549 writes: In the last maybe decade or so we’ve seen a lot of chimney contractors change their general evaluations of chimneys.
It used to be very unusual to see a repair recommendation—other than for crowns which are often in need of some work.
But lately we find many chimneys are condemned due to joints in flue liners, liner damage, or even written reports that the fireplace is too big for the flue liner.
I have been curious about it and did some amateur research including joining a FB group for chimney companies. I think it’s fair to say that there has been a change in thinking about these types of issues. In the past they were seen as common, minor, and not normally worth addressing. But there are a lot of posts where people say things like “why wouldn’t you note it and offer a repair” or “if you don’t write it up you’re liable” and the like. Between insurance requirements, updated thinking on risk, and the fact that chimney people make much more money on large repairs than minor cleanings, all the arrows point toward calling out any visible issues.
As Ian’s story from his childhood home shows, chimneys are pretty risky when there’s anything wrong at all, so I have to admit there’s a certain amount of sense to the approach of not letting anything go when inspecting a chimney. However, we’ve also seen reports & recommendations which cross over into unethical in my opinion, where a contractor is saying a flue needs ten thousand dollars of repairs but second qualified contractor will say it’s fine, or only needs minor repairs.
When I help interpret inspection reports (especially at the sale of houses), we’ve had to push back on some of these contractor recommendations, often another chimney person will have a very different opinion. I’ve learned to recommend a second opinion if a company with nice trucks says the whole thing needs redoing.
Related Links:
Listener Feedback 3:
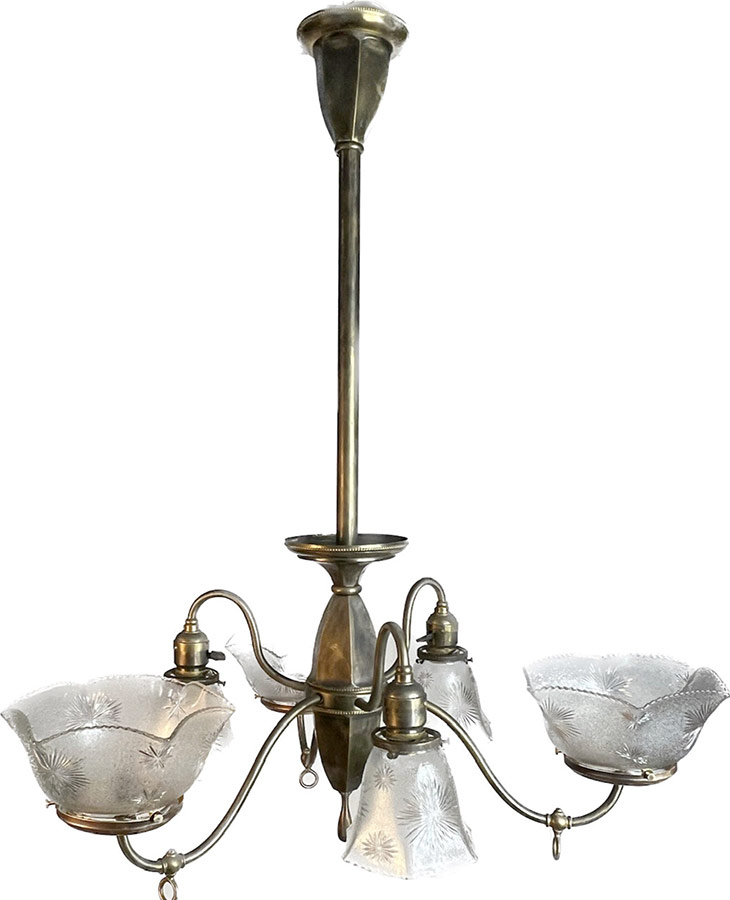
Brian in San Francisco, writes: Hi Podcast crew. In episode 557 you mentioned discovering ceiling boxes with hookups for both gas and electrical. You wondered what sequence of historical events could lead to that being done.
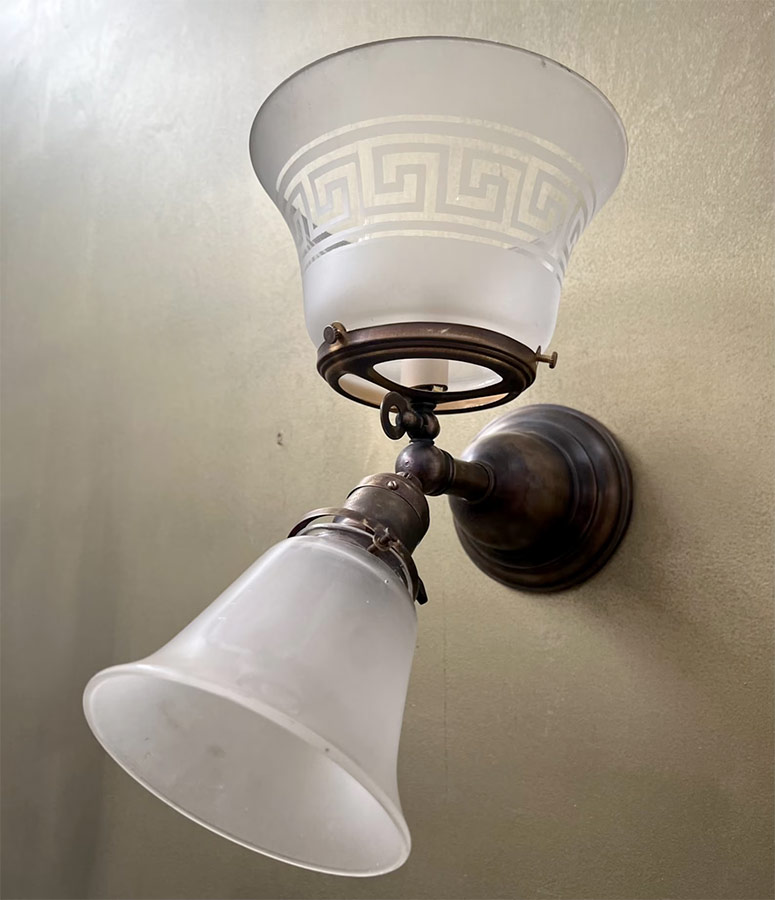
As a DIY homeowner in San Francisco, I can tell you this was because when electrification was new it was incredibly unreliable. The light fixtures of the era therefore combined both electric and gas. This allowed using electricity when it was available and gas the rest of the time.
Your discussion turned to how light fixtures today retain the design of old gas fixtures. I can tell you that the combo gas/electric fixtures always had their gas arms pointed up, whereas their electric arms pointed down or at a sideways angle. You may notice that retrofitted or reproduced fixtures from this era have candelabra sockets for lights facing up and standard e26 sockets elsewhere.
A neighbor of mine still maintains and operates their dual fuel chandeliers, turning them on for holiday parties and special events. Too risky for my taste but I admire their commitment to historical accuracy.
Thanks for hosting such an informative show and I hope this email was helpful.
Brian
PS a couple combo light fixtures below to illustrate my description.
 |
 |
Question 1: Should I caulk the spaces between siding planks?
Evan Bache Wiig from Dallas writes: Good afternoon, FHB podcast!
Thank y’all very much for answering my question about adjustable shim screws. I have introduced multiple friends to them and they love them. I greatly enjoyed my interview with Patrick and hope that it helps shed some light on the terrifying world of mold. I heard Kiley mention that she tried to organize a BS and beer gathering around the topic of mold and had trouble finding speakers. I would love to help with that if I can, there is not a BS and beer chapter in DFW that I’m aware of so maybe that’s something I need to start!
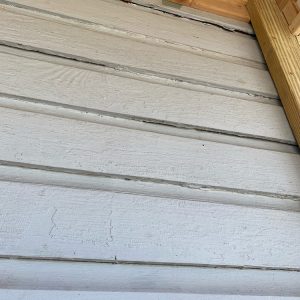
On to my question: I got into a friendly disagreement with my friend who is gut remodeling a 110-year-old pier and beam in climate zone 3A to turn it into a rental property.
The argument we got into was whether or not he should caulk the spaces between the siding planks before painting. His painter insisted that the thick gaps between the boards, some of which are a quarter of an inch in places, would make the exterior “look dirty” from a distance once it’s all painted white.
As far as the wall assembly, it is a pattern 105 drop siding, then loose cellulose or fiberglass batts for insulation (some places are missing insulation entirely). If it has tar paper as a moisture barrier in places, I have not seen it, so I am assuming there is none.
Given the hodgepodge nature of the wall assembly, I was hesitant to advise completely sealing the exterior boards, but clearly the house has a airflow and drying potential from the crawlspace and lack of air sealing so does it really matter whether he seals the exterior or not from a vapor drive/moisture control standpoint?
Pictures are attached! Thanks in advance!
 |
 |
Related Links:
- Air-Seal Penetrations With Canned Foam
- Is Adding Exterior Insulation When Residing Your Home Worth the Cost?
- How to Install Clapboard Siding
Question 2: What are best practices for handling moisture damage on the side of my house?
Andrew writes: Recently purchased a home and discovered some old, but bone dry, water damage on one of the elevations. Pulled off the wallpaper and wood paneling on the inside in the area and there is definitely some rot/damage to framing and sheathing. The plaster under the wallpaper was stained but intact. The inside I can pick away at, but it’s the exterior I’m more wary of.
If I go and start removing vinyl siding (never done, but bought the tools) and get in over my head I’m concerned I’ll be open to the weather and make things worse. Not exactly something I can stop mid-job, right? Is there a way to temporarily seal it at the sheathing layer once I replace any damage? Tape the seams, etc.? My other thought is that if I go this far why would I not replace the window on this elevation as well? Should I just plan to redo this whole elevation anyway? Not ready to tackle the whole home yet. Interested to know how to tackle this in steps without rushing to close things before the next rain.
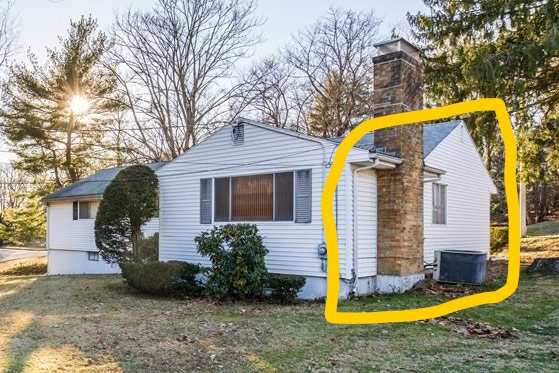
Another thing I’m considering is doing a gable-end soffit (ladder framing method, max 8″ wide) while I’m over here on this side, but can this be done without replacing the whole roof right away?
Related Links:
Question 3: How should people deal with their unconditioned attic?
Samantha’s attic issue.
Related Links:
- Attic-Ventilation Strategies
- Vented and Unvented Roofs
- Building Codes for Insulation and HVAC in Attics
END NOTE:
Podcast 563: Members-only Aftershow — The Joy of Homeownership
Mike, Samantha, and Patrick talk about buying your first house, the biggest surprises with buying and owning, and knowing when a house is right for you.
Check out one of our latest Project Guides: Energy Retrofit!
Check out our FHB Houses:
Visit the Taunton Store • Magazine Index • Online Archive • Our First Issues • All Access
Help us make better episodes and enter for a chance to win an FHB Podcast T-shirt: www.finehomebuilding.com/podcastsurvey

If you have any questions you would like us to dig into for a future show, shoot an email our way: [email protected].
If we use your question we’ll send you a FHB Podcast sticker!
FHB Podcast T-shirts!
Represent your favorite podcast! Available in several styles and colors. Made from 100% cotton. Find the Podcast t-shirt and more cool products in the Fine Homebuilding Store.
| Fine Homebuilding podcast listeners can now get 20% off anything in the Taunton store, including Pretty Good House.
Use the discount code FHBPODCAST to take advantage of this special offer. |
 |
“Finally, knowledgeable people talking about building reasonably-sized, high-performance houses for normal people with real budgets!” — DanD, VA, 8/19/22, Amazon.com review |
We hope you will take advantage of a great offer for our podcast listeners: A special 20% off the discounted rate to subscribe to the Fine Homebuilding print magazine. That link goes to finehomebuilding.com/podoffer.
The show is driven by our listeners, so please subscribe and rate us on iTunes or Google Play, and if you have any questions you would like us to dig into for a future show, shoot an email our way: [email protected]. Also, be sure to follow Fine Homebuilding on Instagram, and “like” us on Facebook. Note that you can watch the show above, or on YouTube at the Fine Homebuilding YouTube Channel.
The Fine Homebuilding Podcast embodies Fine Homebuilding magazine’s commitment to the preservation of craftsmanship and the advancement of home performance in residential construction. The show is an informal but vigorous conversation about the techniques and principles that allow listeners to master their design and building challenges.
Other related links
-
- All FHB podcast show notes: FineHomebuilding.com/podcast.
- #KeepCraftAlive T-shirts and hats support scholarships for building trades students. So order some gear at KeepCraftAlive.org.
- The direct link to the online store is here.
