FHB Logo Facebook LinkedIn Email Pinterest Twitter X Instagram Tiktok YouTube Plus Icon Close Icon Navigation Search Icon Navigation Search Icon Arrow Down Icon Video Guide Icon Article Guide Icon Modal Close Icon Guide Search Icon Skip to content
Subscribe
Log In
  • How-To
  • Design
  • Tools & Materials
  • Restoration
  • Videos
  • Blogs
  • Forum
  • Magazine
  • Members
  • FHB House
  • Podcast
Log In
Q&A Spotlight

Close the Gap Between the Wall and Flush Built-Ins

Readers and an expert weigh in, considering options such as corner bead, caulking, and leaving a shadow line.

By Charles Bickford
  • X
  • facebook
  • linkedin
  • pinterest
  • email
  • add to favorites Log in or Sign up to save your favorite articles

In a recent post, firsttimeroller writes that he has made several flush built-in cabinets. When installed, the cabinet face frames will be inset, flush to the adjacent walls. He’s also finished each of the wall openings with corner bead and joint compound. He asks “What’s the best way to close the gap and get a nice, clean look?” Up for consideration is stapling a plywood strip onto the face frame, recessed from the front to create a small space to be filled with joint compound, but firsttimeroller doesn’t know if the compound should actually touch the face frame.

That’s the topic of this Forum Spotlight.

The first response comes from agm413, who suggests using tear-away plastic drywall corner bead to fill the gap. This gets a thumbs-up from calvin. Firsttimeroller then asks if it makes sense to apply the tear-away bead over the existing corner bead, or if he should pull out the older corners and start from scratch. He has twelve cabinets, so that’s a lot of work to create a perfect finish.

Calvin comes back to say that he’s used both regular and tear-away corner bead in similar situations. “We would staple L-bead to the drywall, use Durabond for the first coat and it would hold fast. With mudded corner . . . might hold, might not. The staples have to go so they don’t interfere with subsequent coats. You’ve already built out the corner somewhat with your corner bead, but if you feather out the L-bead, it might appear flat.”

Calvin then offers an alternative: stuff the crack with foam backer rod that’s slightly bigger than the gap, ¼-in. into the gap. Mask each side of the gap with painter’s tape, then fill the gap with a flexible caulk. Use the putty knife to smooth the caulk, let it dry, and remove the tape. “I’ve caulked like this a lot. There’s a bit of a trick to it. Painters often do it. I’m just a dumb carpenter, retired.”

Firsttimeroller likes this idea. “I’m going to try this method. I’ve got the luxury of being able to cut the face frames to size (they aren’t glued on yet), so I can take my time and have a nice even space all around. I will try to attach the backer rod to the sides of the faces before I squeeze the cabinets back into the wall. If that doesn’t work, I’ll try the stuff method. Now you’ve got me wondering if I could even skip the caulk if I could find some other material to staple to the sides of the frames since they aren’t installed—vinyl compression jamb liners for windows maybe? Something that will fill the gap and look clean all in one.”

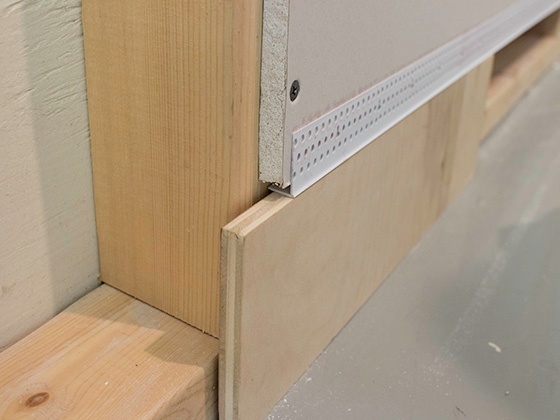
As the face frames aren’t installed yet, Calvin says he would remove the existing corner bead, pad out the opening with something appropriately sized, install the cabinets with the face frames attached, then use the tear-away corner bead to finish the openings. “The flush flat look is nice, but detailing that assumes the walls and cabs are in plane and everything goes as planned. You can ‘fool the eye’ but never fool yourself.” He then recommends instructional videos from Trim-Tex and includes a photo of a similar installation

The final two posts, from 1095mike and Alex2019, both recommend using a flexible caulk to fill the gap around the face-frame. They each cite that wood is prone to expanding and contracting with changes in humidity, and that if joint compound is applied next to the wood frames, the wood will absorb moisture from the compound and expand. When the compound and wood dry out, the wood will shrink, leaving a gap. A better solution is to use a caulk that will accommodate the movement of the wood.

An expert replies

FHB editorial adviser Mike Guertin responds with this:

I like the clean look when the drywall blends in almost seamlessly with trim elements. I’ve done this with flush installs of baseboard, door and window jambs, and cabinets. And I’ve tried numerous approaches that include terminating the drywall with regular metal corner bead, L-bead, tear-off-style beads, no bead, and fine caulk joints. They can all work, but some are more reliable than others in creating and maintaining the clean look.

One thing I haven’t tried is cutting cabinet face frames to match already installed drywall bead. It seems like a challenge, unless the corner bead is installed perfectly straight and without any variations in plane. Even if you could get a perfectly scribed face frame to fit the opening, it would be hard to adjust the frame in and out to account for slight drywall bead bulges outward or dips inward of the wall plane. And any deviation from perfect will be noticeable.

I recommend Calvin’s suggestion to remove the corner bead (or leave it in place), install the cabinets and face frames without scribing to the opening, and then install tear-off or L-bead. The bead can be adjusted tight to and flush with the perimeter of the cabinet frames. Then the joint compound can be blended to the wall plane to match the cabinet—an easier prospect than the other way around.

The caulking option is viable but does require that the gap between the face frames and corner bead be pretty close widthwise. There will be a difference in the wall surface finish, the face frame finish, and the caulk joint finish. The transition between materials will look fine if the gap doesn’t vary much, but if it does, the caulk line might highlight the gap variation.

I don’t recommend compounding right up to the face frames without a drywall bead as a stop, and don’t fill a gap between the existing corner bead and the face frame with joint compound. Inevitably the framing and/or the cabinet frame will move slightly with humidity changes in the house. The movement can cause the compound-to-face-frame bridge to fracture and chip out. Drywall bead isolates the cabinet frame so if there is any movement and a fine gap opens up, it still looks even, rather than jagged.

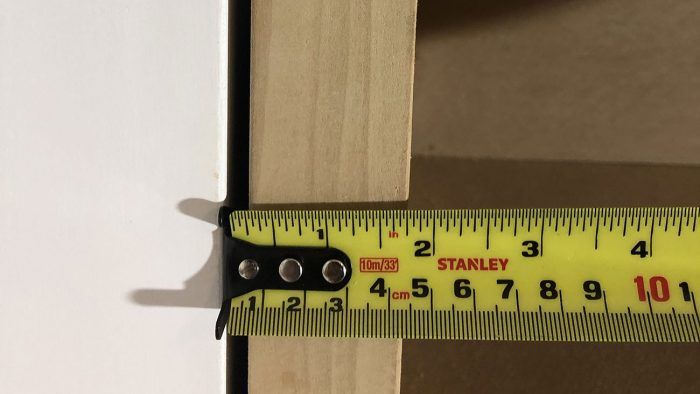
Another approach is to intentionally leave an even shadow-line gap between the corner bead and the face frame.  I usually aim for a 1/8-in. to 3/16-in. gap. You still get a clean crisp look with some built-in forgiveness. When building elements move slightly and the gap width changes slightly, it doesn’t become unsightly as a tight joint would when it opens up. And if there are any slight differences in the plane of the corner bead and the face frame, it isn’t noticeable.


RELATED STORIES

  • Drywall Corner Beads
  • Foolproof Inset Cabinet Doors
  • Installing Semicustom Cabinets: Preparation and Layout

Sign up for eletters today and get the latest how-to from Fine Homebuilding, plus special offers.

Signing you up...

This site is protected by reCAPTCHA and the Google Privacy Policy and Terms of Service apply.
See all newsletters
See all newsletters
×

Get home building tips, offers, and expert advice in your inbox

Signing you up...

This site is protected by reCAPTCHA and the Google Privacy Policy and Terms of Service apply.
See all newsletters
See all newsletters

New Feature

Fine Homebuilding Forums

Ask questions, offer advice, and share your work

  • X
  • facebook
  • linkedin
  • pinterest
  • email
  • add to favorites Log in or Sign up to save your favorite articles

Log in or create an account to post a comment.

Sign up Log in

Become a member and get full access to FineHomebuilding.com

More Q&A Spotlight

View All
  • Leveling Foundation Walls
  • Tips on Ceiling Repair
  • Fixing Rotted Windowsills
  • Replace Rotten Boards in a Roof Overhang
View All

Up Next

Video Shorts

Featured Story

Tool Test: You Need a Drywall Sander

We tried out a range of rotary and random-orbit sanders to compare their dust collection, quality of finish, and user fatigue after hours of sanding.

Featured Video

A Modern California Home Wrapped in Rockwool Insulation for Energy Efficiency and Fire Resistance

The designer and builder of the 2018 Fine Homebuilding House detail why they chose mineral-wool batts and high-density boards for all of their insulation needs.

Related Stories

  • An Easier Method for Mitered Head Casings
  • A Practical Approach to Exterior Insulation
  • Making and Installing Wood Wall Paneling
  • FHB Podcast Segment: Designing and Building an Efficient Slab-On-Grade Home

Discussion Forum

Recent Posts and Replies

  • |
  • |
  • |
  • |
  • |
  • |
View More Create Post

Highlights

Fine Homebuilding All Access
Fine Homebuilding Podcast
Tool Tech
Plus, get an extra 20% off with code GIFT20

Video

View All Videos
  • Building Custom Kitchen Cabinets
  • Podcast 331: PRO TALK With Cabinetmaker Ben Scott
  • How to Use a Pocket-Hole Jig
  • Podcast 128: Worst. Photo. Shoot. Ever.
View All

Finish Carpentry

View All Finish Carpentry Articles
  • Window Glazing with Traditional Putty
  • Sand Smooth Contours
  • Building a Flush Interior Door With Carpenter Casey Knips
View All Finish Carpentry Articles

Fine Homebuilding Magazine

  • Issue 331 - June 2025
    • A More Resilient Roof
    • Tool Test: You Need a Drywall Sander
    • Ducted vs. Ductless Heat Pumps
  • Issue 330 - April/May 2025
    • Deck Details for Durability
    • FAQs on HPWHs
    • 10 Tips for a Long-Lasting Paint Job
  • Issue 329 - Feb/Mar 2025
    • Smart Foundation for a Small Addition
    • A Kominka Comes West
    • Making Small Kitchens Work
  • Issue 328 - Dec/Jan 2024
    • How a Pro Replaces Columns
    • Passive House 3.0
    • Tool Test: Compact Line Lasers
  • Issue 327 - November 2024
    • Repairing Damaged Walls and Ceilings
    • Plumbing Protection
    • Talking Shop

Fine Home Building

Newsletter Sign-up

  • Fine Homebuilding

    Home building tips, offers, and expert advice in your inbox.

  • Green Building Advisor

    Building science and energy efficiency advice, plus special offers, in your inbox.

  • Old House Journal

    Repair, renovation, and restoration tips, plus special offers, in your inbox.

Signing you up...

This site is protected by reCAPTCHA and the Google Privacy Policy and Terms of Service apply.
See all newsletters

Follow

  • Fine Homebuilding

    Dig into cutting-edge approaches and decades of proven solutions with total access to our experts and tradespeople.

    Start Free Trial Now
    • Facebook
    • Instagram
    • X
    • LinkedIn
  • GBA Prime

    Get instant access to the latest developments in green building, research, and reports from the field.

    Start Free Trial Now
    • Facebook
    • YouTube
  • Old House Journal

    Learn how to restore, repair, update, and decorate your home.

    Subscribe Now
    • Facebook
    • Instagram
    • X

Membership & Magazine

  • Online Archive
  • Start Free Trial
  • Magazine Subscription
  • Magazine Renewal
  • Gift a Subscription
  • Customer Support
  • Privacy Preferences
  • About
  • Contact
  • Advertise
  • Careers
  • Terms of Use
  • Site Map
  • Do not sell or share my information
  • Privacy Policy
  • Accessibility
  • California Privacy Rights

© 2025 Active Interest Media. All rights reserved.

Fine Homebuilding receives a commission for items purchased through links on this site, including Amazon Associates and other affiliate advertising programs.

  • Home Group
  • Antique Trader
  • Arts & Crafts Homes
  • Bank Note Reporter
  • Cabin Life
  • Cuisine at Home
  • Fine Gardening
  • Fine Woodworking
  • Green Building Advisor
  • Garden Gate
  • Horticulture
  • Keep Craft Alive
  • Log Home Living
  • Military Trader/Vehicles
  • Numismatic News
  • Numismaster
  • Old Cars Weekly
  • Old House Journal
  • Period Homes
  • Popular Woodworking
  • Script
  • ShopNotes
  • Sports Collectors Digest
  • Threads
  • Timber Home Living
  • Traditional Building
  • Woodsmith
  • World Coin News
  • Writer's Digest
Active Interest Media logo
X
X
This is a dialog window which overlays the main content of the page. The modal window is a 'site map' of the most critical areas of the site. Pressing the Escape (ESC) button will close the modal and bring you back to where you were on the page.

Main Menu

  • How-To
  • Design
  • Tools & Materials
  • Video
  • Blogs
  • Forum
  • Project Guides
  • Reader Projects
  • Magazine
  • Members
  • FHB House

Podcasts

  • FHB Podcast
  • ProTalk

Webinars

  • Upcoming and On-Demand

Podcasts

  • FHB Podcast
  • ProTalk

Webinars

  • Upcoming and On-Demand

Popular Topics

  • Kitchens
  • Business
  • Bedrooms
  • Roofs
  • Architecture and Design
  • Green Building
  • Decks
  • Framing
  • Safety
  • Remodeling
  • Bathrooms
  • Windows
  • Tilework
  • Ceilings
  • HVAC

Magazine

  • Current Issue
  • Past Issues
  • Magazine Index
  • Subscribe
  • Online Archive
  • Author Guidelines

All Access

  • Member Home
  • Start Free Trial
  • Gift Membership

Online Learning

  • Courses
  • Project Guides
  • Reader Projects
  • Podcast

More

  • FHB Ambassadors
  • FHB House
  • Customer Support

Account

  • Log In
  • Join

Newsletter

Get home building tips, offers, and expert advice in your inbox

Signing you up...

This site is protected by reCAPTCHA and the Google Privacy Policy and Terms of Service apply.
See all newsletters
See all newsletters

Follow

  • X
  • YouTube
  • instagram
  • facebook
  • pinterest
  • Tiktok

Join All Access

Become a member and get instant access to thousands of videos, how-tos, tool reviews, and design features.

Start Your Free Trial

Subscribe

FHB Magazine

Start your subscription today and save up to 81%

Subscribe

We hope you’ve enjoyed your free articles. To keep reading, become a member today.

Get complete site access to expert advice, how-to videos, Code Check, and more, plus the print magazine.

Start your FREE trial

Already a member? Log in

Privacy Policy Update

We use cookies, pixels, script and other tracking technologies to analyze and improve our service, to improve and personalize content, and for advertising to you. We also share information about your use of our site with third-party social media, advertising and analytics partners. You can view our Privacy Policy here and our Terms of Use here.

Cookies

Analytics

These cookies help us track site metrics to improve our sites and provide a better user experience.

Advertising/Social Media

These cookies are used to serve advertisements aligned with your interests.

Essential

These cookies are required to provide basic functions like page navigation and access to secure areas of the website.

Delete My Data

Delete all cookies and associated data