Wood Lintels with Masonry Cladding
Learn how to install wood lintels with a steel lintel on top. Find out the best type of wood to use, proper installation, and flashing techniques.
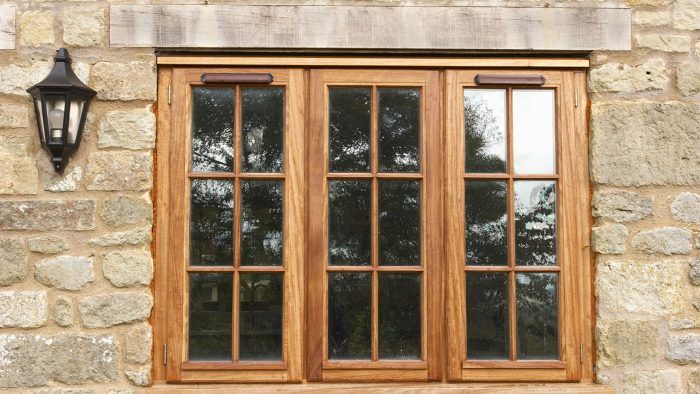
I’m in the planning stage of building a new house. Much of the exterior cladding will be a stone veneer. I love the look of real timber lintels set into masonry above windows and doors, but I cannot find any construction details on how this is best accomplished. Can a wood lintel be structural, or are they placed above or under a steel lintel? Is this even a good idea?
—Scott Comeaux, Orange County, Calif.
Steven Fechino, engineering and construction manager at Mortar Net Solutions, replies: Historically, wood lintels were structural components, but today, it makes more sense to install a steel lintel on top of the wood lintel. Before I discuss installation and flashing, let’s talk about the wood itself. The type of wood you use should be weather and pest resistant, and if you are using reclaimed wood, it’s critical that it still has structural integrity. Also, the wood should be fully weather-acclimated. By this I mean that the wood cannot be stored on the ground or exposed to the rain weeks before installation as the moisture will move in and out of the material, creating wood movement or dimensional change. Finally, the wood should be treated with a sealer that would create an impervious surface for any moisture that could find its way between the flashing and the wood by a weather event or capillary action. I recommend several coats of tung oil.
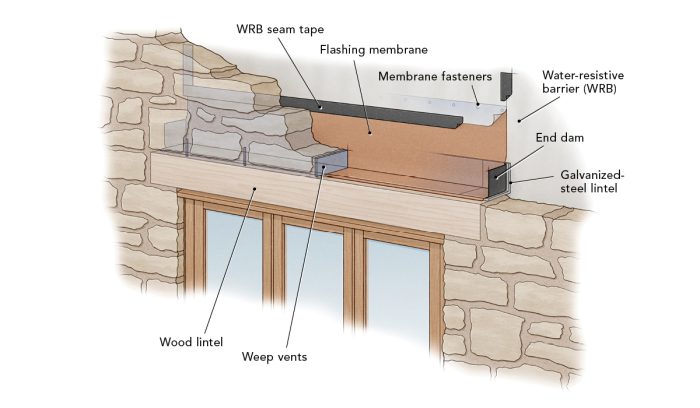
For the installation, I’m going to assume that the stone you will be working with is full bed depth (at least 4 in.) and will have an approximately 1-in. air space between the back of the stone and the sheathing. To avoid rust stains, I recommend using a hot-dipped galvanized-steel lintel. Before installing the lintels, cut back the water-resistive barrier (WRB) above the opening. Both the wood and steel lintels should overlap onto the stone at least 4 in. to 6 in. on each side. They will be held in place by the surrounding stone and mortar, so no fasteners are necessary.
When it comes to flashing, the first question to ask is, “Do I really need flashing at all?” If the door or window is under a covered porch or in an area that does not have direct weather exposure, then I would probably have second thoughts. Similarly, if wind-driven rain is rare in your region, there is only 2 ft. of stone veneer over the lintel, and it’s protected with large soffits, I would have to really look close at the need for flashing. If you do need flashing, I normally recommend a drip edge for standard lintels that I install. However, historical wood lintels would not have any flashing at all, so to preserve an authentic architectural appearance, I would not recommend that a visible drip edge be part of this assembly.
There are several ways to install and flash this detail, but here is one common method: Place a bead of nonstaining sealant, like polyurethane or polyether, on top of the steel lintel about 3⁄4 in. from the face of the lintel. Install end-dam flashing on each side. You could buy premade dams, build them yourself out of the flashing material, or simply fold up the flashing membrane at each side. The membrane selection for this application should be a 40-mil material such as stainless steel, copper laminate, or synthetic rubber. Install the flashing mem-brane directly over the steel lintel and end dams. Hold it back 1⁄4 in. from the face of the stone, so it can be concealed in the mortared bed joint.
Run the top leg of the flashing at least 8 in. up past the back leg of the steel lintel. Attach the flashing to the wall with cap nails or cap screws spaced 4 in. on center. Finally, overlap the flashing with the WRB, and seal the two with seam tape. While installing the stone, insert weep vents in the head joint over the steel lintel every 12 in. to 16 in. That’s more than code requires, but a good choice for this application.
Photo: courtesy of F Cuff & Sons Ltd. Drawing: Peter Wojcieszek
RELATED STORIES
Fine Homebuilding Recommended Products
Fine Homebuilding receives a commission for items purchased through links on this site, including Amazon Associates and other affiliate advertising programs.
Graphic Guide to Frame Construction

A Field Guide to American Houses

Not So Big House
