Podcast 622: Wood-Slab Walls, Sealing a Crawlspace, and Pipes that Don’t Drain
Listeners write in about off-site construction and ask questions about board-framed walls, sealed crawlspaces, and overflowing laundry standpipes.
Follow the Fine Homebuilding Podcast on your favorite app. Subscribe now and don’t miss an episode:
 |
Michael asks why houses are so expensive. Will is insulating an old house with unconventional construction. Kurt is considering a sealed crawlspace. Evan’s laundry is overflowing.
Editor Updates:
- Mike: Loader/backhoe rental
- Brian: Pergola rafter angles
- Andres: Bathroom remodel
- Patrick: Landscape lighting and awesome electrical crimper, connectors kit, and heat shrink tubing kit.
 |
 |
Listener Feedback 1:
Michael writes: Hello,
I’m curious about your take on the recent Freakonomics podcast discussing construction in America. One point they bring up around the 31-minute mark is about prefab homes. I have always found it interesting that most products in our world—from phones to cars—have standardized, mass-produced models, while home building largely remains a custom, individualized process. As a millennial facing challenges in purchasing my first home, it can be disheartening to hear about older generations owning multiple rental properties. I’m hopeful that more affordable prefab homes will become a viable option.
Prefab companies for example:
Thanks,
Michael
Related Links:
Question 1: What’s the best approach to insulating this old-house renovation?
Will from Turnkey Builders in Vermont writes: Hi Patrick,
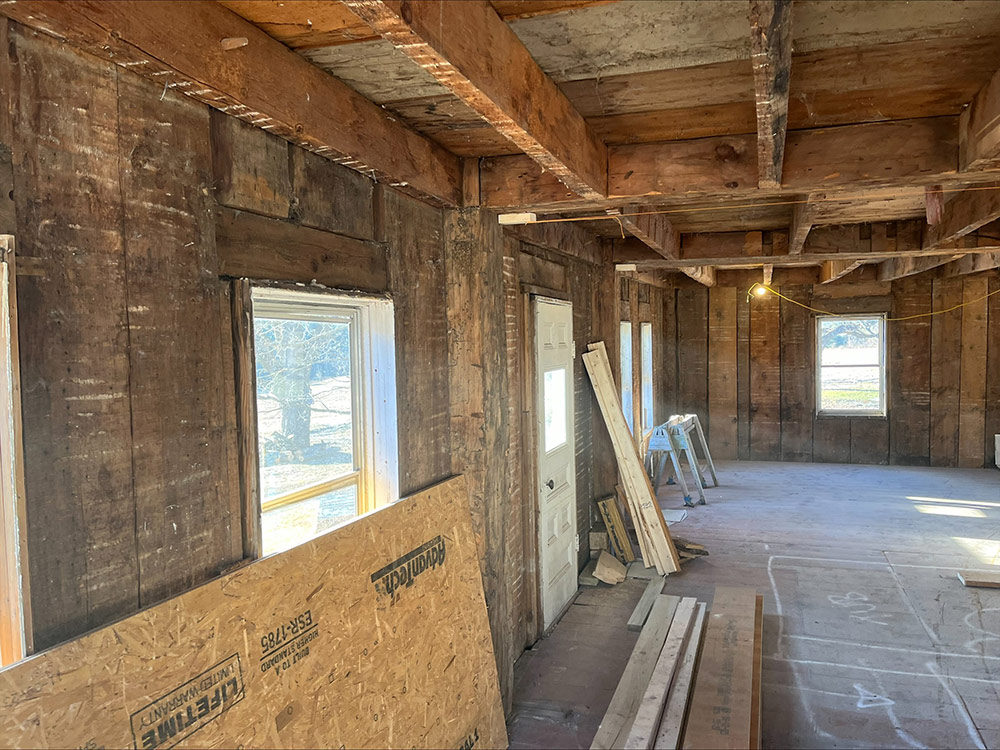
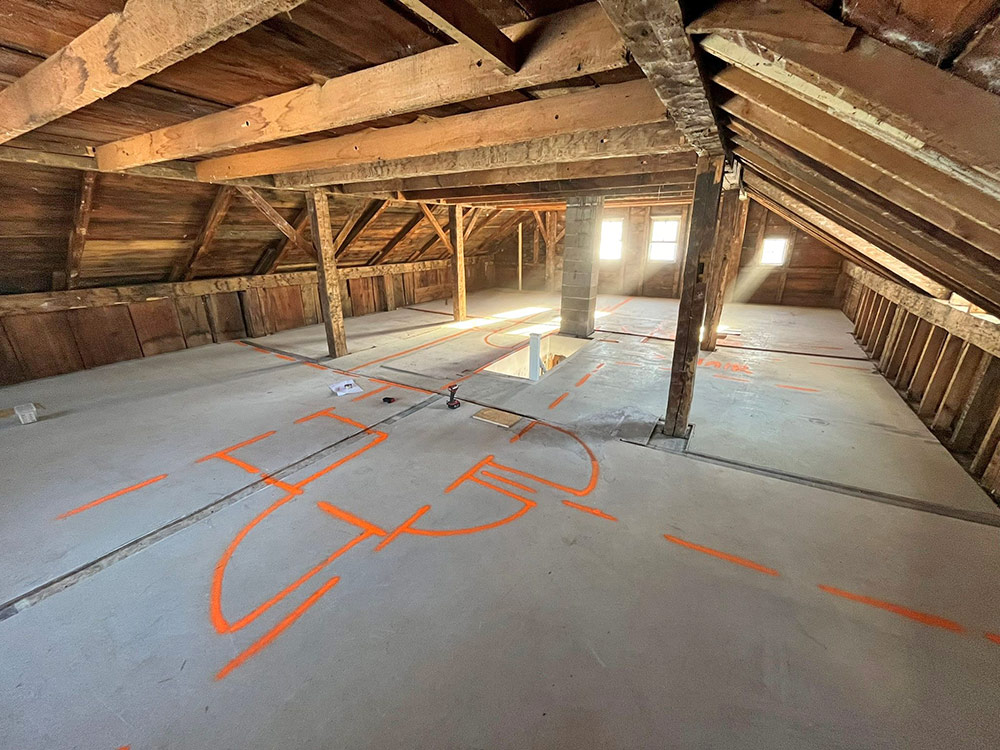
I hope you are well. I have a question that may warrant further discussion by you all (or not!). I’m working on a house that is being turned into a duplex for the two sets of couples who purchased this house with a large tract of land to farm. The main purpose of the build is to get two livable, comfortable, durable, healthy, efficient units. The owners are adding a lot of sweat equity to make this build happen on a budget—like hand-mixing 30 bags of concrete this past weekend for new footings so I could roll into some structural repairs at the start of this week!
Setting the stage:
- It’s a 1836 farmhouse in climate zone 5 in Jericho, Ver.
- The exterior siding is wood. It is in okay condition so there is no need to replace at the moment aside from a few problem areas.
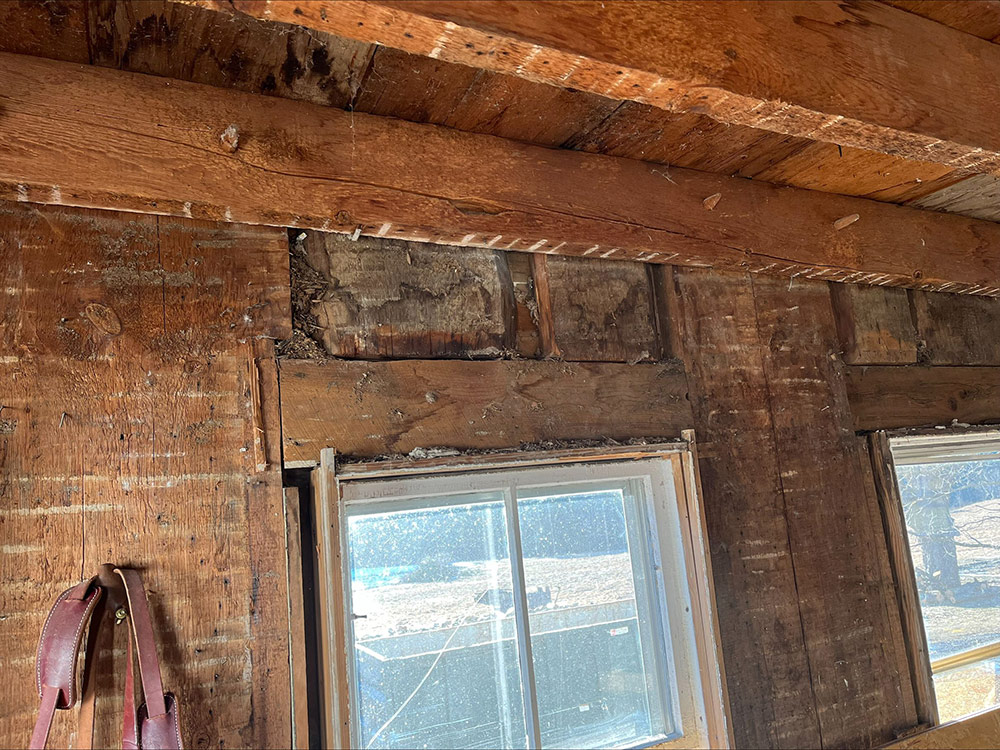
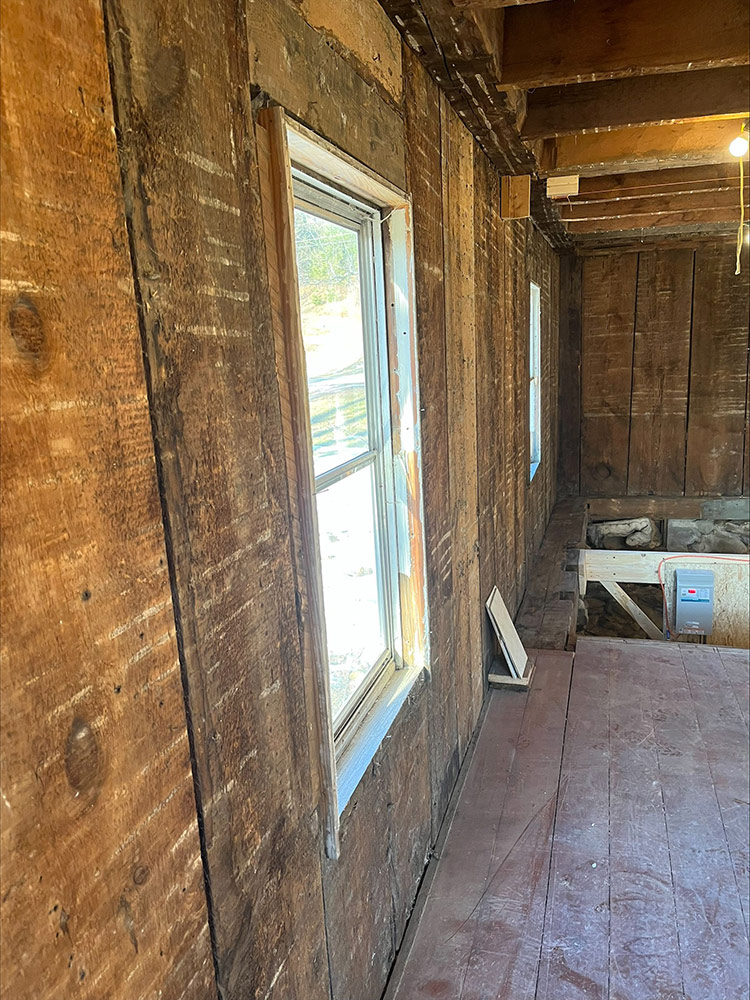
- The interior has been gutted back to the studs. (There was no existing insulation in the house.)
- There are a few posts (corners and intermediate along the eave side), but generally the structure is comprised of vertical 3-in. plank timbers stretching from bottom plate to top plate at the roof edge. These timbers are what the siding is attached to (building or tar paper unknown, but you can see daylight out in spots when looking from the inside to out).
- Minimizing spray foam as much as possible.
 |
 |
 |
 |
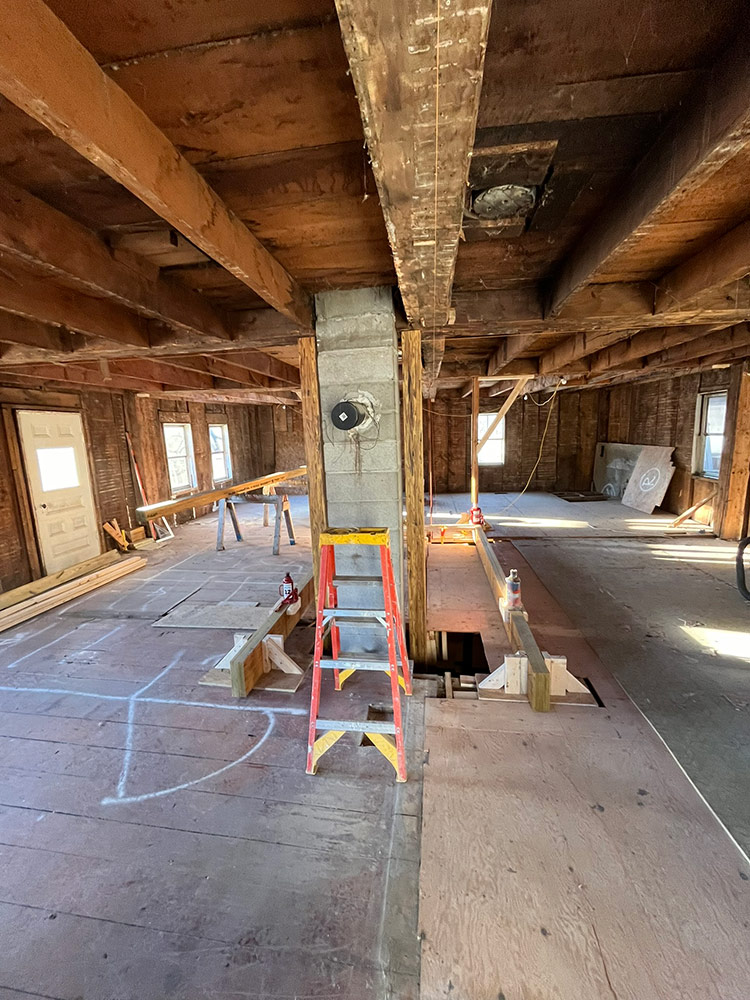 |
Question: I’ve suggested two approaches to the insulation (see below), both of which I believe could work, but I’m curious if I am missing something. I’m thinking that until the siding is replaced and proper air and water barriers installed on the outside, we need to be prepared for some moisture getting into the wall.
Approach 1: Insulate the interior walls with continue 2-in. Rockwool Comfortboard 80, then stand up a 2×4 wall, then install cavity Rockwool R-15 insulation.
Approach 2: Insulate the walls with dense-pack cellulose, but before installing the 2×4 wall, add a layer of tar paper to the wall so any water that gets past the siding does not impact the cellulose. Keep the 2×4 wall away from the exterior wall plane by 2 in. to maintain thermal break.
Fun extra: The basement (or crawlspace) has all the things:
- Stone foundation
- CMU block foundation
- Poured 4-in.-thick slab
- Mud slab/rat slab with cracks/exposed dirt areas
I thought originally about wrapping the space with impermeable membrane, but after reading some articles by Martin and Andy, I landed on the following approach.
- Rigid foam on the CMU block sections, with taped seams.
- Mortar joints in the fieldstone, then paint with Drylok.
- Install plastic over the floor of mud-slab area. Maybe then add horse-stall mats to have a workable surface on the plastic.
- Install a commercial-grade dehumidifier (like the Sante Fe Compact70) in the space.
Cheers!
Related Links:
- 9 More Building Science Mistakes to Avoid
- Managing Water When Insulating Old Walls
- Insulating an Old Farmhouse
Question 2: What are the best changes to make when sealing a crawlspace?
Steven writes: Hi podcast crew,
In a few months, we will be doing a seismic retrofit and crawlspace/basement encapsulation of our 1905 two-story house in Seattle (climate zone 4c). I wrote into the podcast about a year ago (#560) regarding the seismic work and finally came to my senses to just hire out the project. The house currently has a vented crawlspace and a 3-year-old electric-resistance hot water heater (along with the high-efficiency gas furnace), both of which are located in a deeper, but still unconditioned portion of the crawlspace.
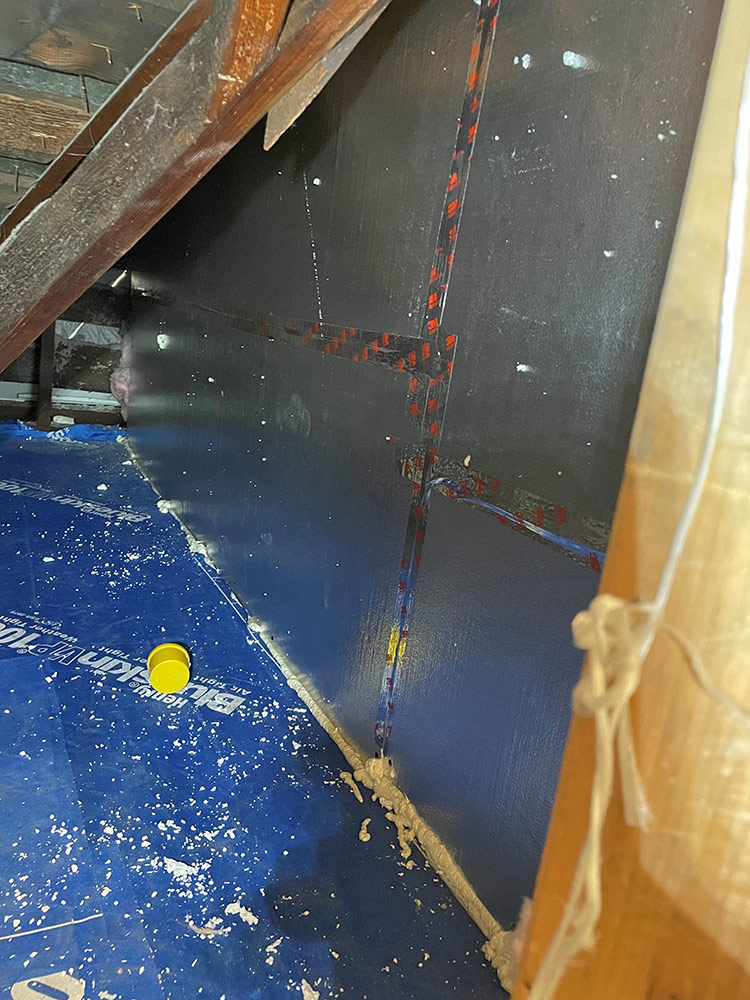
I’m curious about your thoughts about changing the existing water heater to a heat-pump water heater? The dehumidification benefits help after the encapsulation is complete, but I am concerned about the temperature drop and overall efficiency. The crawlspace is roughly 1100 sq. ft. and will have continuous interior foam on the pony walls, but none on the floor. The annual average ground temperature in this area is 47°F to 52°F, but it’s certainly warmer in the summer months. The underside of the first floor currently has fiberglass batts, which are disgusting and will likely be replaced with TimberHP batts after finishing the encapsulation. I plan to do a little heating into the space via existing ductwork. Will a heat-pump water heater make our main floors cold? Anything is certainly going to be better than it has been with the vented and poorly insulated floor!
I’ve read through a number of articles on GBA, Energy Vanguard, and other sites. Energy Vanguard suggests that the temperature will drop on average 2°F. One paper from the University of Maine suggests an 18% energy savings if switching to a heat-pump water heater. Given the rebates and tax credits, it seems like a good time to consider this work. Our Emporia energy monitor shows the current water heater using 30% of our total electricity. Our electricity bills vary between $100 to $450 per month, depending on the season.
What’s my best choice here? Should I locate the heat-pump water heater in the basement and have it duct to the outdoors? Should I only exhaust it outdoors? Should I stay with the resistance heater as is? Do I replace the batt insulation? Should I save my money here and switch the gas furnace to a heat pump instead?
For some additional context: Our blower-door test prior to any upgrades was literally off the charts, and they were unable to reach the ACH 50 pressure! Since then I’ve done considerable air-sealing in the upstairs kneewalls, attic (now insulated to R49), and to the exterior walls. I believe the encapsulation project will both improve indoor-air quality and reduce the stack effect significantly. Our energy bills vary between $300 and $600 per month, depending on the season.
I’m sorry for the long email, but I thought the context was important. Any advice is welcome, as usual. I have attached a photo from the upstairs kneewall air-sealing and insulation project from this summer. I calculated that I enclosed about 50 sq. ft. of open joist bays, and the floors are a lot warmer this winter. It was uncomfortable work, but it was definitely worth the effort!
Related Links:
- Home Energy Diet for an Old Victorian
- GBA.com: Where Does the Heat Pump Water Heater Go?
- Codes for Crawlspaces
- Choosing an Efficient Water Heater
Question 3: Why is my washing machine’s drainpipe overflowing?
Evan writes: Hey FHB crew, it’s your friend from North Carolina here again working on his old house.
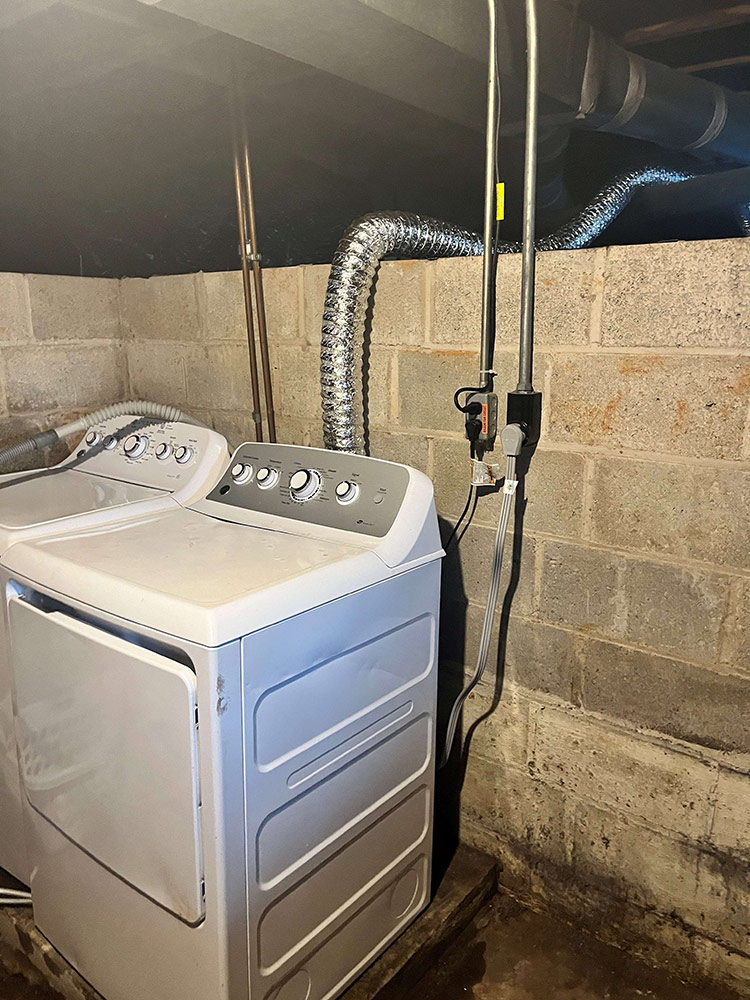
A previous owner installed an equipment pad and basic connections for a washer/dryer in the dugout section of the basement of the house. There strangely was no dryer vent, so I ran a duct and attached a vent to the outside of the house.
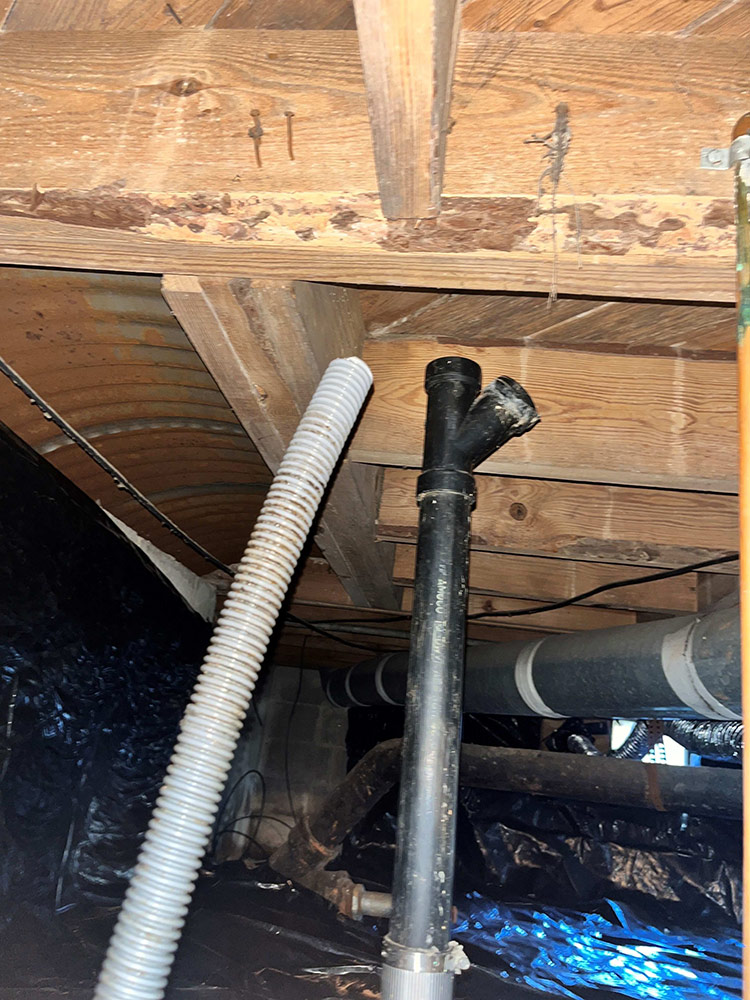
Well, this is not where the trouble ends. I installed the washer and directed the drain to the existing pipe (shown in the photos) that terminates about 6 ft. above the equipment pad (in order to drain back down to the sanitary main that is about +3 ft.).
 |
 |
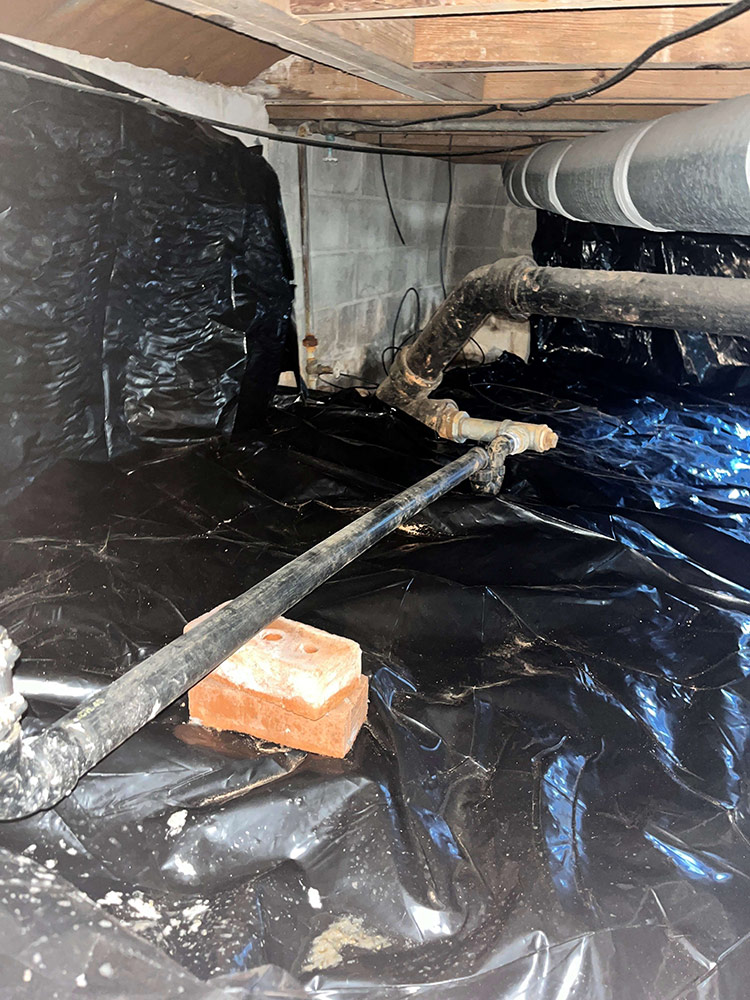 |
I came downstairs after running a load to find the whole basement floor wet and the washer with dirty water on the clothes. After disassembling part of the drain, I found it to be clogged with a bunch of semi-wet, semi-solid material. Putting the shop vac up to the end of the drain and holding it there brought most if not all of the gross stuff out of the drain, which I figured was clogging it. While running another load of clothes after doing this I sat in the basement and watched the machine work. When the cycle went to drain, everything was fine for a moment, but then all of a sudden water started pouring out of the top of the drain again.
If I don’t have a clog in the pipe, what could be causing this issue? Is the drain not properly sized? Could there be a clog in the next pipe (the sanitary main)? Can a washer not work from below the point of draining? Any solutions or insight would be helpful as I am not sure how the previous owners made this system work.
Thanks for your advice and countless hours of listening,
Evan
Related Links:
This episode of The Fine Homebuilding Podcast is brought to you by TiteGrab Plus Construction Adhesive

You may know them for their wood glues, but did you know Titebond also has a complete selection of construction adhesives? Designed for a variety of applications, Titebond’s adhesives make any building or home improvement project a breeze with their high-performing and durable formulas. These adhesives are trusted by the professional, providing squeak free subfloor installations, long lasting retaining walls and even fastener free feature walls.
Check out Titebond’s construction adhesives at Titebond.com, including their newest award-winning adhesive—TiteGrab Plus!
Check out one of our latest Project Guides: Energy Retrofit!
Check out our FHB Houses:
Visit the Taunton Store • Magazine Index • Online Archive • Our First Issues • All Access

If you have any questions you would like us to dig into for a future show, shoot an email our way: [email protected].
If we use your question we’ll send you a FHB Podcast sticker!
FHB Podcast T-shirts!
Represent your favorite podcast! Available in several styles and colors. Made from 100% cotton. Find the Podcast t-shirt and more cool products in the Fine Homebuilding Store.
| Fine Homebuilding podcast listeners can now get 20% off anything in the Taunton store, including Pretty Good House.
Use the discount code FHBPODCAST to take advantage of this special offer. |
 |
“Finally, knowledgeable people talking about building reasonably-sized, high-performance houses for normal people with real budgets!” — DanD, VA, 8/19/22, Amazon.com review |
We hope you will take advantage of a great offer for our podcast listeners: A special 20% off the discounted rate to subscribe to the Fine Homebuilding print magazine. That link goes to finehomebuilding.com/podoffer.
The show is driven by our listeners, so please subscribe and rate us on iTunes or Google Play, and if you have any questions you would like us to dig into for a future show, shoot an email our way: [email protected]. Also, be sure to follow Fine Homebuilding on Instagram, and “like” us on Facebook. Note that you can watch the show above, or on YouTube at the Fine Homebuilding YouTube Channel.
The Fine Homebuilding Podcast embodies Fine Homebuilding magazine’s commitment to the preservation of craftsmanship and the advancement of home performance in residential construction. The show is an informal but vigorous conversation about the techniques and principles that allow listeners to master their design and building challenges.
Other related links
-
- All FHB podcast show notes: FineHomebuilding.com/podcast.
- #KeepCraftAlive T-shirts and hats support scholarships for building trades students. So order some gear at KeepCraftAlive.org.
- The direct link to the online store is here.


