Podcast Episode 664: The Best of the Fine Homebuilding Podcast, Volume 8
The crew talks about pier foundations, shingle lifespan, training new carpenters, brick sidewalks, and rooftop decks.

Welcome to the Fine Homebuilding podcast, our weekly discussion of building, remodeling, and design topics aimed at anybody who cares deeply about the craft and science of working on houses. In this best-of show the Podcast crew revisits some of their favorite segments. Please email us your questions to [email protected].
You can find previous podcasts and check out the show notes at finehomebuilding.com/podcast
 |
Can I salvage my cabin’s foundation?
Dale writes:
Hello Podcast,
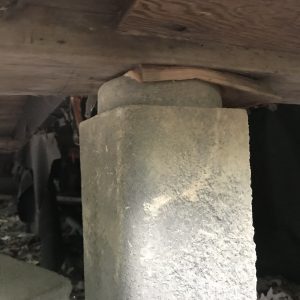
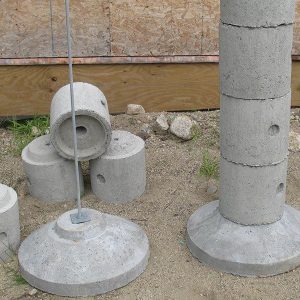
Love the show. I recently purchased a small cabin in real tough shape in the Hudson Valley in New York (Climate Zone 6). I am planning to personally repair and renovate on a small budget with the intention of having it as a weekend/rental place. It was built around 1950, and it has been unused for about 20 years. There is some water damage, but I think the majority of the roof sheathing, original foundation, and wall structure are surprisingly okay. The original 500 sq. ft. of the building has CMU crawlspace in pretty good shape, but I think the back 250 sq. ft. was a porch that was enclosed at some point to add a bedroom and move the bathroom. There is a step down into the addition, and it is built with a ledger on the main house CMU crawlspace wall, and the remainder of the addition is on strange precast hollow-core piers that I have never seen. (See attached pictures of a pier in place and one broken pier.) The building corners cantilever off of these piers. Any idea what these are?
Correct me if I’m wrong, but I don’t think I can salvage this section of the house. (I’m not sure it was ever permitted or safe.) I plan to tear this section down and want to rebuild a similar footprint. But as I am trying to do the work myself, I don’t love the idea of digging footings down to the 48-in. (or more) frost depth and then trying to build forms and pour foundation walls for a crawlspace.
Could I alternatively:
A: Go ahead and dig to below frost line, but then use a pressure-treated wood foundation wall on gravel base for my foundation.
Or
B: Pour a frost-protected slab on grade (per your article Frost-Protected Shallow Foundations) and then frame the new addition out of wood with a mini floor between the slab and the existing floor level.
 |
 |
 |
 |
 |
RELATED STORIES
What happens if my 20-year shingles only last 10 years?
Dave from Plainfield, Ver., writes:
Hi there FHB podcast crew!
I love the podcast. Thank you for keeping it going!
I was listening to you all talk, with a certain briney wit, about how anyone trying to claim a warranty on an asphalt shingle should, basically, collect four-leaf clovers and wish upon a shooting star, cuz it ain’t gonna happen. My neighbor is in the throes of a fight with BP over her 25-year-shingles blowing off her house in a breeze after a 15-year service life. I found myself saying, “Yeah, good luck with that.” She rolled her eyes, saying, “I know, but someone has to try to hold these b*stards accountable eventually, right?”
So, my question is: What the heck?
How do the shingle companies get away with this? And why do we let them? It’s like some evil joke we all know about and the best we can do is be cynical about it (which, I guess, on some level, is just the simple truth). When I have a client asking about shingle warranties, I say something to the effect of, “well, a 20-year shingle lasts 10 years. A 30-year shingle might last 15. A ‘lifetime’ shingle, well… I guess it’ll last half a lifetime?!? But no one can access the warranty anyway, so just keep an eye on your roof.”
A shingle has a tough job to do, let’s face it. So why the dishonesty? Or why the run-around on fulfilling warranty claims?
I’d love to hear your thoughts on this! Thanks again and #keepcraftalive
Related Links:
- When Is It Time to Reroof?
- Will Your Next Asphalt Roof Last a Lifetime?
- 10 Roof Goofs and How to Fix Them
Ian Schwandt talks about readying apprentices:
Your Bay Area emailer touched on a topic that I believe plays a major role in keeping craft alive—how we, as established tradespeople, train the next generation in the field. I strongly believe that those of us in the field are a point of leverage for making a difference. I have some advice for apprentices based on my time as an apprentice.
I’m calling this Ian’s 8 commandments for apprentices:
- Nothing is learned from constant success. Try it, screw it up, think about it, repeat. After 30 or 40 years of this, retire.
- Ask every stupid question you think of. But never ask more questions than you can give considerate thought to the answers.
- Show up early. Learn how to set the job up. Better yet, ask at the end of the day how to set the job for tomorrow.
- Watch how the experienced people in your trade set up their work. How do they store their tools, set up their work station, arrange their material? If you cannot figure out why, ask. Most guys would love to tell you.
- Understand that you will likely be seeing and experiencing things out of sequence. Until proven otherwise, you are viewed as cheap labor and will get bounced around. Reading, watching videos, and helping someone from the crew on a weekend project will begin to fill in much of the rest.
- Make peace with the following; If you learn how to build a shed, then you know how to build a shed. If you learn how to cut straight and square, read a tape measure and a level, use a square, make accurate marks, and apply right triangle trigonometry (easier than it sounds), then you will possess the foundation needed to build anything.
- The correct answer to “how much lumber can you carry?” is “two more sticks than the boss.”
- If an employer or a crew is not giving you what you need to learn, find one that will. It is okay to move around when you are learning this business (IMHO).
Contributing editor Ian Schwandt
How can I restore my brick walkway?
Andy from Norfolk, Va., writes:
Dear Fine Home Building Podcast,
I have enjoyed the podcast. I just finished listening through all the episodes. As a DIYer with moderate skill, I have used the podcast and the links you post online for a bit of a crash course in home building. I am in the process of converting a 1924 leaky home, which I purchased about a year ago, into a Net Zero home. I’m working with a building scientist out of Charlottesville, Va., so I have most of the air-sealing and roof-venting plan down.
 |
 |
 |
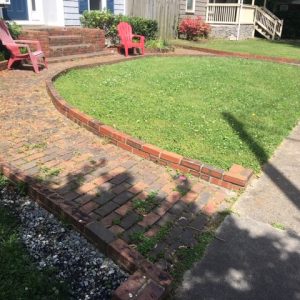
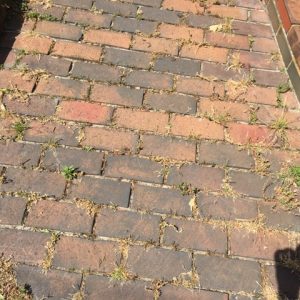
However, my question is more about the aesthetics. My home has a large brick walkway leading up to my home. The oldest photo I could find is an aerial photo from 1978, so I know the bricks are at least that old (but not the same type of brick as the foundation.) While the foundation of the home is a lime-based mortar, the steps on the front of the home and the walkway are some type of portland cement. My question is about how to restore the actual walkway. The bricks of the walkway are still in the correct spot, they have not sunk or moved. However, the area between the bricks is overgrow with grass. I can’t tell if there was mortar there, or just sand there. Do I repoint with portland cement just like it was a wall? I’ve head of polymeric sand being brush in, but the manufacturer website of Sakrete’s product said “do not use on clay brick, as it may stain them.” Any ideas? Thanks in advance for your time.
Related links:
- The Brick Industry: Technical Notes on Brick Construction — Stains
- Weed Dragon
- Aliance G2 Rapid Set Intelligent Polymeric Sand
- Video Series: Building a Brick Walkway
Recommendations for using polymeric sand on clay bricks from Hardware Building Supplier Dealer:
- Red clay bricks are a candidate for staining under any conditions, so it’s best to avoid them.
- Before you apply the sand, you’ll want to make sure the pavers are completely dry most of the way through if you want to avoid staining. This means waiting if you’ve just used a pressure washer, or if it’s rained recently.
- It’s important to remove all of the dust created when you put the sand down. After you have swept everything that you can into the joints, a leaf blower set on low and held at about a 30-degree angle will gently remove excess dust. This dust is what causes the stains once it is wet.
- When watering, it’s important to add enough water to saturate the sand but not so much that you float the polymers out of the sand. The most effective way to do this is to adjust the nozzle to “shower” and water the pavers until no more water will soak in. Spray for a few seconds, then stop and observe. If the joints continue to take water, keep spraying. When they won’t take any more water, and before you float the polymer out of the sand and onto the pavers, stop spraying.
- To protect your finished patio while it’s setting, cover with a plastic or tarp. Make sure to redirect pedestrian traffic for 24 hours and vehicular traffic for 72 hours.
We asked listeners for help with building watertight rooftop decks in episode #187
Ben Bogie, who’s a lead carpenter, answered our call: Regarding rooftop decks, I’ve dealt with this a few times and here’s my SOP. If going over a level surface you need to create pitch, on a wood frame I use pre-pitched poly-iso roof insulation which slopes 1/4 in. per foot. If we’re going over a concrete-slab system, we apply a bond coat and a create a pitched “dry” packed mortar bed like an old school shower pan. Then an EPDM or TPO glue down membrane tied into the wall WRB and terminated at the edges with a sheet metal drip edge. On top of the membrane I use Bison or MRP deck pedestals spaced on a 16-in. or 24-in. grid with 2x sleepers on the flat on top of the pedestals. The pedestals are screw-adjustable for level, and once everything is “tuned” the pedestals are glued down with a high quality compatible exterior adhesive like OSI Quad Max or similar. If there is a concern of wind uplift, I install 4x guard posts before starting any of this, tie them into the structural framing, flashed and counterflashed at membrane install and then the outer courses of sleepers are tied to those guard rail posts.
It’s not the lowest-cost method, but it works and is pretty simple for the average carpenter to pull off correctly.
We also heard from our friend Bob Hastings in Annapolis, Md.
He says to check out Duradek or Dec-Tec.
Fine Homebuilding Recommended Products
Fine Homebuilding receives a commission for items purchased through links on this site, including Amazon Associates and other affiliate advertising programs.

Handy Heat Gun

8067 All-Weather Flashing Tape

Affordable IR Camera


