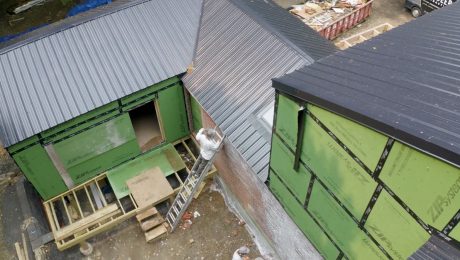
This 1780s Connecticut farmhouse needed a kitchen upgrade to replace a small, dated addition that clashed with the home’s aesthetic. To maintain a level floor and minimize disruption to the surrounding grade and a nearby tree, the builders chose a crawlspace foundation with the floor system framed inside it.
This approach preserved accessibility, protected the existing stone foundation, and facilitated future utility upgrades. Careful excavation, reinforced concrete footings and walls, and a thoughtfully framed floor system provided a solid base for the new kitchen and mudroom. The completed addition blends seamlessly with the historical home while offering modern functionality and design.
Start with a Clean Slate
The original stick-framed kitchen addition, built in the middle of the 20th century, was too small for a growing family and didn’t match the original house. The solution was to tear it down and build a larger one with appropriate architectural details.
Plan for a Clean Break: Sawing through the siding on the addition exterior and breaking through the plaster on the interior prevents the excavator from damaging the main house when pulling down the walls and roof of the addition.
Disconnect Pipes and Wires:Wires to the old kitchen are disconnected, and pipes for domestic water and the kitchen radiator are turned off and cut. We also disconnect and later reroute communication cables and wires running to the well head that cross the excavation area.
Pull Down the Walls and Roof: The excavator demolishes most of the structure and later places it into a dumpster. After the machine has done its work, a pair of carpenters remove the remaining parts of the addition with handheld demo tools.
Clear the Foundation: A hydraulic breaker on a compact excavator demolishes the stone foundation for removal. The excavator then digs a larger foundation hole and places 8 in. to 12 in. of gravel at the bottom for leveling and drainage.
Adding to a Beautiful Old Home
This beautiful Connecticut farmhouse, which dates back to the 1780s, needed a new kitchen. Its existing 10-ft. by 12-ft. kitchen was added in the early 20th century and last remodeled in the 1980s. The cramped, dark space didn’t work for a modern family, and nothing about the addition matched the attractive exterior of the center-hall Colonial it was connected to.
So in partnership with a good design team, our clients hired us to replace the unfortunate addition with a larger one featuring a modern kitchen and a functional mudroom. The roughly 18-ft. by 18-ft. addition would require a new foundation and removal of the existing one.
Prep for the Foundation
A few days before the foundation pour, the crew formed and placed a 12-in. by 24-in. reinforced-concrete footing in a few hours using a 3000-psi concrete mix. A keyway (series of grooves) cast into the top of the footing prevents the foundation walls from sliding from soil pressure.
Set Forms: The wood forms for the foundation walls are connected with form ties that prevent them from spreading when filled with wet concrete. Wood braces hold the forms straight and plumb.
Mark for Forms: With the footing sufficiently cured, the foundation forms are placed on layout marks that show the foundation corners. The crew then uses right triangles and diagonal measurements to check that the layout is square.
Plan for Pipes and Wires: Short lengths of PVC pipe create holes in the foundation for running pipes and wires. They’re securely wired to nails driven into the wall forms to prevent them from moving when concrete is dumped on top of them.
Connect Old and New: Pieces of #5 rebar reinforce the connection between the old and new foundations. A hole is drilled with a rotary hammer, and then the rebar is driven into the hole before the forms are placed.
Add Rebar:Once the foundation forms are set, straightened, and braced, #4 rebar is placed in pairs on top of the form ties about 1 ft. from the top of the foundation.
Form a Ledge: Two layers of 2-in.-thick XPS insulation are nailed to the formwork to create the ledge in the foundation wall that will support the ends of the 2×10 floor joists.
Get Grounded: We cast a grounding electrode into the foundation top for a subpanel that will power a pair of heat pumps for cooling and shoulder-season heating. It’s held in place for the foundation placement by the foam blocks that form the ledge for the floor system.
The spacious lot had great access for equipment and concrete deliveries, but the kitchen addition would be on the uphill side of a slope with an amazing 100-year-old maple nearby. We would need to lower the grade so that the framing and sheathing would be sufficiently above grade to discourage decay and insects.
Unfortunately, the maple and an existing water line running from the well meant we couldn’t lower the grade more than a few inches and not much beyond the new foundation footprint. Of course, we could have maintained the existing grade and raised the addition above it, but that would have meant a step up into the kitchen addition from the main house and a trip hazard.
Foundation and Floor System
We wanted to keep the addition as low as possible, so we built the floor system inside the top of the crawlspace foundation. This method minimized site disturbance and allowed the new kitchen floor to line up with the floor in the main house without a step. It’s the same foundation and floor system we use to keep any new house or addition close to grade for greater accessibility or because of site conditions.
Place and Finish the Foundation
The concrete mixer was able to reach all of the foundation forms with a chute extension provided by the foundation contractor. It took 8 yd. of 3500-psi concrete to form the 3-ft.-tall, 10-in.-thick foundation walls.
Start With a Stiff Mix: The new foundation is deepest where it meets the old bulkhead door. Its depth and the irregular nature of the stone required site-built formwork. To prevent a blowout, this deepest part is poured first with 4-in.-slump concrete (no water added). The low-slump mix is less likely to result in a blowout.
Fill to the Corners in Lifts: After adding water to the concrete mix to increase the slump to 5 in. for workability, we fill the foundation forms moving from the house toward the corner. The concrete is placed in stages (lifts) to prevent the forms from moving.
Trowel Smooth: Once the forms are filled to the correct height, the top of the foundation is floated with a magnesium float.
Check for Straight: The foundation crew stretches stringlines from the foundation corners to ensure the forms are straight. The forms can be pulled and the braces adjusted for straightening.
Install Anchor Bolts:After the tops of the foundation wall are smoothed, the anchor bolts are wet-set 4 ft. on-center. We opted for 10-in. anchor bolts in case we’d need a second plate to make the new floor system match the old.
With old houses like this one, the deepest courses of stone in a stone foundation are only minimally mortared, especially on the soil side. The stones become unstable when the soil around them is removed during excavation.
Even though a full basement is only a little more money in a situation like this, we opted for shorter crawlspace walls over a full-height basement to minimize excavation close to the existing stone foundation to prevent undermining it. We like crawlspaces under kitchen additions because they make future changes and upgrades easier compared to slab-on-grade or pier-and-beam foundations.
Place and Finish the Slab
A gravel layer and 15-mil plastic sheeting under the crawlspace slab prevent water in the soil from moving through the slab into the crawlspace and evaporating, increasing humidity levels inside the house. The slab was poured and finished the same day as the foundation, using the same concrete delivery.
Place the Concrete: A little more water is added to make the concrete more workable, and then the concrete is spread throughout the crawlspace at a 3-in. to 4-in. thickness.
Check for Level:The slab is screeded flush with the top of the footing, and the center is checked for level with a rotating laser in several spots.
Screed and Smooth: The slab is screeded and then bull-floated for a reasonably smooth surface. This crawlspace, which is strictly for access to pipes, ducts, and wiring, doesn’t require a troweled finish.
Strip and Fill: The following day, the foundation crew strips the forms. They break away or grind down any concrete or cement paste that’s seeped through the forms. They also seal the utility penetrations that pass through the foundation corner with hydraulic cement to prevent groundwater from leaking in.
Final Touches
With the foundation and floor system in place, the rest of the addition was very conventional: 2×6 walls with insulated sheathing and dense-pack insulation and a drywall interior. We framed the roof with trusses and had the HVAC contractor rough in the refrigeration lines over the kitchen ceiling for the kitchen and second-floor minisplits for cooling and supplemental heating. Once the drywall was hung and finished, we insulated above the ceiling with loose-fill cellulose.
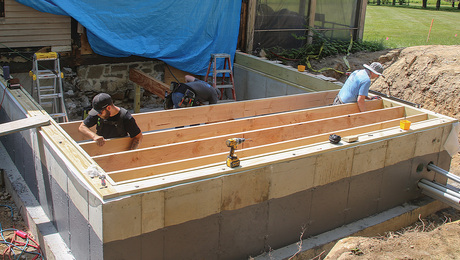
Frame the Floor
Two mudsills connect the walls and floor system to the new crawlspace foundation walls. The wood elements are separated from the concrete with plastic seal sealer.
Fasten the Mudsills: A 2×6 PT mudsill set on the anchor bolts will connect the exterior walls to the top of the foundation, while a 2×4 PT mudsill will connect the floor joists to the foundation. The 2×4 is fastened to the foundation ledge with 1⁄4-in.-dia. by 3-1⁄4-in.-long concrete screws.
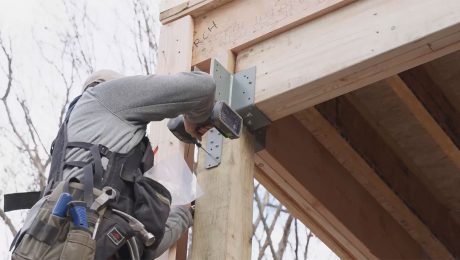
Set the Girder:A two-ply LVL mid-span girder allows the floor joists to carry a large kitchen island in the middle of the floor. The beam bears on 4×4 posts over thickened sections of the slab. Galvanized post bases installed with concrete screws connect the posts to their footings.
Set Joists: The floor is framed with 2×10 joists, which provide a sturdy floor with the minimum depth. I-joists would have to be deeper or tightly spaced to achieve a similar load capacity.
Set the Rim Joists:Once the mudsills are in place, we cut and fasten PT 2x10s around the floor system perimeter. We use 2-1⁄2-in. powder-actuated fasteners to hold the rim joists in place until the floor joists are cut and fit.
Sheathe the Floor: Once all the joists are installed, a layer of subfloor connects the mudsill for the exterior walls to the floor system. Construction adhesive on the joists improves the bond and prevents squeaks.
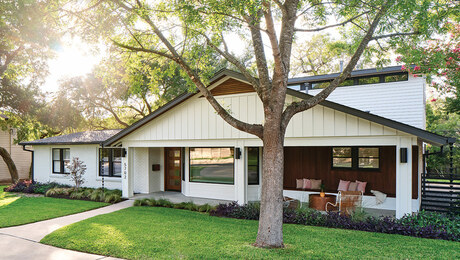
In addition to the new kitchen and mudroom, we did some other work on the house too. We rebuilt and replaced gutters and flashed the dormer windows with copper when we installed a new cedar roof. Our electrical contractor moved the electric lines underground when a new higher-amp service was installed. It was a satisfying project and it was nice working with kind, enthusiastic clients committed to preserving their beautiful old house. It’s rewarding to see how the new addition looks like it’s always been there.
Building as Usual
Once the floor system was finished, the rest of the kitchen addition was typical construction: 2×6 walls, a truss roof, and clapboards over taped water-resistant insulated sheathing.
Frame the Walls and Roof:A small daily crew frames and raises the 2×6 walls without sheathing to make them easier to lift. Raised-heel “energy” trusses are used to frame the roof. Loose-fill cellulose covers the drywall ceiling under the vented red-cedar-shingle roof.
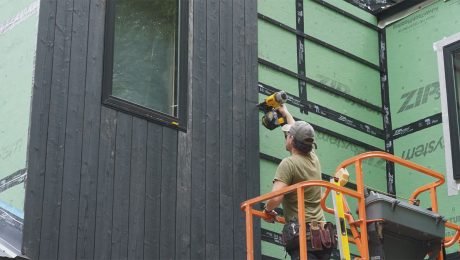
Sheathe the Roof and Walls:Walls are sheathed with insulated Zip R-sheathing using 3-in. ring-shank nails. The sheathing is lapped over the PT 2×6 mudsill on top of the foundation walls. The 24-in. on-center trusses are covered by 5⁄8-in.-thick Zip system sheathing.
Make it Match: The floor of the original Colonial is out of level, so the transition between the main house and kitchen addition is refined with a grinder equipped with a 60-grit sanding disk. A second 1⁄2-in. layer of subfloor in the addition will bridge the gap between old and new.
Like It Never Happened: The new addition’s clapboard siding, 12-over-8 windows, and cedar roof match the older parts of the house and make it appear as though the kitchen was part of the original build.
— Dave Seegers is a partner with Hudson Valley Preservation in Kent, Conn. Photos by Patrick McCombe.
Fine Homebuilding receives a commission for items purchased through links on this site, including Amazon Associates and other affiliate advertising programs.
All New Bathroom Ideas that Work
Everyone wants their bathrooms to be beautiful, but few know the challenge of arranging all the fixtures, storage, and convenience of a great bathroom into one of the smallest space in our homes. This book has hundreds of ideas to inspire you.
Get Your House Right: Architectural Elements to Use & Avoid
If you are designing or remodeling a traditional home and want to make sure that you get all the finish details right, this book is for you. Marianne’s drawings are illustrative, covering every aspect of interior and exterior finishes.
Code Check 10th Edition: An Illustrated Guide to Building a Safe House
It would be great if this book didn’t need to exist, but it's definitely a must-have. It's a one-size-fits-all code book that's easy to understand and will help you sail through your inspections.
This is a dialog window which overlays the main content of the page. The modal window is a 'site map' of the most critical areas of the site. Pressing the Escape (ESC) button will close the modal and bring you back to where you were on the page.
We use cookies, pixels, script and other tracking technologies to analyze and improve our service, to improve and personalize content, and for advertising to you.
We also share information about your use of our site with third-party social media, advertising and analytics partners.
You can view our Privacy Policy
here and our Terms of Use here.