DIY Refinishing of Victorian Doors
OHJ reader and blogger Gina Bellous describes her method for refinishing the historic Eastlake-style doors she came to collect.
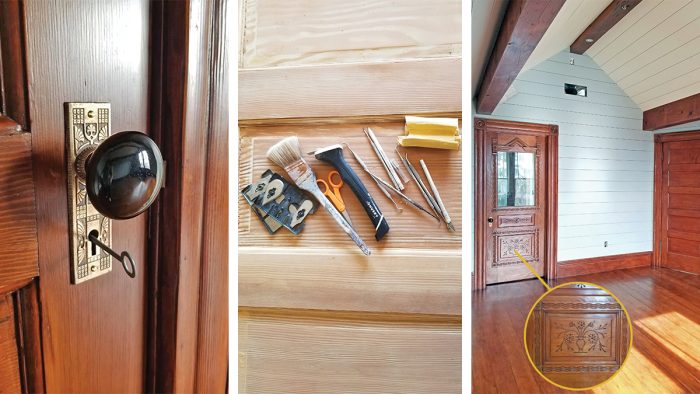
A door of Douglas fir does not take stain very well, especially after it’s been subjected to six to eight coats of paint over a century or so. I’d already spent months (years, actually) hand-stripping millwork and the existing five-panel doors in my Queen Anne when I developed a passion for Eastlake doors.
I began to collect them, with an eye toward placing these beauties in key locations that lacked doors, especially in the primary suite upstairs. I learned the hard way to remove every bit of paint and shellac from a door before moving to the next step. Old shellac and stain, hardened into crevices, will show if it isn’t removed.
 |
 |
It’s especially tedious to pick out, but I use a contour scraper with sharp, pointed head to remove it. Once every scrap of residue is gone, I apply a pre-stain conditioner that seals the wood and helps a stubborn wood like Doug fir accept stain without unevenness or blotching. Even with the conditioner, some doors will show a lot of unevenness.
Darkening a Light AreaIn areas that are too light or lack the reddish hue of the rest of the door, Gina Bellous dry-brushed a transparent layer of oak-tinted gel stain— just enough to lend those areas some color. Use a high-quality, soft, natural-bristle or synthetic brush to apply, and keep it loaded with shellac. If it is set down for even a minute, it will harden.
|
Working With Shellac
When I stripped the woodwork upstairs, I discovered it was originally finished with shellac. Since I wanted the beautiful clear grain to be the star, I decided to use shellac on the plainer sides of the Eastlake doors and a wiping stain for the fancier decorated sides. When I tested shellacs, the one that came closest to the original finish was garnet dewaxed shellac, so I began with that one.
I discovered I had to work really fast, because the shellac begins to dry almost immediately. I used a staining pad to lay down the first coat. Because the shellac had a reddish cast, I added a few drops of a dye stain (Transtint) in a dark-walnut color to tone it down. I applied two coats of the garnet, and two of a Bysakhi shellac, which has a very durable finish. I sanded between each coat and then fine-sanded the last coat to take the shine down a bit, buffing it out.
About Shellac“Orange” shellac’s lustrous glow is the preferred finish of many a restorer, despite its lack of resistance to water or alcohol. Properly applied, perhaps protected with paste wax, its beauty is unrivaled. When liquid shellac is applied, the alcohol evaporates and shellac forms a resinous film. Back in the day, this type of evaporative finish was called “spirit varnish”—spirit for the alcohol and varnish for the clear or tinted finish. The amount of flake in the solution is measured in the “pound cut”—a one-pound cut has a pound of flakes or buttons per gallon of solvent. The cut affects the look, workability, and drying time of the shellac (higher cuts = more viscous and harder to work with). Use the thinner, one-pound cut as the first coat, then follow with two- and three-pound cuts for later coats. Use long strokes to brush the shellac out. |
Applying Stain
For the fancy side of the same door, I used a wiping stain (Old Masters Provincial). I like to stain the door standing up next to finished woodwork so I can make sure the stain matches as closely as possible. I brush the stain on in sections and wipe it off as I work, faster than the directions recommend. On a five-panel door, I might apply stain very quickly to two or three panels before wiping. Then I go back and add more stain where needed.
 |
On one of the first doors I stained, there were several areas that barely took stain. The blond wood, next to wood with reddish highlights, looked dead. My fix was to dry-brush on an oil-based gel stain in a dark, oaky color called Candlelite, from General Finishes. With the brush not fully loaded, I dry-brush the stain lightly on the dull areas. I keep the application fairly transparent, moving quickly because gel stain dries quickly. Once it’s on, the lighter areas blend in with the rest of the panel.
Home-Mixed ShellacThe deep-amber color of Victorian woodwork comes from shellac, a resinous material made from the secretions of the lac beetle. While you can buy shellac in liquid form, it then has a shelf life of six months or less, which is why shellac most often comes in flakes or buttons.
For a thin, forgiving shellac, try a test-sized 1-pound cut. Add about an ounce of shellac flakes or crushed buttons to 3 or 4 ounces of denatured alcohol in a glass container with a screw-on cap. Cover the container and give the mixture a shake every 15 to 30 minutes until it’s fully dissolved. Then strain the mixture through cheesecloth before using.
|
After the stain was fully dry, I applied four coats of clear shellac, sanding with a finishing grit (220 to 300-grit sandpaper) between each coat. Then I waxed the door to give it a beautiful hand-rubbed finish. The grain just glows now.
Resources
|
— Written and photographed by Gina Bellous.
RELATED STORIES
Old House Journal Recommended Products
Old House Journal receives a commission for items purchased through links on this site, including Amazon Associates and other affiliate advertising programs.

RCordless Multi-Purpose Battery-Powered Scrubber

3 Step Double-Sided Step Stool

DEWALT DCK240C2


