Podcast Episode 674: Trimming Out Stairs, Extension Jambs, and Ground Gutters
Listeners write in about DIY heat-load calcs and extension jambs and ask questions about trimming out stairs, ground gutters and improvements in construction tools.

Welcome to the Fine Homebuilding podcast, our weekly discussion of building, remodeling, and design topics aimed at anybody who cares deeply about the craft and science of working on houses. This is senior editor Patrick McCombe. I’m joined by Fine Homebuilding associate editor Grant Baver, Fine Homebuilding editorial advisor Mike Guertin, and producer Andres Samaniego. Please email us your questions to [email protected].
You can find previous podcasts and check out the show notes at finehomebuilding.com/podcast
 |
Check in:
Grant: FHB stucco content and frozen pipes
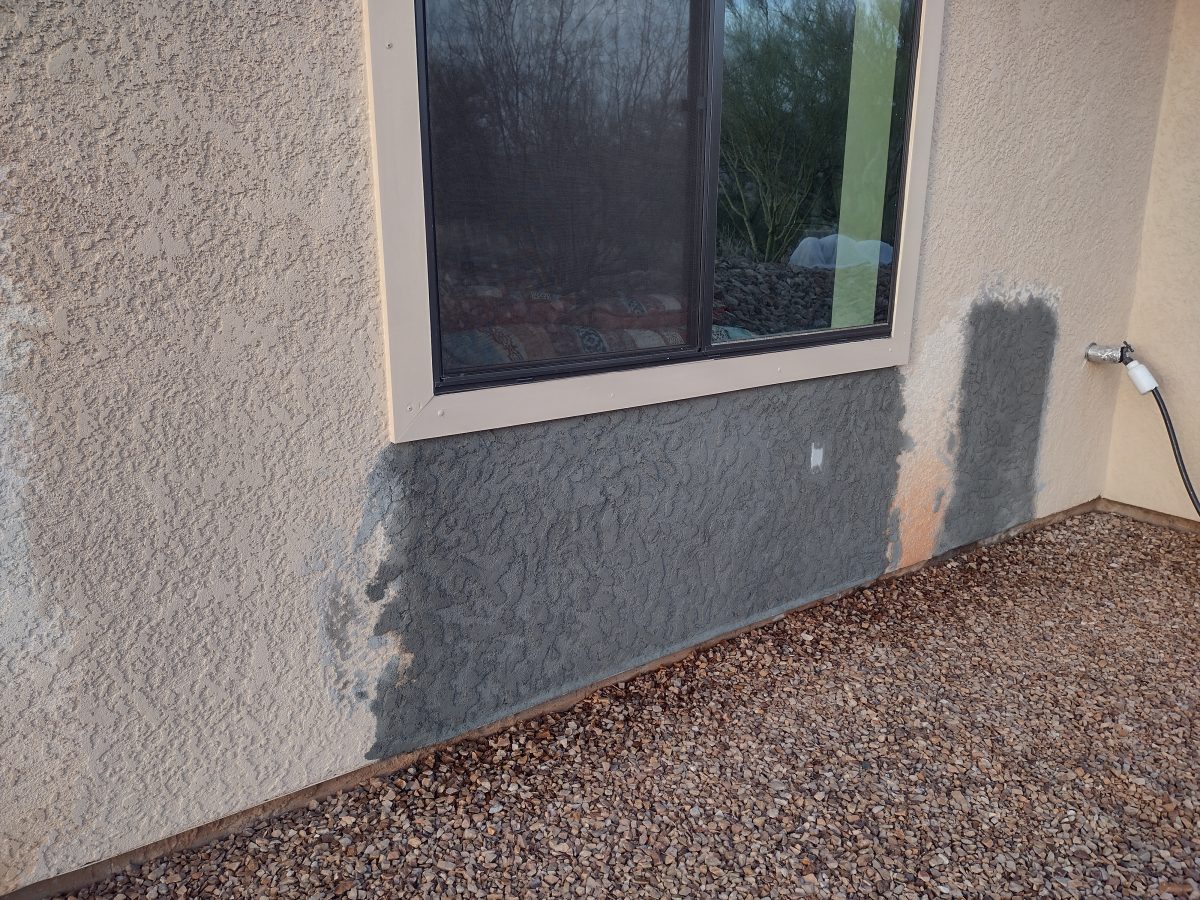 |
Mike: Stucco repairs on his Arizona house
Patrick: Reminder to listeners it’s the time of year FHB hits the road for articles
Listener Feedback 1:
Phillip writes:
Hi FHB podcast crew,
I have a couple thoughts about Episode 668.
My first thought was about Sam’s balloon-framed house. He should definitely use closed-cell foam on the whole thing. If he’s worried about off-gassing, he should request a foam that’s Greenguard Gold Certified, then install a ducted and balanced ERV and keep the house slightly pressurized. Closed-cell foam is going to be the most realistic way to air-seal the house, and the right insulation company will use a blower-door test to confirm that.
My second thought was about the DIY Manual J calculation. I think the listener had it right by calculating how much cooling he was currently using. You would be hard pressed to get a more accurate load calculation from a typical HVAC contractor.
My third thought is about extension jambs. I’ve done them every way that was mentioned, and every situation is different. If there’s a foolproof method for every scenario, I’d love to hear it. I prefer to pre-build the jambs with the trim/sill and install it all as one piece.
And last, congratulations to Grant for joining the team, and thank you all for doing what you do. Keep Craft Alive!
Phil
RELATED STORIES
- Getting Good Load Calculations
- Sizing Heating and Cooling Equipment
- Commissioning HVAC Equipment for Efficiency
Listener Feedback 2:
Ian writes:
Hello FHB team!
I’m a pretty ambitious DIY builder in Ontario, Canada, and also an engineer and certified energy auditor. In podcast 668 you wondered about ways to do a DIY version of a Manual J calculation. (Here in Canada, we call it an F280 Heat-Loss-Gain).
The traditional way, as you point out, is the tedious process of adding up all the surfaces that lose heat, estimating the R-value and surface area of each. There a couple of other ways to get an estimate on the overall size needed for a heating system. The easiest is to figure out the BTU/hr that your heating system is adding to the house, and then measure how much goes in for an hour or two. You then scale this up to account for what would happen if the outdoor temperature was really cold (like at the outdoor design temperature for your location).
Many furnaces will have output BTU/hr on the nameplate. If not, use input BTU/hr x efficiency.
Here’s an example with simple math to show the concept:
The furnace has an output BTU/hr of 60,000. We sit by the hot air register on a winter evening and find the furnace cycling on and off, but over an hour it ran a total of 30 minutes. That means that the house received 30,000 BTU of heat in that hour. So 30,000 BTU/hr was required to hold the indoor set point that evening. Now look at the temperature difference between inside and outside—the delta-T. Let’s say it was 72˚F in the house and 32˚F outside—the delta-T is 72-32=40˚F.
Now look at the delta-T when you’re at your outdoor design temperature. If that was say -8˚F, then the delta-T would be 72-(-5)=80˚F.
The delta-T at the design temperature is twice what it was on the test night, so the BTU needed would also be double. So we would need 60,000 BTU/hr from our heating system. It’s common to oversize about 10% from the design number for a furnace, but of course sizing an air-source heat pump is more complicated.
In a real example, the math will be slightly more complicated, but the concept is that heat needed is directly proportional to the delta-T. Some “smart” thermostats have some data logging built in, which would tell you the run time over a longer period of time. This method has some advantages and drawbacks compared to a conventional Manual J:
Advantages:
- Quick and easy.
- Accounts for air leakage and internal gains such as plug loads, which are usually just guesses in a Manual J calculation.
Disadvantages:
- Accuracy could be lost if:
- Internal gains during the test are not typical (e.g., baking a turkey in a small house).
- The heating system output number is not accurate. For example, if the furnace is dual-firing, you’d have to know at which rate it was running. If you don’t have output BTU/hr from the nameplate, you have to make assumptions about the efficiency, which could be wrong.
- You need to have a single source of heat input that is measurable—a woodstove, for instance, would be very difficult.
- If the winds on the test night are not typical, that could affect accuracy.
- Manual J gives you room-by-room BTU needs; this method does only the whole house.
More or less the same method could be used for sizing cooling, but I’ve never done that, and you’d have to decide if your test day had typical humidity or not. You can also do interesting things like reading the gas meter before and after your test, or the electric meter if the heating is electric.
It’s also possible to get the design heat-loss number from utility bill analysis. That’s beyond the scope of an email, but basically you plot fuel use vs. heating degree days and statistically draw the best straight line through it. This method actually teases out the part of fuel that went to space heating vs. other loads like domestic hot water.
Cheers,
Ian
P.S. My own house problems coming soon…
RELATED STORIES
Question 1: How do I finish the banister wall in my staircase rebuild?
John writes:
Hello everyone at FHB,
Thank you so much for all the years of excellent podcasts. I’m writing to you all hoping for some guidance on what to do with the staircase in my home in eastern Tennessee. My home was built in 1977 and is a very basic ranch with a partially finished basement.
I’m 35 with two kids under four years old, so of course I decided to bite off more than I could chew and tear apart the ugly staircase leading down to our basement. The old stairs were undersized, chipped, squeaky, and had some type of mystery garage floor type epoxy that developed a tackiness over the years. I was winging it and using cheap materials I had around the house—2×12 pine boards and ¼-in. plywood. I figure even if it turns out poorly, I’ve got nearly zero dollars invested in it, and since I didn’t use any adhesives, it’ll be a ten-minute job to disassemble and rebuild with a nicer hardwood down the road.
Two weekends later, I met my goal of “good enough for now” on the stairs themselves, but I failed to take into consideration what to do with the ripped up drywall on the wall with the banister. I am lost on how to cover up these studs in the half-wall. It was drywall before, but I would much prefer to use a material I could unfasten should I decide to remove the treads. Plus, who in their right mind likes doing drywall work?!
Whatever material I end up choosing, how in the world do I accurately trace or cut it to fit around the nose of each tread? I read a few related articles on FHB about scribing skirtboards to fit, but wanted to ask if a skirtboard is the best application given the very narrow space between the nose of each tread and this trim board that frames the top of the half-wall. It’s difficult to see in photos, but the flat 1×6 trim board that frames out the top of the half-wall overhangs the treads by about ¾ in.
Thanks in advance if you have any ideas or suggestions!
John
RELATED STORIES
Question 2: Will an underground gutter situation work for me?
Ben K. writes:
Greetings FHB Crew!
As always, thank you for the great content and informative guessary! (But let’s be honest, your “guessery” is usually spot on.) I have both a comment and a question.
My comment is in regard to the extension jambs conversation in episode #668. I’ve been a finish carpenter for around 10 years and have come across many wonky windows. Often our crew will try to convince the builder to install windows without the pre-installed window jambs from the factory. Inevitably, due to poor framing around the window opening or a thick plaster coat, the drywall is proud of the pre-installed jamb. For the less egregious situations, it often leads to a combination of bashing the drywall around the jamb, using a clamp to draw the window closer to the plane of the drywall, using finish screws to make sure the window jamb doesn’t separate from the trim, rolling the miters if possible, and even after all that, it never truly looks right. It might pass for paint grade, but for stain grade it can leave much to be desired. It also leaves an awful mess.
My preferred method is to make my own extension jambs. I precut the lengths of the head and sides, butt them up to the window, mark the outside flush with the drywall in each corner, and then connect the dots with my track saw. Also, depending on the situation, I’ll use the track saw to cut the sill where it bumps into the window. When I cut the sill notches for around the drywall, I cut it so the outside of the jamb legs will be flush with the notch leading back into the window. The reason for this is related to something else that was brought up: to preassemble or not to preassemble the casing onto the jambs, “that is the question.”
Always preassemble. Since your jambs are in line with the drywall, and your sill notches are cut to accept the jamb legs in the correct spot, there’s little reason to not preassemble. You can prebuild your extension jambs and sill and that gives you all the measurements you need for your casing. Doing it this way has helped me a couple of ways;
- You can do 90% of the work at your bench, so there’s less time running around and it’s easier to make sure your cuts all line up with correct reveals.
- You look like an absolute boss preassembling the whole window detail and popping it into the opening.
Attaching all that to the window depends on the type of window. I typically don’t glue the jamb to the window. I prefer to fasten or glue to the sides of the opening. If minimal nail holes are desired, I will used shims that are held back 1/8 in. or so from the outside of the jambs. I’ll then put PL 375 on the shims, install the unit, nail the casing, and walk away. Sort of a “wet-setting” method.
If it’s paint grade, I’ll use drywall or cabinet screws as my “shims” and then use long enough nails or finish screws to attach through the jambs and into the rough framing. The screw shims provide a lot of adjustment to get the reveals just right. If the builder did request attachment to the window, I would back-bevel the extension jamb 5 degrees so it would provide a cavity for PL to sit in without squeezing out. Of course, there are 10 different ways to accomplish the same thing and there are multiple details I didn’t get into, but this method works for me.
Now my question:
My wife and I recently bought a two-story, 1850s Carpenter’s Gothic house. The listing originally said it was built in 1900, but as I was cleaning out an original built-in, I found a newspaper from 1858. What’s one of the front-page articles? “Dysentry and Diarrhea—a season to be expected and dreaded.” How times have changed…There are many updates that we will be doing to the house that I will probably be writing in about to get your thoughts. The first one is about water seeping into the basement through the fieldstone foundation.
There are some gutters on parts of the house, but not on all. The previous owners did connect some (but not all) of the gutters to underground pipes. Those dump into the driveway, which just creates other issues. Anyway, I wanted to explore Mike Guertin’s underground gutter system, but I have a few questions:
- Does it have to be EPDM, or would a thick plastic work just as well?
- How far down does it need to be? 12 in.?
- We have 20-in. overhangs all around the house. Would coming out 4 ft. from the of the house be enough, or should it be more?
- We have basement window wells that greatly contribute to the water coming in. My thought is to remove them and block them up, which I think would make it easier to have a continuous underground gutter. The basement is not finished and will never be used for anything other than mechanicals. Also, the HVAC contractor said if we did seal up the windows, there is enough volume of air in the basement that we don’t need to be concerned about our propane furnace having issues, which has its own air intake anyway. Does all that make sense, or am I missing something?
- Do you need to have the underground gutter terminate into a buried perforated pipe that will lead the water away, or will it sufficiently percolate into the soil without the need of a pipe?
- We want to use river stone or some kind of rock on top of the gutter. Or should it be compacted top soil?
Our goal, which might make some people upset, is to have no gutters on the roof at all. For one, it’s a steep roof and the water shoots over most of the existing gutters. I know there are solutions for this, but I would like to decrease the amount of ladder work I would need to do each year in maintenance. Also, I would need to do a fair amount of fascia work in some areas to accept a gutter. In the end, if we can just let the water fly off the roof and be directed away by means of an underground gutter, that would be nice.
Any advice you can give would be greatly appreciated! More to come in the future!
Ben
Sterling, Mass.
RELATED STORIES
FHB All-Access Membership
Well unfortunately that is all the time we have for today, Thanks to Mike, Grant, and Andres for joining me and thanks to all of you for listening. Remember to send us your questions and suggestions to [email protected] and please like, comment, or review us no matter how you’re listening–it helps other folks find our podcast.
Happy Building!
Fine Homebuilding Recommended Products
Fine Homebuilding receives a commission for items purchased through links on this site, including Amazon Associates and other affiliate advertising programs.

Reliable Crimp Connectors

Affordable IR Camera

Handy Heat Gun