Making and Installing Wood Wall Paneling
An expert carpenter details the steps of building and installing veneered wall paneling.

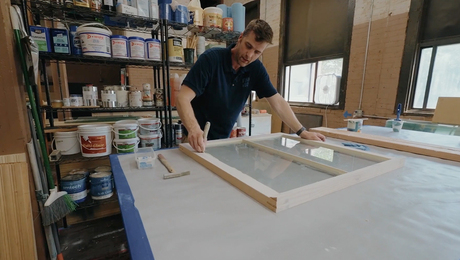
Casey Knips, owner of True Fit Carpentry, walks through the steps of building and installing white oak wood paneling with a hidden door. From starting with a plumb substrate to matching the wood grain and everything in between, Knips emphasizes the importance of preparation and precision, offering helpful tips and tricks along the way.
Here’s the Transcript
My name is Casey Knips. I own True Fit Carpentry based in Minneapolis, Minnesota, and on this job, I am installing red oak wall paneling. The wall also features a couple of hidden doors. This job required a lot of detailing, a lot of planning. The first thing that I did was shim these walls flat and add a plywood substrate that made it much easier to use the hidden clips that I was using for this job. I’m very happy with how it turned out, so let’s get to it, and I’ll show you how I did this.
Start With a Great Substrate
The first step in the process of attaching these panels is this plywood layer here. This is a layer of 1/2-in. Baltic birch, and you can see I needed to pre-shim this wall. Even though it was timber strands, there was still quite a bit of shimming that I needed to do, but with shimming and adding the 1/2-in. Baltic birch, it gives me a very flat surface to work on.
These panels get a concealed fastener, which I’ll show later, and it just makes the install so much easier. I can put a fastener anywhere on this plywood, and then these panels just snap into place. I have done most of the shimming here, but I’ve left off a couple of areas to show how I like to do it. I purchased some broad fixed shims — they’re just flat plastic shims and they range from 1/32 in. to 1/4 in., and you can tell that by the different colors.
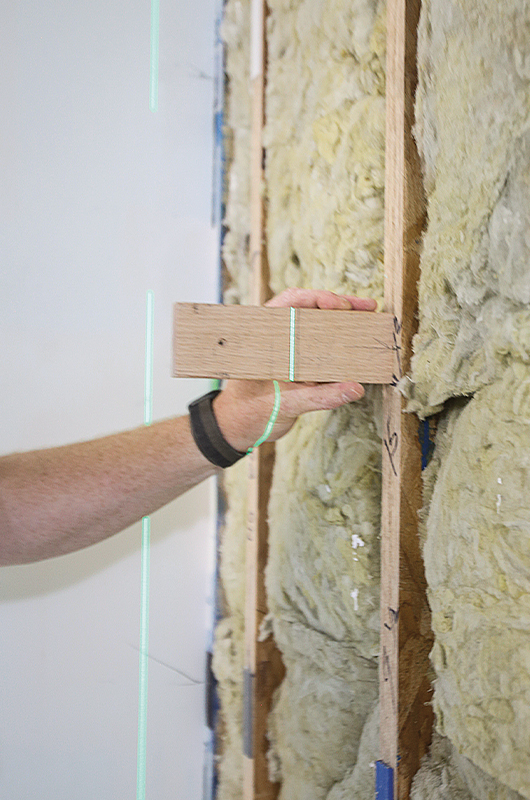
Use a Laser
I set my laser up and got it to be parallel off the existing framing and picked two points, shooting a 360° line all the way around the wall. That allows me to go everywhere and set shims. Because we’re working with a hidden door, I wanted it to be flat and plumb.
When I put a level on the framing, I am reading plumb, which is going to be very helpful when installing this door. Now that I’ve double-checked everything on this wall and I know I like it, the next step is to add the 1/2-in. plywood. I chose 1/2-in. in this case because it was less weight and more cost-effective. I make sure that the first course starts level, so I shim it up off the tile floor.
Glue and Screw
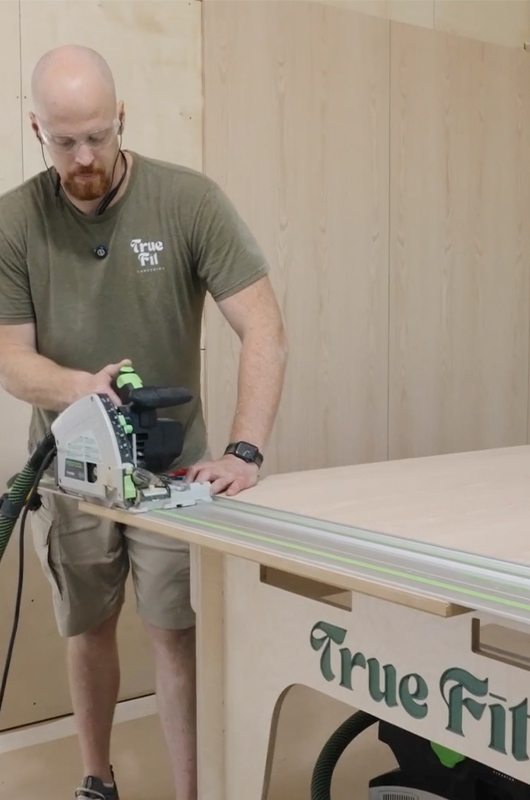
I chose shorter screws and then put just a few dabs of adhesive to back it up. I didn’t want to use too long a screw — I didn’t want to worry about hitting anything. The laser line helps set the first course and makes the cuts a lot easier when you start off as level as you can. I’ll just put in a handful, and I’ll get the next piece on. The adhesive doesn’t set up super fast, so I’ve got time to work with this before anything sets up.
Now that the first course is done, I can install all these pieces. I haven’t precut a lot of this, but a good chunk of the screws are already predrilled. I’ll put that up there and then start marking for the screw locations, predrill, and add the screws. I’m going to shut the laser off and then start installing the rest of these pieces.
Look at the Layout
Now that the plywood is on, the next step is to do a little layout. The left-hand portion is the wall that we just straightened and added the plywood to. I want to do a layout from this left-hand, left-side jamb all the way to this exterior wall. I know my dimensions are pretty close, but I guessed how far I would need to shim this out.
Now I know with the door and the panel and the intersecting rabbets that I need to be 3/8 in. back from where the jamb is. I also need to know where the jamb is, so now that I’ve laid that out, I’m going to put that on the wall right now and work backward.
Based on my computer drawings, we’ve got the jamb here. My finished panel is going to be 3/8 in. past, and I know how much space is left between my plywood and the back of my panel. It’s just a shy 3/16 in. taken up with these connectors. I know that this dimension is 9-1/2 in., so I just confirm that because that needs to be 9-1/2 in.
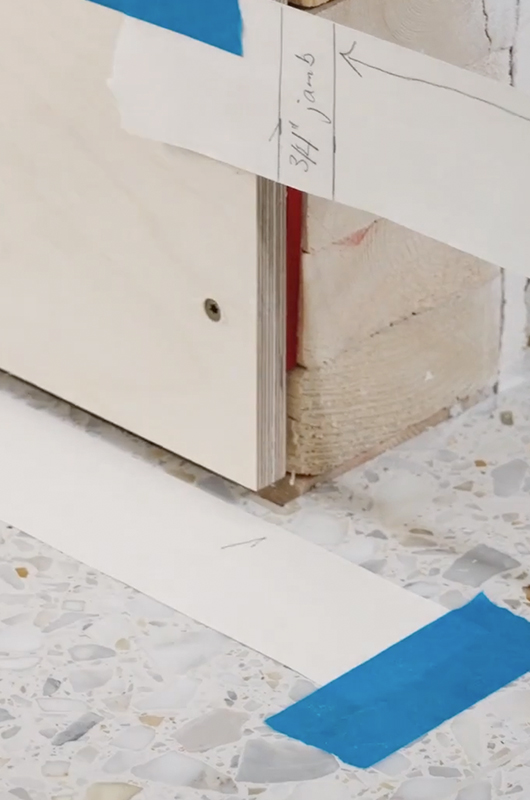
Measure and Mark
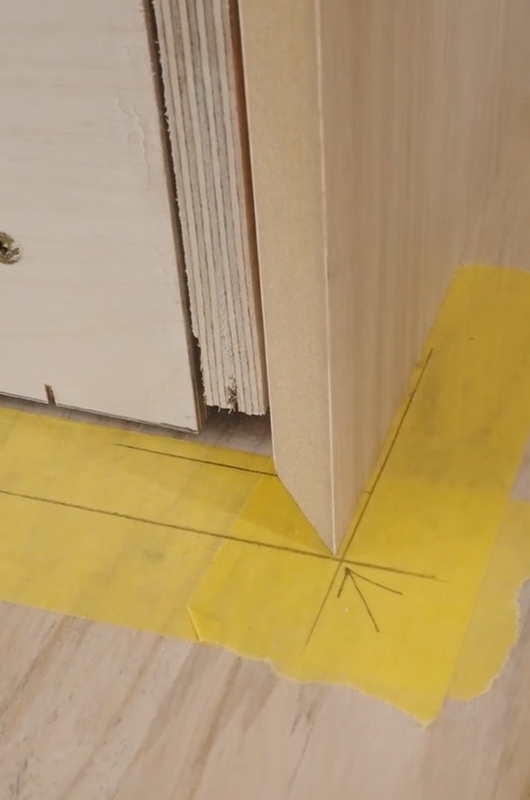
Now that I know this is where the jamb is, I can lay out some more drywall tape along here and mark this down. I’m trying to go for equal-size panels. The door is going to be slightly different, but I want these three panels to be the same.
Now that we transferred that jamb location down on the floor, I know that my finished intersecting rabbets are going to be 3/8 in. where my panel starts. I take a measurement between the exterior wall and get 114 in. I want equal-size spacing. I have three panels and two 1/8-in. gaps (or 1/8-in. reveals). So taking that 114 in., I subtract 1/4 in., getting 113-3/4 in., then divide by three. That gives me a panel width of 37-15/16 in. I start my panel and hold myself at the 1.
If I’m at 37-15/16 in., I need to be 38-15/16 in., then mark where my 1/8-in. gap is. I repeat the process, marking 38-15/16 in. and then over 1/8 in. for the 1/8-in. spacing. That puts us at 37-7/8 in. I want to be able to do this layout, draw lines up, and place hidden connectors. I’m not worried about the slight variations because I will have to scribe to this wall, so some panels will be slightly different sizes depending on where you measure.
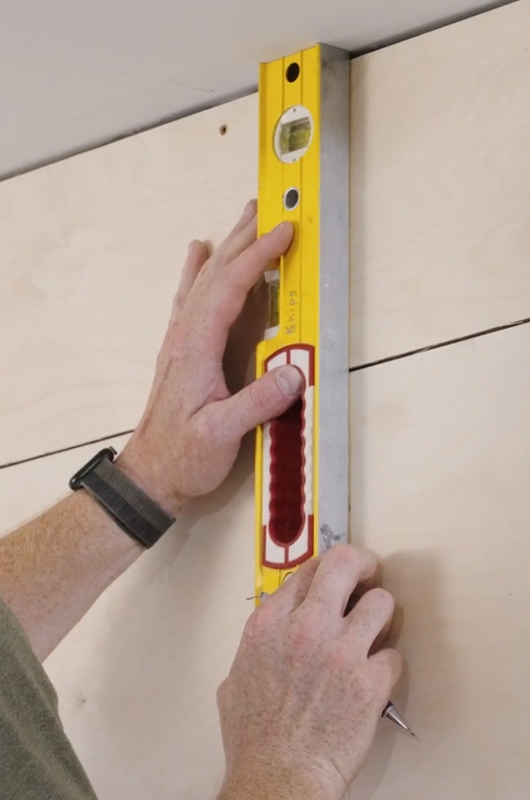
Confirm the Layout and Mark for Installation
Now that I have the layout, I’ll take my 8-ft. level and plumb these lines up to the soffit. This will help visually confirm the spacing and figure out the location for the hidden connectors. I can mark this as panels 1, 2, and 3 because my diagram shows all the numbers for these panels. The grain needs to line up since these are continuous sequence panels.
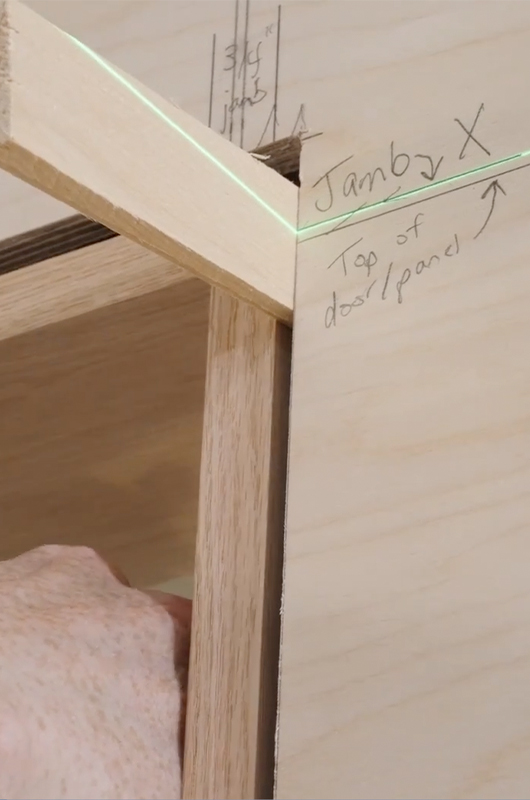
This setup ensures that the top of the doors aligns with the soffit at the corner. The 1/8-in. reveal above will be above that. These panels get scribed tight to the soffit here, but then the 1/8 in. will die into the face. I’m going to transfer this lineup; I’ll just use my plumb bob, because then that will give me a height or a location of exactly where I want it.
Now that one side is marked, the inside dimension of my jamb is 36. So I’m going to go on the 37, mark the 1. In doing this, I’ve already done this before to know where the jamb is going to be, but you can see here how much shim room I have on either side, because you don’t want it to be too tight. Here I have about 1/4 in.
When I did this layout, I accounted for 1/8-in. shim space from the jamb to the framing. So that’s about 1/8 in., and when we get up top, I’ve had about 1/4 in. on that side. This side’s a little bit less than a quarter. Then when we undo our tape, we’ll have about 3/16 in. on that side.
I’ll start off on this side. I know where my jamb is, then I can mark the location of where this top panel is going to have a small panel right here. So just imagine this coming across. This will be the top of the door, top of the panel. The 1/8 in. will die into the soffit. I’m doing the same thing on the other side with how I want these panels to overlap each other, this is how this side ends up.
Cut and Assemble the Jamb
Now that we have that, the next step is cutting the jambs to length, mortising for the pivot door hardware, pre-assembling, and then putting this in the opening. I added a 1/16-in. roundover to break the corner so it’s not so sharp and so I can treat these as two separate pieces. I didn’t want to hide the seam, so I intentionally put a 1/16-in. roundover on each side. This way, it breaks it up—this is the panel, this is the jamb, and that’s the line.
Now we are going to assemble the side jambs to the top. The way I like to do it, and it works better with this detail, is to have the top head jamb overlap the side jambs. You can see over here what I was talking about earlier—one side is 3/8 in. wider than the rest of the jambs, and that is on purpose. This side is flush, but that will make more sense once the panels go on.
In order to do this, what I have found works pretty easily is to just flush these up. I know I want to be flush on the bottom, and my bench is flat. So I can just take this, put a little 23-ga. pin, and tack it right there. What that allows me to do is predrill for some screws, and I’m not worried about this moving.
Make Adjustments
Now that we have the jamb in place, I’m going to take some shims and pin the top two corners so it does not move side to side. It also keeps it in the right spot, front to back, in the opening. Once that is set plumb, to get that exact pivot point down on the floor — because we need to mount the bottom bracket for the pivot door — I’ll set my laser up again. I’m going to go 1/8 in. lower than what we were, and that’s going to be at the top of my door.
Then I have a little 3/16-in. gauge block that I’m going to put on the tile floor, and that’s exactly the distance I want between the door and the tile floor. Then I measure from that block up to the laser line; it’s a very easy way of getting the exact door height that I need.
Now that we have the door cut to final length, we add the hardware. We’ve already done the hardware at the top of this jamb. We need to focus on getting this bottom bracket installed for this pivot door. This is the last thing that needs to go in before the door can be installed.
Place the Door
I’ve already drilled one hole in this terrazzo floor tile; it’s very soft and doesn’t take much to drill. I’m going to drill oversized holes for these four locations, but I’m also going to take some double-sided tape and stick that down. Then when I’m drilling my screws, it won’t slightly move either way.
The next step is to bring the door over here, put it on the bottom pivot, and get it swinging. With this pivot-door hardware, we are secured at the floor and at the top of the head jamb. This pivot-door hardware does not rely on these jambs, so I can get this door in the opening. The most critical part is ensuring that the bottom bracket is exactly in line with the top bracket. That way, you know it is plumb in both directions.
All I need to do is match this gap that I have here. In this case, it was just a gray shim and one playing card, and I’m going to work my way down. You see, I have a bigger gap here. I can leave that shim in just like that and take another shim to get it tight. I don’t want to put any face screws or nails into the face of this jamb, so I’ll take a drill with a countersink, drill at an angle, and drive a screw in. Once that screw is in, I can pull these shims out, and I’ll have exactly the gap between the door and the jamb.
Locate and Drill Holes for the Wall
Next step in this process — the door is in, the jamb is secure — I’m going to locate and drill all the holes for this entire wall. The reason I do that is because with these clips, you have a little bit of adjustability. Right now, I’m just setting up a laser and making a story pole for laying these out based on the locations of the panels.
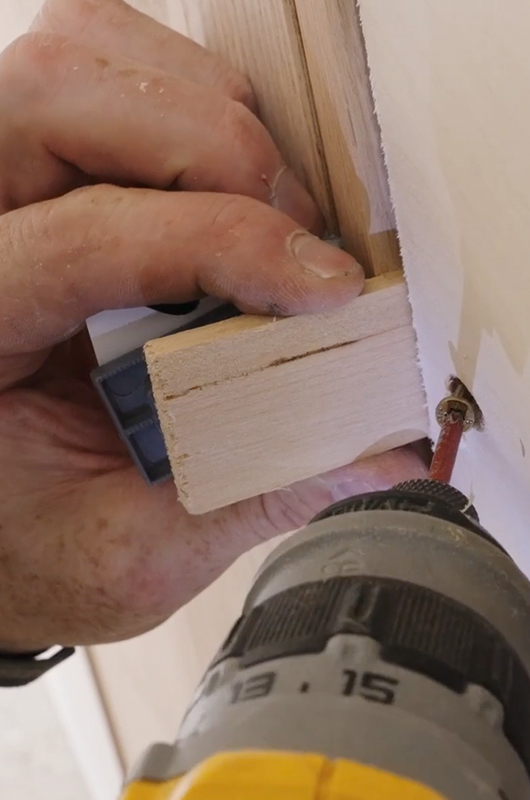
I know this is our 1/8-in. seam. I know I need to be at a maximum distance here, and I’m going to make sure there’s one in the center of the panel. I’ll do that for this panel and this panel. But for this panel, since I’m putting one along this side and one in the middle, I’m not going to worry about clips here because it actually gets connected to the jamb.
The clips go into the wall at the required spacing. You get your panel to fit, put these indexing pins on, and when you push the panel into the clips, it leaves a tiny dent that you use to drill a hole to accept the male portion. Then these just snap together.
Prepare the Next Panel
Now we are working on this panel right here. It is oversized in both width and height. I know my finished width is 35-1/16 in., and I’ve got 36-9/16 in., so I know if I’m at 35-1/16 in. I’m going to take off roughly 3/4 in. each side because I don’t want to take off the full 1-1/2 in. off one side because you’re going to lose a lot of this green, and then if you look behind on these panels, it’s not going to look as good as it should.
I’m probably going to go like 11/16 in., maybe 3/4 in., and then straight-line it so I get a nice clean edge. And then I’m going to take and cut a square edge at the top because I need to clean up some of these edges. On the other panels, I’m trying to take off as minimal an amount as possible, so I’m taking off 1/4 in. I’m going to edge-band this top and then edge-band this side.
Let’s say I cut it to finish width and I do something on this edge-banding or something happens on this edge. Then I don’t have the option to cut any more off. So that’s why I’m going to do the top, one side, finish edge-banding that, and then cut it to final size.
Cut the Edge-Banding
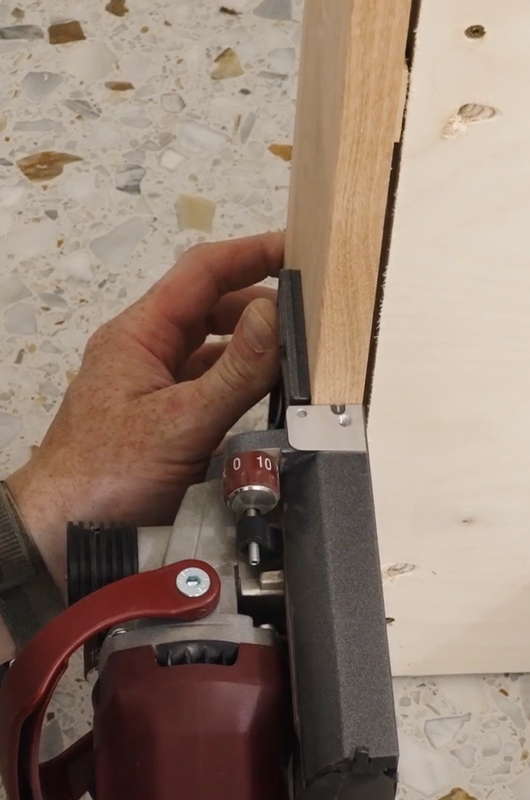
One of the first things we need to do is cut our edge-banding to rough width. With this machine, you want to have about 2 in. of overhang on each side. When it’s thin enough, I can just snap it. This gets cut, and then I have a couple of inches extra on each side. There’s a front and a back to this; you feed it through and push a button, then it automatically feeds and shows you that you’re ready to start. It’s a pretty simple process.
It’s got a little error or a little line right here. You start on the edge of your piece, push this button on top, and then it will feed this out with adhesive. I want it to come out about 2 in., and then I will start going from right to left. All I have to do is keep pressure against the panel; it’ll push its way along, and you just have to keep it tight.
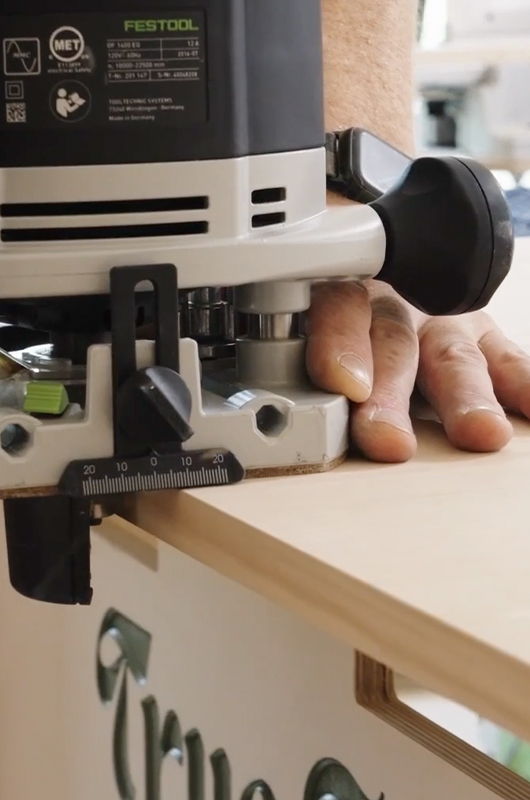
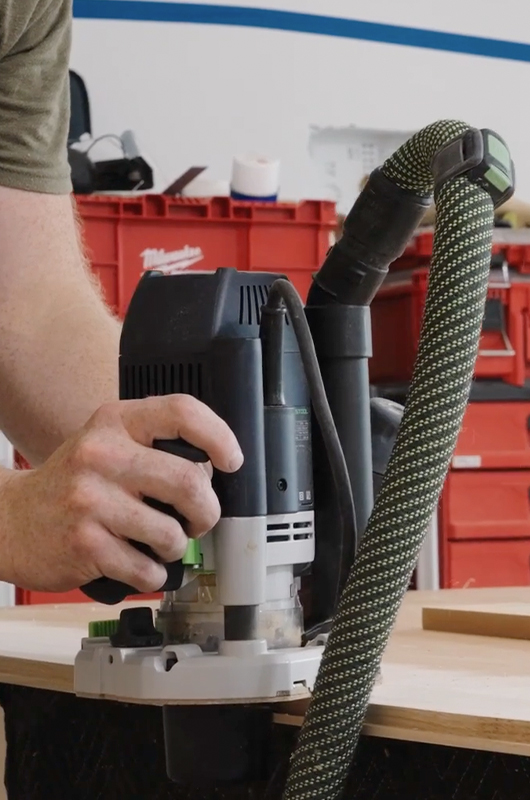
With this extra, there’s an accessory kit you can get, and this cuts it exactly flush with the side. You’ll see it’s a 3/4-in. panel, but the edge-banding is 7/8 in., so it overhangs about 1/16 in. each side. Now I’m going to take a router with this special setup and trim this edge-banding on both sides to get it nice and flush.
Another thing that comes with the accessory kit for that portable hot melt edge-bander is a little card scraper. What this does is it gets it much closer — you can see here how nice that gets it. There’s just a little bit of adhesive left, but with these panels being unfinished, I just take some sandpaper and clean up the edge.
Once the front side is good, I’ll take that same router setup and run it along here just to clean this edge up, and then that is a finished top. I know I need to go over 35; I’m going to be a touch under 1/16 in. to account for the 1/2-millimeter edge-banding.
Make Rabbet Cuts
I want to keep the same sequence for these sheets. You can tell by the cathedrals in here that this is my top. We need to cut a rabbet. We’re going to put a wood spline in here, but with these connectors, I can’t do another spline and push it in and then get these connectors to see.
So it’s a spline here, and then it’s a rabbet, so this whole thing can just push straight in. With the front side up like this, this is the right-hand side, and I want to do my rabbet right here. This next one is going to cut the spline. I’m going to start in this corner and then work my way down. I did just slightly round that over, but then you can see over here, it’s a different depth of cut.
That spline is cut so that it’s at the underside of this rabbet. So when I put my spline material in like that, that’s what we get for our 3/8-in. reveal there. I’m getting set up to cut this to final length. I’m trying to keep an even 3/8-in. gap on the underside of this paneling that matches the 3/4-in. undercut on this door.
Adjust for Floor Variations
I’m trying to get this door to be as hidden as I can, but what I found was the floor started off pretty level in the first 3 ft., then slowly started to go down, and then it goes down even more. I don’t want to make all these panels the exact same size because I’m going to go from like 3/8 in. over here to almost 3/4 in. over here, and that would be very visible.
So what I’m doing is taking my same 3/8-in. setup block, and from that block up here, I get 99-3/16 in. From our layout lines, I know my panel is going to end right about there. This one is actually better than I thought; this one is at 99-1/4 in. So I can come down to 99-1/4 in., put a little carrot there.
On this right side, I was 99-3/16 in. I’ll say on this one, you’re never going to see underneath there, so I don’t bother adding any edge-banding to the bottom because it’s just another step — more sanding, trimming. But I will just slightly round that over.
Now I’ve got a piece of solid red oak on the bottom that I need to cut. I’m shooting for it to end at 3/8 in., but I know the floor has dips in it. So I’m going to cut this piece at 5/8 in., glue and nail it on, then put this piece up here, get it exactly where I want it, and scribe the bottom. I’ll end up very close to 3/8 in. — you know, we hit 3/8 in. at each corner where the panels intersect — but then it follows the floor.
Place the Panel and Match the Grain
Now that we have all of the male connectors on the back side of this panel, the last two things we have to do — remove these red indexing pins, and I already have spline material cut to the width and thickness I need. I just need to cut it to length, put the spline in there, and then this piece will pop right over.
All right, the moment we’ve all been waiting for. OK, so right now we’re working on the first panel, and this is the door panel on this other wall. I want the grain to match around the corner, so on these panels, I barely took anything off the top in order to get a grain match to the top panel, and I took all of it off the bottom.
But in this one, I’m actually going to have to do the opposite because there is quite a bit of difference between this right here and the panels on the wall. Then what I did was just hold up — if I did cut that — like it’s probably going to be about 3-1/2 in. off.
But if I go here, I still get a pretty good grain match, even on the uppers on this wall that we just did. It’s very close. Some of them are not. I can’t get everything to line up, so I’m trying to get it as close as I can, and I feel pretty good about doing something like that in order to get it so it looks as close as I can from this wall to that next wall.
As you can tell, I left about 3/16 in. from the finished face, and the reason for that is I want this rabbet to end up at a 1/4 in. When I hog out here, I want 1/4 in. left, so once I glue in a solid piece of wood here, it’ll leave me with 1/16 in. of solid wood. Then I don’t have to edge-band this side and this side of the rabbet. We are going to let this glue set up for a good hour, maybe two hours.
Work on the Corner Panels
Next, we’re going to get started on the corner. The same detail that we did on the previous panel — gluing in that solid piece of wood — we have to do on this panel. We just need to get these rough cut to size and start doing a lot of the prep work here. I have plenty of width here, so I’m going to keep consistent with what I’ve been doing and take about 3/4 in. off this side, squaring up the top, and then it’ll be edge-banding.
Pretty much everything will be the same as this panel that we installed. The only difference is we just need to mark for the outside miter, so what I’m going to do now is just lay out for my miter. This is the back side of it, so I can just take a scrap piece of this material and have that pushed against there. I got to see the back side right there, and this will be the outside corner of my miter.
All right, so I know I’ve got 8 and just under 3/4 in. Now to get this outside miter, all I have to do is hold up my little 1/8-in. stick right there. We’re going to go 9-9/16 in. short. So we can kind of see a little glimpse. Being very careful of that miter, and when we have our 1/8 in., it’s going to be right about there. Now we just need to add glue on that piece at the bottom, let that glue set up, and then this will be ready.
Now we’re going to put this piece just like that. Then the same thing — setting up a laser and scribing it down, dropping in about 1/4 in. All right, that one is good to go. Now we’re just going to put in all the connectors on this wall, the female connectors, and then mark for the male connectors on the back side of this panel. So far, it looks really good.
Dial In the Door Panel
Now that the clamps are off, we’re working on this door panel for the other door. I’ve glued in this solid piece of wood, and now I’m just going to take my sander and sand out a little bit of discrepancy here. Then I’ll flip it over and cut a nice, clean, straight edge. My finished rabbet is going to be 1/4 in., so I’m going to put edge-banding on this now. Then it’s going to cover up the MDF and a little bit of the solid wood, and then I can run my rabbet, and then you’ll see all solid.
I took some measurements for this door and figured out the height I need for this panel, leaving a little bit of wiggle room at the bottom. I’m going to square up this top, then bring it over to the opening and see. I know it’s already going to look a lot better, but I’ll check how close I was able to get it to these other panels after cutting material off the top.
As you can see, I couldn’t get all the way down there. If I would have been able to go another inch, that would have been great, but I think once you stand back, the peaks of these cathedrals are going to line up much better than if I were to cut the majority off the bottom of this panel. I’m still able to get a pretty good grain match on the panel above this, but visually, when you’re in this space, you’ll see these peaks of the cathedrals line up better.
I need to run that rabbet on the side. This is the bottom of the door, and you can see we glued in that piece but then routed out a good portion of it, leaving just a little bit on each side. This allows me to add a bigger size roundover if needed. I can sand this without worrying about sanding through the thin edge-banding, and I thought this would work better than cutting the rabbet and trying to fit edge-banding in here with contact cement or something like that.
We’re working on this door panel, and it’s a similar start to what we did on this side, where we did the rabbet and then glued in a solid piece. But on this side, we took the rabbeting bit again and hogged out the majority of the material so we’d be left with solid wood. In this case, we’re going to rabbet out this panel, but then we’re actually going to glue on a piece that sticks out 5/16 in., and that’s because of the interlocking rabbets for the panel next to it.
I need to let this set up for a little bit. Now it’s time to start working on this panel. We have to do the same rabbet detail and prep that panel exactly like we did here. So I need to glue in a solid piece, let that set up. It’s a lot of prep work, letting glue set up, moving on, and then coming back later. That’s the next few steps.
Finish the Door Panel
All right, next steps — finishing up this door panel. The glue has set up enough that I’m going to put this over on my bench, pull off all the clamps, do a little sanding where I had some glue squeeze out, and take care of that. The only last thing to do on that door is cut it to the final height.
Once that’s done, we will take this door out of the opening, put it on my bench, place the panel on top, and start making reference points so I can start using these Lamello plastic connectors that snap in so that I’ll be able to pop this panel on and off.
Next step is going to take the panel off the door, and then start cutting for all of this joinery on the front of the door. Now that the door is off, the connection here between this skinny panel and this jamb, I’m going to use those same tenso connectors from Lamello. So now that the door’s off, I’m going to make some reference marks on this and do this whole jamb. It’s going to be easier without the door on.
And now that we’re done with these tenso connectors, I’m going to switch to my Domino, and everywhere that I have a D marked I am going to mortise for a loose tenon. With the panels only 3/4 in., I’m using 6×40 Dominos. Make sure you get the depth set, because if you split the depth, you’re going to go through 3/4-in. material, and that would be very bad. So on the panel, I’m going 15 millimeters, and on the door, I’m going to go 25, so it’s going to be deeper on the door.
Install and Adjust the Door Panel
So now this door is completely done, and as long as it’s on the bench, I’m not going to put in every single connector, but I can show how those go in. We’ll probably go every other just so it’s not so difficult to take this thing off. This will just double-check the fit and make sure it’s not so difficult to take this out. And I think for our purposes, just for test fitting, that will be enough.
So I’m going to get this back over there and reinstall it on the pivot-door hardware. Now that that’s done, I can get the panel put on my bench and mortise everything on the back side of that. All right, now it’s time to put in the other side of the connectors. This is like the male portion that will just slide in there and then snap in those pieces that we did on the other side. Now that all my connectors are in and Dominos are in the right spot, we’re going to put this on the door and see how everything works.
Adjust the Next Panel
OK, now that that door panel is installed, we’re going to work on this panel. The glue has set up enough, so I’m going to take the blue tape off, rip a straight line on this, edge-band it, and then rabbet it again — similar steps to everything that we have been doing. The only difference is this one’s going to have an outside miter, and then we have to notch around the nosing.
In the meantime, I’m going to start making just a little jig to get around the nosing. Right here for this piece, I could notch it, but I’ve got some connectors on this side, some snapping connectors, and I don’t think I’m going to be able to make the angle. So I’ve decided to start off making a template and go from there.
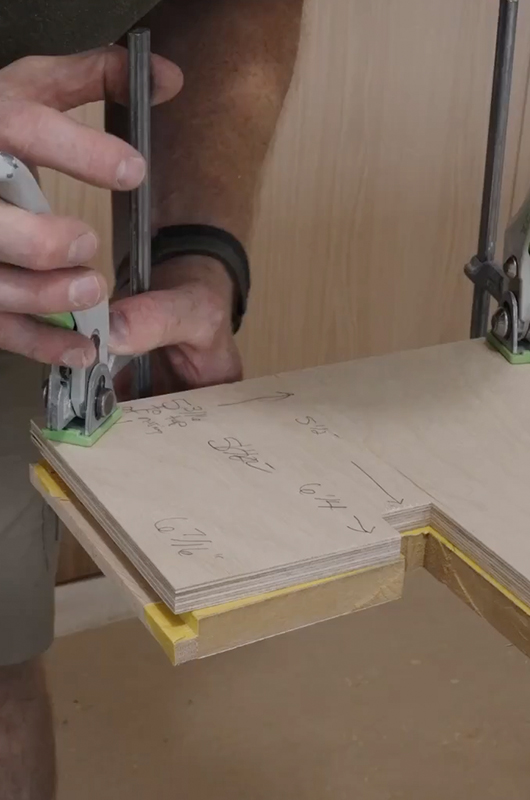
Now that I have my jig here and we know it fits, once I see that it fits nicely — you know, we did that little test piece and the radii worked out — I’m going to mark for the location of this. So I am at 5-1/2 in. I’m going to mark that at the location because that’s to the nosing.
Five and a half short to drywall, we’re at 6-1/4-in. And 6-7/16 in. at the bottom. I’m at 5-3/16 in. So I’m just going to roughly put that there, and I want to mark out with tape so I can mark everything up and not have to sand off. So that’s what I know we need to do.
So when I line up this, well, we’re plenty long here because we’re only going to — and you’ll see here in a moment — we only really need to be tight for like this first inch. But I’m going to cut this line right here with my track saw. Then I’m going to hog out a lot of this with a jigsaw, clamp this on, and then use the router.
Cut and Fit the Panel
All right, now that we’ve made all of our cuts, we’re going to test-fit this piece. See how it fits. Just like that. Now that I know the piece fits, I decided I’ve got to trim a little bit off the top and edge-band it again, but now I’ve got my scribe line. We’re going to take that and end this 3/8-in. shadow reveal here, 1 in. from the nosing. Because I don’t want to follow the nosing around, we’re going to have it stop just short.
OK, now that all the connectors are in, both the female and the male tenso connectors, again, I don’t have any of the concealed fasteners on this edge — I want this to be free-floating. So I’m going to put a bead of glue on this, pop this jamb in, and then we’re going to go on to this side. Oh, that’s popped in. We still get our 1/8 in.
Now that I have this, all I have to do is push this over right there, tape that, and just work my way down here. I can feel this piece is more — or is above that one or sticking out further. So what I do is get the tape, try and get most of the glue out of there before, and let’s give it a good hit. Now that’s much, much better.
Final Adjustments
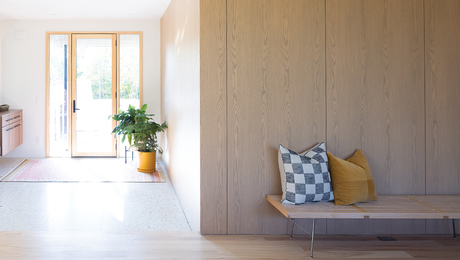
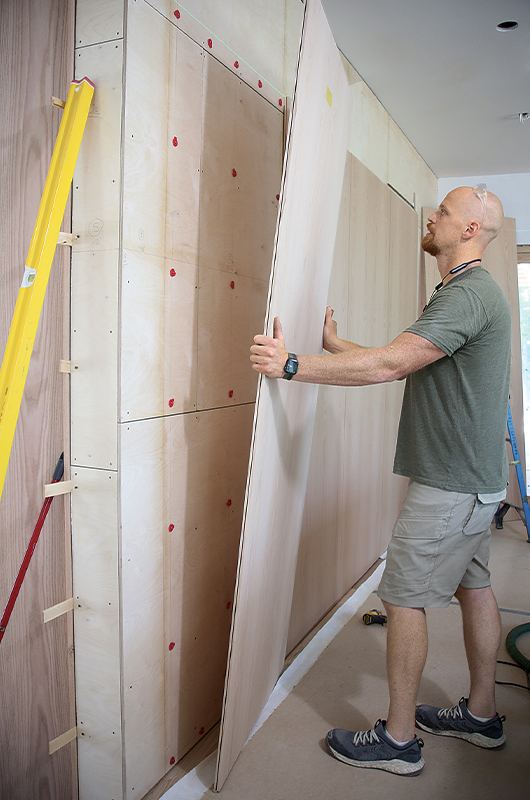
As you can see, we don’t have all the panels on the wall, but the hardest parts are done, and that was doing this outside corner, getting this to line up, 1/8-in. reveal on this door, keeping it consistent on this panel, and our 3/8-in. shadow reveal at the bottom.
But now that the hardest parts are done, all I have to do is a couple of full-size panels and then fill in at the top. These 1/8-in. reveals are going to go all the way up to the ceiling. It’s going to get scribed to the ceiling, and there’ll be a consistent 1/8-in. gap right on top of these panels.
Thanks for watching. I hope you enjoyed it.
—Casey Knips is owner and operator of True Fit Carpentry, a custom trim and cabinetry company in the Twin Cities.
RELATED STORIES