Ranch Redux
An architect and a handy homeowner team up for an exterior upgrade with energy efficiency, comfort, and durability as part of the plan.
This article follows a DIY homeowner’s ambitious journey to upgrade his 1950s ranch house. Modern updates like closed-cell spray foam, Zip System R-sheathing, and a vented roof assembly address outdated materials and poor insulation. Exterior details include vertical-cedar and Corten steel siding, along with original windows restored by the owner and a standing-seam metal roof installed for durability. The result is a transformed, energy-efficient home that stands out in the neighborhood.
When It’s Time for an Exterior Upgrade
All over the country there are midcentury homes like this, built just before materials such as plywood sheathing and housewrap were common, and just long enough ago that the original siding and windows are either way past their service life or have been covered or replaced, likely with vinyl. For people who own these houses, there are many reasons to invest in their curb appeal.
An exterior makeover not only transforms a house into a place they love coming home to; it can sometimes provide a significant return on investment if they decide to sell. But the devil is in the details of the design and its execution. Today we know how to make a house like this energy-smart, comfortable, and long lasting. The good news is that an exterior upgrade often presents the opportunity to do it all.
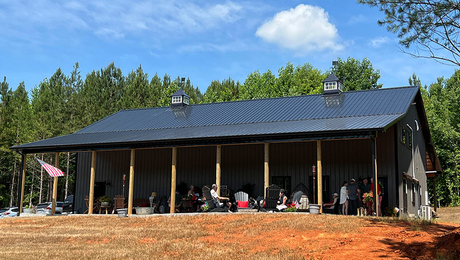
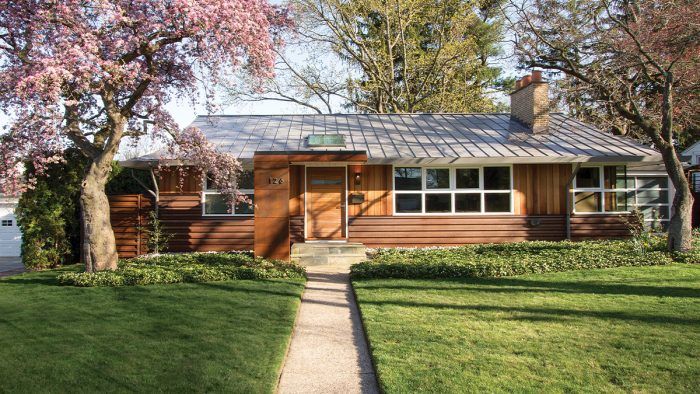
Our design team was hired by John, an ambitious, talented, and dedicated DIYer who wanted to upgrade his 1950s ranch and was willing to do most of the work. John wanted to embrace the good bones and inherent strengths that his house had to offer while modernizing the building enclosure and finishing the exterior to stand out in a neighborhood of similar ranch homes on quarter-acre lots.
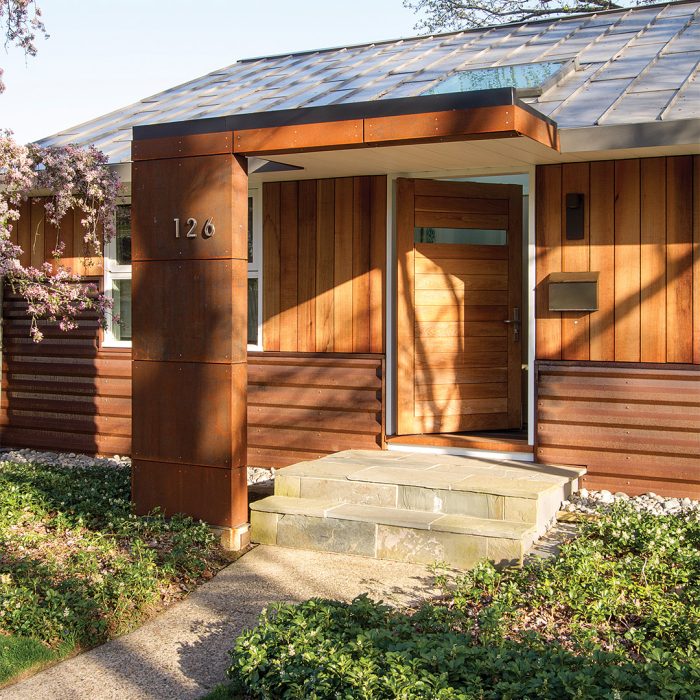
As you’ll see, the house now has a tight building enclosure with decent levels of insulation, siding installed over a modern water-resistive barrier (WRB) with rainscreen details for drainage and drying, and a well-insulated, vented roof assembly. The materials that bring the new exterior to life include a standing-seam metal roof, a combination of clear-finished vertical cedar and Corten steel siding, composite trim, and rebuilt windows.
With low maintenance as a goal, materials like the metal roof and Corten steel were no-brainers—steel oxidizes its own protective surface that never requires paint. The clear-finished cedar should be easy to keep looking great with occasion sealing, and even the composite trim used around the roofline is rot resistant and holds paint extremely well.
This project is a good example of how to get performance upgrades done while improving the style of a common ranch house, and it shows just how much a willing homeowner can accomplish on their own.
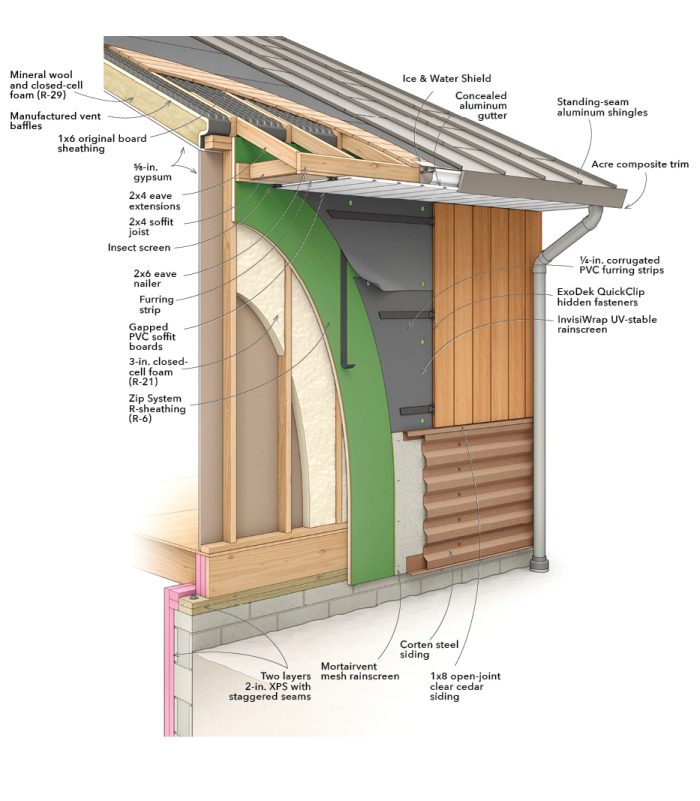
A Nearly New EnclosureThe architect created a plan that the homeowner could execute in stages. A continuous thermal layer starts with rigid foam on the inside of the basement walls. There is spray foam and insulated sheathing on the walls, and a flash-and-batt system in the cathedral ceiling. Siding was installed over a rainscreen, and the eave has a neat concealed-gutter detail.
 |
Dealing With Past Sins
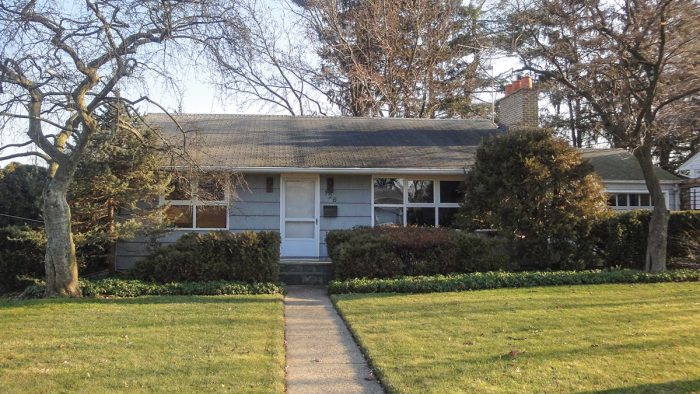
During the housing boom of the late 1940s and 1950s, about 1.5 million houses were built every year. Demand was high, and building codes were mostly concerned with fire prevention and wind resistance. Plywood had yet to become a standard building material. Wall sheathing ranged from nonexistent to solid-wood boards installed diagonally.
Tyvek was still at least a decade away, insulation was optional, and windows were still commonly single-pane. This ranch house in New Jersey was a fitting example of the seemingly random building methods of the time, including some material, like the wall sheathing, that offered little benefit.
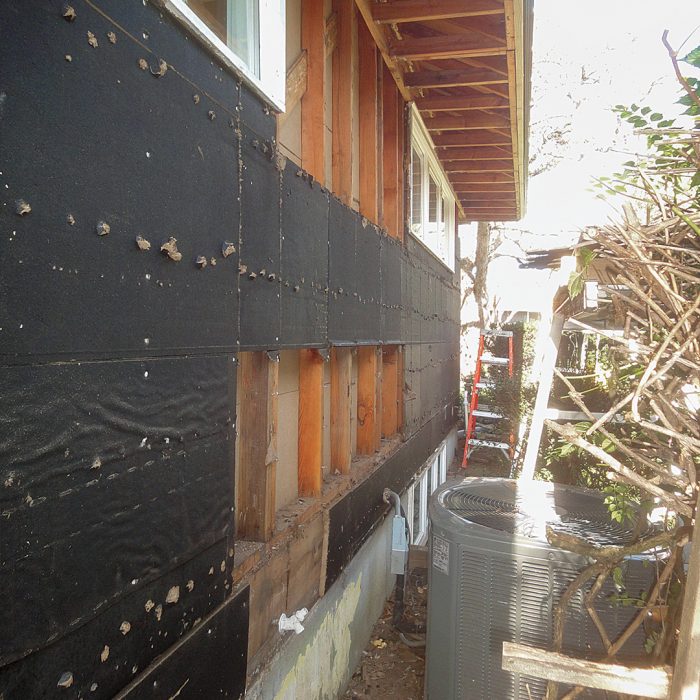
The conventional 2×4 exterior walls were sheathed with 2-ft. by 4-ft. pieces of a compressed paper product with an asphaltic coating commonly referred to as “homasote,” though Homasote is a brand name. This dense, cardboard-like product provided no shear strength, so the builders added diagonal bracing at the corners.
Over this shell, they applied #15 building felt, followed by skip-sheathing and painted redwood shingles. The number of nails used to fasten the siding created a Swiss-cheese effect at the felt-and-sheathing layer, further weakening an already weak exterior air barrier. The interior plaster, also applied over homasote panels, also failed as an air barrier at every outlet, switch, light, and other penetration.
The walls were uninsulated, and the ceiling had 31/2-in. kraft-faced fiberglass batts that had compressed over the years. The roof was framed with 2×6 rafters with scabbed-on 2×4 rafter tails. Though the attic was an unconditioned space, the original soffits were fiberboard panels and didn’t include any ventilation openings for the roof.
The good news was that the house possessed some inherent strengths, such as low rooflines, nicely proportioned eave overhangs, mostly original site-built windows with modern looks, and a garage that was thoughtfully set back from the house to avoid overshadowing the main structure. A makeover for performance and style was possible.
More Than Siding
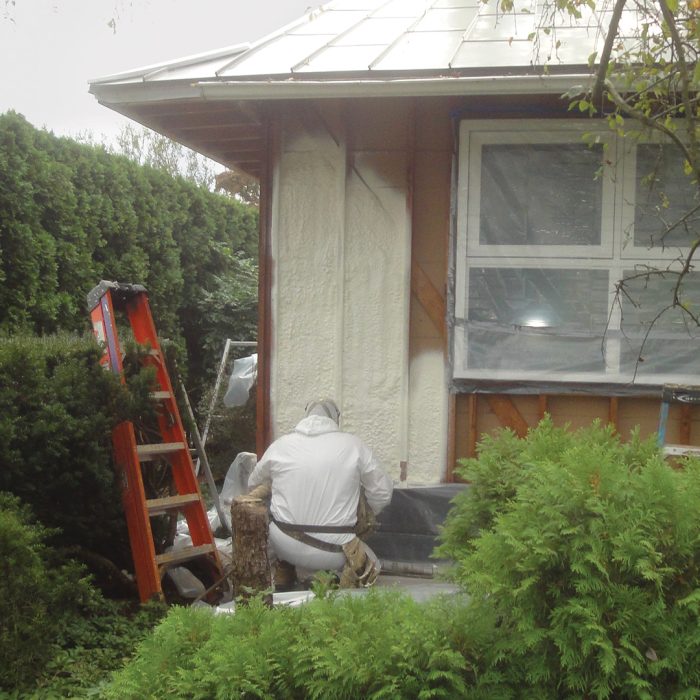
With the wall cavities open from the exterior, we installed 3 in. of closed-cell spray foam (for about R-21), and then John covered the walls with Zip System R-6 insulating sheathing. He sealed the panels at the perimeter and taped the seams.
Although closed-cell spray foam has a larger carbon footprint than many other insulation options, it has far and away the highest R-value per inch, which we needed in these 2×4 walls. The spray foam also helps a lot with air-sealing, which is even more important than insulating.
Because installers in this area tend to overspray as much as an inch when installing spray foam, we typically specify 3 in. of foam instead of 3-1⁄2 in. We do this to reduce our carbon footprint and the waste of foam plastics, and to save the homeowners money. If we specify a full cavity of spray foam, the homeowner pays for 4-1⁄2 in.
If we specify just 3 in. of spray foam, that’s all they pay for. The taped Zip R-sheathing creates a layer of continuous insulation to help slow thermal bridging, offers a durable air barrier, and provides a solid layer for the siding details to come.
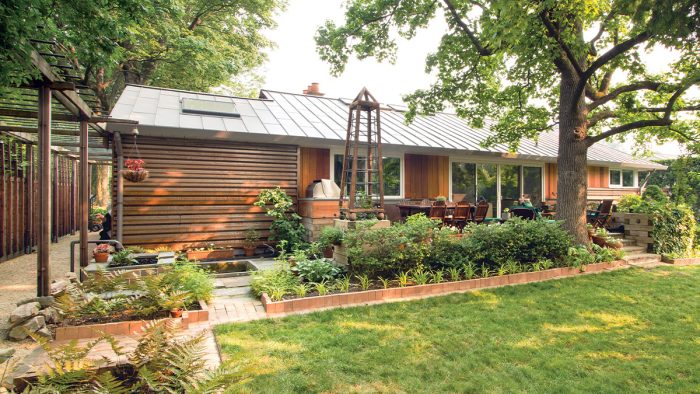
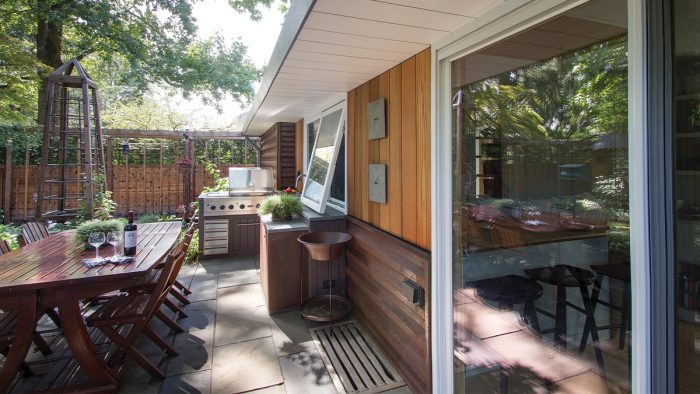
We used two siding materials on the house: horizontal ribbed Corten steel at the base of the wall and vertical cedar above. Behind the steel we first applied Mortairvent, a woven mesh rainscreen from Advanced Building Products, to provide a ventilation channel and drainage plane. Because the cedar siding was to be installed with open joints, we added an extra WRB behind it to hide the Zip sheathing—Benjamin Obdyke’s black InvisiWrap, a UV-stable product designed for this purpose.
John grooved the cedar boards and used Nova’s ExoDek QuickClip hidden deck fasteners to install them. The fasteners are screwed through 1⁄4-in. black corrugated PVC strips run horizontally to allow air movement and drainage behind the siding.
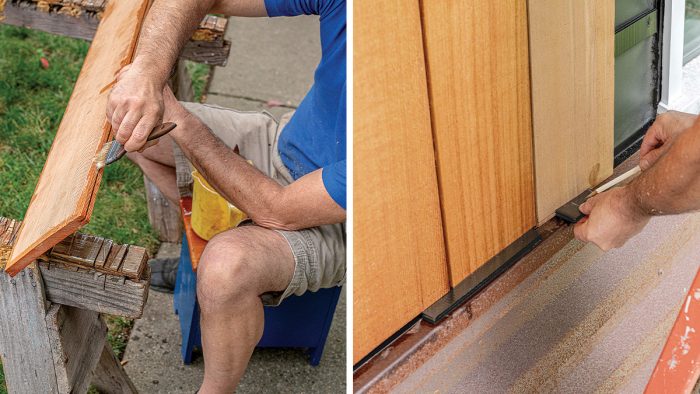
John aligned the cedar boards with the soffit boards above and ripped the siding and soffits for equally spaced boards between windows and doors. He scribed each board at the top and bottom for a uniform gap for airflow and visual appeal. Before the boards were fastened to the exterior, John laid them out and arranged them so that grain and color would flow visually across each section, and then he applied Thompson’s WaterSeal on all six sides.
The home’s original windows were site-built with 2×4 frames. They had 1⁄2-in. double-pane glass with an ineffective thermal spacer and were held in the frame with quarter-round molding. The operable windows were mostly push-out awnings and still worked with the modern look we were going for.
Only a few windows had been replaced with vinyl double-hungs. The newer windows were removed, and the old windows were restored with added rubber weatherstripping from Resource Conservation Technology and upgraded with R-6 IGUs.
A Roofline Retrofit
For the roof, we selected a shingle-style standing-seam aluminum for its character and durability. The light color of the roof helps to keep the house cool during the summer while allowing it to blend in with the landscape. But replacing the roofing was just the start. Although we kept the original 2×6 rafters and the 1×6 sheathing, nearly everything else is new, including ventilation and lots of insulation.
We started at the eaves, where we created our own vented soffits from gapped PVC boards, installed with the same hidden fasteners we used for the siding, and insect screen. We kept the white color of the PVC to reflect as much daylight into the home as possible. The light color also makes for easier cleaning.
The new roof assembly has 2-in. soffit-to-ridge vent channels. We started with a manufactured product for the vent channels, but it skyrocketed in price during the pandemic. So John started making his own baffles from rigid-foam insulation, sealed to the rafters with acoustic sealant, a system we ended up preferring that has the added benefit of the insulation’s R-value.
For the fascia on the front of the house, we used Boral, a trim product made from polymers and fly ash. We changed to Acre, a composite made from upcycled rice hulls, on the back of the house. It is lighter, and we’ve found it to be more durable. The fascia detail also conceals the gutters.
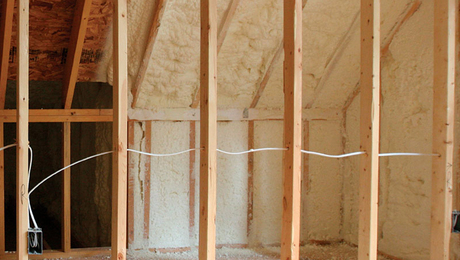
Inside, the roof has three different approaches to insulation. In one area of the house, we were able to simply air-seal the existing plaster ceiling and add 18 in. of cellulose for about R-60. Where John wanted an attic for storage, we insulated the joist cavities with closed-cell spray foam and mineral wool and then ran continuous rigid-foam insulation on top of the joists before screwing down an OSB floor, hitting about R-35.
In the living room, John wanted a cathedral ceiling. We replaced the ceiling joists with steel ties, furred down the rafters with 2x3s, and insulated the cavities with the same flash-and-batt system of closed-cell spray foam and mineral wool. Because we needed to maintain the ventilation space, we only hit R-29 in the cathedral ceilings, but we believe vented roof assemblies are the most durable.
A Hit in the Hood
As you might imagine, this project progressed slowly. As John said, “All my neighbors must think I’m nuts.” But things began to take shape when he installed the custom white-oak pivot door. Then he finished the new entry canopy.
Nothing like it existed in the neighborhood, and the chatter among neighbors grew. With the completion of the metal siding and pivot-gate entry to the backyard, passersby stopped to remark how much they liked the remodeled house.
The big aha moment came one day when a delivery man announced, “I really dig your house!” At that point, John knew he had achieved what he had set out to do, which all started with the master plan that our firm put in place for him.
Now, people regularly stop by to snap photos of the house. And we know not only that the house looks good, but that everything was done right and will keep John and future owners safe and comfortable for a long time.
— Architect John T. Conroy; principal and founder of the Princeton Design Collaborative (PDC) in Lawrenceville, N.J. Finished photos by Jeff Tryon; all photos courtesy of PDC.
RELATED STORIES
- Rear Addition for a Ranch
- Focused Remodel
- Finishing Details for a 1950s Ranch-Style Home
- Reinvented Ranch
Fine Homebuilding Recommended Products
Fine Homebuilding receives a commission for items purchased through links on this site, including Amazon Associates and other affiliate advertising programs.

Great Stuff Foam Cleaner

Insulation Knife

Loctite Foamboard Adhesive