FHB Logo Facebook LinkedIn Email Pinterest Twitter X Instagram Tiktok YouTube Plus Icon Close Icon Navigation Search Icon Navigation Search Icon Arrow Down Icon Video Guide Icon Article Guide Icon Modal Close Icon Guide Search Icon Skip to content
Subscribe
Log In
  • How-To
  • Design
  • Tools & Materials
  • Restoration
  • Videos
  • Blogs
  • Forum
  • Magazine
  • Members
  • FHB House
  • Podcast
Log In
Ask the Experts

Installing Prefinished Cabinet Molding

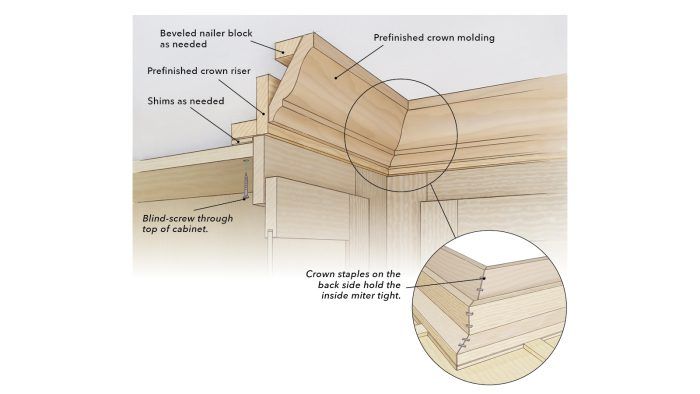
Use these assembly techniques when installing crown risers and molding to minimize visible gaps and nail holes.

Issue 331 - June 2025
  • X
  • facebook
  • linkedin
  • pinterest
  • email
  • add to favorites Log in or Sign up to save your favorite articles
Crisp Crown: Great-looking prefinished cabinet molding starts with a solid place to nail, achieved by installing an “L”-shaped crown riser blind-screwed through the top of the case. Fastening the lower edge of the crown to the vertical face of the riser allows for minimal nailing while ensuring a precise fit to the ceiling. Gluing and blind-fastening inside corners before installation keeps the miter tight over time. Click here to enlarge illustration. Drawing by Dan Thornton.

It seems that cabinet trim like crown molding is almost always prefinished along with the cabinetry before it’s delivered to the job site. This makes installation difficult, as often the moldings cannot be caulked and filled the same as trims that will be finished in place. How do professional carpenters get good-looking results when installing prefinished moldings?

— Greg Boyd; Cape Vincent, N.Y.

Master Finish Carpenter Corey Mercer Replies

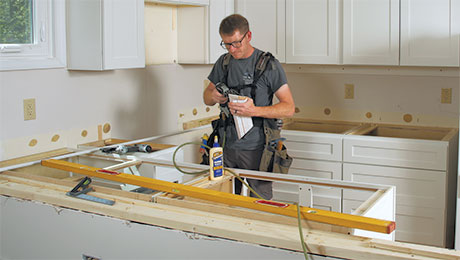
To install the best-looking prefinished moldings, a carpenter’s overall goal should be to eliminate gaps or joints that require caulk or filler while also minimizing the amount of nail holes required to be filled. The first key to installing prefinished crown molding on kitchen cabinets is crown riser. Crown riser is the L-shaped piece of molding that is installed around the upper perimeter of the cabinetry, and which provides a surface for the lower edge of the crown molding to rest on.

This is important when crown will be installed against the finished ceiling, as it provides a taller area for the crown to rest than the upper frame of the cabinet alone, giving the installer some flexibility on the height of the top of the cabinet. Plus, the larger reveal between the crown’s bottom edge and the riser’s bottom edge helps hide minor variations in alignment when a ceiling isn’t perfectly flat or level, which is often the case.

Crown riser is typically installed flush to the cabinet edge or slightly overhanging to create a pleasing reveal line against the cabinet. If the riser is shipped in two pieces, I glue and screw from the back of the horizontal portion of the L so there are no visible nail holes on the front side.

Once it’s assembled, I screw the horizontal leg of the riser to the cabinets and then glue and nail the corners. As the cabinets are normally already in place before I install the riser, I like to blind-screw the riser up through the top of the cabinet, placing shims as needed to account for any inset between the top of the case and the top of the face frame.

Installation Methods

You can cut and install the prefinished crown piece by piece, or preassemble the pieces and install them in larger sections. I typically do a hybrid of the two, installing most of the molding piece by piece but preassembling inside corners. I like to preassemble the inside corners because I can glue and fasten the miter from the back side.

Assembling outside corners piece by piece allows me some flexibility to adjust the individual pieces to keep the miter tight on the corner as I glue and fasten it in place. And when the ceiling isn’t flat, scribing the top edge of the crown to meet the ceiling to avoid an unsightly gap is much easier with individual pieces. If your crown is especially large, attaching some blocks to the ceiling can provide a nail backing for the top edge to securely fasten the crown in place.

To get even more technical, I prefer to use a non-sliding compound dual-bevel miter saw for most installs, switching only to a sliding saw when the crown or riser is too tall for the non-sliding capacity. A non-sliding saw is inherently more accurate than its sliding counterpart, as the blade will experience less deflection during the cut.

I usually don’t do much with crown-cutting jigs or crown stops, and prefer to tape or draw a line on the saw fence as a reference to hold the correct nested angle every time. Whichever method you choose, the key point is to make sure you have a repeatable reference for nesting your crown on every cut in order to maintain your joint accuracy.

More to Consider

Gluing your joints is especially important to keep them tight and good-looking over time. I often use a PVA wood glue such as Titebond for corners, although some carpenters use cyanoacrylate adhesive (CA) glues with accelerators, such as 2P-10 or Starbond, with excellent results. I think traditional PVA glue makes a slightly stronger finished joint than CA glue, and its slower set also allows for extra adjustment time while assembling pieces in place. (The speed of CA does shine when you’re assembling small returns with no fasteners.)

I like to use an 18-ga. nailer, as it offers a good trade-off between holding power and size of hole, but I reserve a 23-ga. pin nailer for delicate pieces or returns. A middle ground for prefinished work is a 21-ga. pneumatic nailer, which leaves smaller nail holes to fill than 18-ga. brads, but provides more holding power than pins.

The only drawback is that 21-ga. nailers are typically pneumatic only, making them less than ideal in a cordless-dominated workflow (Grex is currently the only company to make a 21-ga. cordless nailer). Finally, a staple gun with 1/2-in. crown staples is handy for blind-fastening inside corners from the back side when preassembling the crown, as the legs on the staples are wide enough apart to span the joint and hold both pieces tightly together as the glue cures. Just make sure to use staples that are short enough not to blow out the front of the material.

Careful and thoughtful nailing is key to minimizing the amount of nail holes. Most cabinet manufacturers include a wax fill stick to fill nail holes. If needed, this can be applied to the mitered corners as well—just heat the stick a little with a lighter, smear the wax into the hole or miter, scrape off the excess, and polish with a dry rag. Some manufacturers also have touch-up pens available depending on the finish, which I would recommend coordinating when you order.

From Fine Homebuilding #331

RELATED STORIES

  • 10 Steps to Install Crown Molding on Cabinets
  • 10 Essentials for Quality Trim Carpentry
  • Installing Semicustom Kitchen Cabinets

Need help?

Do you have more questions about installing prefinished cabinet molding or something else? Get answers you can trust from the experienced pros at FHB. Email your question to Experts@FineHomebuilding.com.

Sign up for eletters today and get the latest how-to from Fine Homebuilding, plus special offers.

Signing you up...

This site is protected by reCAPTCHA and the Google Privacy Policy and Terms of Service apply.
See all newsletters
See all newsletters
×

Get home building tips, offers, and expert advice in your inbox

Signing you up...

This site is protected by reCAPTCHA and the Google Privacy Policy and Terms of Service apply.
See all newsletters
See all newsletters

New Feature

Fine Homebuilding Forums

Ask questions, offer advice, and share your work

  • X
  • facebook
  • linkedin
  • pinterest
  • email
  • add to favorites Log in or Sign up to save your favorite articles

Log in or create an account to post a comment.

Sign up Log in

Become a member and get full access to FineHomebuilding.com

More Ask the Experts

View All
  • Installing Prefinished Cabinet Molding
  • Tall Deck on a Sloped Lot
  • Hard-to-Use Electrical Outlets
  • HVAC for a Slab-on-Grade House
View All

Up Next

Video Shorts

Featured Story

Ducted vs. Ductless Heat Pumps

Choosing the right heating and cooling system means finding the best fit for your home's size, layout, and climate—and balancing trade-offs in efficiency, comfort, and cost.

Featured Video

How to Install Cable Rail Around Wood-Post Corners

Use these tips to keep cables tight and straight for a professional-looking deck-railing job.

Related Stories

  • An Easier Method for Mitered Head Casings
  • Making and Installing Wood Wall Paneling
  • A New Approach for Millwork Finishes
  • Prevent Paint Bridging With Picks

Discussion Forum

Recent Posts and Replies

  • |
  • |
  • |
  • |
  • |
  • |
View More Create Post

Highlights

Fine Homebuilding All Access
Fine Homebuilding Podcast
Tool Tech
Plus, get an extra 20% off with code GIFT20

Video

View All Videos
  • Building Custom Kitchen Cabinets
  • Podcast 331: PRO TALK With Cabinetmaker Ben Scott
  • How to Use a Pocket-Hole Jig
  • Podcast 128: Worst. Photo. Shoot. Ever.
View All

Cabinets and Built-ins

View All Cabinets and Built-ins Articles
  • What to Know When Buying Kitchen Cabinetry
  • Stop the Slam
  • Sand Smooth Contours
View All Cabinets and Built-ins Articles

Fine Homebuilding Magazine

  • Issue 331 - June 2025
    • A More Resilient Roof
    • Tool Test: You Need a Drywall Sander
    • Ducted vs. Ductless Heat Pumps
  • Issue 330 - April/May 2025
    • Deck Details for Durability
    • FAQs on HPWHs
    • 10 Tips for a Long-Lasting Paint Job
  • Issue 329 - Feb/Mar 2025
    • Smart Foundation for a Small Addition
    • A Kominka Comes West
    • Making Small Kitchens Work
  • Issue 328 - Dec/Jan 2024
    • How a Pro Replaces Columns
    • Passive House 3.0
    • Tool Test: Compact Line Lasers
  • Issue 327 - November 2024
    • Repairing Damaged Walls and Ceilings
    • Plumbing Protection
    • Talking Shop

Fine Home Building

Newsletter Sign-up

  • Fine Homebuilding

    Home building tips, offers, and expert advice in your inbox.

  • Green Building Advisor

    Building science and energy efficiency advice, plus special offers, in your inbox.

  • Old House Journal

    Repair, renovation, and restoration tips, plus special offers, in your inbox.

Signing you up...

This site is protected by reCAPTCHA and the Google Privacy Policy and Terms of Service apply.
See all newsletters

Follow

  • Fine Homebuilding

    Dig into cutting-edge approaches and decades of proven solutions with total access to our experts and tradespeople.

    Start Free Trial Now
    • Facebook
    • Instagram
    • X
    • LinkedIn
  • GBA Prime

    Get instant access to the latest developments in green building, research, and reports from the field.

    Start Free Trial Now
    • Facebook
    • YouTube
  • Old House Journal

    Learn how to restore, repair, update, and decorate your home.

    Subscribe Now
    • Facebook
    • Instagram
    • X

Membership & Magazine

  • Online Archive
  • Start Free Trial
  • Magazine Subscription
  • Magazine Renewal
  • Gift a Subscription
  • Customer Support
  • Privacy Preferences
  • About
  • Contact
  • Advertise
  • Careers
  • Terms of Use
  • Site Map
  • Do not sell or share my information
  • Privacy Policy
  • Accessibility
  • California Privacy Rights

© 2025 Active Interest Media. All rights reserved.

Fine Homebuilding receives a commission for items purchased through links on this site, including Amazon Associates and other affiliate advertising programs.

  • Home Group
  • Antique Trader
  • Arts & Crafts Homes
  • Bank Note Reporter
  • Cabin Life
  • Cuisine at Home
  • Fine Gardening
  • Fine Woodworking
  • Green Building Advisor
  • Garden Gate
  • Horticulture
  • Keep Craft Alive
  • Log Home Living
  • Military Trader/Vehicles
  • Numismatic News
  • Numismaster
  • Old Cars Weekly
  • Old House Journal
  • Period Homes
  • Popular Woodworking
  • Script
  • ShopNotes
  • Sports Collectors Digest
  • Threads
  • Timber Home Living
  • Traditional Building
  • Woodsmith
  • World Coin News
  • Writer's Digest
Active Interest Media logo
X
X
This is a dialog window which overlays the main content of the page. The modal window is a 'site map' of the most critical areas of the site. Pressing the Escape (ESC) button will close the modal and bring you back to where you were on the page.

Main Menu

  • How-To
  • Design
  • Tools & Materials
  • Video
  • Blogs
  • Forum
  • Project Guides
  • Reader Projects
  • Magazine
  • Members
  • FHB House

Podcasts

  • FHB Podcast
  • ProTalk

Webinars

  • Upcoming and On-Demand

Podcasts

  • FHB Podcast
  • ProTalk

Webinars

  • Upcoming and On-Demand

Popular Topics

  • Kitchens
  • Business
  • Bedrooms
  • Roofs
  • Architecture and Design
  • Green Building
  • Decks
  • Framing
  • Safety
  • Remodeling
  • Bathrooms
  • Windows
  • Tilework
  • Ceilings
  • HVAC

Magazine

  • Current Issue
  • Past Issues
  • Magazine Index
  • Subscribe
  • Online Archive
  • Author Guidelines

All Access

  • Member Home
  • Start Free Trial
  • Gift Membership

Online Learning

  • Courses
  • Project Guides
  • Reader Projects
  • Podcast

More

  • FHB Ambassadors
  • FHB House
  • Customer Support

Account

  • Log In
  • Join

Newsletter

Get home building tips, offers, and expert advice in your inbox

Signing you up...

This site is protected by reCAPTCHA and the Google Privacy Policy and Terms of Service apply.
See all newsletters
See all newsletters

Follow

  • X
  • YouTube
  • instagram
  • facebook
  • pinterest
  • Tiktok

Join All Access

Become a member and get instant access to thousands of videos, how-tos, tool reviews, and design features.

Start Your Free Trial

Subscribe

FHB Magazine

Start your subscription today and save up to 81%

Subscribe

We hope you’ve enjoyed your free articles. To keep reading, become a member today.

Get complete site access to expert advice, how-to videos, Code Check, and more, plus the print magazine.

Start your FREE trial

Already a member? Log in

Privacy Policy Update

We use cookies, pixels, script and other tracking technologies to analyze and improve our service, to improve and personalize content, and for advertising to you. We also share information about your use of our site with third-party social media, advertising and analytics partners. You can view our Privacy Policy here and our Terms of Use here.

Cookies

Analytics

These cookies help us track site metrics to improve our sites and provide a better user experience.

Advertising/Social Media

These cookies are used to serve advertisements aligned with your interests.

Essential

These cookies are required to provide basic functions like page navigation and access to secure areas of the website.

Delete My Data

Delete all cookies and associated data