Stop Ice Dams When Reroofing
Three methods to improve your roof's performance by adding a new layer directly over the old.
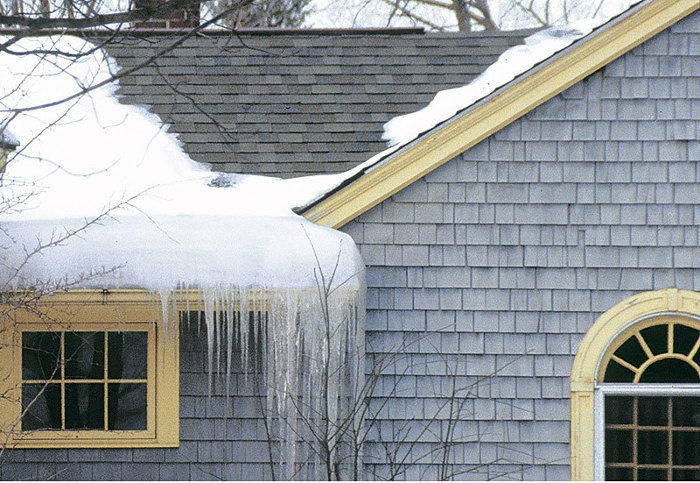
I own a Cape Cod–style home in climate zone 6 that suffers from significant ice damming in the winter. The second floor sits below an unvented simple gable roof, which is insulated to an estimated R-20 with loose-fill insulation above the plaster ceilings and batts in the kneewalls. Can I improve the performance of my roof and eliminate the ice dams without doing any remodeling work on the finished interior?
— ND; Ithaca, N.Y.
Michael Maines, Residential Designer and Co-Author of Pretty Good House, Replies:
One common way to combat ice damming is through ventilation. By providing a continuous ventilation path along the underside of the roof sheathing, any escaping heat or moisture is carried away by air movement before it reaches the sheathing. This keeps the sheathing at a similar temperature to the outdoor ambient air, reducing the potential for warm sheathing to melt the snow closest to the roof surface (which then refreezes and causes the dam).
When there is conditioned attic space, venting works best with simple roof geometries that allow an uninterrupted vent space from eave to ridge. (Venting also works well when the entire attic space is vented and unconditioned. Roofs with dormers and valleys over conditioned spaces, hip roofs, and low-slope roofs are more difficult to vent properly, making them well-suited for an unvented assembly.)
In this case, since the geometry of the vaulted roof is simple, a possible solution when reroofing would be to create an over-vented roof assembly above the existing roof sheathing. You would first need to apply a watertight, airtight, and vapor-permeable membrane (such as Pro Clima’s Solitex Mento or Siga’s Majvest) on top of the existing roof sheathing.
Ideally, the membrane should be terminated to the tops of the walls at both the eaves and the rakes and carried continuously over the ridge. Next, I would recommend running 2×3 or 2×4 furring vertically up the roof, with the wide face parallel to the sheathing, fastened to the existing rafters below. The 1-1/2-in. air space provided by 2x material is simple to attain and allows more airflow than the code-required 1-in. minimum space. (Many building scientists suggest the optimal vent space is actually 2 in.)
Finally, another layer of roof sheathing fastened on top of the furring creates a nailing surface for your roof covering. To be most effective, this option would also need to be paired with an interior renovation that includes building down the rafters to allow for additional insulation on the inside.
Another Option
A similar approach with better performance would be to add a layer of continuous insulation on top of the existing roof deck, which would further slow heat flow through the roof assembly. To accomplish this using a layer of impermeable or semi-permeable rigid foam (and potentially eliminate the need for roof venting), in climate zone 6 you would need to ensure that the foam layer made up at least 50% of the total R-value to limit condensation risk on the sheathing.
You could also consider using a layer of vapor-permeable exterior insulation in an over-vented assembly. The benefit of using permeable insulation above the sheathing is that the roof assembly will be able to dry relatively freely to the exterior while also keeping future interior insulation choices open.
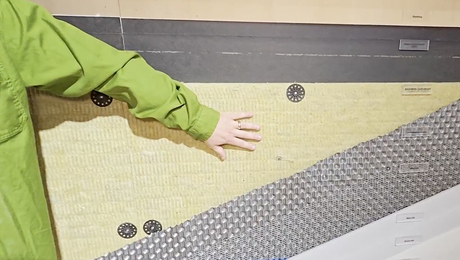
An insulated over-vented roof also starts with the same airtight, watertight, and vapor-permeable membrane over the sheathing. A layer of rigid, high-density, vapor-permeable wood-fiber or mineral-wool insulation would then be installed over the membrane, followed by 2x furring running vertically up the roof and screwed down through the thick insulation to the existing framing members with long screws. As before, a second layer of sheathing would be installed over this furring, providing a substrate for the roof cladding.
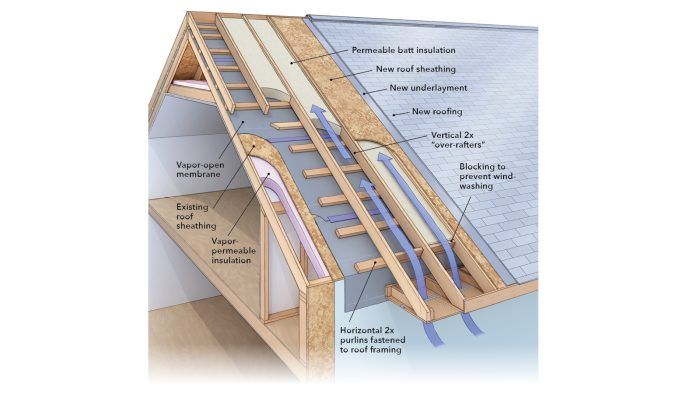
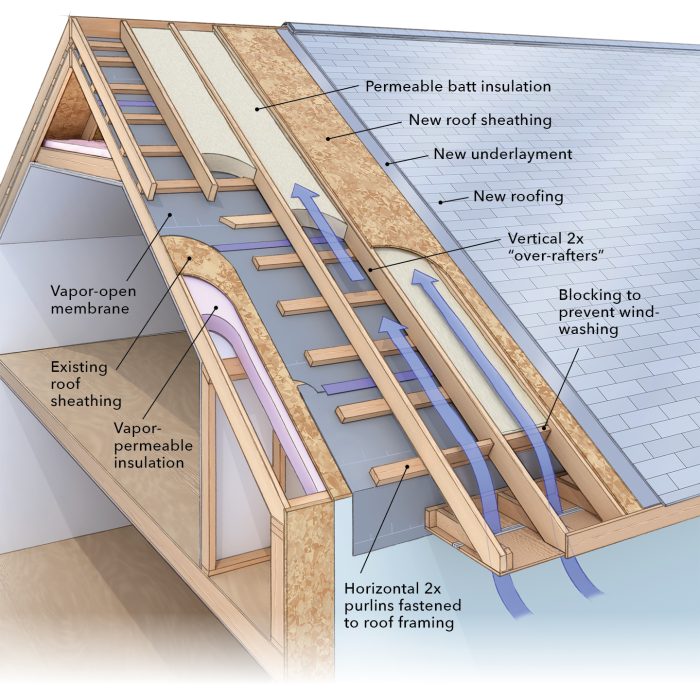
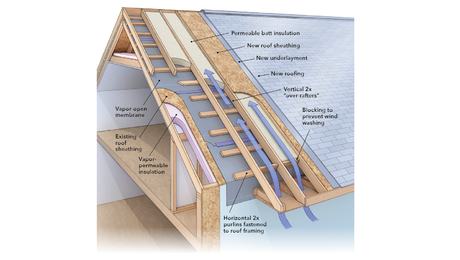
Another method that allows for the use of less dense and less costly (and often more readily available) batt insulation is to first run 2x purlins on the flat horizontally across the roof deck, followed by 2x6s or 2x8s on edge as vertical “over-rafters.”
The 2x purlins provide a thermal break and are often easier to screw into the existing framing than vertical furring. Batt insulation is placed in spaces between the purlins and in the over-rafter cavities, stopping 1-1/2 in. below the top of the over-rafters to allow for a vent space under the layer of sheathing installed directly over this framing. This approach commonly requires modifying or removing the overhang or eave detail.
Remember, most ice dams are caused by air leaks or poor thermal insulation, which allows heat from inside to reach unvented or inadequately vented roof sheathing. Even if you’re not renovating the interior, be sure to air-seal where possible, especially around areas like electrical boxes and light fixtures.
And I strongly recommend moving the kneewall insulation to the rafter cavity at the same time you complete the roof work. Not only is this required by code, but these interstitial spaces—not fully indoors or outdoors—are often where condensation occurs, as they contain some indoor air but are closer to outdoor temperatures.
RELATED STORIES
- Ice Dams, Can Lights, Wet Walls, and Water Damage
- How to Fix Ice Dams
- Ice-Dam Protection: How Far Up the Roof Slope?
Need help?
Do you have more questions about preventing ice dams when reroofing or something else? Get answers you can trust from the experienced pros at FHB. Email your question to [email protected].
Fine Homebuilding Recommended Products
Fine Homebuilding receives a commission for items purchased through links on this site, including Amazon Associates and other affiliate advertising programs.

Peel & Stick Underlayment

Musings of an Energy Nerd: Toward an Energy-Efficient Home

A House Needs to Breathe...Or Does It?: An Introduction to Building Science


