FHB Logo Facebook LinkedIn Email Pinterest Twitter X Instagram Tiktok YouTube Plus Icon Close Icon Navigation Search Icon Navigation Search Icon Arrow Down Icon Video Guide Icon Article Guide Icon Modal Close Icon Guide Search Icon Skip to content
Subscribe
Log In
  • How-To
  • Design
  • Tools & Materials
  • Restoration
  • Videos
  • Blogs
  • Forum
  • Magazine
  • Members
  • FHB House
  • Podcast
Log In

Fine Homebuilding Project Guides

Wiring

Guide Home
  • Working with Electricity
  • Tools and Materials
  • Receptacles and Switches
  • Lights and Fans
  • Rough-In
  • Outdoor Wiring
  • Panels and Subpanels
Editor's Notepad

Wiring a Subpanel

Learn how to safely and successfully install a garage subpanel.

By Andy Engel
  • X
  • facebook
  • linkedin
  • pinterest
  • email
  • add to favorites Log in or Sign up to save your favorite articles

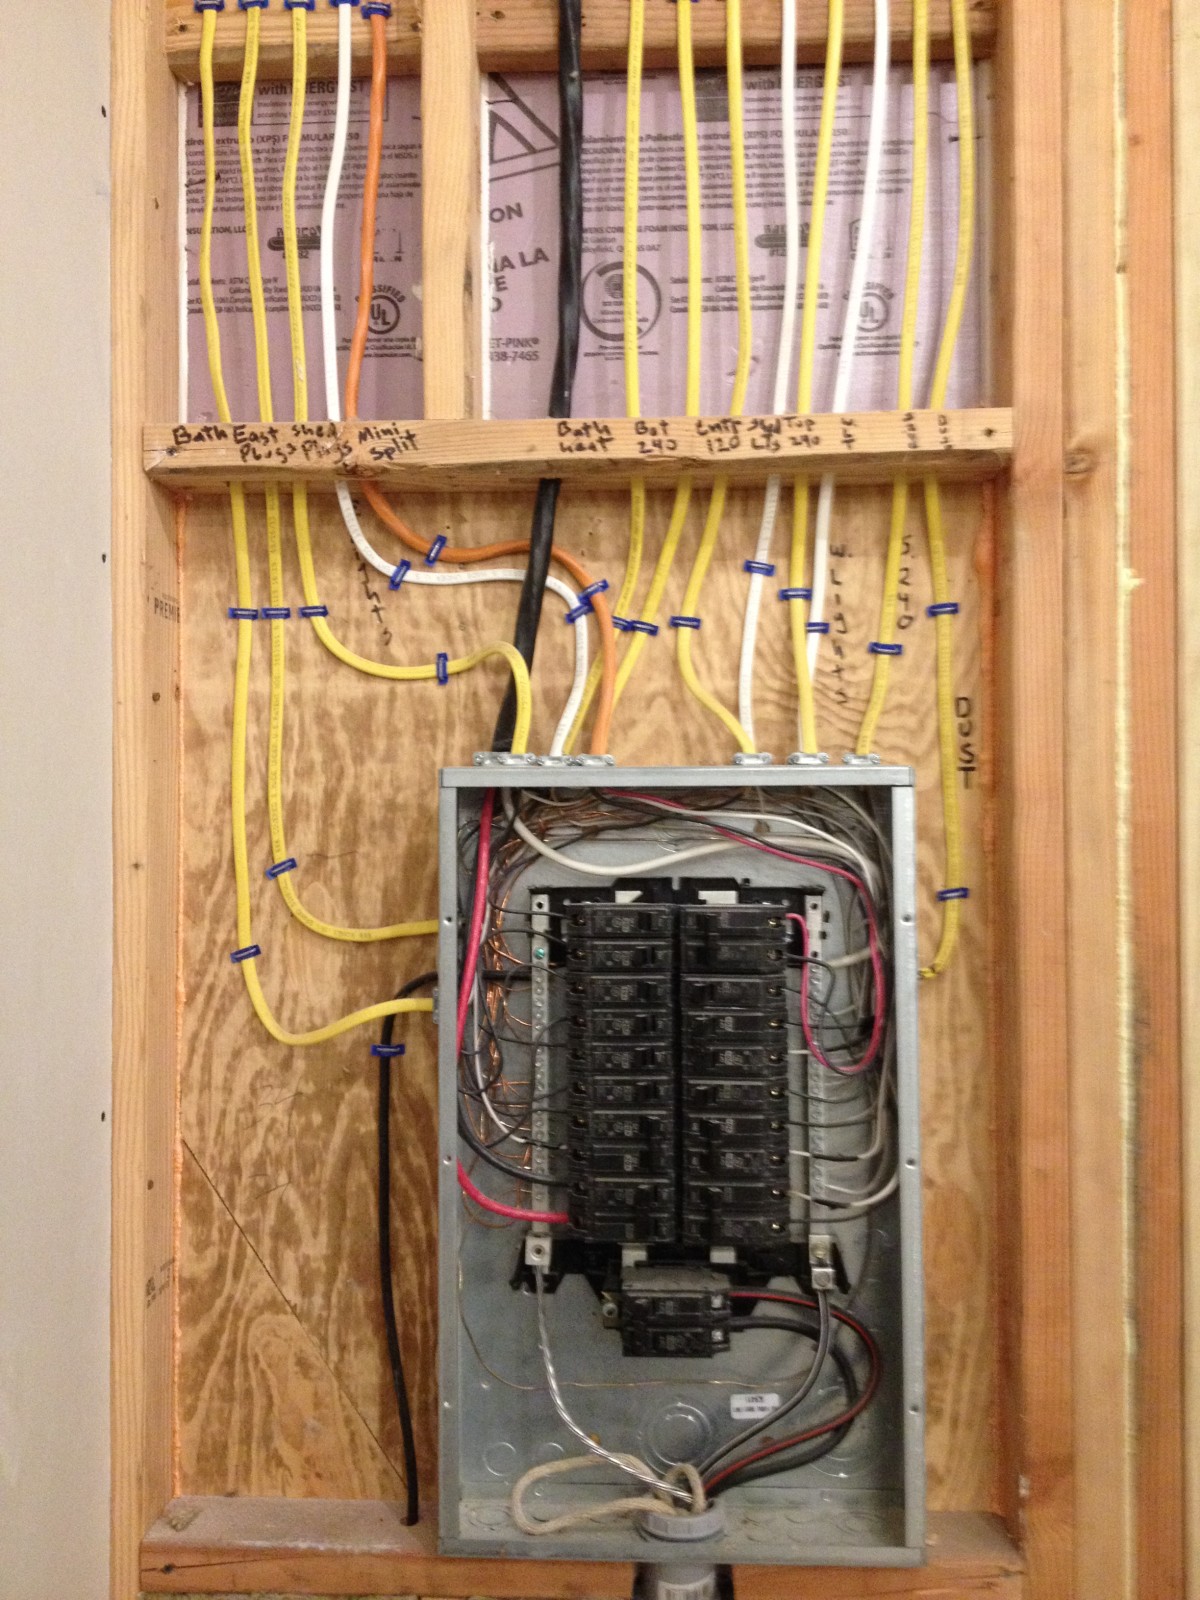
When I was a builder, my partner was a licensed electrician. We did a lot of the work ourselves on the houses we built, and I got a pretty good apprenticeship in house wiring. Consequently, I’ve wired a number of panels and service connections on new houses, but until building my own garage recently, I had never done a subpanel. Like any electrical work, this is something I recommend you tackle only if you have a thorough understanding of the process, and that you pull the proper permits.

Subpanels have both similarities and differences with main panels. Both require properly sized entrance cable, from the main disconnect in the case of main panels, and from the main panel in the case of a subpanel. The conductor size depends on the amperage the subpanel’s main breaker can handle and the distance from the main panel. There are any number of online references to find that information. I had to buy about 60 ft. of cable, and considered both copper and aluminum conductors. Because copper is a better conductor than aluminum, a smaller diameter wire can be used, which makes it a lot easier to pull through conduit. However, even though I had to buy a larger gauge of aluminum conductor, it was substantially cheaper than the copper. One critical thing when using aluminum wires is to coat their ends thoroughly with Noalox to keep the aluminum from corroding where it ties to the panel. Corroded aluminum doesn’t conduct electricity well, and the extra resistance creates heat, which has caused fires.

Because the subpanel is fed from a new 100 amp breaker in the main panel, no other disconnect was required in my case, so tying in was a simple matter of clamping the wire ends to the lugs. The biggest difference between a subpanel and a main panel is that the ground and neutral buses on a subpanel have to be separated. Most panels come with a bar joining the two, which is easily removed. Code requires subpanels to have a ground connection that’s independent of the main panel’s. In my town, two 8 ft. ground rods separated by at least 6 ft. are required. With our rocky soil, they are a challenge to drive. One tip that’s served me well is to chuck the rods into a hammer drill and spin them into the ground. The combination of rotary motion and impacts seems to move the rod around most obstructions, and will even set a rod in frozen ground. And since the rods are 8 ft. long, I drive them at a 45 degree angle to avoid having to stand on a ladder initially.

Because the ground and neutral bars are separate, all the grounding conductors have to go the grounding bus and all the neutral conductors to the neutral bus. Beyond that, there’s no difference between wiring from a subpanel and a main panel. One thing I find very helpful in either case is to mark the incoming cables with the name of the circuit they serve. That helps not only in labeling the panel, but in balancing the load between the two hot busses.

Fine Homebuilding Recommended Products

Fine Homebuilding receives a commission for items purchased through links on this site, including Amazon Associates and other affiliate advertising programs.

Reliable Crimp Connectors
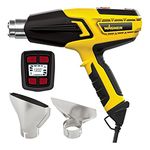
These reliable, high-quality connectors from Wirefy work on 10-22-gauge wire have heat-shrink insulation to keep out water and road salt.
Buy at Amazon

Handy Heat Gun

This heat gun is great for drying joint compound, primer and paint when patching drywall and plaster walls. Plus it can soften adhesive, get a very cold small engine to start, and shrink heat-shrink tubing.
Buy at Amazon

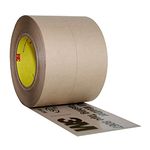
8067 All-Weather Flashing Tape

Available in 2- to 12-in. widths, this is a good general-purpose flashing tape that sticks well to most things. It features a two-piece release paper, water-shedding layers, and good UV resistance.
Buy at Amazon

Previous: How to Wire an Instagram-Worthy Electrical Subpanel Next: Subpanel Installation: Fitting and Fastening the Box

Guide

Wiring

Chapter

Panels and Subpanels

Sign up for eletters today and get the latest how-to from Fine Homebuilding, plus special offers.

Signing you up...

This site is protected by reCAPTCHA and the Google Privacy Policy and Terms of Service apply.
See all newsletters
See all newsletters

View Comments

  1. melli | Mar 09, 2015 10:42pm | #1

    Just adding a consideration on sub panel. Aluminum is a lot cheaper, especially for long runs, but the size of wire needed for a typical 100 amp sub panel in garage or shed may exceed what the sub panel can handle. That is, as an example, the lug in sub panel can handle #1-4 wire, whereas you may need bring in a 1/0 wire due to the fact you have a long run.

  2. ddivito | Mar 17, 2015 07:17am | #2

    If the sub panel is located in the same building, then 4 service wires have to go back to the main panel to complete the grounding.

  3. HWG | Mar 17, 2015 08:23am | #3

    I take exception to the statement that a subpanel requires its own ground rod. In fact it is only permitted in very limited cases in detached buildings, and only where there is no metallic connection back to the main building (telephone wire, copper water line, etc. ) Additionally, good grounding practice for lightning protection requires there be only one ground source for the entire electrical system. Having two grounding rods, even as close as six to eight feet apart, can direct current from a nearby lightning strike into the structure through one rod, run through the entire electrical system, and exit through the second rod. This can do enormous damage.

  4. sbandyk | Jun 29, 2017 06:10pm | #4

    I can confirm that my local Electrical Code (DuPage County, just outside Chicago.. possibly an addendum from my town) requires two grounding points.
    I pulled a permit for a panel upgrade and the inspector let me know he'd be happy pass me as soon as made a couple more additions, one of those being a 2nd grounding point (in addition to the line bonded to steel water line where it enters the basement). He told me all new construction in my area requires two grounds.
    I was a little surprised, not because it occurred to me lightening might be a problem, but because I'm familiar with multiple ground points occasionally introducing noise into the electrical infrastructure through a ground loop.

    Also now required by me, an emergency shut-off where my service enters. That's a pretty good idea, especially if you're a fireman who might have to slog through a water-soaked house with live power. If only 200A external cut-off switches weren't so expensive. :-(

Log in or create an account to post a comment.

Sign up Log in

Become a member and get full access to FineHomebuilding.com

Wiring

Wiring

Trusted, code-compliant guidance from the pros for working safely on any wiring project

View Project Guide

View All Project Guides »

Become a member and get unlimited site access, including the Wiring Project Guide.

Start Free Trial

Working with Electricity
  • Basics
  • Safety
  • Troubleshooting and Upgrades
Tools and Materials
  • Electrical Tools
  • Electrical Boxes
  • Cables and Wires
Receptacles and Switches
  • Materials
  • Wiring Receptacles
  • Wiring Switches
Lights and Fans
  • Lighting Design
  • Installing Lights
  • Fans
Rough-In
  • Planning
  • Installing Electrical Boxes
  • Running Cable
  • Retrofit Work
  • Making Connections in Boxes
  • Electrical Conduit
Outdoor Wiring
  • Basics
  • Outlets
  • Installing Lighting
Panels and Subpanels
  • Understanding Panels
  • Circuits
  • Installing a Subpanel

Fine Home Building

Newsletter Sign-up

  • Fine Homebuilding

    Home building tips, offers, and expert advice in your inbox.

  • Green Building Advisor

    Building science and energy efficiency advice, plus special offers, in your inbox.

  • Old House Journal

    Repair, renovation, and restoration tips, plus special offers, in your inbox.

Signing you up...

This site is protected by reCAPTCHA and the Google Privacy Policy and Terms of Service apply.
See all newsletters

Follow

  • Fine Homebuilding

    Dig into cutting-edge approaches and decades of proven solutions with total access to our experts and tradespeople.

    Start Free Trial Now
    • Facebook
    • Instagram
    • X
    • LinkedIn
  • GBA Prime

    Get instant access to the latest developments in green building, research, and reports from the field.

    Start Free Trial Now
    • Facebook
    • YouTube
  • Old House Journal

    Learn how to restore, repair, update, and decorate your home.

    Subscribe Now
    • Facebook
    • Instagram
    • X

Membership & Magazine

  • Online Archive
  • Start Free Trial
  • Magazine Subscription
  • Magazine Renewal
  • Gift a Subscription
  • Customer Support
  • Privacy Preferences
  • About
  • Contact
  • Advertise
  • Careers
  • Terms of Use
  • Site Map
  • Do not sell or share my information
  • Privacy Policy
  • Accessibility
  • California Privacy Rights

© 2025 Active Interest Media. All rights reserved.

Fine Homebuilding receives a commission for items purchased through links on this site, including Amazon Associates and other affiliate advertising programs.

  • Home Group
  • Antique Trader
  • Arts & Crafts Homes
  • Bank Note Reporter
  • Cabin Life
  • Cuisine at Home
  • Fine Gardening
  • Fine Woodworking
  • Green Building Advisor
  • Garden Gate
  • Horticulture
  • Keep Craft Alive
  • Log Home Living
  • Military Trader/Vehicles
  • Numismatic News
  • Numismaster
  • Old Cars Weekly
  • Old House Journal
  • Period Homes
  • Popular Woodworking
  • Script
  • ShopNotes
  • Sports Collectors Digest
  • Threads
  • Timber Home Living
  • Traditional Building
  • Woodsmith
  • World Coin News
  • Writer's Digest
Active Interest Media logo
X
X
This is a dialog window which overlays the main content of the page. The modal window is a 'site map' of the most critical areas of the site. Pressing the Escape (ESC) button will close the modal and bring you back to where you were on the page.

Main Menu

  • How-To
  • Design
  • Tools & Materials
  • Video
  • Blogs
  • Forum
  • Project Guides
  • Reader Projects
  • Magazine
  • Members
  • FHB House

Podcasts

  • FHB Podcast
  • ProTalk

Webinars

  • Upcoming and On-Demand

Podcasts

  • FHB Podcast
  • ProTalk

Webinars

  • Upcoming and On-Demand

Popular Topics

  • Kitchens
  • Business
  • Bedrooms
  • Roofs
  • Architecture and Design
  • Green Building
  • Decks
  • Framing
  • Safety
  • Remodeling
  • Bathrooms
  • Windows
  • Tilework
  • Ceilings
  • HVAC

Magazine

  • Current Issue
  • Past Issues
  • Magazine Index
  • Subscribe
  • Online Archive
  • Author Guidelines

All Access

  • Member Home
  • Start Free Trial
  • Gift Membership

Online Learning

  • Courses
  • Project Guides
  • Reader Projects
  • Podcast

More

  • FHB Ambassadors
  • FHB House
  • Customer Support

Account

  • Log In
  • Join

Newsletter

Get home building tips, offers, and expert advice in your inbox

Signing you up...

This site is protected by reCAPTCHA and the Google Privacy Policy and Terms of Service apply.
See all newsletters
See all newsletters

Follow

  • X
  • YouTube
  • instagram
  • facebook
  • pinterest
  • Tiktok

Join All Access

Become a member and get instant access to thousands of videos, how-tos, tool reviews, and design features.

Start Your Free Trial

Subscribe

FHB Magazine

Start your subscription today and save up to 70%

Subscribe

This is your last free article.

Don't miss another expert tip or technique from building pros. Start your free trial today.

Start your FREE trial

Already a member? Log in

We hope you’ve enjoyed your free articles. To keep reading, become a member today.

Get complete site access to expert advice, how-to videos, Code Check, and more, plus the print magazine.

Start your FREE trial

Already a member? Log in

Privacy Policy Update

We use cookies, pixels, script and other tracking technologies to analyze and improve our service, to improve and personalize content, and for advertising to you. We also share information about your use of our site with third-party social media, advertising and analytics partners. You can view our Privacy Policy here and our Terms of Use here.

Cookies

Analytics

These cookies help us track site metrics to improve our sites and provide a better user experience.

Advertising/Social Media

These cookies are used to serve advertisements aligned with your interests.

Essential

These cookies are required to provide basic functions like page navigation and access to secure areas of the website.

Delete My Data

Delete all cookies and associated data