Crown Molding: Mitering vs. Coping. Which Do You Do?

To say that I don’t install a lot of crown molding is an understatement. In the past five years, I’ve probably put up less than 100 ft. of it. I just don’t do a lot of trim carpentry. One thing I remember about my last crown molding project, though, was an exchange that took place between me and a buddy about the best way to make an inside corner.
As I was half way through a cope, my oh-so-patient co-worker called from across the room, “why didn’t you just miter the thing?” My saw stopped and the only response I could come up with was, “you don’t do that.” The truth is that a lot of people―many of whom are better craftsmen than I’ll ever be―make their inside corners by mitering. Some like to cope, some like to miter. I stuck with my coping method because I was told that coping keeps inside corners tighter, longer, and I believe it. But, who’s to say I’m right?
I recently checked in with two trim carpenters, Chris Whalen and Tucker Windover-both of whom have written for FHB-to ask how they make their inside corners.
I’m sharing their responses with you in the hopes that you’ll weigh in too.
Mitering vs. Coping
I Miter. . .
“As an old-school finish carpenter, I always used to cope the inside corners of crown molding; it was the only way the old guys would do it. 20 years ago a fellow I was working with told me it was a lot simpler to miter those corners. After all, that’s what we do with crown on kitchen cabinets. I was skeptical, but tried it and found he was correct.
The miter joint is clean and simple and can be glued. It also allows the molding to be rotated up and down to close the joint. Usually I back cut each piece a degree or so to accommodate the corner being out of square due to taping compound build up. If this is not done the joint will tend to open up in the front.
As with most finish carpentry techniques, having a system for doing things is one of the most important ways to achieve effectiveness. I leave the end of the first piece of crown loose until I have the second one up and am ready to adjust and nail the first corner. This allows the corner to be rolled and tweaked until it fits. With paint-grade material a dab of caulk takes care of any slight issues with the inside corner. I don’t use caulk as a way of cheating, but as a way of finishing off the joint.”
-Chris Whalen
I Cope. . .
“I always say: if the miter fits, nail it. But generally speaking, I find the miter is harder to fit or it takes longer to get the joint tight. When I started working as a finish carpenter I scratched my head about the cope vs. miter question, but I realized that carpenters have coped moldings for many generations, and I suspected there was more to it than a blind following of tradition. There had to be a reason. That reason has not altogether been lost by the advent of the compound-miter saw and the Bosch miter angle finder. Let me explain.
Coping is a skill. Once learned, it is as quick and easy as tying your shoes. I teach my guys to cope an entire room of crown at once and then begin the process of marking and measuring and cutting. Tight mitered joints are exacting and fussy. They result in a joint that is at best sloppy, but probably unacceptable. Coped joints are relatively forgiving and built for speed. Making up a tight miter joint gets even fussier when we have to work with walls that are not straight or square. A coped joint can more easily float over those minor imperfections.
That being said, a mitered joint is something I will typically use on kitchen crown molding when I know all the corners are dead square. I also miter inside corners when preassembly and installation makes sense, typically when I’m working with smaller pieces around columns, a keystone on a header or a fireplace mantle.”
-Tucker Windover
Fine Homebuilding Recommended Products
Fine Homebuilding receives a commission for items purchased through links on this site, including Amazon Associates and other affiliate advertising programs.

Affordable IR Camera
8067 All-Weather Flashing Tape

Reliable Crimp Connectors
-
Perfection
-
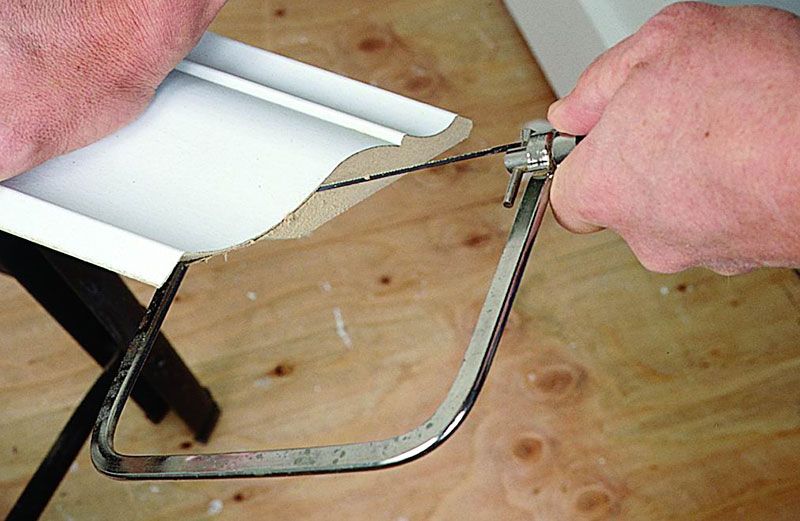
Although it takes some practice to cope well, most pros think it yields a better corner.
-
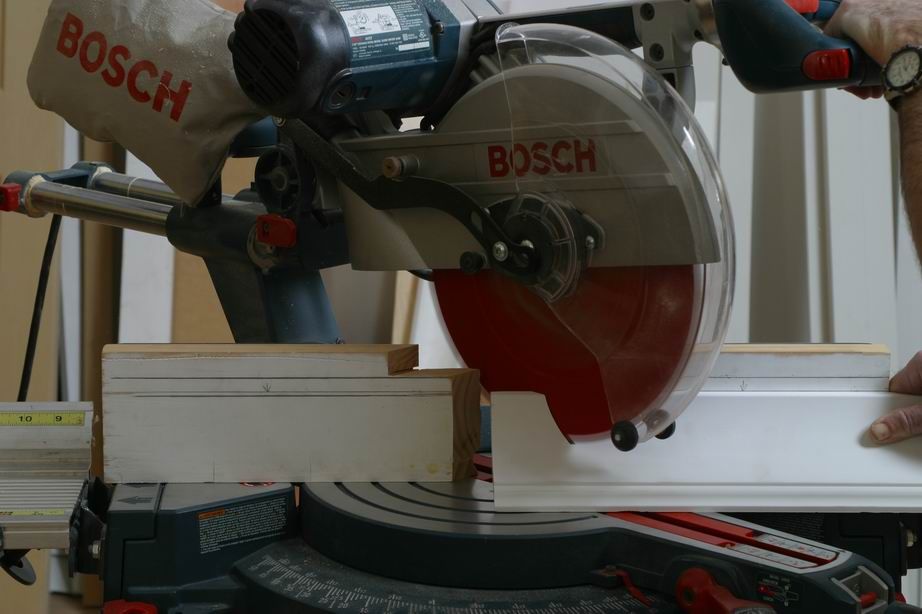
Some people think a mitered inside corner will perform just fine. Others fear the joint will open up as the wood expands and contracts throughout the year.


View Comments
Mitering crown is for outside corners, furniture and cabinets.
It is simply the best practice to cope inside corners on crown installed at the wall/ceiling. Mitered inside corner joints very often fail and open up. Coping done well looks as good as perfect miters and is a more forgiving joint.
Coped joints can be cut a skosh long and sprung into place tightly for a perfect fit. These joints are much less likely to ever open up. If they do open all you see is a tiny shadow line of the coped piece against the piece that runs behind it and butts against the wall.
However, both sides of the joint pull back equally When an inside miter shrinks, revealing a open miter at least twice the size of the coped joint shrinking under the same conditions. With stain-grade there is no caulk to handle this wood movement and the unfinished wood of the miter cuts shows. For these reasons there is more justification for coping stain-grade than painted crown. Inside miters will often result in call backs... coped joints will not.
I also use copes to hold one end of the crown, working solo, and install the crown in reverse order (if you can visualize that). I make sure the cope is just right with a short scrap of crown, but don't nail the last 2-3' of crown before the corner. Pull the scrap and pull the coped end down and slip the end of the next piece of crown in, push the corner together and tack in place with one nail or push that corner together with a "3-rd Hand" (by Fastcap) and head to the other end and check that cope with a scrap... if all is good nail off all but the last 2-3' of that piece and repeat.
Regards,
Brian Campbell
Like Rob, I was taught to cope crown because-“that’s the way you do it.” When I had my own trim carpentry business and was faced with getting in and getting out and still making a buck at the end of the day, I started questioning everything, looking for efficiencies anywhere I could find them.
I found that preassembly whenever possible was a big time saver. Plus the joints looked better because there is more control working off a bench top than working off a ladder.
When assembling before installation I always used an inside miter. I put two-part ten-second (2p10) in the joints to hold while we installed and at the same time I put a little yellow glue and some nails to hold the joint over time.
For all other joints I coped using a special coping jig I made and then the Collins coping foot after I evolved a little.
When it comes to most interior trim, coping is the way to go. Yes, it's a little fussy - I sometimes find myself back-cutting the cope with a utility knife - but it always works. If an inside corner is out of square, you have to under or over cut a miter, and it still may open up over time. Or the backing isn't as solid as it should be and the miter opens up when you nail it. Besides, what else would you do with your coping saw?
I have tried all sorts of methods for mitering inside corners but these days I cope. http://www.goodmillwork.com
I cope on all crowns, with the exception of crown on cabinets. To me it's not so much the out of square inside or outside corners, it's the fact that I have to hold that miter just right while I'm fastening, and that even the force of the finish nailer may knock it out of alignment. A coped joint can be pressure fit and will hold tight while I shoot a nail through it.
I've been installing crown for over 30 years, have probably coped thousands of joints,and I still prefer to cope whenever possible. For one, I can spring the piece with the cope into the the previous piece, and get a very tight joint. I also can adjust the fit of the crown a bit by tapping both pieces up or down.
At this point, I can do an average room by myself in a few hours, including the copes. I think its faster, since a coped joint will adjust to an out of square inside corner, where a mitered joint has to be perfect.
About the only thing I have to caulk when I'm done is the crown to wall, and crown to ceiling, joint.
I do still cope the old timer way, by hand with a coping saw. One of these days I'm going to try the mini grinder and disk method, tho.
There is no question a cope is the only way that will last over years of seasonal change in wood movement.
Inside miters will open as the crown shrinks and swells with moisture content. The reason a cope does not is wood does not shrink with the grain but across it. A miter is a angle cut across the grain so as the wood shrinks the miter will open at one side then as it swells it will close at that side but as it swells more it will open at the other side. so the only time the miter is tight with no gaps is when the moisture content of the wood is equal to he day it was installed.
On cabinets and furniture inside corners are glued and installed on perfect 90 deg.
But even on that when the glue joint fails you can still get a slight gap if the molding is very wide. But any good cabinet maker installing a very wide/tall crown detail on cabinet or furniture will use a multi-part molding because the profile of each piece is not that wide the movement is not as great as say a 4 1/2 inch crown molding or a large cove molding you might install at a ceiling.
But There is one exception to this rule and that is exterior PVC trim in that case you get movement with temperature not moisture and it does move along it's length so when you have a inside PVC crown joint a Miter and glue is the way to go I recommend in that case to use the 2 part (Bond-n-fill) when glued the joints become as one and don't nail with-in 1 foot of the corner then both pieces will move together but the joint will not open. A 20 foot piece of cornice trim in the winter can shrink as much as 1/2 inch in length (1/4 at each end if secured in the center) so you really need to glue joints and leave a expansion and contraction space then use a flexible sealer in the expansion space (bond-n-fill flex)
On really long runs of PVC trim I even use a expansion joint mid way filled with bond and fill flex then the joints at the end do not open.
I might just write a entry on my blog about installing PVC exterior trim and how details differ vs how you would install the same trim in wood.
Just finished 300 ft of 9 1/4 MDF crown in new construction with some painful waves in the ceilings and imprecise corners. I coped everything. Granted, MDF won't expand and contract like solid wood, but there is no way mitering would have looked nearly as good nor been as fast and forgiving.
Coping can also be used when butting different crown profiles together. For example, when your ceiling crown meets cabinet crown in a kitchen. A simple jig and 3 step process make it possible (and with small pieces you can cope your edge by holding it perpendicular to a table saw to make it really easy.)
I was going to weigh in on this, but the weight has already been dropped I see.
There is really is no debate on my sites. For crowns that are cope-able, coping is infinitely faster (I cope all the inside rights before cutting the dead-ends to length). And you can tune the corner sooooo much better/faster it's...well...been said above.
Some crowns you can't cope, like a Greek revival style, in which case I like to get my brain in miter-mode early. And if you're building up a crown--you know, the upside down base trick--coping offsets the shadow-lines in the inside corner as the molding climbs toward the ceiling. It's not so bad if you only have one piece on the wall, but if you lay a third piece on the ceiling, now you've got lines all over the place. It looks like a rural road on a map for cripe's sake. To keep it clean I miter them all on built-ups--and STILL have a hard time getting them exact.
Build a cabinet or fireplace mantle that you know has square corners, use the miter saw for the crown. Install crown in any house new or old and the corners are not 90 degrees on inside or outside corners. The two walls forming any corner also have to square with the ceiling. Thus, I cope. In a simple rectangular room the first piece gets two butt joints and I leave about two feet from the ends unnailed. The second and third walls get a butt joint to the fourth wall and I cope the opposite end into the first wall again leaving about two feet unnailed on the ends. That leaves the fourth wall with a double cope or what I call the money cut (one chance only). Measure wall number four a touch long and bow it out in the center and spring it into the wall. Cut to the right length and coped properly, wall four pops all four corners into position. Nail it all around. At the start I make a scrap block with the top projection and bottom to mark the wall every few feet as a guide. For very wide crown I install a two by four nailer ripped at 45 degrees. This gives your nails a bit more reach into the distant corner between wall and ceiling.
Some additional thoughts. A new house or a new addition leaves the trim carpenter with framing that will dry and move around a lot during its first year and less so later. In a perfect world I would prefer to trim a year later. Good luck with that. I always opt for one length of crown for each wall. That makes for the best quality but sometimes rooms exceed the 16' that is the longest available crown stock. (I always hand pick my crown from the same mill run. The next batch of the same profile can differ). The joint in a long run can be dealt with in a couple of ways. The traditional diagonal cut leaves the most glue surface and makes it possible to sew the faces using small pins - set, filled and sanded. Paint grade work. obviously. With large crown that is thick, try a butt joint with biscuits in the heavy part of the crown. My material of choice is tulip/poplar which has a tight fit years later. Coping this hardwood is a more work but results in a better job. I often get follow-up business down the road as well as relatives and neighborhood referrals.
I always try to miter because a glued miter joint resists spreading. I have miter joints in my house that after 10 years the paint on the inside corners still isn't even cracked. I started doing this several years ago when I bought my first compound miter saw which had in the instructions a method for mitering corners. Before the compound miter saw the accepted method was "backwards and upside down" with the crown on an angle against the fence. The fence height limited the size crown you could saw in this way so I was looking for a better solution. One problem with mitering is that the measurement has to be dead nuts whereas with coping you can cut a little large and "snap" into place. When mitering I sometimes have to use shims to bring the corners together to get a good squeeze on the glue but the extra work is worth it when you look at the job years down the line. If you never see your work again and if your bottom line is "time is money" then cope it and "git R done"
So far, it appears the score is 11-1 in favor of coping. As I said in my initial post, the most important thing in finish carpentry is to have a system that works for you. If that includes coping crown, I can't argue about that. But I would like to point out a few things in these comments that are either false or unfair in this debate of miter vs. cope.
1. Precision
It's pretty difficult to beat the precision of a miter cut using a chop saw or glide saw. It's a controlled, straight, clean, accurate cut. Not so with a cope, which is done by hand and is subject to all sorts of variables. I have coped thousands of joints and I doubt I have done one that was absolutley right. You all know what I am talking about, whether it's a ragged edge or a divot from one stroke too many or you just couldn't quite follow the outline correctly. Coping that produces acceptable joints is a skill that requires lots of practice. Perfection can be approached but never attained. And then there's the issue of back-cutting. And fine tuning with a rasp or sand paper or whatever you choose to use. Once you've set up the miter saw, pull the trigger and slice through the material.
2. Fit
There's been some talk about how the coped joint fits better than the mitered one. This is false. First, the cut is more precise on a mitered joint. (see above) Secondly, I do all of the things with a mitered joint that others do to a coped joint. I back cut to allow for out of square corners. I cut the pieces slightly long so they snap into place and make the corners tight. I tap the two pieces up or down in the corners to get a batter fit. If I need to, I shim the pieces to hold them while I nail. And I can glue the pieces together to hold the corner tight over time, an impossibility with a coped joint. And I usually wipe the joint with caulk as the icing on the cake. Colored caulks work great for stained wood. It's not cheating, it's using the technology science has developed! The old boys would have used it too, if they had it. One more thing, I may benefit from living in a semi-arid climate where we don't have so much wood movement.
3. Speed
Overall speed starts with measuring, followed by cutting and then installation. Once again, it depends on whether a system has been developed. Usually, I measure the whole room from rolling scaffolding, making notes about squareness as I go. Then I cut all of the pieces and begin installing them. I leave the ends loose so I can tweak the fit at the corners. There's no comparison between the two approaches as far as speed is concerned. Start with the cut. You're still trying to cope that first curve and mine piece is cut.
4. Best parctice
I've read about "best practice" and "that's the way it's done" in several of these comments. I can't criticize anyone for coping crown. It's a personal choice and one that's comfortable. But let's not be so judgemental. Even now I cope from time to time. In fact, I cope any profiled baseboard that I install, though I use a trim router to do it. Keep an open mind, do what makes sense and allow for some "outside the box" thinking. Afterall, there are some crowns that cannot be coped. As far as I know, all of them can be mitered. So if you had to pick one system for all crowns, by default, it would have to be mitering.
My advice is to develop a system that works for you, beginning with how best to measure for the crown. Cope or miter? That's for you to decide, but I would suggest giving miters a try. I have been doing finish carpentry for over 35 years and mitering crown for almost 20. I have never had a call back or a complaint. Chris Whalen
I put up a lot of crown a few years ago when the economy was purring. We were spoiled in some ways: where I live there were (still are but not so many) clients with big houses, budgets and pocketbooks so it was critical that we do a good job.
I've tried mitering and there is no question in my mind that coping gets me where we need to be. We live and work next to the ocean so seasonal movement of wood is off the charts. The few times I've tried mitering the joints were open in weeks; with copes I haven't seen them come apart yet.
Layout is fairly straightforward, mapping out insides and outs are obvious, and we plan our cuts so we never get the dreaded double cope. We also always use a backer or nailer board made from spf to catch nails, usually 16 gauge.
Somethings we do that help get good results (I think):
1. Order what we need from the lumber yard. Often I will order 20 % extra and I want the boards to come from one milling. If I pick the lumber then i will only choose sticks that are coming from a bundle and not outside of it.
2. Use the Bosch digital protractor to check corners for 90's. For outside corners it's a good way to anticipate a back cut while you still have the stock to do it.
3. Install nailers. Rip 2 x 4 or 2 x 6 in two on bevel. Check crown to determine bevel angle and leave 1/4" between back of crown and nailer for wiggle and twist room. We nail and glue these up fast- leave a space for the butt joint of non-coped inside piece.
4. We use the table saw method to hog out the cope. I finish off the copes with my dremel and piece of fine sandpaper.
5. I plan my scarfs or joints of two pieces for the end of the day. this gives overnight drying of epoxy and the boards aren't in anyone's way during the night. I set up a straight workstation of horses or whatever to support the pieces. I then use west system with a 30 deg scarf cut. I cut 3/16" shims to hold the joint, clamp, glue and shoot 18 gauge short nails to hold the shims and hand sand in the morning to get the face of the joint perfect.
6. I find the only way to get good, consistent results means to take a half hour and build a plywood jig to hold the crown on the miter saws. Here's where you appreciate the movement of wood when you go to get the measurement of widths for your crown. I take 10 measurements and arrive at a mean. I find a piece that represents that mean, check to make certain it isn't cupping and lay out a 90 degree jig with a stop at the top so the wood can't creep when I'm holding it up to get cut. The jig is well worth the effort.
7. We use blocks to lay out marks that we will then use a chalk line to connect. The blocks are for the wall- height portion of the crown, the chalk is to anticipate the waves when they come. Occasionally the plasterers have given us some pretty badly faired sections and in these instances I will scribe out with a block plane a portion of the back of the crown to hide these inconsistencies as well as possible.
QUESTION TO ALL? Whats the best way to achieve a coped joint? A coping saw or grinder or both ?
I cope and miter.Both methods are very effective given the situation.Everyone knows that coping is much more effective when corners are out of square.Its also very labor intensive.
mitering is faster and cleaner,not that coping cant achieve the same effect . but its just the way it is.
QUESTION?? what portable tablesaw has the best rip fences.If know one please let me know.
Gman - I've had great luck with the larger of the two Ridgid portable saws (the one with the folding stand), but the smaller of the two is less reliable. I hear good things about the bosch saw, too. Supposed to have a nice fence.
Miter for paint grade, cope for stain.
Mitering even works with a sloped ceiling, if you make a few trial cuts with a couple of scrap pieces to get the correct angles.
In my opinion, crown (as well as other profiled moldings)should be coped at inside corners, not mitered. The things is this:wood moves with changes in humidity and moisture content, and glue and caulk will not work in all situations to hide or stop this movement. Plus an inside miter wants to move and open as you fasten it There are always exceptions, and I'm not trying to convince people that have a working method to switch to coping ( unless they're on my jobs). That said, there is a good reason that the traditional method is a cope: it may take skill, practice, and a little bit of time to cope properly, but properly done nothing works better.
I hate to beat a dead horse about the cope or miter issue but here goes. Most crown profiles are milled 45-45 which makes the projection at the ceiling the same as the height on the wall. The other most common milling is 62 degrees which makes the projection at the ceiling less than the height on the wall. The latter may be the only way to get behind ceiling air conditioning vents installed too close to the wall. Nevertheless the actual milling may not be 45-45 as is assumed to be the case. That's why I pick my crown from the same mill run. As well, ceilings, walls and corners are almost never the theoretical angle. But the compound miter saw is preset for the theoretical angle. What happens in the corners? In my experience an inside corner will open if mitered. Yellow glue on the end grain of a miter gets sucked into the wood leaving precious little to hold the two faces together. That's why I cope and that's why I use a rubber mallet to coax everything against the wall and ceiling before I shoot the final nails. This is what I've found installing probably miles of crown over more than a decade. I have always found the inside of houses to be something less than perfect. The only trade that doesn't run into difficulty with out of square conditions is the painter, unless he has to hang wallpaper.
Although I'm not a professional trim carpenter, but a mere experienced DIY'er, I've been wrestling with this issue for the past 40 years. My first shock hit me when I decided to install crown molding in my kitchen. The shock occured when the mating mitered piece was ready for installation. It pointed toward the floor at an angle. At that time I was the project director for a large building project. I asked the construction super what went wrong. He replied that I had to cope the joint and proceeded to show me how. Truthfully, I was never very good at it. That is until I bought my first compound miter saw and shortly discovered Wayne Drake who hosts a website, compoundmiter.com and has published a book on the subject of cutting miters for crown molding installation. Since then I've completed several projects for relatives and friends w/o any problems of separation caused by wood movement. We all know that wood expands across the grain much more so than laterally with the grain. Joints can open because the house may move with seasonal changes, but if this occurs both types of joints are subject to the same stresses and will open. One last comment. An earlier contributor offered that most crown is 45/45. My experience dictates otherwise. to my knowlege, most crown sold in the USA is 38/52 whereas 45/45 is more popular in Canada.
Regards, Tom Jordan
To crown a 4 sided room:
Mitered crown- 8 precise miter cuts
Coped crown - 5 precise Miter cuts
For years I used a hand Coping saw for crown. Until another trim carpenter showed me coping with a Bosch jigsaw and a T244D blade. I never looked back. Just rest the base on the mitered surface cut and you will be amazed at how accurate you can get. I detest people who use caulk or putty on their joints. Pay attention to what your doing and you can do perfect joinery.
Painters shouldn’t have to be trim carpenters too!
I cope with a portable table saw or even grinder then finish off a few strokes of 120 or 150 grit. Also put a little caulk (Sherwin Will 60yr exteruor or Phenoseal) in the joint and squeaze it out. It leaves a great finish.
Oh by the way I think the Dewalt is the best portable table saw on the market. Great rail guide, and no bog even when with wet lumber.
I do think miter joint are best but don't have time to fiquere out funky angles.
Yanni
Has anyone else tried the new Rigid multi-tools for doing copes? I switched from using the coping foot and have never looked back!! Works fantastic more precise and accurate and I feel a lot quicker as well.
coping vs mitering....
When I was taught by Sy Mason, an old-school english carpenter to apply molding, the first rule was that you should try to minimize the possibility of looking straight into a joint.
With a mitre joint, standing in the centre of the room yer looking directly into most mitred joints.
You walk into a room, and the wall facing you is square cut on each end, most of the other pieces are coped at one end, butt on the other
With a coped joint, yer head has gotta be along the wall to look into the joint.
I much prefer to cope, as with suitabale backcutting on the coped, you can achieve an acceptable joint with a degree or two of motion
Less waste too. A F/U on length of a mitre joint, making it too short, can mean 75 or 100 bucks in wasted material. but with a coped joint, you can easily fine tune the cope by maybe 1/8", and yes you may have a gap at the other end, but it's generally patchable with caulk as it's at the painted wall juncture.
Some other tricks I use are to use a 23g pinner to tack in place. Rationally placed, they will hold the piece in place (but I do use jacks to help support it. Wanna take the piece down, Electronic wire cutters will fit behind it and cut the pins, 18g pins used once I is happy
Instead of sandpaper, I use rasps and files
And yes, I use an oscillating saw to augment/replace the coping saw. A recent epiphany.
Eric in Calgary
I always cope.
I don't know how many times that I thought I had a perfect miter and then see it open up after I hit it with the finishing nailer.