FHB Logo Facebook LinkedIn Email Pinterest Twitter X Instagram Tiktok YouTube Plus Icon Close Icon Navigation Search Icon Navigation Search Icon Arrow Down Icon Video Guide Icon Article Guide Icon Modal Close Icon Guide Search Icon Skip to content
Subscribe
Log In
  • How-To
  • Design
  • Tools & Materials
  • Restoration
  • Videos
  • Blogs
  • Forum
  • Magazine
  • Members
  • FHB House
  • Podcast
Log In

Fine Homebuilding Project Guides

Windows & Doors

Guide Home
  • Choosing Windows
  • Installing Windows In New Walls
  • Retrofitting Windows
  • Window Repairs
  • Door Basics
  • Interior Doors
  • Exterior Doors
Tools & Materials

A Door Hanger’s Jigs

A door specialist reveals a few shop-made accessories that make the job faster and easier.

By Larry Hart Issue 112
  • X
  • facebook
  • linkedin
  • pinterest
  • email
  • add to favorites Log in or Sign up to save your favorite articles

I’ve been a finish carpenter for a number of years now, and by a rough estimate I have hung about 3,600 doors. Door hanging involves many repetitive operations, such as mortising hinges and drilling locksets, so it makes sense to use jigs. On a typical job, I might have 20 or 30 doors to hang; using jigs, I can cut my installation time in half.

Factory-made jigs, such as those for cutting hinge mortises or boring locksets, are tempting, but they are expensive. So when I need a special jig or can’t afford the commercial model, I make it myself. Although it takes extra time to build, a jig usually saves me time in the long run, and the process keeps me in tune with my work.

Lockset Jig Reduces Layout Time

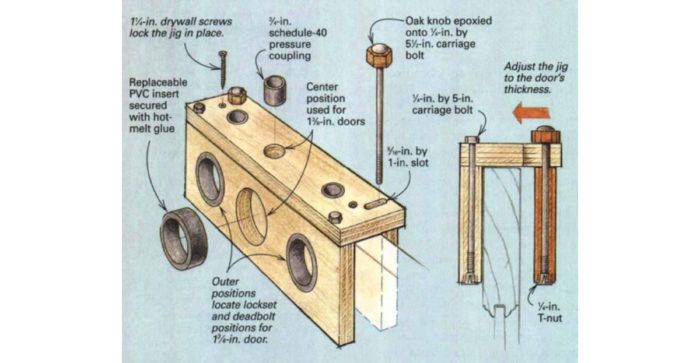
The jig shown in the drawing is my plywood version of commercially-available lockset jigs that are used to drill holes through the face and edge of a door. Unlike the steel models that template only one lockset at a time, my jig lets me drill both lockset and deadbolt at the same time from either side of the jig. The width of my jig (4 in.) is also substantially less than the commercial jigs and won’t interfere with any door’s raised cope and sticking. I cut removable inserts from ¾-in. thick PVC sheet (available from most plastics-supply outlets); these inserts prevent excess wear on the plywood. I can adjust the jig for door thicknesses that vary from 1 1/4 in. to 1 7/8 in., and I set the bore locations for the most common backset, 2 3/8 in. Once the jig is in place (typically centered 44 1/16 in. from the top of a 6-ft. 8-in. door), I lock it down to the door with 1 1/4-in. drywall screws and bore the holes for the lockset with the appropriate Forstner bit.

Lockset jig aligns both lockset and deadbolt holes.

Once he has set the position of the jig, the author can quickly drill the necessary holes for a complete lockset and deadbolt without moving the jig.

Door-Edge Mortising Jig Has Multiple Uses

I typically use the door-edge jig when I have to repair the edge of a door. If someone else has botched the job of installing a strike or if the position of the strike needs to be changed, I rout a mortise into the door edge and fill it with a tight-fitting dutchman, or patch. After the glue dries, I can drill a new hole.

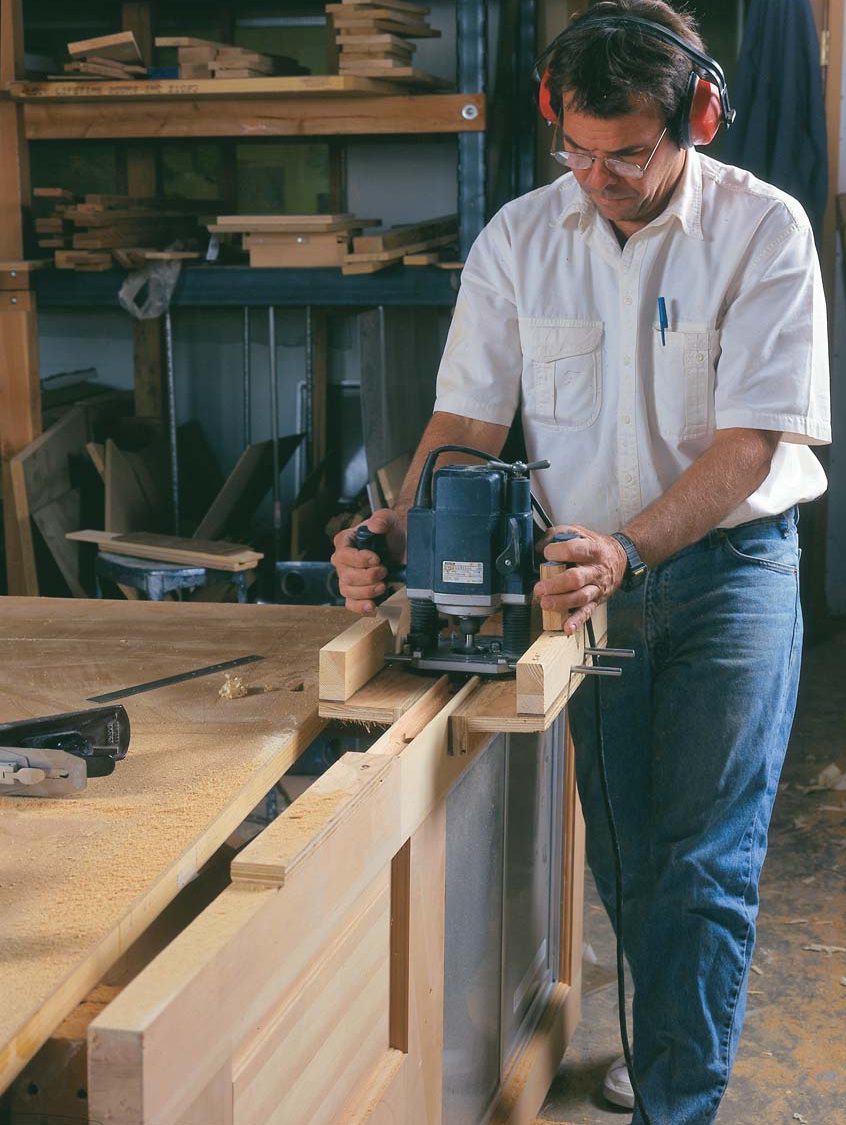
This setup is made to be used with a plunge router fitted with a straight mortising bit. The jig centers the router on a self-clamping platform that slides along the door’s edge, providing a stable base for the router. The jig ensures a straight, even mortise while keeping the router bit from wandering off the edge of the door. The jig is made up of two halves connected by 3/8-in. steel rods and, like the previous jig, can be adjusted to varying door widths by loosening the oak-handle carriage bolts. The steel rods fit through the edge-guide holes in the router’s base, fixing the router’s position to the base.

Door-edge jig creates a controlled cut on a narrow surface.

To repair damaged door edges, the author uses a router and straight bit to cut a deep mortise, which he will later fill with a dutchman. Note stop blocks screwed to the door edge to limit the jig’s travel.

Door-edge jig creates a controlled cut on a narrow surface.

Dual-Axis Jig And Router Cut A Flat And Square Mortise

I use the jig shown below when I want to relocate the lockset on a door and need to patch the old location with a dutchman. The beauty of this jig is that it enables me to cut a perfectly flat mortise over an area that’s larger than the router’s base. In addition, the adjustable stops ensure that the mortise’s dimensions will be precise. The resulting mortise has a flat bottom and square sides, and it is a cinch to fill.

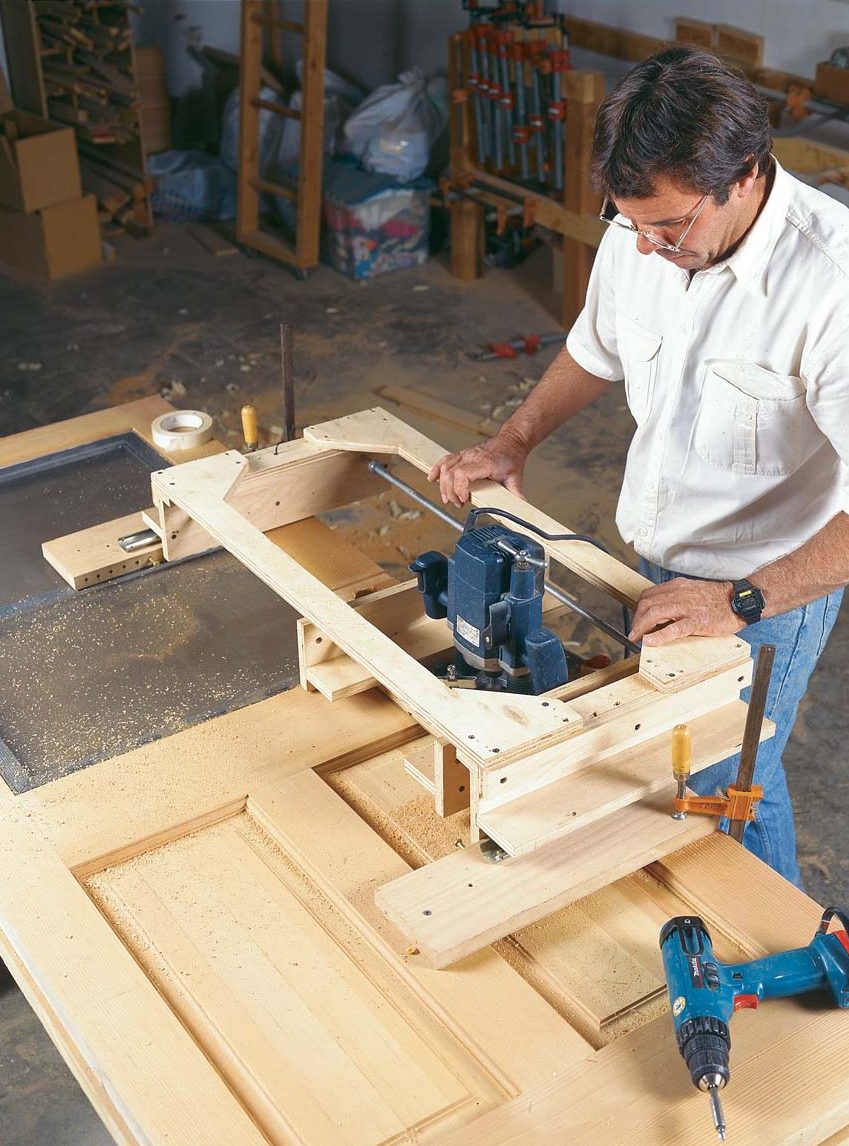
The router is clamped onto a carriage that slides laterally on a pair of 3⁄4-in. rods and moves forward and back on drawer slides. Once the jig is screwed and clamped to the door, I can set the stops to limit the cut across the width and length of the door’s stile. I set up the plunge router with a 1-in. straight bit and clamp it into the jig. Typically, I begin by setting the cutting depth to approximately 1⁄8 in. and increase the depth by the same increment at each pass.

I kept the cost of the jig to a minimum by using scrap and spare parts where possible; my only outlay was for the 3⁄4-in. rods and the stop collars, which I bought at the local hardware store, and the toggle clamps, which are available from most tool catalogs.

Dual-axis jig makes nearly invisible door repairs.

For door repairs, the author cuts a mortise across the width of a stile, a technique that eliminates one visible joint.

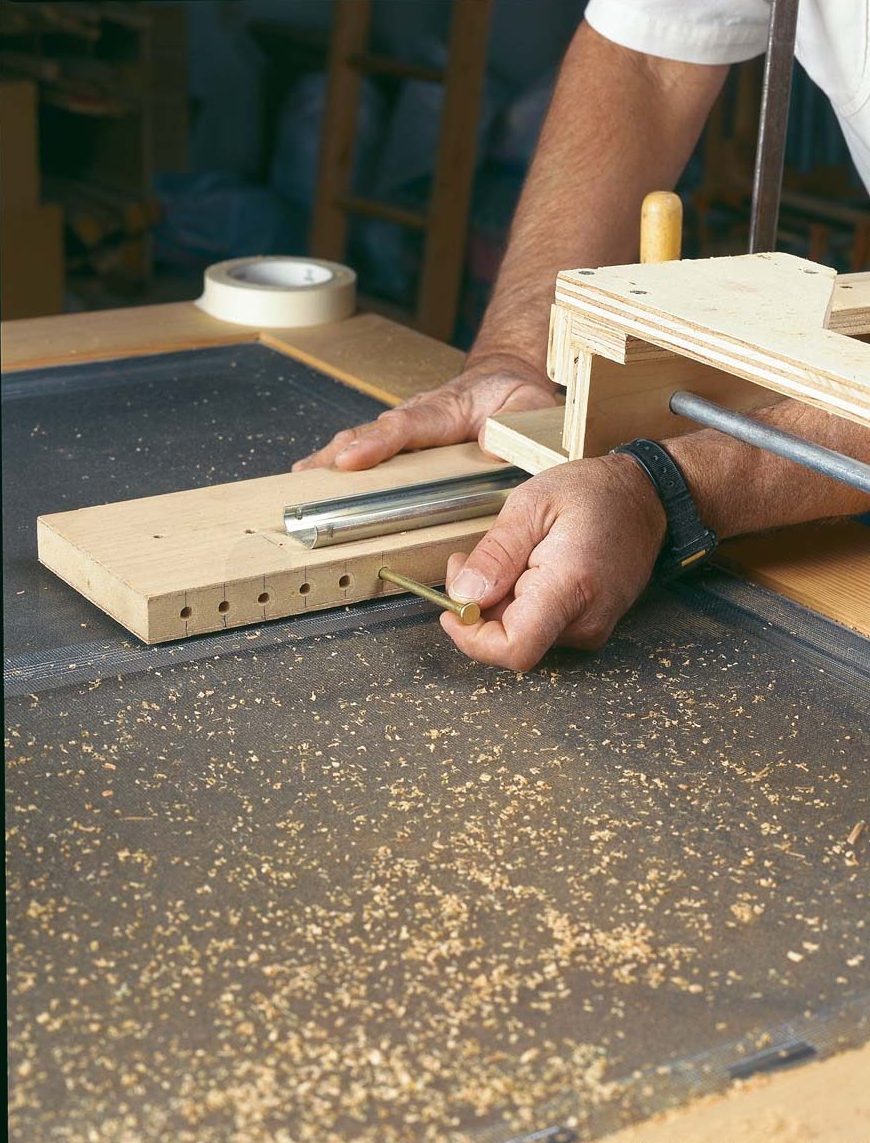
Recycled hinge pins serve as a stop.

The travel of the router carriage can be limited by inserting the pin into any one of the indexed holes.

Dual-axis jig makes nearly invisible door repairs
Recycled hinge pins serve as a stop

Door Bench Reduces The Backache Of Prepping Doors

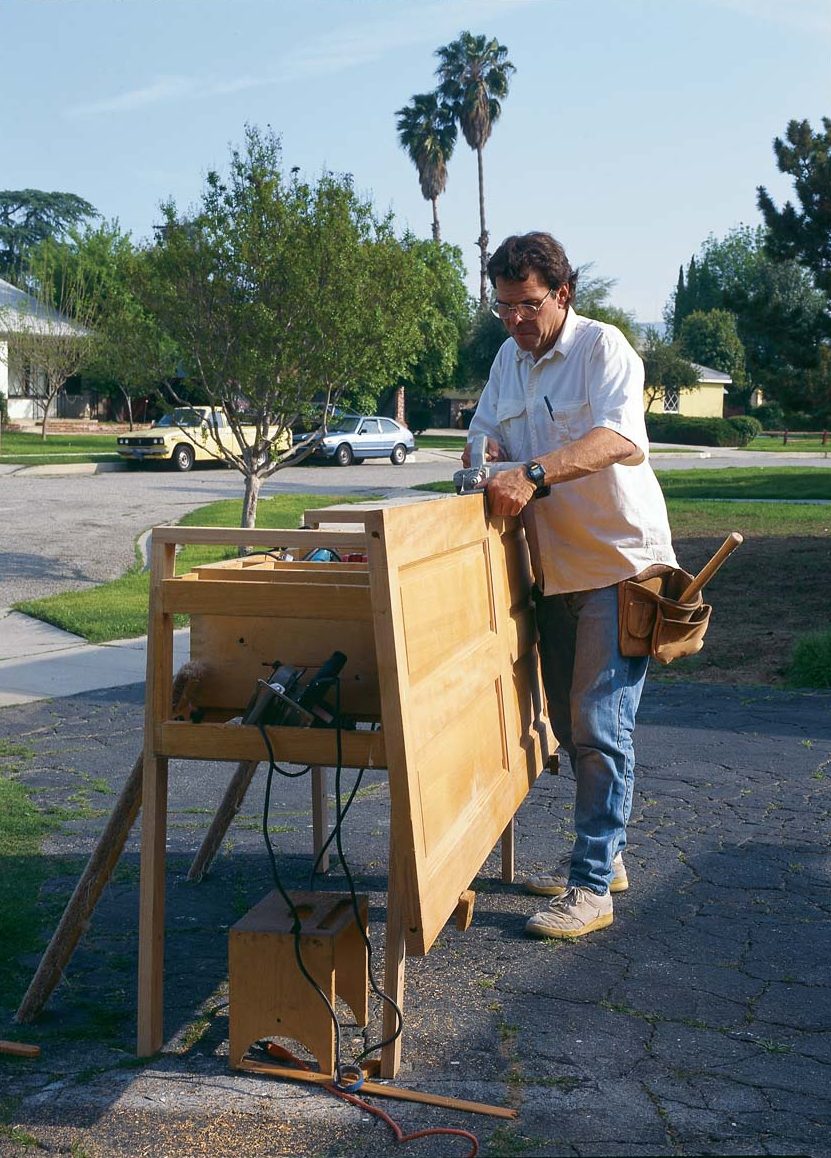
Door benches have been a fixture in the door-hanger’s trade for decades, and they must have been invented by some anonymous carpenter who was sick and tired of bending over a door that wobbled around while he tried to cut the hinge mortises. Typically, the benches combine a portable work surface with handy tool storage, they are easy to carry, and they allow a carpenter to stand comfortably while the carpenter readies a door for hanging.

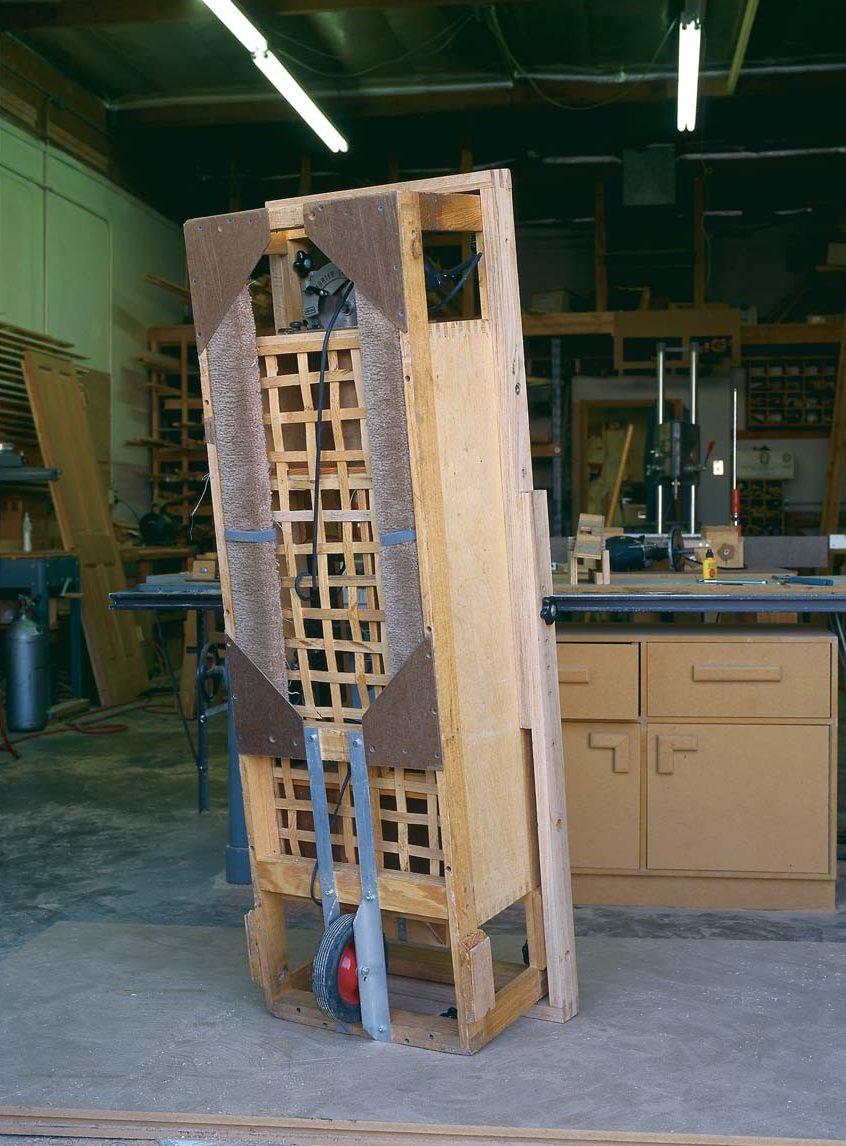
I’ve used knock-together door benches for years but was always too busy to make anything better. When the recession hit our neck of the woods in the early ’90s, I used my extra time to build a sturdy bench (drawing below) that was good looking and easy to set up. The new bench featured storage compartments for all my door-hanging tools, sliding drawers, padded rests, fold-down legs (photo bottom left) and a wheel so that I could pack up the bench and roll it into the back of my truck or the trunk of a car. Best of all, it has adjustable door bucks on the legs that allow me to position doors of the most common widths to a consistent working level.

The main interior box is made of Baltic-birch cabinet-grade plywood, and the frame and legs are 5/4 red oak. Each pair of oak legs is connected by a horizontal stretcher dovetailed into the top; this assembly pivots on the upper portion of the frame and can be locked in standing or folding position with carriage bolts and T-nuts. When the legs are locked into the standing position, the horizontal stretchers also form an attachment point for removable padded rests that won’t scratch the door’s finish. When not in use, these rests are tucked into hardboard gussets.

Sturdy construction keeps bench rolling.

Aluminum axle supports were made from L-stock trimmed and bolted to the bench’s frame.

Fold-down legs make setting up a snap.

The bench’s legs are locked in the down position by inserting a bolt through the leg into the lower frame.

Sturdy construction keeps bench rolling.
Fold-down legs make setting up a snap.

Door bucks save the carpenter’s back.

Because door bucks are adjustable, the author can position doors to a consistent working height.

Door bucks save the carpenter’s back.

For more photos, drawings, and details, click the View PDF button below:

View PDF
Previous: Jigs for Jambs (and Other Door-Hanging Devices) Next: Plane Doors More Easily with a Shopmade Jig

Guide

Windows & Doors

Chapter

Door Basics

Sign up for eletters today and get the latest how-to from Fine Homebuilding, plus special offers.

Signing you up...

This site is protected by reCAPTCHA and the Google Privacy Policy and Terms of Service apply.
See all newsletters
See all newsletters

Log in or create an account to post a comment.

Sign up Log in

Become a member and get full access to FineHomebuilding.com

Windows & Doors

Windows & Doors

Trusted, comprehensive guidance from the pros for choosing, installing, replacing, and repairing windows and doors on any house

View Project Guide

View All Project Guides »

Become a member and get unlimited site access, including the Windows & Doors Project Guide.

Start Free Trial

Choosing Windows
  • Window Types
  • Design and Materials
  • Energy-Efficient Windows
Installing Windows In New Walls
  • Installation, Start to Finish
  • Head Flashing for Windows
  • Video Series: Nail-Fin Window over Zip System Sheathing
  • Video Series: Nail-Fin Window over Exterior Rigid-Foam Insulation
  • Video Series: Nail-Fin Window over Housewrap
  • Video Series: Nail-Fin Window over Peel-and-Stick Housewrap
  • Video Series: Nail-Fin Window over a Fluid-Applied WRB
  • Video Series: Weatherproof Window Installation
Retrofitting Windows
  • Removing the Old, Installing the New
  • Video Series: How to Replace a Window
  • Video Series: Install a Full-Frame Replacement Window in a Brick Wall
  • Video Series: Install an Insert Replacement Window in a Brick Wall
  • Video Series: Retrofit a Flanged Window
Window Repairs
  • Restoring Old Windows
  • Repairs and Upgrades
Door Basics
  • Tools & Jigs for Door Hanging
  • How to Install Doors
  • Hinges
  • Handles, Knobs, and Locksets
  • Fixing Door Problems
Interior Doors
  • Prehung Doors
  • Pocket Doors
  • Other Types of Doors
  • Custom-Built Doors
Exterior Doors
  • Door Choices and Design
  • Installing Entry Doors
  • Building Exterior Doors
  • Installing French Doors
  • Replacing a Door
  • Adding Weatherstripping and Sweeps

Fine Home Building

Newsletter Sign-up

  • Fine Homebuilding

    Home building tips, offers, and expert advice in your inbox.

  • Green Building Advisor

    Building science and energy efficiency advice, plus special offers, in your inbox.

  • Old House Journal

    Repair, renovation, and restoration tips, plus special offers, in your inbox.

Signing you up...

This site is protected by reCAPTCHA and the Google Privacy Policy and Terms of Service apply.
See all newsletters

Follow

  • Fine Homebuilding

    Dig into cutting-edge approaches and decades of proven solutions with total access to our experts and tradespeople.

    Start Free Trial Now
    • Facebook
    • Instagram
    • X
    • LinkedIn
  • GBA Prime

    Get instant access to the latest developments in green building, research, and reports from the field.

    Start Free Trial Now
    • Facebook
    • YouTube
  • Old House Journal

    Learn how to restore, repair, update, and decorate your home.

    Subscribe Now
    • Facebook
    • Instagram
    • X

Membership & Magazine

  • Online Archive
  • Start Free Trial
  • Magazine Subscription
  • Magazine Renewal
  • Gift a Subscription
  • Customer Support
  • Privacy Preferences
  • About
  • Contact
  • Advertise
  • Careers
  • Terms of Use
  • Site Map
  • Do not sell or share my information
  • Privacy Policy
  • Accessibility
  • California Privacy Rights

© 2025 Active Interest Media. All rights reserved.

Fine Homebuilding receives a commission for items purchased through links on this site, including Amazon Associates and other affiliate advertising programs.

  • Home Group
  • Antique Trader
  • Arts & Crafts Homes
  • Bank Note Reporter
  • Cabin Life
  • Cuisine at Home
  • Fine Gardening
  • Fine Woodworking
  • Green Building Advisor
  • Garden Gate
  • Horticulture
  • Keep Craft Alive
  • Log Home Living
  • Military Trader/Vehicles
  • Numismatic News
  • Numismaster
  • Old Cars Weekly
  • Old House Journal
  • Period Homes
  • Popular Woodworking
  • Script
  • ShopNotes
  • Sports Collectors Digest
  • Threads
  • Timber Home Living
  • Traditional Building
  • Woodsmith
  • World Coin News
  • Writer's Digest
Active Interest Media logo
X
X
This is a dialog window which overlays the main content of the page. The modal window is a 'site map' of the most critical areas of the site. Pressing the Escape (ESC) button will close the modal and bring you back to where you were on the page.

Main Menu

  • How-To
  • Design
  • Tools & Materials
  • Video
  • Blogs
  • Forum
  • Project Guides
  • Reader Projects
  • Magazine
  • Members
  • FHB House

Podcasts

  • FHB Podcast
  • ProTalk

Webinars

  • Upcoming and On-Demand

Podcasts

  • FHB Podcast
  • ProTalk

Webinars

  • Upcoming and On-Demand

Popular Topics

  • Kitchens
  • Business
  • Bedrooms
  • Roofs
  • Architecture and Design
  • Green Building
  • Decks
  • Framing
  • Safety
  • Remodeling
  • Bathrooms
  • Windows
  • Tilework
  • Ceilings
  • HVAC

Magazine

  • Current Issue
  • Past Issues
  • Magazine Index
  • Subscribe
  • Online Archive
  • Author Guidelines

All Access

  • Member Home
  • Start Free Trial
  • Gift Membership

Online Learning

  • Courses
  • Project Guides
  • Reader Projects
  • Podcast

More

  • FHB Ambassadors
  • FHB House
  • Customer Support

Account

  • Log In
  • Join

Newsletter

Get home building tips, offers, and expert advice in your inbox

Signing you up...

This site is protected by reCAPTCHA and the Google Privacy Policy and Terms of Service apply.
See all newsletters
See all newsletters

Follow

  • X
  • YouTube
  • instagram
  • facebook
  • pinterest
  • Tiktok

Join All Access

Become a member and get instant access to thousands of videos, how-tos, tool reviews, and design features.

Start Your Free Trial

Subscribe

FHB Magazine

Start your subscription today and save up to 70%

Subscribe

We hope you’ve enjoyed your free articles. To keep reading, become a member today.

Get complete site access to expert advice, how-to videos, Code Check, and more, plus the print magazine.

Start your FREE trial

Already a member? Log in

Privacy Policy Update

We use cookies, pixels, script and other tracking technologies to analyze and improve our service, to improve and personalize content, and for advertising to you. We also share information about your use of our site with third-party social media, advertising and analytics partners. You can view our Privacy Policy here and our Terms of Use here.

Cookies

Analytics

These cookies help us track site metrics to improve our sites and provide a better user experience.

Advertising/Social Media

These cookies are used to serve advertisements aligned with your interests.

Essential

These cookies are required to provide basic functions like page navigation and access to secure areas of the website.

Delete My Data

Delete all cookies and associated data