
Grouting Tile
Tile contractor David Hart explains how to choose, mix, apply, and seal the messy stuff that goes between tiles.

Synopsis: After new tile goes down on the floor or in the shower, gaps between the tiles must be filled with grout. The author explains the process, with tips on the right tools and advice on what kind of grout is best.
If there’s one thing that most tile installers dislike, it’s grouting. A monotonous, shoulder-wrenching task, grouting is often delegated to the low man on the totem pole. That’s a big mistake. Nothing can ruin a top-notch tile installation quicker than a bad grout job. An inexperienced helper can leave shaded or splotchy grout, uneven joints or grout that can be scratched out of a joint with the stroke of a fingernail.
Years ago, white-wall grout was nothing more than Portland cement mixed with water; floor grout was mixed on the job by combining fine white sand with cement in a 1:1 ratio. Latex or polymer additives weren’t an option, so installers simply added water to the mix. It worked—tile that was installed 50 or more years ago remains intact in many homes—but it had its limitations. Color choices were usually limited to white, black or gray. These days, grout is available in a rainbow of colors.
Modern grout products are also stronger and easier to use. The only factors that need concern tile installers are the type of grout to use, the proper consistency of the mix, even application and a thorough cleaning. And they shouldn’t forget additives and sealants.
The width of the joint determines the type of grout
There are two basic types of grout: sanded and unsanded. Which type of grout that you use is usually determined by the width of the joint between the tiles. Unsanded grout is the product of choice for any tile installation where the joints are less than 1/8- in. wide, even on floor tile. The finish is smooth, and it is relatively easy to clean.
Primarily used in joints wider than 1/8-in., sanded grout (also called floor grout or joint filler) provides the necessary strength for joints up to 1/2-in. and even wider. Although you might get away with unsanded grout in joints slightly wider than 1/8- in., it’s a poor bet. More than likely, tiny hairline cracks will form as a result of shrinkage, which is controlled by sand in the mixture.
As you might guess, the texture of sanded grout is rougher and a bit harder to clean. Although sanded grout is associated primarily with floor tile, it should be used on any tile with wider joints, no matter where it’s installed. However, be prepared for a long day if you plan to grout a wall with sanded grout. Unsanded grout readily clings to vertical surfaces, but sanded grout tends to roll down the wall and end up in little piles on the floor. It’s possible to use sanded grout in thin joints, too, but pushing the thicker mixture into tight grout joints can be a frustrating task that typically leaves small pinholes in the grout finish.
Unlike products of ten years ago, most grouts on the market now include a latex or polymer additive that strengthens the grout and helps it to resist staining. Although you can buy grout without admixes, I don’t bother; I’d rather have the extra protection that admixes offer.
To determine the amount of grout you will need to buy, consult the chart on the back of every bag of grout, or ask the sales clerk at the tile distributor. Measurements are typically based on the square-foot coverage per pound of grout, so you need to know how many square feet the job is, how wide the joints are and how big the tile is. One pound of grout might cover 5 sq. ft. of 6-in. by 6-in.tile with -in. joints; a 25-lb. bag of grout typically covers about 100 sq. ft. of 8-in. by8-in. tile with -in. joints.
A 25-lb. bag of white-wall grout costs about $10 or $12, and colored grouts can cost a few dollars more. I’ve used a half-dozen different brands, and all seemed to work well; none stood out as inferior or difficult to work.
Successful grouting depends on the right consistency
One of the most important aspects of grout is the mix. Nothing can make the process of spreading grout more difficult than adding too little water to the powder. A stiff grout mixture can be nearly impossible to push across the tile and into the joints. Conversely, nothing can ruin grout faster than adding too much water.
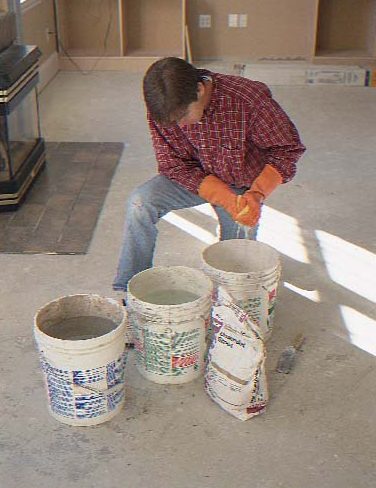
I generally mix grout by hand with a mar-gin trowel in a clean 5-gal.bucket. When I need a large amount, I save time by mixing with a paddlebit chucked into a variable-speed drill. A word of caution here: Whipping the grout into a froth can create air bubbles that will weaken the mix, so go slowly.
Generally, less water is better. As the water evaporates from a typical mix, it leaves microscopic voids. Excess water takes up more space; when the water evaporates, it creates larger voids and weak grout.
What’s the right water-to-grout ratio? Most contractors (me included) eyeball the right balance between powder and water.Grout manufacturers usually recommend a ratio when mixing a whole bag (“mix 25 lb.of grout with qt. to 4 qt. of clean water,”for instance). But there are times when you won’t use that much, so you have to estimate.
I always add less water than I think I need,and then add a little more if necessary.
Both sanded and unsanded grouts should have a stiff, toothpastelike consistency when completely blended. The mix should be allowed to sit for about ten minutes and then be mixed again, an important step called slaking. Slaking allows the ingredients to react and the color pigments to blend, creating a stronger grout with uni-form color.
 |
 |
Working the grout into place
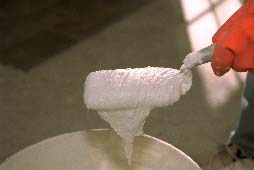
Once I’ve mixed the grout a second time, I dump a pile of it onto the floor and start pushing it around with a float held up at about a 45° angle. I want to make sure the joints are full, so I bear down on the float as I sweep it diagonally acrossthe joints.
I grout a small area, as much as I can reach easily, then go back and pull the float hard diagonally across the tile, holding the float at almost a 90° angle. This step cleans off the large chunks of grout left behind and helps to facilitate a quick cleanup later.
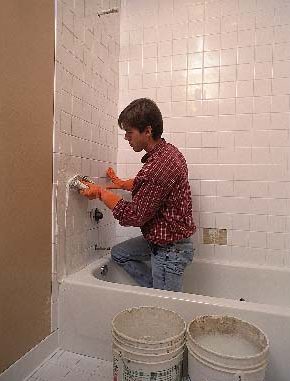
When I’m grouting walls, I usually load up a float with wall grout, start at the bottom and spread it up the wall, leaving plenty of grout on the face of the tile.I go back and clean off the excess grout by holding the float at a sharp angle and pulling it across the tile on a diagonal. As before, I push down on the float pretty hard as I pull it across the tile.
In average conditions, grout begins to setup in about 30 minutes, so I try not to spread more than I can work with in that time. If I’m working in hot rooms or with porous tile, I spread just enough so that I can start the initial cleanup in 15 minutes to 30 minutes. I’ve also found that grout will set faster if left in the bucket, so I dump the entire mix onto the floor and keep it moving until it’s gone.
Although cold joints aren’t an issue with grout, there is a chance of color variation from one batch to the next. If I have to stop, I try to end at a doorway or clear delineation and feather the next day’s work over the old.
Where not to grout
Grout won’t crack between wall tiles that are properly installed, except at the junction of the tile and an abutting structure like a tub or a countertop. If I’m working with large tiles, I try to minimize the amount of grout I pack into these expansion joints. Otherwise,I grout everything, use a margin trowel or utility knife to cut out the grout before it hardens and then run a bead of latex-silicone caulk into the joint. Latex-silicone is easy to use and easy to clean up. Although it doesn’t last as long as a pure silicone caulk, it does a fine job of protecting against water damage.
If you’re concerned about matching that mauve or orange grout, most manufacturers now sell caulks that are color-matched to their grouts.
Essential grouting tools
FLOATS: You can’t grout without a float. They’re available in two varieties: floor floats and wall floats. Wall floats have a soft rubber pad,while floor floats aremuch stiffer. Althoughsome contractors useboth, I use a wall float forall my grouting; I’ve foundthat a floor float is too in-flexible to get into tightcorners. A good-quality float can cost $20 ormore and should last up to a year for a full-timeinstaller. Eventually, the edges of the float weardown and won’t clean offthe face of the tile well.
MARGIN TROWEL: This spatula-shaped tool is essential for mixing groutand for scraping it out of corners and along baseboards. It’s also good for cleaning your other tools at the end of the day. A typical margin trowel will run about $15 and will last for several years.
SPONGES: A good-quality grout sponge willcost $5 or more, but it’s an essential tool for which there is no cheap substitute. I always use large grout sponges because they pick up and hold more grout than smaller ones, and that saves time.
GLOVES: Although some tile installers never wear rubber gloves when grouting, I won’t grout without them. I don’t like to have wrinkled skin at the end of a long day and, inevitably, the dry, rough skin that follows. Frankly, there’s no reason not to wear long rubber gloves. Although I have used grocery-store gloves, they’re too thin and rip far too easily. I use a pair of heavy gloves sold at tile distributors that have lasted almost a year. They cost about $8.
KNEE PADS: If you plan to spend more than an hour on your knees on a tile floor, you need knee pads. It’s foolish to work without them. A cheap pair can cost as little as $5, but you get what you pay for. I have a pair of plastic-capped, foam-lined knee pads from Alta (707-588-0230) that cost about $35, and they still protect me after three years of hard use.
Final cleanup needs less water
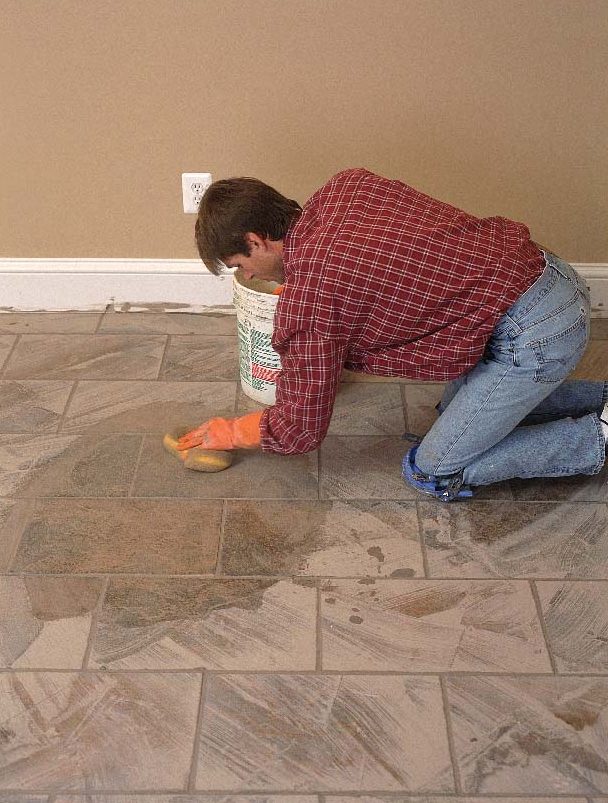
Cleaning up is as important as choosing and mixing the grout. The initial cleanup should accomplish two things: First, it should re-move the bulk of the residual grout on the face of the tile; and second, it should smooth the joints without pulling out the grout.
When the grout in the joints has firmed up to where it isn’t soft to the touch, I start cleaning. How long should firming up take? It varies with room temperature, humidity and the amount of water used in the mixture,but generally, it takes 15 to 30 minutes. If I wait too long, the grout will dry on the face of the tile, and I’ll have to spend time scraping it off. In hot weather or direct sunlight,grout can stick to tile within 15 minutes.
I start with two buckets of clean water, a couple of large sponges, a margin trowel and a grout float. After wetting a sponge and wringing it out, I wipe the face of the tile and the joints with a light circular motion, rinsing the sponge when the pores become clogged with grout. If the grout is pulling out of the joints, I wait a few more minutes. During this first pass, I want to loosen the grout that’s drying on the tile. To avoid splotchy color, I also make sure I don’t leave puddles of water on the joints. I use a margin trowel to scrape clumps of grout out of the corners, door casings and any other place where it doesn’t belong.
After I’ve smoothed the joints and loosened the grout stuck to the tile face, I go back with a bucket of clean water and re-move the light grout haze that remains.With a clean, lightly dampened sponge, I wipe diagonally across the tile or about 2 ft. or 3 ft., taking care not to push down too hard. I then turn over the sponge, repeat and rinse the sponge. This process takes time, and if I try to rush it, I end up smearing grout across the tile. Any streaks of grout haze left after the second wipe-down can be removed with a damp rag or mop when the grout has dried.
Cleaning and sealing tile
Clients often tell me they want a maintenance-free floor, but there really is no such thing, at least not with tile, stone or marble.There is no substitute for general maintenance and upkeep; grout gets dirty, period.It’s important to clean grout on a regular basis with a plastic-bristle brush and a commercial grout cleaner or a solution of mild soap and water. Make sure the soap isn’t oil-based; products such as Pine-Sol and Murphy’s Oil Soap will darken the grout.Sealers offer an optional way of protecting grout from stains; I usually recommend a sealer on floor installations. After trying several formulas available, I’ve found that the easiest to use is a water-based penetrating sealer such as TEC’s Penetrating Silicone Sealer (800-323-7407) or Custom’s TileLab Tile and Grout Sealer (800-272-8786),which soaks into the grout and then dries without changing the appearance. (Sealer manufacturers recommend different waiting periods before sealer application, so consult the product literature first.) No matter what type of sealer I use, it’s often necessary to apply a fresh coat at least once a year, some-times more often. After first cleaning the grout joints, I paint the sealer onto the joint with a foam or bristle brush, allow a few minutes for it to soak in and then wipe off any remaining liquid. I try not to let the seal-er dry on the face of the tile, but if the sealer does dry, a quick scrub with a mild abrasive cleaner removes it. After I apply the first coat, I try applying a second coat, but often,it won’t soak in. That’s okay; it simply means the grout is properly sealed. If the second coat does soak in (the grout will turn dark asit would if it were wet), I simply continue with the rest of the wall or floor.
Other types of sealers include acrylic-based top coats that leave a shiny film on the surface of the grout and oil-based sealers that will permanently darken the color of the grout. They all work, but each variety leaves a different finish on the grout. Test the sealers in a hidden area before you seal the entire tile installation.
Water- and silicone-based sealers are the least expensive, running less than $20 for a quart. Oil and acrylic types can cost $40 a quart or more.
 |
A clean sponge picks up more grout. When the sponge’s pores begin to clog with grout, the sponge should be rinsed and squeezed nearly dry. Excess water left standing on the joints will affect the curing process and discolor the grout.
Cleanup starts with lots of sponge and little water. Once grout has firmed up inthe joints, it’s important to clean the tile and smooth the joints before the grout hardens. A damp sponge will clean up the majority of the grout. Second cleaning removes the grout haze. After the initial cleaning, the remaining grout residue can be wiped up with a clean, damp sponge and light strokes. It’s important to rinse the sponge frequently during this stage. |
Epoxy grout is not for everyone
About ten years ago, the new buzz-word in the tile industry was epoxy grout. It still is the most stain-resistant grout you can find, which makes it a great choice for use on kitchen counters and in restaurants and medical facilities.
It is, however, an unforgiving material to work. It’s sold as a two-part additive that’s mixed with regular grout or as a two-part ready mix that can also be used as a setting compound;either way, you have to mix the en-tire batch at one time to maintain proper proportions. There’s no mixing by eye. It can be used only with ceramic tile and can’t be removed from a porous surface. Cleaning is often a frustrating experience that involves removing excess grout with nylon scrub pads and lots of water (epoxy isn’t water soluble). Here, timing is really important. If you clean before the grout has set, the sticky epoxy pulls out of the joints and smears allover; wait a few minutes too long,and you’ll be hard-pressed to remove it with a hammer and chisel.
Epoxy grout is also expensive. A two-part mix that’s added to a 25-lb.bag of grout costs about $100 and covers about 100 sq. ft. of 8-in. by8-in. tile. A smaller batch of two-part ready mix costs about $30 per quart.
If this material were just difficult and expensive, I still might use it, but most regular grouts now include latex additives far superior to their counterparts of ten years ago. Coupled with a good sealer, these newer fortified grouts are stain resistant and hold up well under normal household abuse. Given the extra expense, time and elbow grease required by epoxy mixes, I can’t think of a good reason to use epoxy unless a customer requests it. I certainly wouldn’t recommend it to any neophyte tilesetters.
From Fine Homebuilding #138
For more photos and details on grouting tile, click the View PDF button below.
