
How to Insulate Walls with No Sheathing
Use one of these two energy-smart details to make existing walls more energy-efficient when doing a gut rehab on an old home that has no exterior sheathing under the siding.
OPTION 1: Air-permeable insulation:
A gut rehab on an old home usually means opening up the walls from the interior so that new wiring, new plumbing, and new insulation can be installed. Uninsulated walls are common in older homes, so it’s no surprise to see empty stud bays. But in some older homes—those without any sheathing—you’ll be looking right at the siding. How do you insulate stud bays from the inside if the building has no wall sheathing or water-resistive barrier (WRB)? There are two basic approaches, and they start with creating an air gap between the back of the siding and the cavity insulation you plan to install.
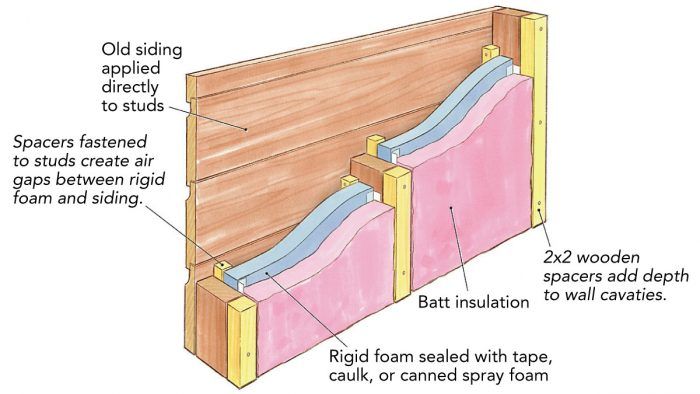
Using air-permeable insulation with rigid foam
If you plan to fill the stud bays with airpermeable insulation (fiberglass batts, blown-in fiberglass, mineral wool, or cellulose), the material you use to create the air gap needs also to be an air barrier. The most common choice is rigid foam. The easiest way to create the necessary air gap is to install wooden spacers (3⁄4 in. or 1 in. sq.) in the corners of each stud bay. These vertical spacers need to be tacked to the framing, up against the siding. Once they are in position, rectangles of rigid foam can be inserted (cut-and-cobble style) against the spacers in each stud bay. The idea is to create an air gap between the siding and the rigid foam. The rigid foam functions as an exte rior air barrier and is also a substitute for the missing WRB.
Foam thickness
The rigid foam needs to be thick enough to resist deformation by whatever type of insulation is used to fill the rest of the stud bay. For studs 16 in. on center, 3⁄4-in. XPS or polyiso should suffice for fiberglass or mineral-wool batts. Wider stud spacing or dense-pack cellulose may require thicker rigid foam.
In cold climates, you need to decide whether to be concerned about condensation on the interior side of the rigid foam. There are two possible ways to approach this situation. The conservative approach (assuming that most of the stud bay will be filled with air-permeable insulation) is to make sure that the rigid foam is thick enough to prevent condensation or moisture accumulation on the interior side of the foam. If the thickness of the air-permeable insulation will be 31⁄2 in. or less, the rigidfoam layer needs a minimum R-value of R-5 in climate zone 5, R-7.5 in zone 6, or R-10 in zones 7 and 8 to prevent this type of condensation.
A less conservative approach is to use 3⁄4-in. unfaced EPS for the foam layer. Without a foil facing or a polyethylene facing, EPS is somewhat vapor permeable (1-in. unfaced EPS has a permeance of 2 to 5.8 perms). The idea behind this approach is that if the stud bays get a little damp during the winter, the moisture will be able to dry—albeit slowly—to the exterior.
Seal air leaks at the perimeter of the rigid foam
Whatever type of rigid foam you choose—EPS, XPS, or polyiso—you need to pay attention to airtightness. Tape the foam seams, and seal the perimeter of each piece of foam with high-quality tape, caulk, or canned spray foam. Once this rigid-foam air barrier is sealed, the stud bays can be insulated normally. The studs also can be padded out with vertical wooden spacers or horizontal strapping to accommodate more insulation.
In most cases, this type of wall is designed to dry to the interior, so don’t install any polyethylene on the interior side of the wall. If your local code official insists on an interior vapor retarder, install a “smart” vapor retarder (one with variable permeance) such as CertainTeed’s MemBrain.
OPTION 2: Spray-foam insulation:
Using spray-foam insulation
A second option for insulating a wall with no sheathing is to use spray foam. Polyurethane foam has the added benefit of sealing air leaks, but you shouldn’t consider installing it directly against the back of the siding. Spray foam, especially closed-cell spray foam, will cling tenaciously to siding, gluing everything together. This will make future siding repairs—for example, replacing a cupped or split piece of siding—next to impossible.
In addition, the spray foam may ooze out of cracks between the siding as it expands, forcing the siding pieces apart. If this happens, you’ll end up with an unsightly mess that’s difficult to fix.
Finally, the spray foam will limit the ability of the back of the siding to dry. When a rainy day is followed by a sunny day, the exterior side of each piece of siding will be dry, while the interior side will be wet. This condition leads to cupping and splitting.
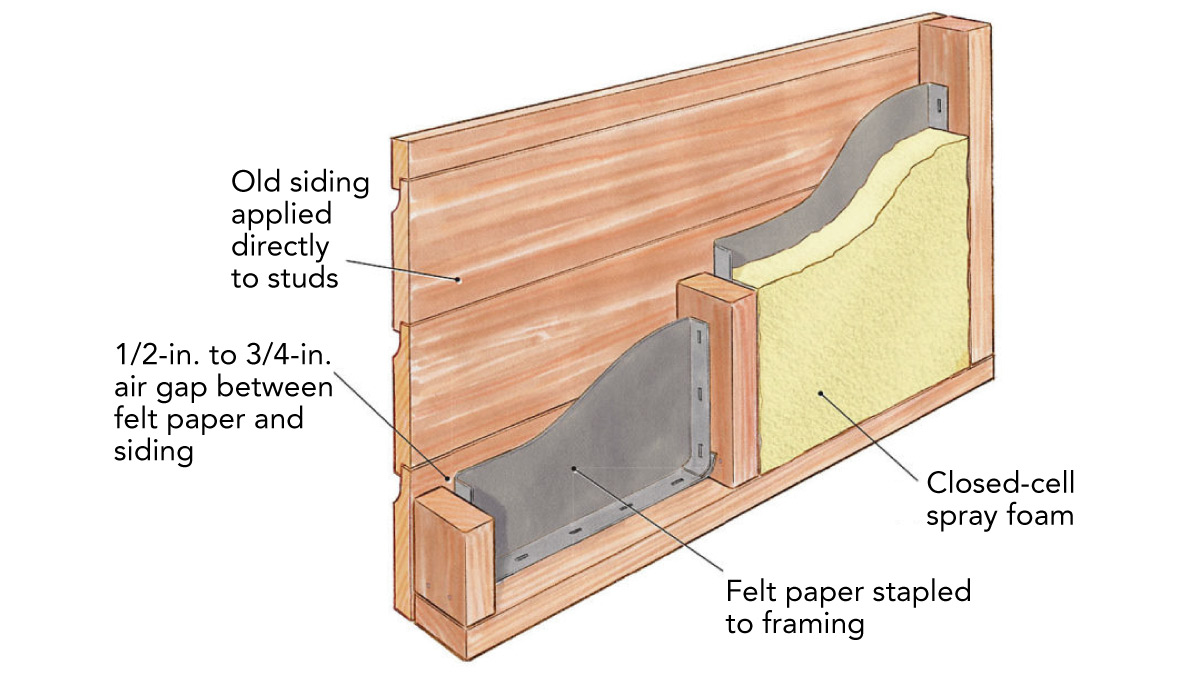
Making spray foam work
If you want to use closed-cell spray foam, install felt paper in each stud bay, up against the back of the siding, before spraying. (Open-cell foam is also an option, but it must be at least 3 in. thick.) Cut the felt as long as the stud bays, but about 2 in. wider. Fold over the extra inch on each side to form a stapling flange. Use an ordinary staple gun to secure these flanges to the sides of the studs, making sure to leave a 1⁄2-in. to 3⁄4-in. air gap between the back of the siding and the felt.
As the spray foam expands, it tends to push against the felt, reducing the depth of the air gap. But the felt has a rough texture and will be wrinkly enough to keep air between the felt and siding, even when compressed by the spray foam.
A variation on this method uses drainable housewrap instead of felt paper. Drainable housewraps are available from several manufacturers and have bumpy, crinkled, stamped, or channeled textures that maintain an air gap of at least 1 mm.
Fine Homebuilding Recommended Products
Fine Homebuilding receives a commission for items purchased through links on this site, including Amazon Associates and other affiliate advertising programs.

Staple Gun
Loctite Foamboard Adhesive
Great Stuff Foam Cleaner

View Comments
Having just discovered you, I greatly admire how well you think and write. I was reading your 2010 piece on radiant barriers. In the section on Radiant-barrier roof sheathing, I thought you should have mentioned that the foil cannot reflect the radiant energy from the sun since it has no air space between the sheathing and foil. The foil can only act as a conductor of the sun energy when glued to the sheathing.
I have an old barn that I need to insulate from the inside. The building has this same style wood lap siding nailed directly to the framing, but was later covered with metal siding. Would you still use option 1 considering the wood is not open to the elements? Is the air gap still needed? The 2x4 framing is actual in dimension so that should give me another 1/2 inch. Also the roof is covered the same way and is an open truss design. How would you insulate that. I am in climate zone 5 and this building would not be heated very high or air conditioned. Thank you
Johnson898,
There are several ways that you could insulate the walls of your old barn. The approach you choose will depend on your performance goals and your budget.
If you like the existing metal siding, and you plan to keep the existing siding for many years, then you don't need to create an air gap between the wall insulation and the oldest layer of siding.
Since your wall lacks an exterior air barrier, the best insulation to choose in your case would be spray polyurethane foam.
There are other options, of course. If you are going to remove the existing siding, you might want to strip the exterior down to the studs and install new plywood or OSB sheathing, followed by plastic housewrap and new siding.
If you don't want to install spray foam insulation, you can use a different product -- perhaps dense-packed cellulose -- but you'll have to settle for more air leakage (and slightly higher energy bills).
Finally, if you are worried about thermal bridging through the studs, you would need to install a continuous layer of rigid foam, either on the exterior or the interior side of your studs. Of course, a layer of rigid foam will increase the cost of the job.
Dear Mr. Holladay,
Thank you very much.
Will option 1 (the spacers attached to studs creating the air gap) also be advised for stucco with no sheathing and no WRB? I think that the answer is yes.
I live in San Mateo County, California which is a climate zone 3-marine. My thoughts are to move forward with option 1; also, I am thinking to add an interior "smart" vapor retarder (not required for climate zone 3 but is required for climate 4-marine). FYI - the house was built in 1946.
Again, thanks.
- ownerbuildernewbie (Mike)
Hi,
A really useful article and seems to be exactly what I’ve been looking for.
I’m planning on building a shed workshop with Rockwool insulation and plasterboard on the inside to cut down on sound as much as possible.
For the sake of time I’m planning on building a prebuilt shed which will basically be made up of cladding directly on stud work.
Am I correct in thinking that if I was to follow option #1 would I not need to install a vapour barrier as foil lined foam would do this for me?
Thanks,
Jamie
What would be wrong with stapling a vapor barrier as shown in option 2 and then using regular fiberglass insulation?
SAME QUESTION AS LIBBYRs! Can anyone answer why using a vapor barrier and regular fiberglass insulation wouldn't be an option????
I meant to reply to your post, but see I entered it as a new post. Check out #8 below.
I think the reasoning here (I'm only another reader, like yourselves!) Is they are trying to create a vapor barrier. Before there was any insulation, where ever moisture came from, be it bulk water or vapor, it could easily dry. When you start closing off wall cavities with insulation, you reduce air flow, and therefore the speed at which water that might collect inside the walls can evaporate. One strategy to deal with this is to reduce the amount of moisture that can enter the wall. Closed cell foam, sealed or caulked with spray foam, will keep liquid water and vapor from entering the interior of the house. The old exterior cladding is plenty breathable, so unless yours is really leaky, water that gets in will pretty well find its way out.
In the felt paper approach, any bulk water that might collect behind the sheathing will pretty much run down the face of the paper, eventually to dry outwards. However the paper is somewhat permeable to vapor; if there is higher humidity on one side of the paper than the other, some of that vapor will slowly migrate thru the paper to the drier side. The foam won't do this. If you're worried about moisture entering from the outside, foam is a better protector.
Note that with the foam, if well installed, you are effectively creating a water block inside the wall. Water that comes from the outside can only escape to the outside, while water that originates inside can only dry to the inside. Some variation in this approach is common in new construction; but it's a good question as to whether this approach is appropriate for older buildings that lack a weather-resistive barrier, rainscreen and continuous sealed sheathing. I've seen a lot of problems crop up in old buildings where modern materials and techniques were applied during rehab and repair projects. My feeling is the goal should be to minimize air flow thru the wall, but allow moisture to flow both directions. In the winter there is moisture inside that wants to get out, while in the summer it wants to move in. Providing space for that to happen is ensuring the longevity of the whole wall unit.
Where I live in the northern Northeast, a common and tested approach to insulating old and very old houses that never were insulated, is to blow cellulose into the wall cavity. You'll see that construction details are similar to the example here: rough pine board sheathing with all kinds of gaps and holes; frequently no tar paper or builder's paper; plaster interior walls. Dense pack cellulose seems to have properties that manage in-wall moisture well. Plaster is vapor permeable, as is the exterior sheathing. The cellulose has properties which modulate the flow of vapor; so all parts of this system work as a unit. In the foam scenario presented in the article, the foam effectively divides the wall into two units.
In homes that I have worked on that have had blown cellulose for years, the walls are in perfect shape; whereas in more than one scenario where air/vapor barriers were applied during renovation, moisture and structural problems inside the wall rapidly developed.
The big difference I see between my examples and the article's building, is that in my homes there is an additional layer outside the sheathing: clapboards. This does provide some sort of rainscreen effect, even if not great. Where the sheathing IS the cladding, I would be reluctant to pack the cellulose against the sheathing. Thus I think an interior barrier as suggested would be a good idea.
I would look into blowing cellulose into the wall cavities from the inside before interior cladding. There are different ways this can be done, and a good contractor who does this work regularly can advise. If you want to insulate yourself, I would consider rock-wool, which also handles moisture well and has a little better R than fiberglass. I haven't researched the vapor properties of glass; but it loves to hold water and I wouldn't want to see it touching the siding. With air space as shown here it might be OK. Finish off the interior with a vapor-open air barrier. Carefully taped sheetrock with no holes fill that order; or so-called "smart" membranes can be used behind wood paneling. If your situation allows you to wrap the membrane behind any electrical boxes or other holes, that might be a good choice even with drywall.