FHB Logo Facebook LinkedIn Email Pinterest Twitter X Instagram Tiktok YouTube Plus Icon Close Icon Navigation Search Icon Navigation Search Icon Arrow Down Icon Video Guide Icon Article Guide Icon Modal Close Icon Guide Search Icon Skip to content
Subscribe
Log In
  • How-To
  • Design
  • Tools & Materials
  • Restoration
  • Videos
  • Blogs
  • Forum
  • Magazine
  • Members
  • FHB House
  • Podcast
Log In

Fine Homebuilding Project Guides

Finish & Trim Carpentry

Guide Home
  • Trim Design
  • Tools and Materials
  • Interior Trim Basics
  • Window and Door Casings
  • Baseboard and Crown Molding
  • Wainscot and Paneling
  • Mantels and Fireplace Surrounds
  • Coffered Ceilings
How-To

Perfect Miter Joints Every Time

The trick is to assemble the mitered casings with biscuits and glue, clamp them together, and install them as a complete unit.

By Jim Chestnut Issue 164
  • X
  • facebook
  • linkedin
  • pinterest
  • email
  • add to favorites Log in or Sign up to save your favorite articles

Synopsis: An experienced builder shares his time-tested process for installing miter joints — a process which saves time, requires less skill, and yields better results. In the authors case, it also put an end to his habit of falling off of mud-buckets used as improvised step ladders. This article highlights a logical and methodical approach for cutting miter joints and casing.


Ten years ago, my approach to installing casing was fairly traditional: Measure, cut, test the fit, walk back to the saw, trim the cut. Then one day, I climbed onto a joint-compound bucket to test the top piece of trim on a doorway a few feet upstream of a short flight of stairs. Microseconds later, I felt my feet describing an arc about my head and proceeded down the stairs like an otter wearing tennis shoes. It’s amazing how such a short trip can get so rocky, so quickly; it made me realize my methods (and stepladder) needed an upgrade.

A few months later, I happened to work with James Chambers, a talented trim and cabinet builder from Old Saybrook, Conn. He cut, biscuited, and clamped his casings together on the floor, then installed them as a complete unit. His miter joints were perfect, and the installation nearly flawless. By the next job, I had abandoned the mud-bucket shuffle and converted to the preassembly method of casing, which has improved work quality, reduced both the level of skill and hours required for the job, and extended the useful lifetime of my lower back. Here’s some of what I’ve learned over the years, wrestling with and pinning miles of casing.

Get set up, then cut the miters

Claim a big room in the name of progress. To work the customary long lengths of casing, the author advises setting up in a fairly large space that will accommodate a miter-saw station and an assembly table made of a full sheet of melamine or laminate-covered plywood screwed to a pair of sawhorses.

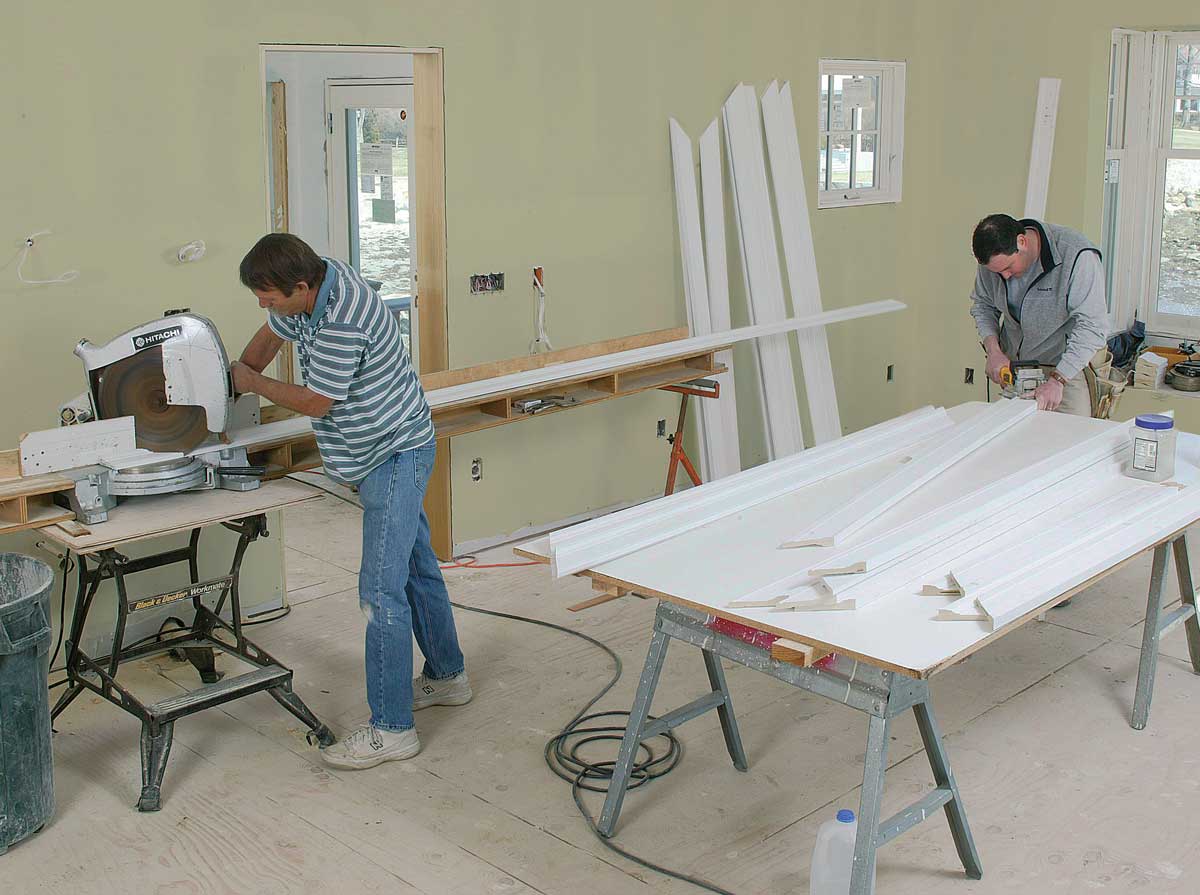
When the material arrives, my crew and I orient it in the cutting room so that a 16-footer does not have to be spun end for end in a 14-ft.-wide room. I like to cut the miters before cutting the stock to exact length and prefer to have the outside edge of the casing against the fence when cutting them; this placement eliminates any tearout on the inside edge of the miters.

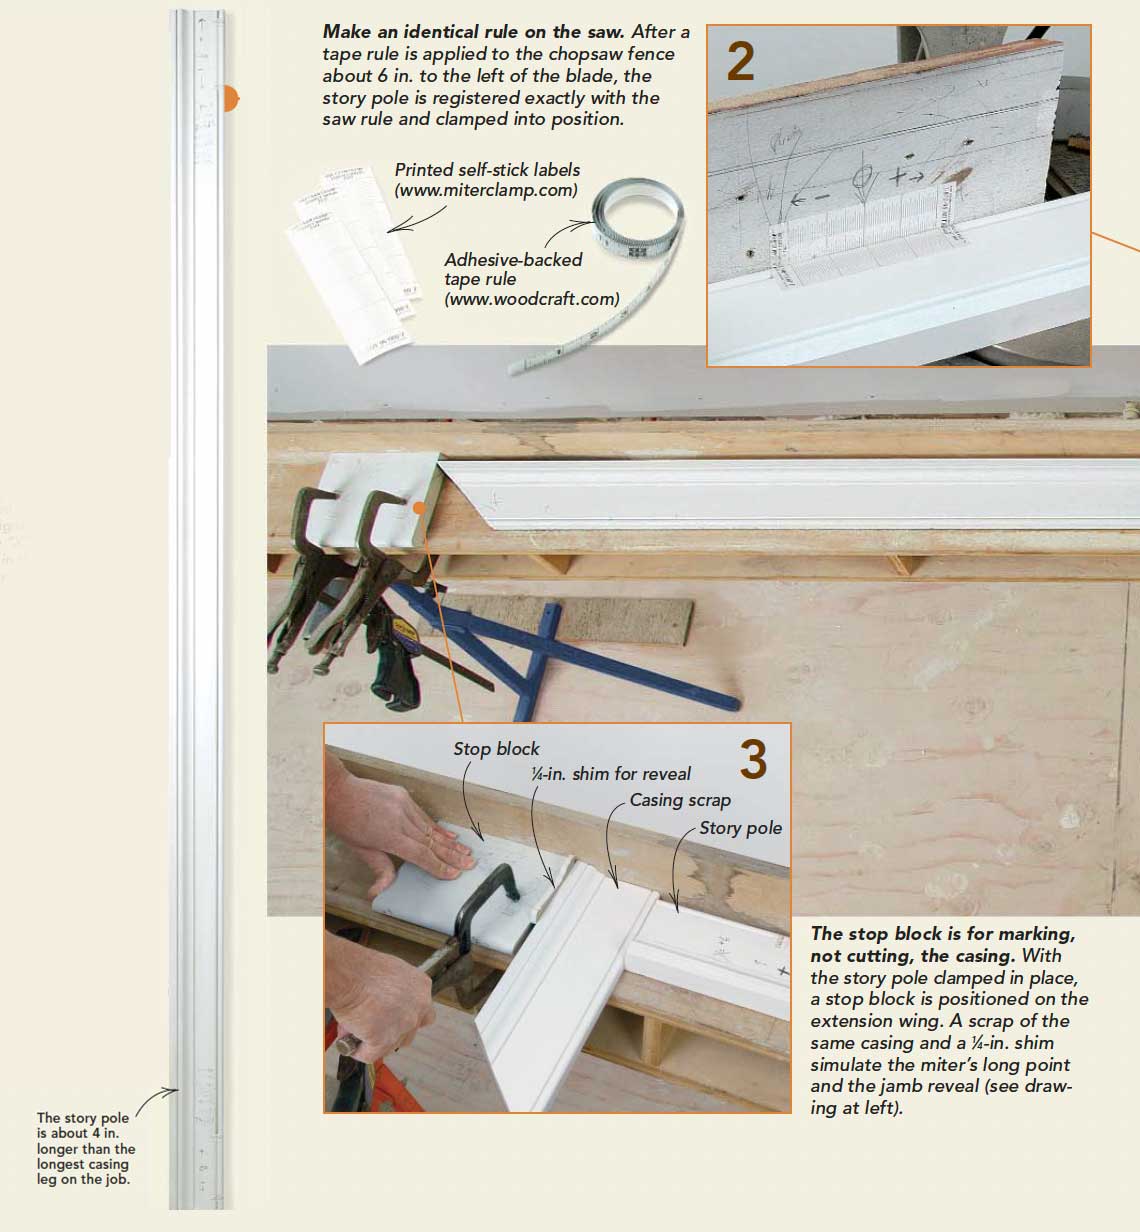
I always cut two sample 45° miters after setting up the saw station to ensure that the result is square and that all the details line up. After the necessary adjustments, someone starts cutting the miters, either lefts or rights for the trim on the sides of the doors, or door legs as we call them. This way, I don’t have to change the saw angle repeatedly. By placing a strip of blue painter’s tape on the miter saw’s extension wings as a reference, I can cut the door miters quickly an inch or so long and cut the square ends later. Once a bunch have been cut, they can be slotted for biscuits at any time. In addition, if the cutoff from one door leg is not long enough for another leg, it may be long enough for a top (or head), which can be cut after the legs are finished.

Miter clamps and biscuits make indestructible joints

To mate casing miters together so that they stay together longer than the next heating or cooling season, I assemble casings on the workbench with biscuits and glue, then clamp them together before installing them as a complete unit. I use special miter clamps that I designed and manufacture (Clam Clamps; www.miter clamp.com; 800-966-4837). The Hartford Clamp Co. (860-528-1708) makes a similar clamp. I don’t believe that spring clamps exert enough pressure to allow you to move the assembly while it’s still drying; I’ve avoided using a pneumatic nailer to pin the biscuited joint for the same reason.

Slot all the miters at once to save time. After the stock has been cut to a rough length and mitered, the mitered ends are slotted for biscuits. To speed the process, each piece is partially pulled from the pile and slotted from the back; the miter’s short point is used as the biscuit joiner’s reference point.

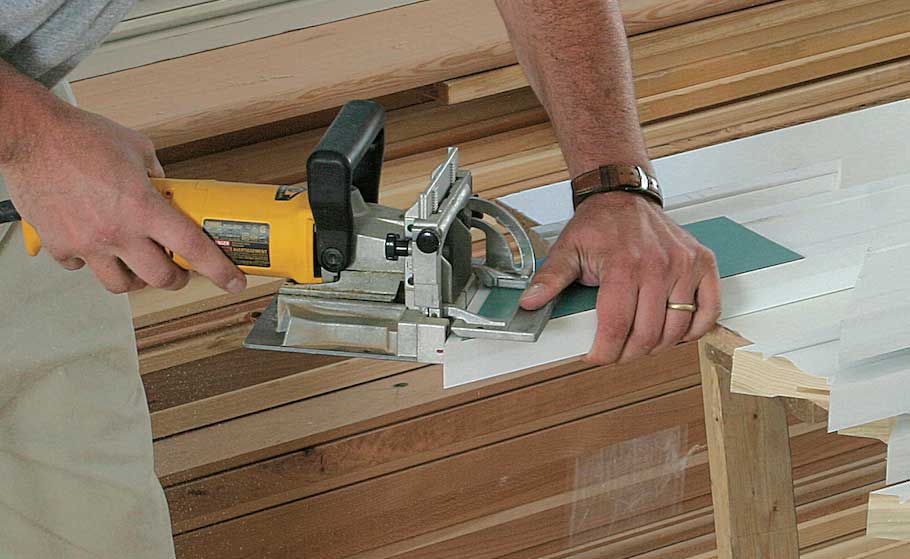
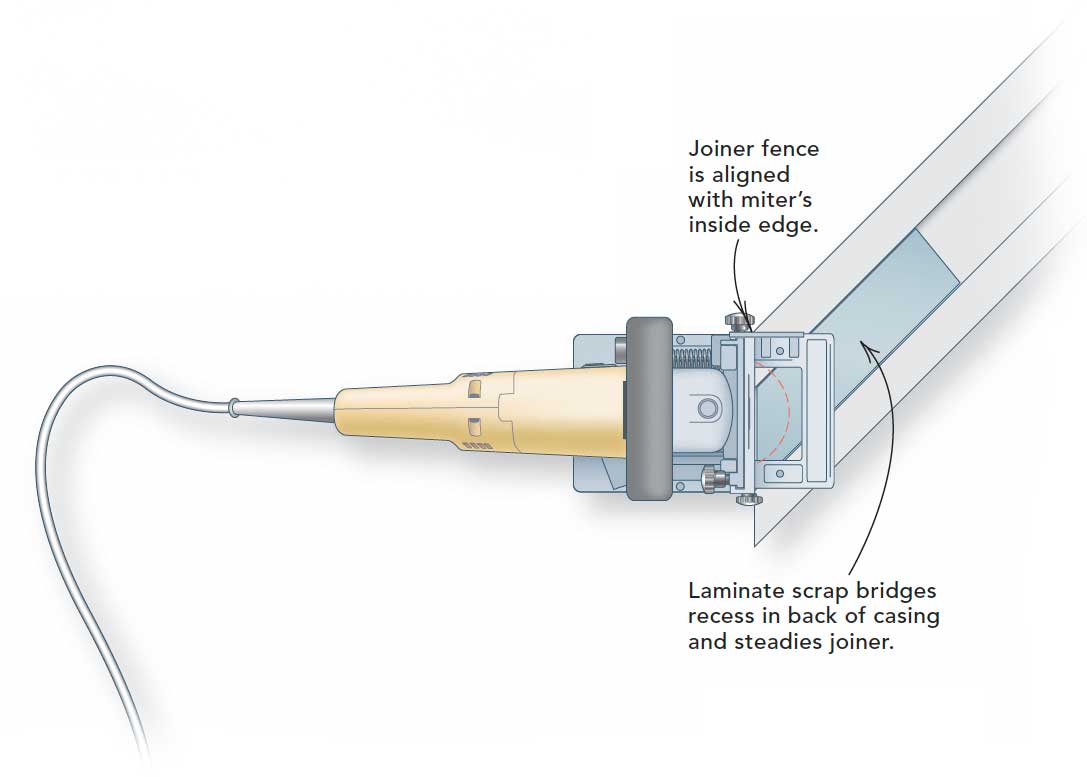
Although you can hold each piece face up on the table while slotting, I find it easier to slot from the back of the casing, especially if there’s limited space and a large pile of casing. Two layers of thin plastic or laminate, cut slightly narrower than the casing at 45° and glued back to back, span the relief cut in the back of the casing and form a platform that reduces the chance that the biscuit joiner’s base will rock, misaligning the slots. I align the outside edge of the biscuit-joiner fence with the inside of the miter and plunge. Putting the biscuit close to the inside edge of the joint helps to prevent the inside corners from opening.

joiner fence

Glue up is messy, especially when I’m doing with laminate for a glue-up table, though any sheet goods (such as melamine) work fine. (Dried yellow glue easily pops off with a taping knife.) The table’s width can handle most door and window casings. Wider assemblies, such as double closets, can be clamped together on the floor in front of their destinations and nailed to the jambs immediately with the clamps still attached.

I cut a bunch of 4-in. shims tapered from zero to 1⁄8 in.; butter the mitered edges, slots, and biscuits; shove together the joints; and align the details. I use a lot of glue and try to avoid sliding the miters against each other because it tends to remove too much glue and could result in a starved joint. I use the thin shims to adjust the alignment of the miter faces when a head or leg has a slight twist or when the glue-up table itself is torqued. When the miter is assembled, I hold it with one hand, slide a clamp into position with the other, and clamp it home. Between the glue, biscuits, and clamps, the joints set up fast; poplar casings at 7% moisture content in an ambient temperature above 70°F can be unclamped safely in 5 or 10 minutes, as long as you’re careful. Under the business end of the table, where it almost never is knocked over, I keep an old pot half-filled with water heated on a cheap electric hot plate and bristling with toothbrushes. A warm, wet toothbrush cleans glue squeeze-out quickly; a quick blast of compressed air dries any residual water. I have been using this process on both paint- and stain-grade work for years without problems for the finishers, though for stain-grade or clear finish, I repeat the process with a sponge and clean water after the first blast of air.

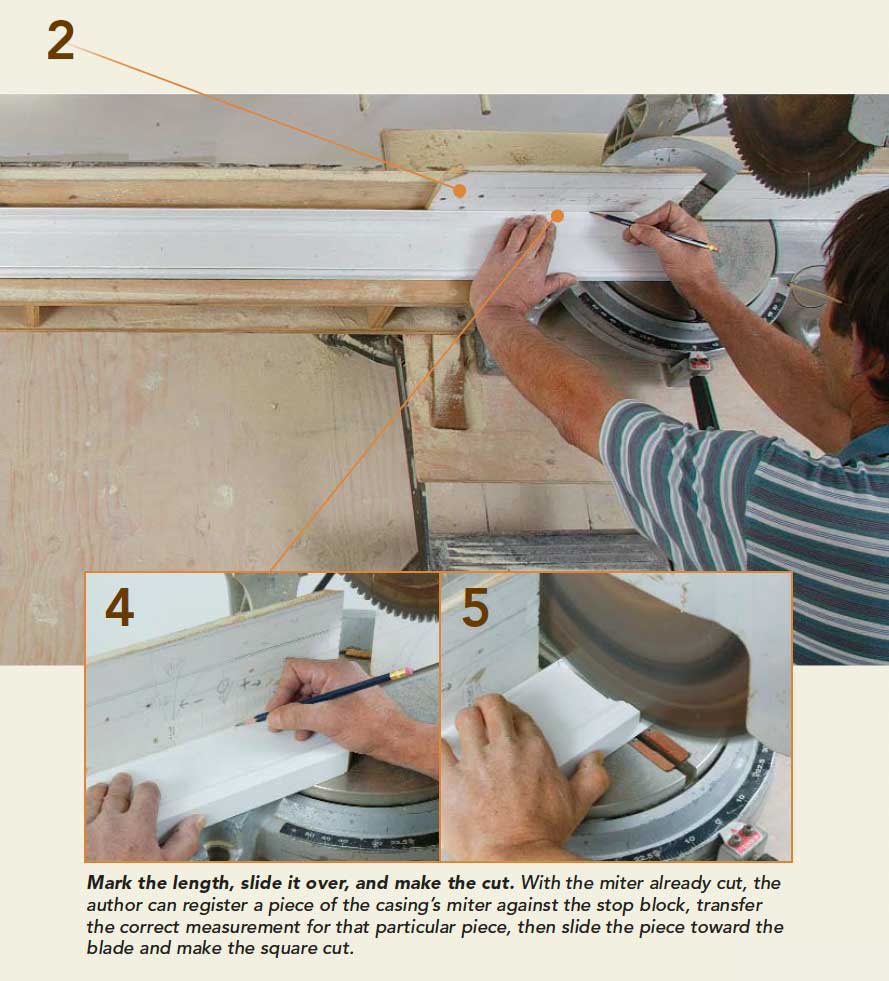
Don’t use a tape; use a story pole. It’s fast and accurate.

After years of using a tape to measure and mark each piece of casing on big jobs with lots of doors and windows, I stumbled onto a method that’s both fast and foolproof. I use a story pole (a 7-ft. piece of casing, actually) on which I record the casing lengths; the measurements then are transferred easily to an identical marking system on the miter saw. Because I cut the miters first, each piece of casing can be measured with the mitered end registered against a stop block, then cut to length with a 90° cut.

To make a story pole, I measure from the floor to the bottom of the head jamb of a representative door; let’s say it measures 81 in. I cut a piece of casing a few inches longer (say 84 in.), square on each end. Now I measure up from each end of the casing along its inside edge and carefully mark 81 in. Centered on these two marks, I adhere a piece of adhesive-backed 4-in. tape measure. I make these myself, but they’re also available as lengths of adhesive-backed tape rules from Woodcraft Supply (www.woodcraft.com); or you can replicate them on sheets of address labels using generic software.

After measuring the side jambs, I measure the head jamb, inside to inside, and write that length on the story pole as well. If I’m lucky, all similar doors’ widths are identical. I then can cut all the heads of 30-in.-wide doors, for instance, at identical lengths from a fixed stop on the saw.

Take and record measurements with the same tool, the story pole. Each door is numbered and lettered: The “H” designates the hinge side, the “X” an exterior door, as in the photo above. The story pole is held on the floor, against one side of a door jamb. Here, the head jamb’s bottom edge intersects the tape mark 3⁄8 in. above its centerline. Measurements are written as the number of sixteenths above or below the zero mark and are paired with the door’s number, directly onto the pole.
1. Take and record measurements with the same tool, the story pole. Each door is numbered and lettered: The “H” designates the hinge side, the “X” an exterior door, as in the photo above. The story pole is held on the floor, against one side of a door jamb. Here, the head jamb’s bottom edge intersects the tape mark 3⁄8 in. above its centerline. Measurements are written as the number of sixteenths above or below the zero mark and are paired with the door’s number, directly onto the pole.

Make an identical rule on the saw. After a tape rule is applied to the chopsaw fence about 6 in. to the left of the blade, the story pole is registered exactly with the saw rule and clamped into position.

Mark the length, slide it over, and make the cut. With the miter already cut, the author can register a piece of the casing’s miter against the stop block, transfer the correct measurement for that particular piece, then slide the piece toward the blade and make the square cut.

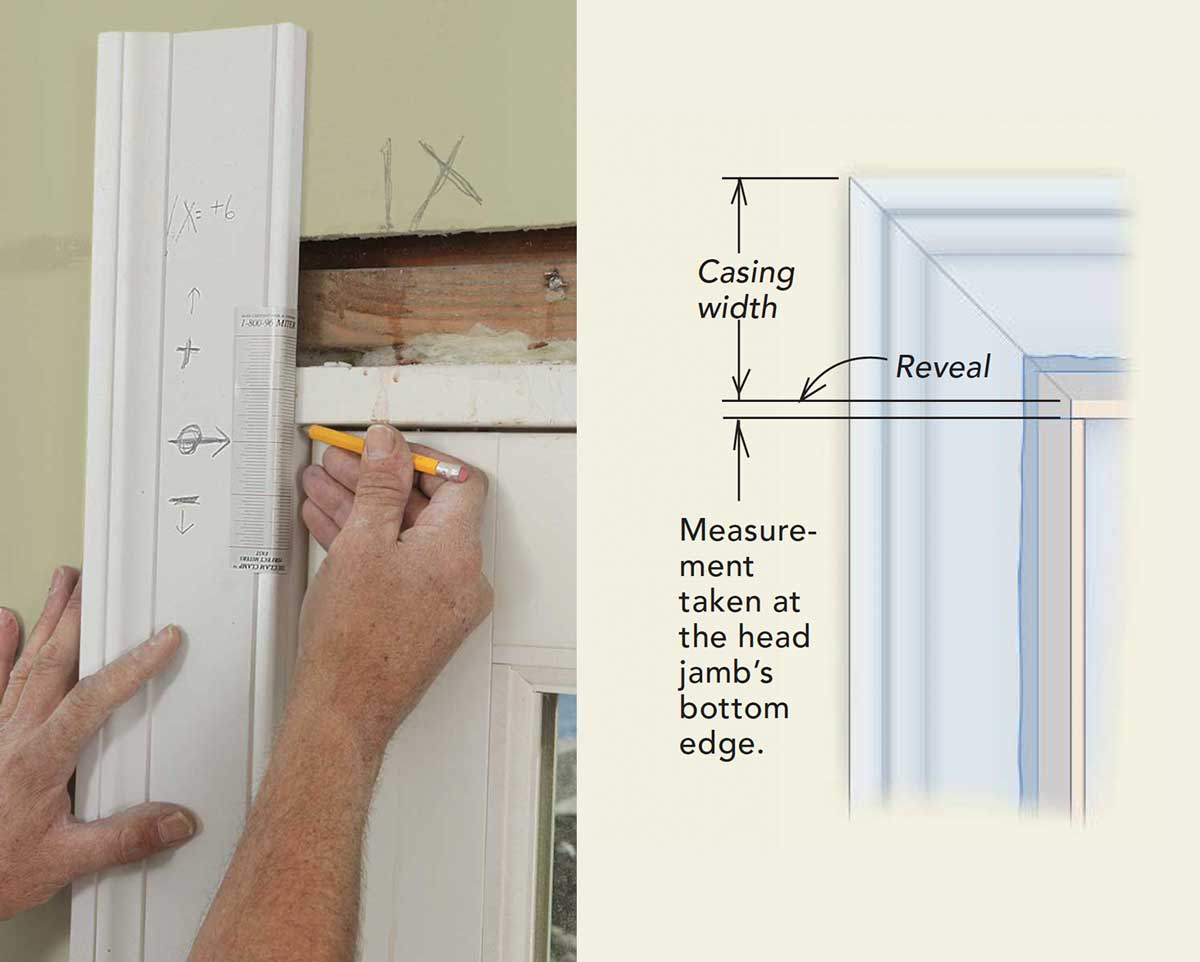
Remove any obstacles and install

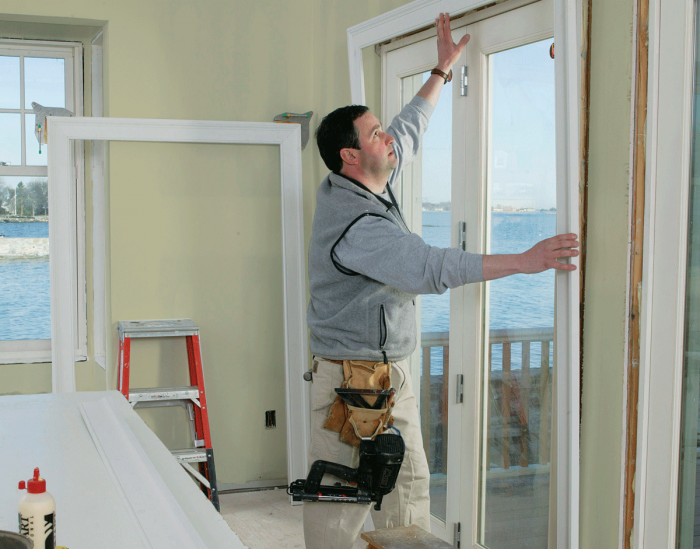
Once the miters are assembled, the casings are ready to be nailed onto their respective door jambs. If the drywall is proud of the jamb, I cut away the drywall from the doorway to make sure that the casing sits tight against the jamb; I typically leave 3⁄4 in. under the casing.

I run a thin bead of glue along the outside edge of the jambs before shooting the casings on; it’s small enough that I rarely get squeezeout at the reveal. This glue adds enormous strength and rigidity to the jambs. Although this effect is diminished tremendously with preprimed parts, I do it nonetheless. The outside edges of the casings can be nailed off later when the baseboards are installed.

Assemble the casings with biscuits and glue, clamp them together, and install them as a complete unit

Equal parts of glue and clamp pressure make a good joint. After spreading an even coat

Small shims placed beneath strategic points in the casing help to align the miters.
Equal parts of glue and clamp pressure make a good joint. After spreading an even coat of glue across both halves of the miter, the author inserts the biscuit, aligns the two halves, and clamps the joint with a miter clamp. Small shims placed beneath strategic points in the casing help to align the miters.

clamps


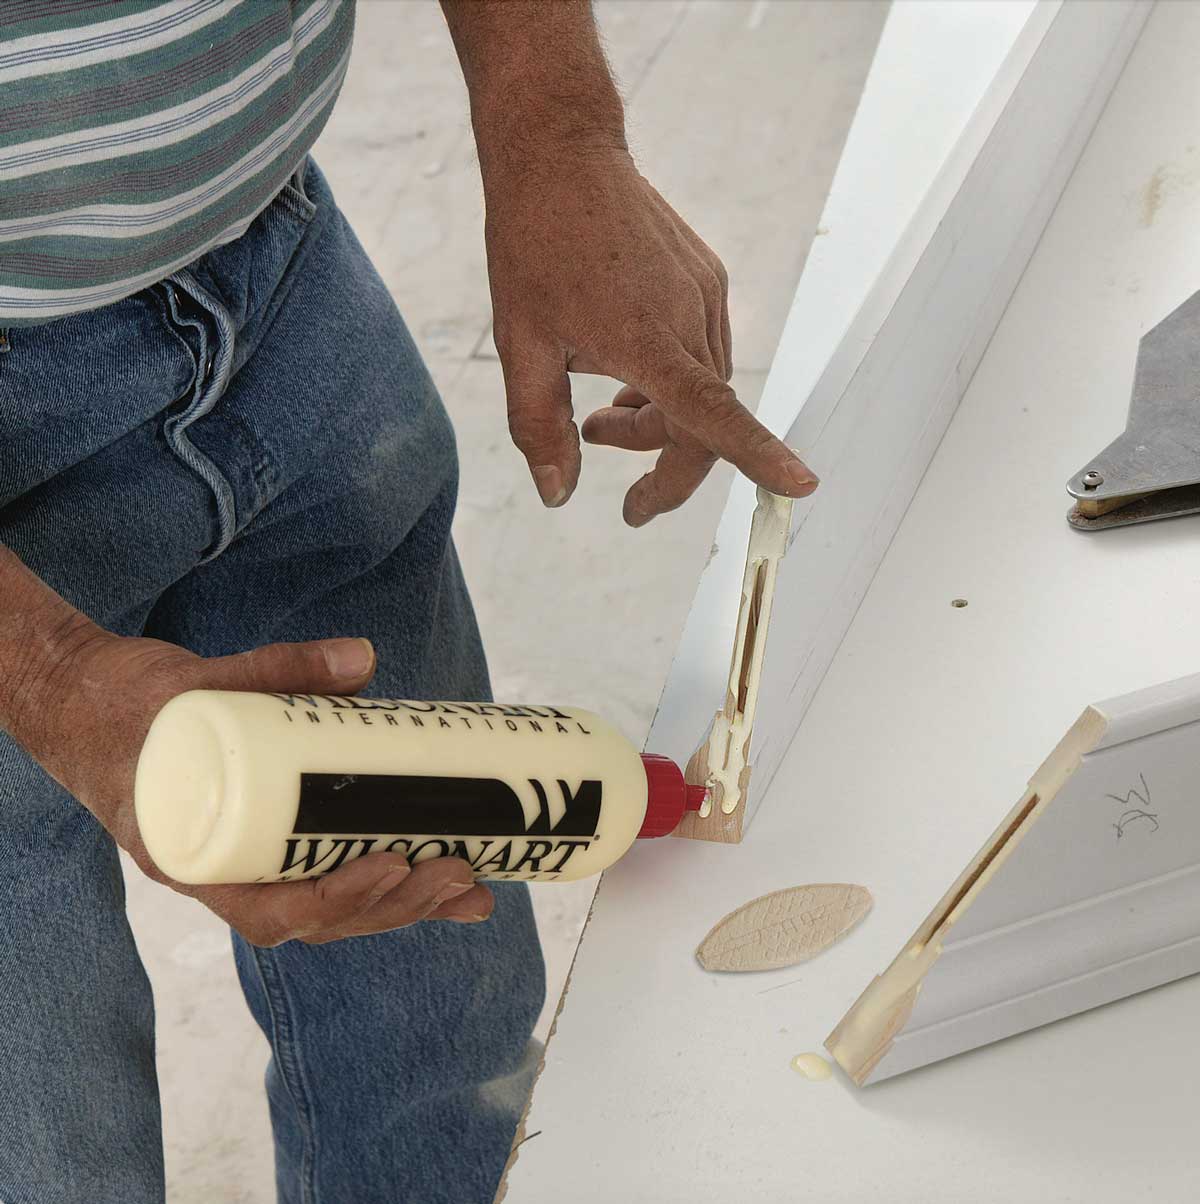
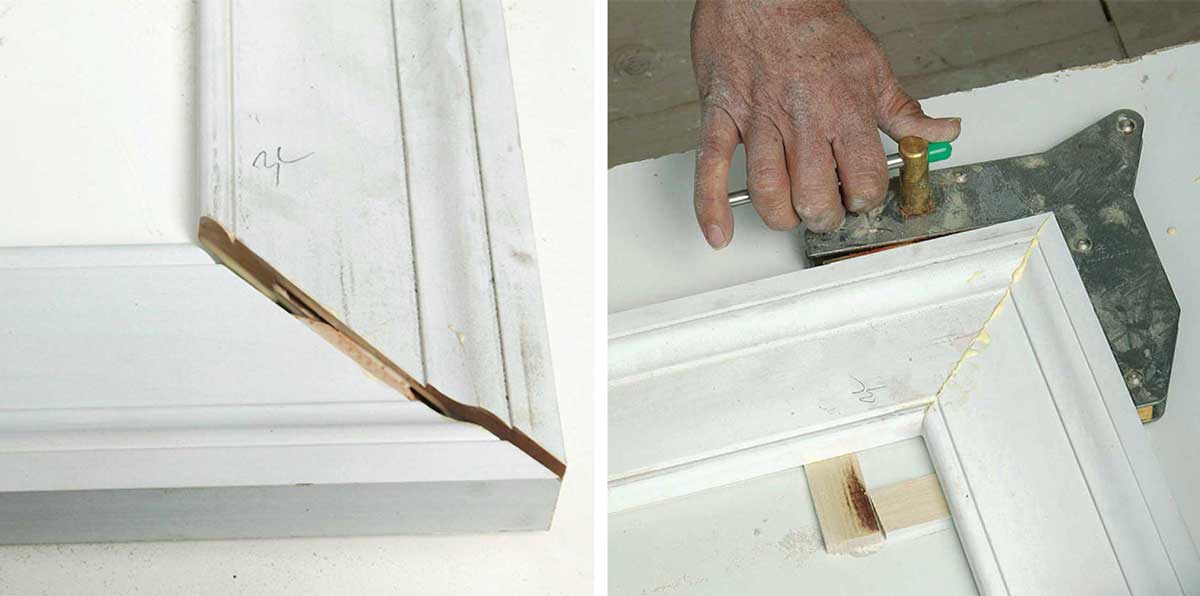
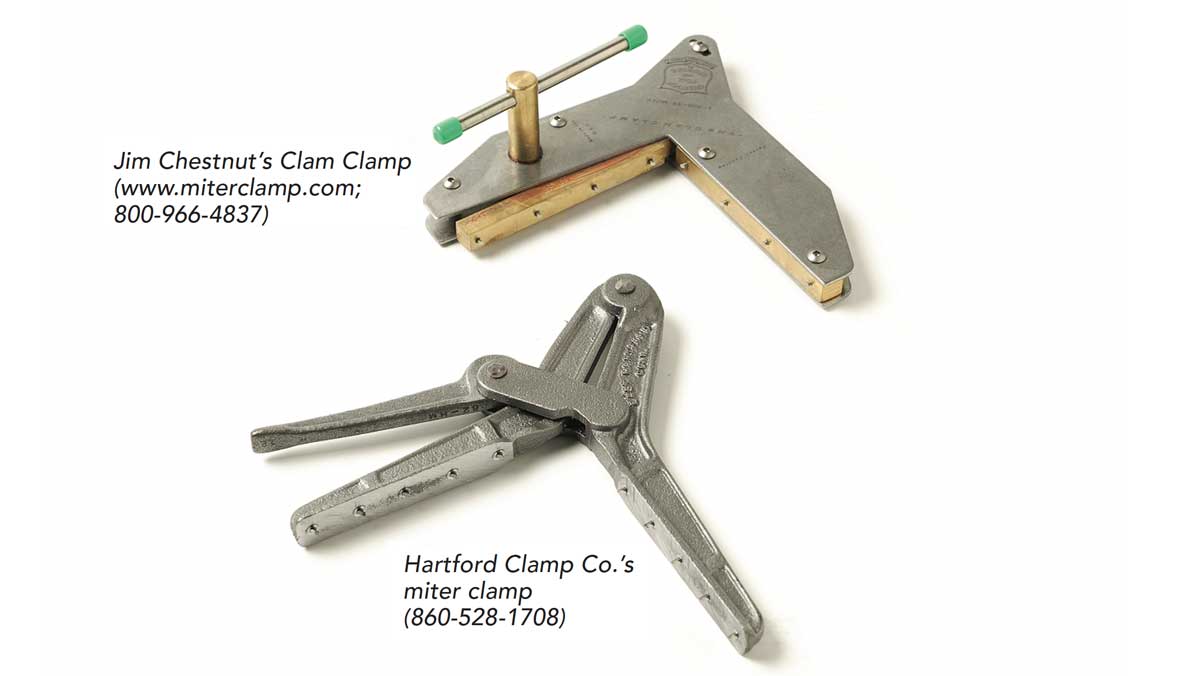
When pressed by either scheduling or lack of space, I clamp and lean four casing units against the wall. I then remove the first set of clamps, clamp and lean another set, remove the next set of clamps in order, and so on, until I have as many as 16 sets complete. Then I install those with the clamps still attached, nailing the casing into the jamb only. When finished with those four, I come back and repeat the process, starting with the first set clamped. Then I take the clamps off the first batch installed and start all over again.  

Good stock makes a difference

trim
“Now the trim men will work their magic.” Ever hear that phrase? That happens only when the stock is top notch. Rather than buy trim stock from the local big-box store, I pay about 20% more and get mine from a small shop that does absolutely nothing but mill trim. They use a computer-controlled molder in a humidity-controlled building and produce identical moldings from one run to the next, all with the same moisture content. This consistent stock allows you to cut just parts, rather than culling chatter, knots, cups, twists, warps, and crooks. You can join miters cut from different pieces of trim and be confident that the details will match precisely. Once I have first-rate stock, I don’t store it in garages or in unheated/un-air-conditioned areas of the house. If the house isn’t ready for trim, the stock shouldn’t sit at the work site. The ends of the stock absorb moisture faster than the middle, and they swell. Because the stock is no longer uniform, perfection is harder to attain.


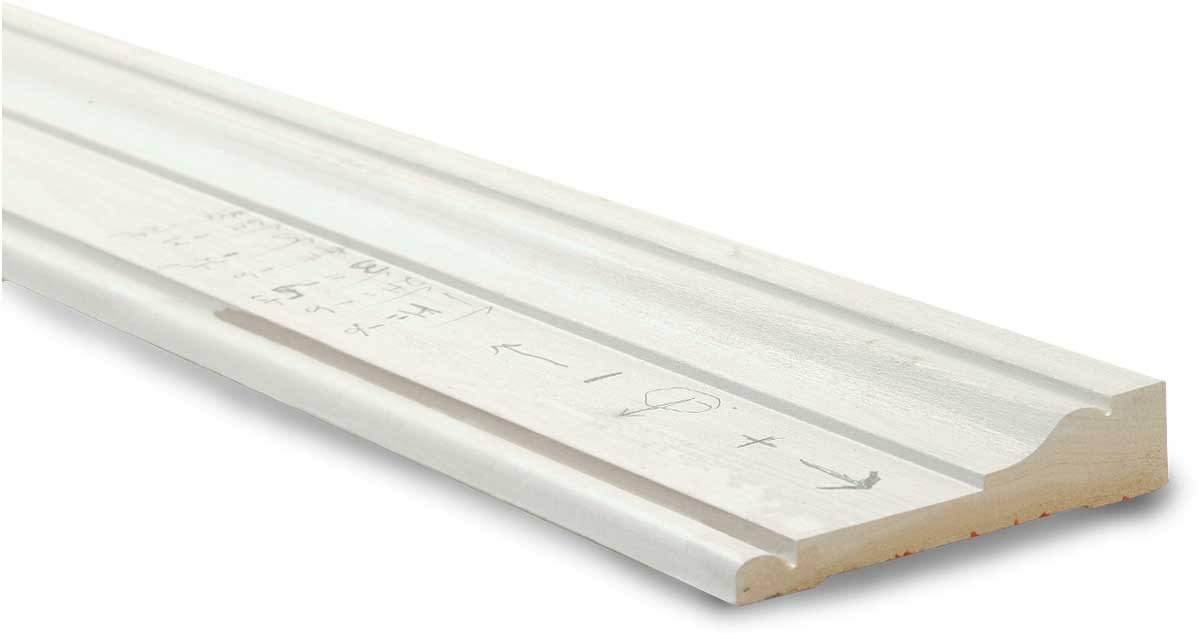
Jim Chestnut has more than 30 years’ experience as a carpenter. He lives near Bangor, Maine. Photos by Randy O’Rourke, except where noted. Clamp photos: Scott Phillips

From Fine Homebuilding #164

View PDF
Previous: Getting Casing Miters Tight Next: Creating Custom Curved Moldings

Guide

Finish & Trim Carpentry

Chapter

Interior Trim Basics

Sign up for eletters today and get the latest how-to from Fine Homebuilding, plus special offers.

Signing you up...

This site is protected by reCAPTCHA and the Google Privacy Policy and Terms of Service apply.
See all newsletters
See all newsletters

Log in or create an account to post a comment.

Sign up Log in

Become a member and get full access to FineHomebuilding.com

Finish & Trim Carpentry

Finish & Trim Carpentry

Trusted, comprehensive guidance from the pros for creating perfect trim details in any room of the house

View Project Guide

View All Project Guides »

Become a member and get unlimited site access, including the Finish & Trim Carpentry Project Guide.

Start Free Trial

Trim Design
  • Trim Style and Design
Tools and Materials
  • Tools
  • Materials
Interior Trim Basics
  • Tips and Tricks
  • Techniques
  • Using Jigs
Window and Door Casings
  • Windows
  • Doors
Baseboard and Crown Molding
  • Baseboard
  • Crown Molding
  • Specialty Crown Situations
Wainscot and Paneling
  • Beadboard Wainscot
  • Paneled Wainscot
  • Chair Rails
  • Wall Treatments
Mantels and Fireplace Surrounds
  • Design
  • Installing Mantels and Surrounds
Coffered Ceilings

Fine Home Building

Newsletter Sign-up

  • Fine Homebuilding

    Home building tips, offers, and expert advice in your inbox.

  • Green Building Advisor

    Building science and energy efficiency advice, plus special offers, in your inbox.

  • Old House Journal

    Repair, renovation, and restoration tips, plus special offers, in your inbox.

Signing you up...

This site is protected by reCAPTCHA and the Google Privacy Policy and Terms of Service apply.
See all newsletters

Follow

  • Fine Homebuilding

    Dig into cutting-edge approaches and decades of proven solutions with total access to our experts and tradespeople.

    Start Free Trial Now
    • Facebook
    • Instagram
    • X
    • LinkedIn
  • GBA Prime

    Get instant access to the latest developments in green building, research, and reports from the field.

    Start Free Trial Now
    • Facebook
    • YouTube
  • Old House Journal

    Learn how to restore, repair, update, and decorate your home.

    Subscribe Now
    • Facebook
    • Instagram
    • X

Membership & Magazine

  • Online Archive
  • Start Free Trial
  • Magazine Subscription
  • Magazine Renewal
  • Gift a Subscription
  • Customer Support
  • Privacy Preferences
  • About
  • Contact
  • Advertise
  • Careers
  • Terms of Use
  • Site Map
  • Do not sell or share my information
  • Privacy Policy
  • Accessibility
  • California Privacy Rights

© 2025 Active Interest Media. All rights reserved.

Fine Homebuilding receives a commission for items purchased through links on this site, including Amazon Associates and other affiliate advertising programs.

  • Home Group
  • Antique Trader
  • Arts & Crafts Homes
  • Bank Note Reporter
  • Cabin Life
  • Cuisine at Home
  • Fine Gardening
  • Fine Woodworking
  • Green Building Advisor
  • Garden Gate
  • Horticulture
  • Keep Craft Alive
  • Log Home Living
  • Military Trader/Vehicles
  • Numismatic News
  • Numismaster
  • Old Cars Weekly
  • Old House Journal
  • Period Homes
  • Popular Woodworking
  • Script
  • ShopNotes
  • Sports Collectors Digest
  • Threads
  • Timber Home Living
  • Traditional Building
  • Woodsmith
  • World Coin News
  • Writer's Digest
Active Interest Media logo
X
X
This is a dialog window which overlays the main content of the page. The modal window is a 'site map' of the most critical areas of the site. Pressing the Escape (ESC) button will close the modal and bring you back to where you were on the page.

Main Menu

  • How-To
  • Design
  • Tools & Materials
  • Video
  • Blogs
  • Forum
  • Project Guides
  • Reader Projects
  • Magazine
  • Members
  • FHB House

Podcasts

  • FHB Podcast
  • ProTalk

Webinars

  • Upcoming and On-Demand

Podcasts

  • FHB Podcast
  • ProTalk

Webinars

  • Upcoming and On-Demand

Popular Topics

  • Kitchens
  • Business
  • Bedrooms
  • Roofs
  • Architecture and Design
  • Green Building
  • Decks
  • Framing
  • Safety
  • Remodeling
  • Bathrooms
  • Windows
  • Tilework
  • Ceilings
  • HVAC

Magazine

  • Current Issue
  • Past Issues
  • Magazine Index
  • Subscribe
  • Online Archive
  • Author Guidelines

All Access

  • Member Home
  • Start Free Trial
  • Gift Membership

Online Learning

  • Courses
  • Project Guides
  • Reader Projects
  • Podcast

More

  • FHB Ambassadors
  • FHB House
  • Customer Support

Account

  • Log In
  • Join

Newsletter

Get home building tips, offers, and expert advice in your inbox

Signing you up...

This site is protected by reCAPTCHA and the Google Privacy Policy and Terms of Service apply.
See all newsletters
See all newsletters

Follow

  • X
  • YouTube
  • instagram
  • facebook
  • pinterest
  • Tiktok

Join All Access

Become a member and get instant access to thousands of videos, how-tos, tool reviews, and design features.

Start Your Free Trial

Subscribe

FHB Magazine

Start your subscription today and save up to 70%

Subscribe

We hope you’ve enjoyed your free articles. To keep reading, become a member today.

Get complete site access to expert advice, how-to videos, Code Check, and more, plus the print magazine.

Start your FREE trial

Already a member? Log in

Privacy Policy Update

We use cookies, pixels, script and other tracking technologies to analyze and improve our service, to improve and personalize content, and for advertising to you. We also share information about your use of our site with third-party social media, advertising and analytics partners. You can view our Privacy Policy here and our Terms of Use here.

Cookies

Analytics

These cookies help us track site metrics to improve our sites and provide a better user experience.

Advertising/Social Media

These cookies are used to serve advertisements aligned with your interests.

Essential

These cookies are required to provide basic functions like page navigation and access to secure areas of the website.

Delete My Data

Delete all cookies and associated data