FHB Logo Facebook LinkedIn Email Pinterest Twitter X Instagram Tiktok YouTube Plus Icon Close Icon Navigation Search Icon Navigation Search Icon Arrow Down Icon Video Guide Icon Article Guide Icon Modal Close Icon Guide Search Icon Skip to content
Subscribe
Log In
  • How-To
  • Design
  • Tools & Materials
  • Restoration
  • Videos
  • Blogs
  • Forum
  • Magazine
  • Members
  • FHB House
  • Podcast
Log In

Fine Homebuilding Project Guides

Tiling

Guide Home
  • Selecting Tile
  • Tools & Techniques
  • Installation Materials
  • Preparation
  • Tiling Floors
  • Tiling Walls & Backsplashes
  • Tiling Showers
  • Grouting, Sealing & Caulking
  • Maintenance & Repair
How-To

Replacing a Broken Tile

With a little care and the right tools, it's easy to remove a cracked floor tile and install a new one.

By Jane Aeon Issue 168
  • X
  • facebook
  • linkedin
  • pinterest
  • email
  • add to favorites Log in or Sign up to save your favorite articles

Synopsis: Learn a foolproof process for replacing a single tile in this article. Step-by-step photos detail the use of an angle grinder to remove a cracked tile, and a few common tools to prepare the area for its replacement. Replacing a tile is the easy part, assuming you’ve got an extra tile that matches.


It was bound to happen. The new floors have been finished for less than a week, and someone already has dropped a hammer on the kitchen’s tile floor. Unless the tile guy is still on the job, you’re either going to wait a long time or fix it yourself.

Luckily, it’s a fairly easy fix, as long as you use the right technique. Although you can use a hammer and an old chisel to break out the damaged tile, this technique can be risky. Within grout joints tighter than 3 ⁄16 in., hammer blows can chip or crack adjacent tiles. Hammering also can pulverize the substrate beneath the damaged tile.

Occasionally, I use a hole saw to cut out the center portion of a cracked tile. This technique is good for removing soft-bodied tile. It’s usually a slow process, but I’m left with a hole in the tile that makes it easy to pry with the tip of a chisel or a screwdriver.

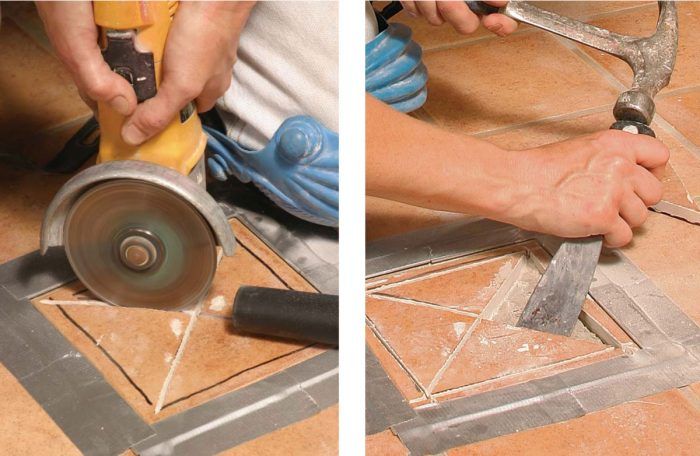
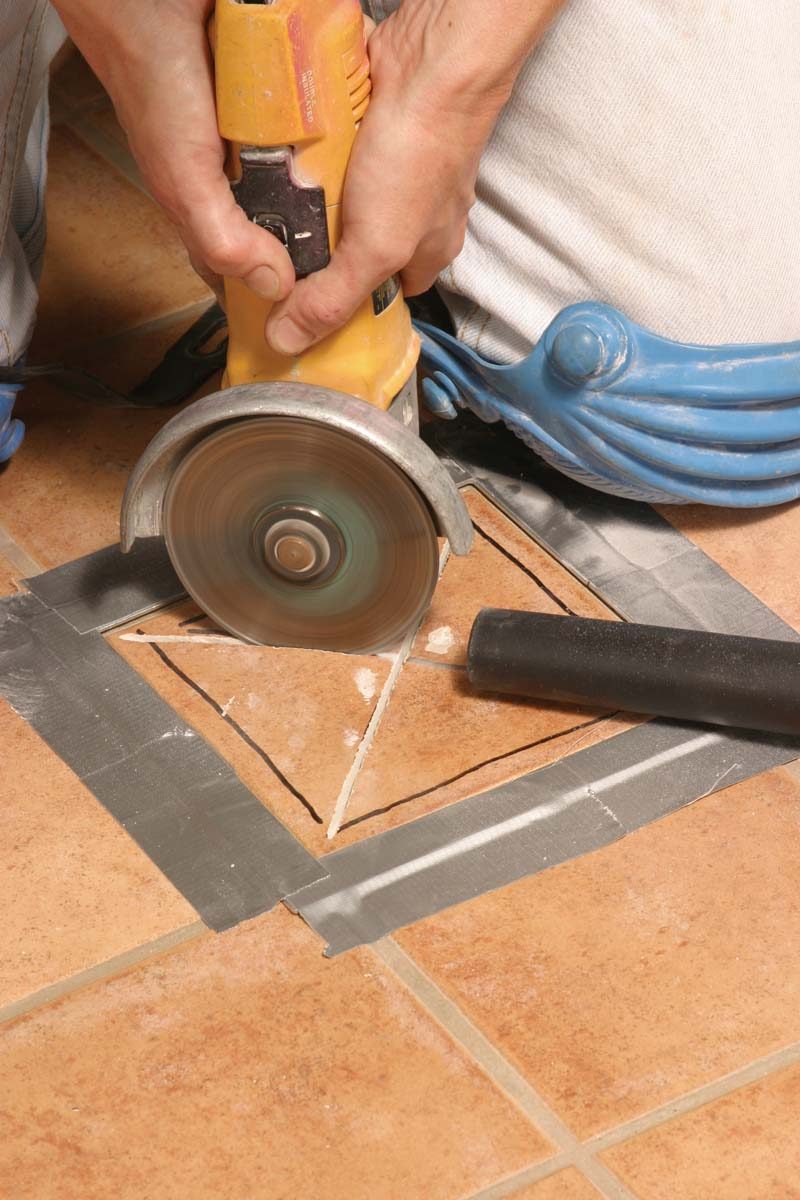
My preferred technique, however, is to use an angle grinder outfitted with a 4-in. diamond blade made by Pearl Abrasive and a shop vacuum. This technique is good for thick, soft bodied tiles such as saltillo, but it works on others as well. The tile must be larger than 4 in., or there won’t be room for a 4-in. grinder blade.

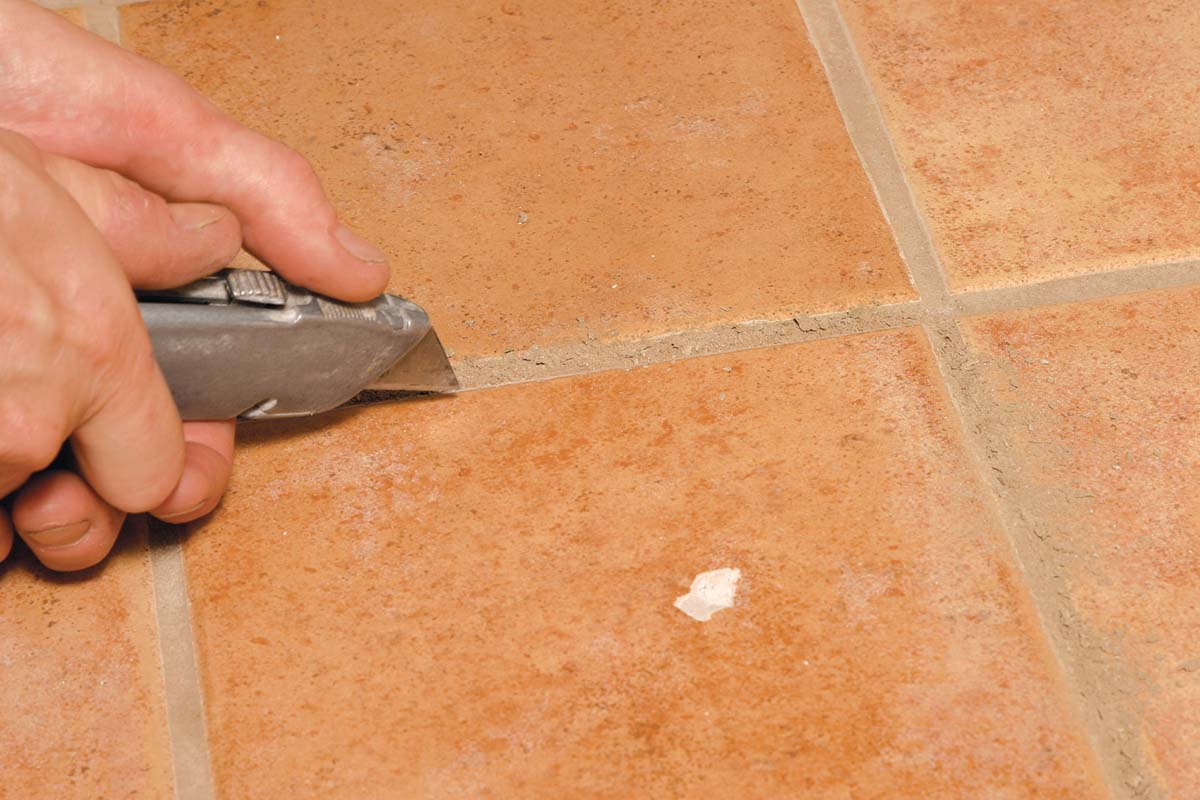
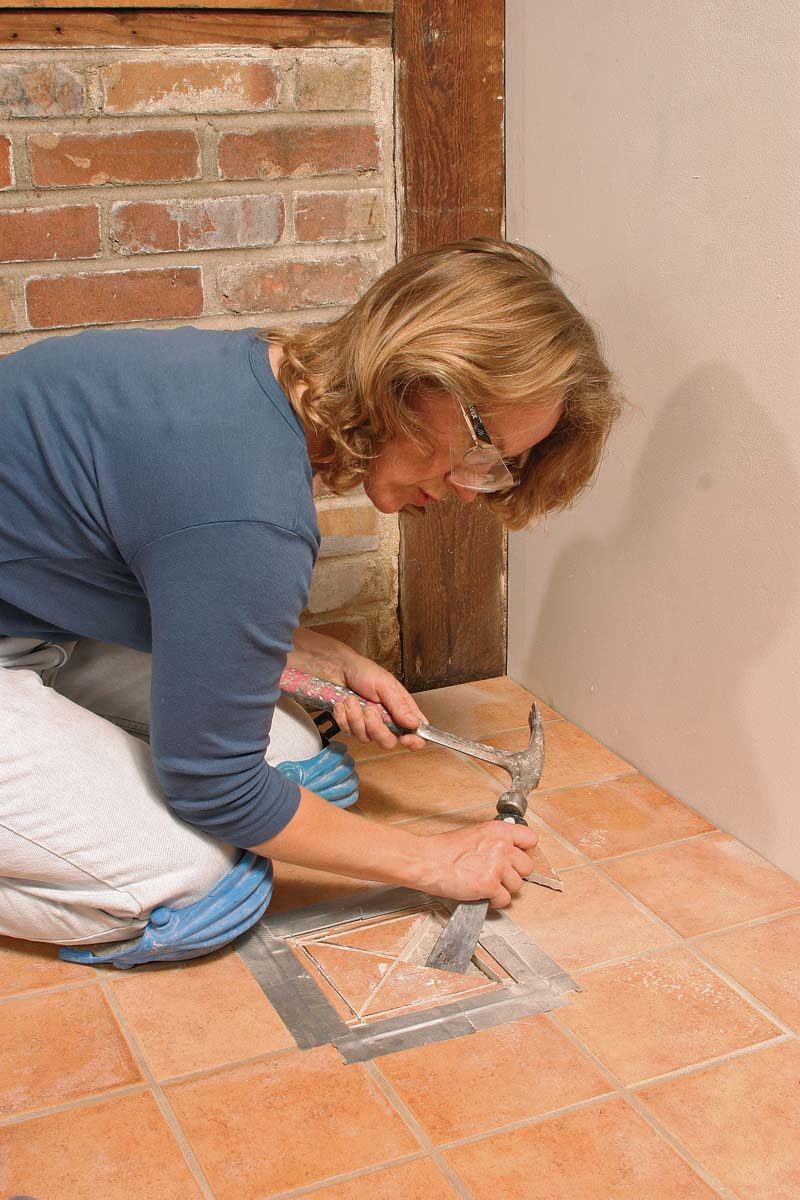
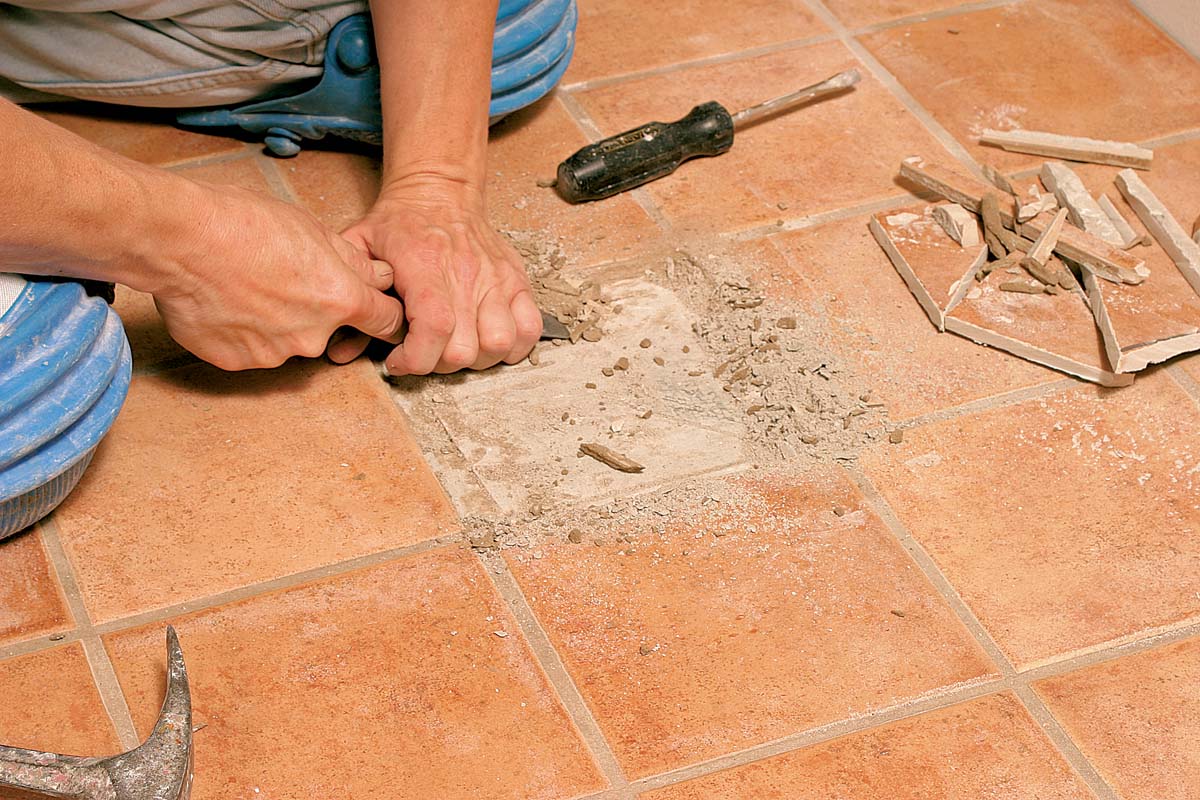
Basically, the trick is first to isolate the tile from neighboring tiles by removing the surrounding grout line, then carefully break the tile into pieces and remove it. Using a grinder can be messy unless you keep a vacuum nozzle trained on the dust stream. I mask off any surrounding cabinet faces or furniture, and also protect neighboring tiles with sheet metal or plywood in case I overcut. I mask off myself as well, donning safety glasses, a dust mask, and hearing protection.

I start by making diagonal cuts, then make separate cuts that run parallel to the edges. The parallel cuts along the tile edges make it possible to position a chisel from the edge of a tile facing in so that the neighboring tile is not damaged. This technique is good for removing tiles with tight joints, like marble. There’s also a cordless 33/8-in. saw made by Makita with a slightly smaller diamond blade that comes in handy; I also use a Dremel tool fitted with a small #7134 diamond-point bit in the corners where the grinder can’t reach.

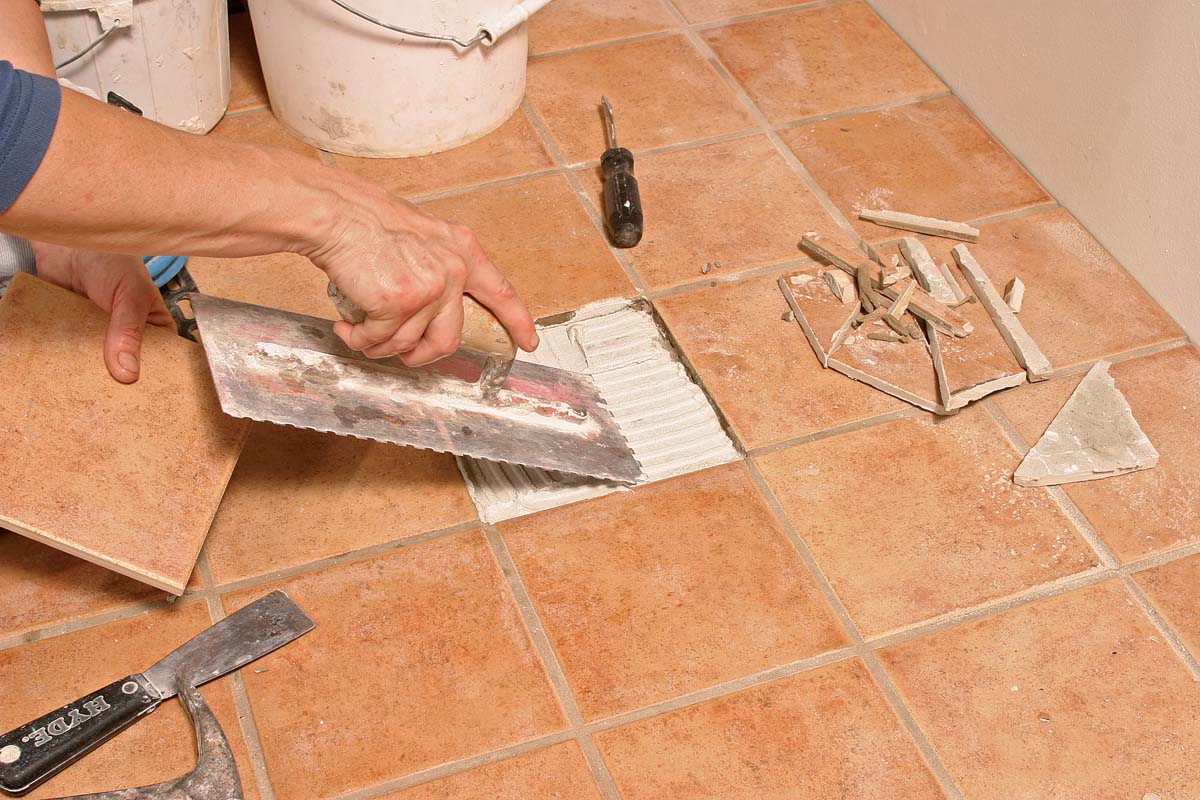
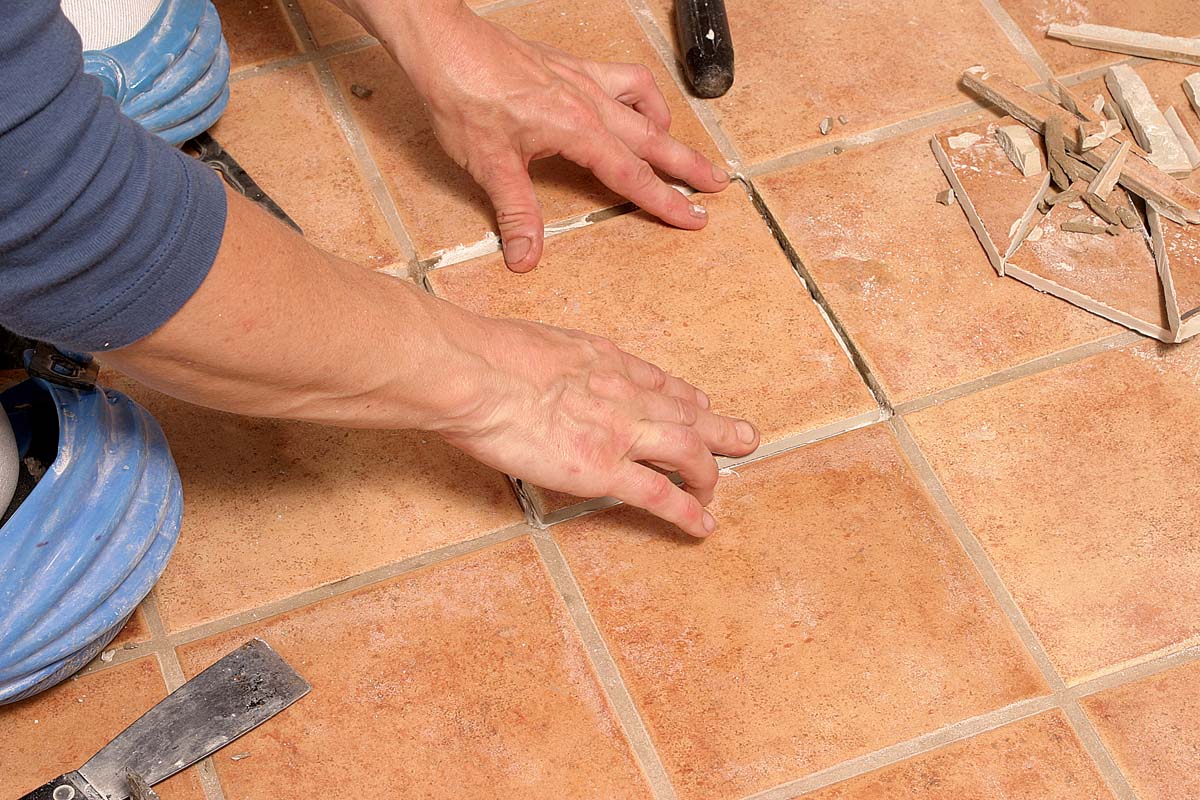
Once the tile is removed, I scrape out any remaining thinset and vacuum the substrate. With fresh thinset and a new tile, the job is finished, except for the grouting work.

Replacing a broken tile

To keep the neighboring tiles intact, the first step is to score the grout lines with a utility knife.
1. Isolate the victim. To keep the neighboring tiles intact, the first step is to score the grout lines with a utility knife. A few light passes do the trick.
Before cutting, it’s a good idea to mask off any nearby cabinets or furniture with plastic and tape.
2. Protection is prevention. Before cutting, it’s a good idea to mask off any nearby cabinets or furniture with plastic and tape. On the floor, angle brackets taped to the surrounding tiles protect them from inadvertent slips of the grinder’s blade.
With both hands firmly holding the grinder, the author carefully plunges the blade into the tile’s center and cuts diagonally, then along the tile’s sides.
3. Diagonal cuts open up the tile. With both hands firmly holding the grinder, the author carefully plunges the blade into the tile’s center and cuts diagonally, then along the tile’s sides. A helper holds the vacuum hose to catch the dusty exhaust.
Using a hammer and an old chisel or putty knife, the author works from the outside toward the tile’s center, carefully prying out the pieces.
4. A junky tool still has its uses. Using a hammer and an old chisel or putty knife, the author works from the outside toward the tile’s center, carefully prying out the pieces.
After the tile is removed, all old thinset and grout are scraped from the substrate, which then is vacuumed clean.
5. Make a clear space. After the tile is removed, all old thinset and grout are scraped from the substrate, which then is vacuumed clean.
After making sure the replacement tile fits, the author mixes a small batch of thinset, trowels it into the space and sets the tile.
6. Back to square one, again. After making sure the replacement tile fits, the author mixes a small batch of thinset, trowels it into the space and sets the tile.
After the thinset dries, the tile can be grouted.
7. After the thinset dries, the tile can be grouted.

From Fine Homebuilding #168

For more photos and information on repairing broken tiles, click the View PDF button below.

View PDF
Previous: Removing a Damaged Tile Next: Setting a Replacement Tile

Guide

Tiling

Chapter

Maintenance & Repair

Sign up for eletters today and get the latest how-to from Fine Homebuilding, plus special offers.

Signing you up...

This site is protected by reCAPTCHA and the Google Privacy Policy and Terms of Service apply.
See all newsletters
See all newsletters

Log in or create an account to post a comment.

Sign up Log in

Become a member and get full access to FineHomebuilding.com

Tiling

Tiling

Trusted, comprehensive guidance from the pros for a great-looking tile job in any room of the house

View Project Guide

View All Project Guides »

Become a member and get unlimited site access, including the Tiling Project Guide.

Start Free Trial

Selecting Tile
  • The Basics
  • Tile Options
Tools & Techniques
  • Job-Preparation Tools
  • Cutting Tiles
  • Setting & Grouting Tools
Installation Materials
  • Membranes & Substrates
  • Adhesives & Mortars
  • Grout
  • Sealers & Caulk
  • Spacers, Hardware & Trim
Preparation
  • The Prep Job
  • Repairs & Surface Prep
  • Installing Backerboard
Tiling Floors
  • Layout & Installation
  • Setting Specialty Tiles
Tiling Walls & Backsplashes
  • Preparation
  • Backsplashes
  • Walls
Tiling Showers
  • Tile Shower Basics
  • Waterproofing
  • Shower Pans
  • Shower Drains
  • Shower Niches
  • Video Series: Tile a Shower
  • Video Series: Tile a Barrier-Free Bathroom
Grouting, Sealing & Caulking
  • Grouting
  • Caulking
  • Sealing
Maintenance & Repair
  • Maintenance
  • Tile Repair
  • Grout Repair

Fine Home Building

Newsletter Sign-up

  • Fine Homebuilding

    Home building tips, offers, and expert advice in your inbox.

  • Green Building Advisor

    Building science and energy efficiency advice, plus special offers, in your inbox.

  • Old House Journal

    Repair, renovation, and restoration tips, plus special offers, in your inbox.

Signing you up...

This site is protected by reCAPTCHA and the Google Privacy Policy and Terms of Service apply.
See all newsletters

Follow

  • Fine Homebuilding

    Dig into cutting-edge approaches and decades of proven solutions with total access to our experts and tradespeople.

    Start Free Trial Now
    • Facebook
    • Instagram
    • X
    • LinkedIn
  • GBA Prime

    Get instant access to the latest developments in green building, research, and reports from the field.

    Start Free Trial Now
    • Facebook
    • YouTube
  • Old House Journal

    Learn how to restore, repair, update, and decorate your home.

    Subscribe Now
    • Facebook
    • Instagram
    • X

Membership & Magazine

  • Online Archive
  • Start Free Trial
  • Magazine Subscription
  • Magazine Renewal
  • Gift a Subscription
  • Customer Support
  • Privacy Preferences
  • About
  • Contact
  • Advertise
  • Careers
  • Terms of Use
  • Site Map
  • Do not sell or share my information
  • Privacy Policy
  • Accessibility
  • California Privacy Rights

© 2025 Active Interest Media. All rights reserved.

Fine Homebuilding receives a commission for items purchased through links on this site, including Amazon Associates and other affiliate advertising programs.

  • Home Group
  • Antique Trader
  • Arts & Crafts Homes
  • Bank Note Reporter
  • Cabin Life
  • Cuisine at Home
  • Fine Gardening
  • Fine Woodworking
  • Green Building Advisor
  • Garden Gate
  • Horticulture
  • Keep Craft Alive
  • Log Home Living
  • Military Trader/Vehicles
  • Numismatic News
  • Numismaster
  • Old Cars Weekly
  • Old House Journal
  • Period Homes
  • Popular Woodworking
  • Script
  • ShopNotes
  • Sports Collectors Digest
  • Threads
  • Timber Home Living
  • Traditional Building
  • Woodsmith
  • World Coin News
  • Writer's Digest
Active Interest Media logo
X
X
This is a dialog window which overlays the main content of the page. The modal window is a 'site map' of the most critical areas of the site. Pressing the Escape (ESC) button will close the modal and bring you back to where you were on the page.

Main Menu

  • How-To
  • Design
  • Tools & Materials
  • Video
  • Blogs
  • Forum
  • Project Guides
  • Reader Projects
  • Magazine
  • Members
  • FHB House

Podcasts

  • FHB Podcast
  • ProTalk

Webinars

  • Upcoming and On-Demand

Podcasts

  • FHB Podcast
  • ProTalk

Webinars

  • Upcoming and On-Demand

Popular Topics

  • Kitchens
  • Business
  • Bedrooms
  • Roofs
  • Architecture and Design
  • Green Building
  • Decks
  • Framing
  • Safety
  • Remodeling
  • Bathrooms
  • Windows
  • Tilework
  • Ceilings
  • HVAC

Magazine

  • Current Issue
  • Past Issues
  • Magazine Index
  • Subscribe
  • Online Archive
  • Author Guidelines

All Access

  • Member Home
  • Start Free Trial
  • Gift Membership

Online Learning

  • Courses
  • Project Guides
  • Reader Projects
  • Podcast

More

  • FHB Ambassadors
  • FHB House
  • Customer Support

Account

  • Log In
  • Join

Newsletter

Get home building tips, offers, and expert advice in your inbox

Signing you up...

This site is protected by reCAPTCHA and the Google Privacy Policy and Terms of Service apply.
See all newsletters
See all newsletters

Follow

  • X
  • YouTube
  • instagram
  • facebook
  • pinterest
  • Tiktok

Join All Access

Become a member and get instant access to thousands of videos, how-tos, tool reviews, and design features.

Start Your Free Trial

Subscribe

FHB Magazine

Start your subscription today and save up to 70%

Subscribe

We hope you’ve enjoyed your free articles. To keep reading, become a member today.

Get complete site access to expert advice, how-to videos, Code Check, and more, plus the print magazine.

Start your FREE trial

Already a member? Log in

Privacy Policy Update

We use cookies, pixels, script and other tracking technologies to analyze and improve our service, to improve and personalize content, and for advertising to you. We also share information about your use of our site with third-party social media, advertising and analytics partners. You can view our Privacy Policy here and our Terms of Use here.

Cookies

Analytics

These cookies help us track site metrics to improve our sites and provide a better user experience.

Advertising/Social Media

These cookies are used to serve advertisements aligned with your interests.

Essential

These cookies are required to provide basic functions like page navigation and access to secure areas of the website.

Delete My Data

Delete all cookies and associated data