FHB Logo Facebook LinkedIn Email Pinterest Twitter X Instagram Tiktok YouTube Plus Icon Close Icon Navigation Search Icon Navigation Search Icon Arrow Down Icon Video Guide Icon Article Guide Icon Modal Close Icon Guide Search Icon Skip to content
Subscribe
Log In
  • How-To
  • Design
  • Tools & Materials
  • Restoration
  • Videos
  • Blogs
  • Forum
  • Magazine
  • Members
  • FHB House
  • Podcast
Log In

Rhode Island 2016

The 2016 FHB House is energy-smart, connected, healthy, and durable. It’s small and sensible. Most of all, it’s a valuable model home, meant to educate designers and builders who aspire to create high-performance houses that are exceptional in their quality, comfort, and style.

How-To

Flashing Window and Door Bucks

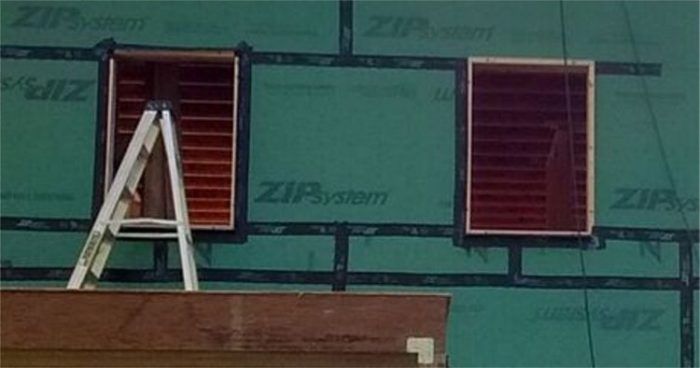
Preflashing the window and door bucks allows us to completely install the exterior insulation and rain-screen furring.
By Mike Guertin
  • X
  • facebook
  • linkedin
  • pinterest
  • email
  • add to favorites Log in or Sign up to save your favorite articles

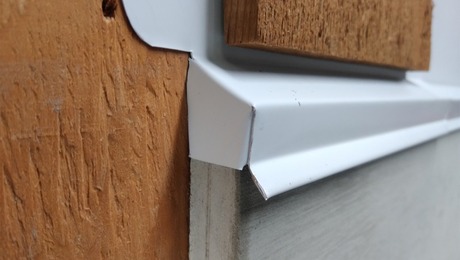
We’re installing 2×3 bucks around the rough openings to pad the windows and doors out to the plane of the rain-screen surface. Since the Huber Zip System wall sheathing is the primary water control layer, we have to flash around the bucks. Buck flash 2That way, in the event any water gets behind the siding and trim and makes its way to the Zip wall, the flashing will redirect the water over or around the windows and doors.
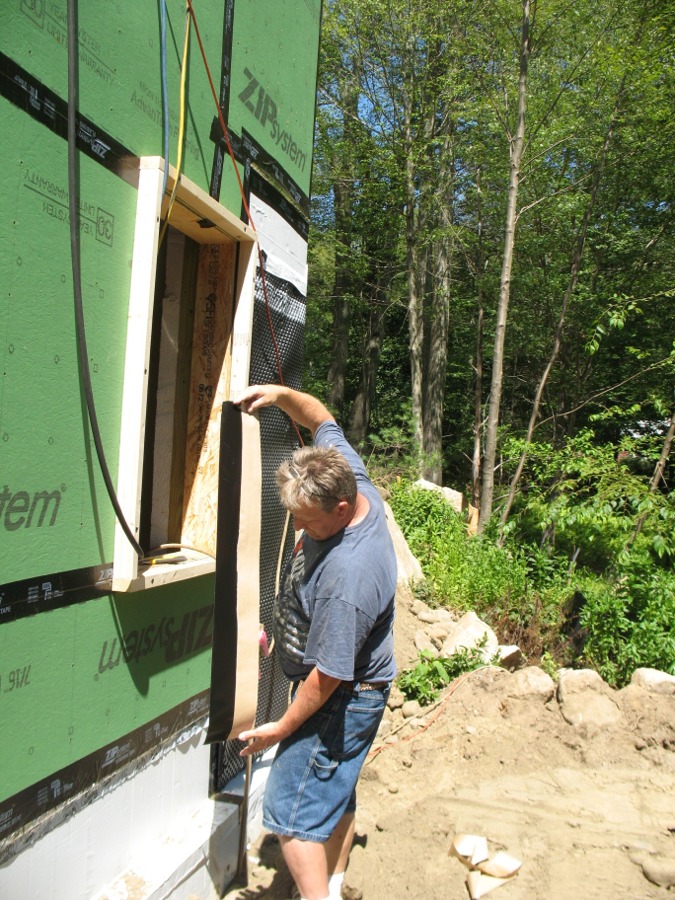
Bruce has been doing most of the flashing and has become proficient at it. He starts at the bottom with a piece of 6-in.-wide Zip System Tape. The 6-in. tape has a paper release sheet, making it easier to work with for this type of flashing than the 3-3/4-in. Zip Tape that doesn’t have a release sheet.

Buck flash 3First, Bruce cuts flashing tape pieces for the perimeter of the buck—each piece a couple inches longer than the side. Then he scores the release sheets of the bottom and side pieces down the center, being careful not to cut into the tape itself. A fresh utility-knife blade helps here. Then he removes one-half of the release sheet, folds it back on itself (face to face), and bonds the exposed adhesive to the wall.

After the wall side is stuck, he pulls off the remaining release sheet and folds the tape onto the edge of the buck and then onto the face. The 6-in. tape gives us 3 in. of coverage onto the Zip wall sheathing, 2-1/2 in. onto the edge of the buck, and 1/2 in. onto the face of the buck.
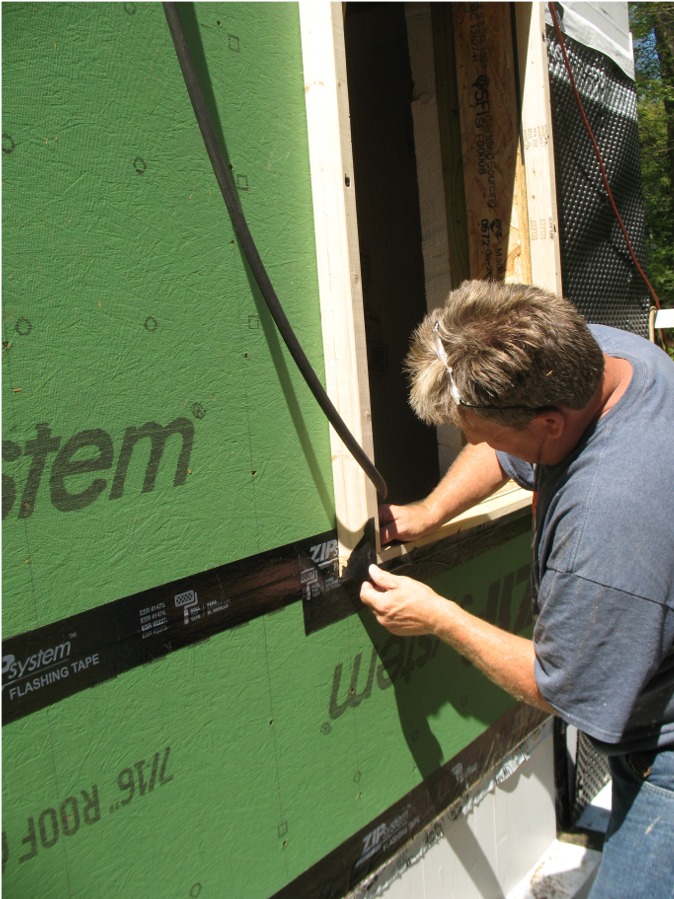
Buck flash 4We start installing the tape along the bottom of the buck. A little bit of the tape extends beyond the end of the buck corner. A relief cut is made, and the extra is folded onto the sides of the buck. Before moving on to the sides, we wrap the corners with 6-in. pieces of Zip Stretch Tape. The tape stretches in length and width, so it’s easy to form a continuous corner that flares out on the wall sheathing for a leakproof seal.

Buck flash 5After the sides are done, Bruce installs pieces of Stretch Tape to transition to the head of the buck.
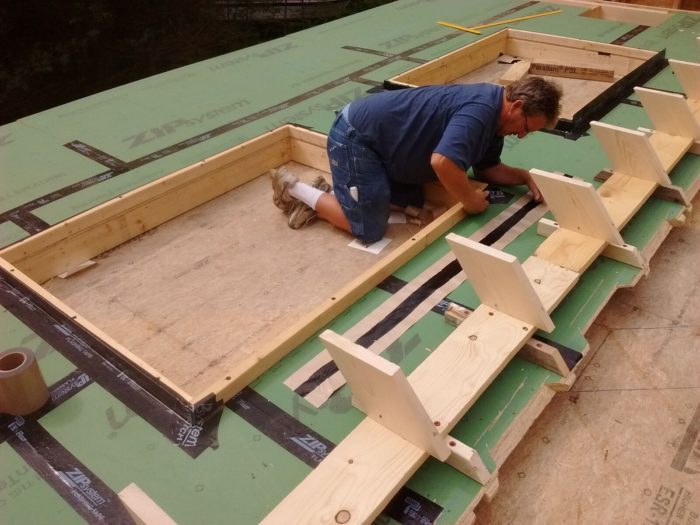
Buck flash 1The head flashing is prepared a little differently than the bottom and side pieces. Instead of a single cut in the release paper, he makes two cuts. For a proper weather lap, the head flashing tape needs to fold on top of the window flange. Since the windows won’t be installed for a couple weeks, we need to leave release paper on the head flap portion of the flashing tape. So Bruce makes two straight cuts in the paper and removes the middle section. He backfolds the tape face-to-face and bonds the exposed adhesive to the buck. Then he removes the wall-portion release paper and bonds the tape to the wall. The remaining paper stays on the tape and will be removed after the window is fastened.

By flashing the window buck at this point with the Zip System Tapes, we can install the Roxul insulation and furring strips all the way around the bucks. Had we not preflashed the bucks, we would have to leave the insulation several inches back from the buck perimeter in order to apply the tape when the windows arrive.

Sign up for eletters today and get the latest how-to from Fine Homebuilding, plus special offers.

Signing you up...

This site is protected by reCAPTCHA and the Google Privacy Policy and Terms of Service apply.
See all newsletters
See all newsletters
×

Get home building tips, offers, and expert advice in your inbox

Signing you up...

This site is protected by reCAPTCHA and the Google Privacy Policy and Terms of Service apply.
See all newsletters
See all newsletters

New Feature

Fine Homebuilding Forums

Ask questions, offer advice, and share your work

  • X
  • facebook
  • linkedin
  • pinterest
  • email
  • add to favorites Log in or Sign up to save your favorite articles
Rhode Island 2016 Videos

Navigate the Build

  • Introduction
  • Foundation
  • Framing
  • Windows and Doors
  • Insulation
  • Roof
  • Siding and Trim
  • Mechanicals
  • Interior Finishes
  • Kitchen and Baths
  • Outdoor Spaces
  • Completed Home

Behind the Build

  • New York 2023
  • Kansas 2022
  • Wisconsin 2021
  • Nebraska 2021
  • Connecticut 2020
  • Kentucky 2019
  • California 2018
  • Vermont 2017
  • Rhode Island 2016
  • X
  • facebook
  • linkedin
  • pinterest
  • email
  • add to favorites Log in or Sign up to save your favorite articles

View Comments

  1. AmherstWoodArtisan | Sep 06, 2016 08:23pm | #1

    Why not just use the stretch tape rather than having three layers of tape in each corner? Cost?

  2. Mike_Guertin | Sep 06, 2016 08:53pm | #2

    Yes - cost. Stretch is about $2/ft vs. straight 6 in. tape that's about 50 cents/ft. Plus Stretch tape is actually hard to work with on straight 90 degree inside corners like on a buck to wall connection. The Zip tapes are pretty thin so the 3 layer build-up at corners is negligible.

  3. AmherstWoodArtisan | Sep 06, 2016 09:36pm | #3

    I can understand how the extra $12-13 a window over a project with a lot of windows can add up, but I'm not sure I follow on the difficulty in the corners? Don't you mean outside corners and aren't you using it solely for the purpose of sealing the corner? Also in practice because you still bought the stretch tape, I think you're really only saving a few dollars a window. I went through this exercise with our window replacement project.

    We've been replacing some windows in our house and using Zip stretch tape. If you score the release paper as described but also score where the 90 degree is, it makes corners much easier (Inside corner in my case).

    I also don't see the three layers as a thickness problem but as an intrusion problem. Shouldn't we be minimizing intrusion points? In this case you have two rather than one. I know it's a lot of sealed/bonded tape for water to work through but just doesn't seem like what I would expect you all to be using in practice.

  4. Mike_Guertin | Sep 07, 2016 06:36am | #4

    Response to AmherstWoodArtisan:

    The cost of the Stretch tape is the main issue for me. Using it for the window and door heads on all units would have totaled over $400. A drop in the overall cost of the house but on the other hand that's the cost of one window. I'm always looking for ways to save a little here and a little there - in the end the savings add up.
    I'm not worried at all about the extra tape joints. Each one has a mechanical overlap. Plus, the biggest potential leak area isn't in the flashing tape joints between the corner pieces / side piece / head piece, it is the reliance on the adhesive bond between the Zip wall sheathing and the tape itself. Without a mechanical overlap we have to make certain that we use a J roller to press the tape tight to the sheathing.

Log in or create an account to post a comment.

Sign up Log in

Become a member and get full access to FineHomebuilding.com

More Rhode Island 2016

View All
  • Makeup Air for the Range Hood
  • Finishing the Basement
  • A Look at the Finished Home
  • Range Exhaust
View All

Fine Homebuilding House - Rhode Island 2016 Sponsors

  • AdvanTech Logo
  • American Standard Logo
  • AMVIC Logo
  • Boral_CulturedStone Logo
  • Boral_Flag Logo
  • Boral_TruExterior Logo
  • CertainTeed Logo
  • Coravent Logo
  • Dryerbox Logo
  • DXV Logo
  • Flir Logo
  • Gladiator Logo
  • MAXUSA Logo
  • ProtectoWrap Logo
  • Roxul Logo
  • Sikkens Logo
  • Weyerhaeuser Logo
  • Integrity Logo
  • SoftPlan Logo
  • Tamarack Logo
  • TiteBond Logo
  • TrusJoist Logo
  • Whirlpool Logo
  • Zehnder Logo
  • ZipSystem Logo
  • Feeney Logo

Up Next

Video Shorts

Featured Story

Mortar for Old Masonry

Old masonry may look tough, but the wrong mortar can destroy it—here's how to choose the right mix for lasting repairs.

Featured Video

Video: Build a Fireplace, Brick by Brick

Watch mason Mike Mehaffey construct a traditional-style fireplace that burns well and meets current building codes.

Related Stories

  • Fastening an Exterior Door With Brick Mold
  • FHB Podcast Segment: Proper Flashing for Marvin Windows
  • A Closer Look at Pella's Steady Set Window Installation System with Mike Guertin
  • Mid-Wall Install

Discussion Forum

Recent Posts and Replies

  • |
  • |
  • |
  • |
  • |
  • |
View More Create Post

Highlights

Fine Homebuilding All Access
Fine Homebuilding Podcast
Tool Tech
Plus, get an extra 20% off with code GIFT20

"I have learned so much thanks to the searchable articles on the FHB website. I can confidently say that I expect to be a life-long subscriber." - M.K.

Get home building tips, offers, and expert advice in your inbox

Signing you up...

This site is protected by reCAPTCHA and the Google Privacy Policy and Terms of Service apply.
See all newsletters
See all newsletters

Video

View All Videos
  • Fastening an Exterior Door With Brick Mold
  • Podcast Episode 627: Leaky Doors, Flashing, and Kneewalls
  • Insulating Foam for High-Performance Windows
  • How to Bend Custom Cap Flashing
View All

Door Flashing

View All Door Flashing Articles
  • Flashing-Tape Cutter
  • Step-by-Step Install Prehung Exterior Doors
  • Choosing the Right Construction Tape for the Job
View All Door Flashing Articles

Fine Homebuilding Magazine

  • Issue 332 - July 2025
    • Custom Built-ins With Job-Site Tools
    • Fight House Fires Through Design
    • Making the Move to Multifamily
  • Issue 331 - June 2025
    • A More Resilient Roof
    • Tool Test: You Need a Drywall Sander
    • Ducted vs. Ductless Heat Pumps
  • Issue 330 - April/May 2025
    • Deck Details for Durability
    • FAQs on HPWHs
    • 10 Tips for a Long-Lasting Paint Job
  • Issue 329 - Feb/Mar 2025
    • Smart Foundation for a Small Addition
    • A Kominka Comes West
    • Making Small Kitchens Work
  • Issue 328 - Dec/Jan 2025
    • How a Pro Replaces Columns
    • Passive House 3.0
    • Tool Test: Compact Line Lasers

Fine Home Building

Newsletter Sign-up

  • Fine Homebuilding

    Home building tips, offers, and expert advice in your inbox.

  • Green Building Advisor

    Building science and energy efficiency advice, plus special offers, in your inbox.

  • Old House Journal

    Repair, renovation, and restoration tips, plus special offers, in your inbox.

Signing you up...

This site is protected by reCAPTCHA and the Google Privacy Policy and Terms of Service apply.
See all newsletters

Follow

  • Fine Homebuilding

    Dig into cutting-edge approaches and decades of proven solutions with total access to our experts and tradespeople.

    Start Free Trial Now
    • Facebook
    • Instagram
    • X
    • LinkedIn
  • GBA Prime

    Get instant access to the latest developments in green building, research, and reports from the field.

    Start Free Trial Now
    • Facebook
    • YouTube
  • Old House Journal

    Learn how to restore, repair, update, and decorate your home.

    Subscribe Now
    • Facebook
    • Instagram
    • X

Membership & Magazine

  • Online Archive
  • Start Free Trial
  • Magazine Subscription
  • Magazine Renewal
  • Gift a Subscription
  • Customer Support
  • Privacy Preferences
  • About
  • Contact
  • Advertise
  • Careers
  • Terms of Use
  • Site Map
  • Do not sell or share my information
  • Privacy Policy
  • Accessibility
  • California Privacy Rights

© 2025 Active Interest Media. All rights reserved.

Fine Homebuilding receives a commission for items purchased through links on this site, including Amazon Associates and other affiliate advertising programs.

  • Home Group
  • Antique Trader
  • Arts & Crafts Homes
  • Bank Note Reporter
  • Cabin Life
  • Cuisine at Home
  • Fine Gardening
  • Fine Woodworking
  • Green Building Advisor
  • Garden Gate
  • Horticulture
  • Keep Craft Alive
  • Log Home Living
  • Military Trader/Vehicles
  • Numismatic News
  • Numismaster
  • Old Cars Weekly
  • Old House Journal
  • Period Homes
  • Popular Woodworking
  • Script
  • ShopNotes
  • Sports Collectors Digest
  • Threads
  • Timber Home Living
  • Traditional Building
  • Woodsmith
  • World Coin News
  • Writer's Digest
Active Interest Media logo
X
X
This is a dialog window which overlays the main content of the page. The modal window is a 'site map' of the most critical areas of the site. Pressing the Escape (ESC) button will close the modal and bring you back to where you were on the page.

Main Menu

  • How-To
  • Design
  • Tools & Materials
  • Video
  • Blogs
  • Forum
  • Project Guides
  • Reader Projects
  • Magazine
  • Members
  • FHB House

Podcasts

  • FHB Podcast
  • ProTalk

Webinars

  • Upcoming and On-Demand

Podcasts

  • FHB Podcast
  • ProTalk

Webinars

  • Upcoming and On-Demand

Popular Topics

  • Kitchens
  • Business
  • Bedrooms
  • Roofs
  • Architecture and Design
  • Green Building
  • Decks
  • Framing
  • Safety
  • Remodeling
  • Bathrooms
  • Windows
  • Tilework
  • Ceilings
  • HVAC

Magazine

  • Current Issue
  • Past Issues
  • Magazine Index
  • Subscribe
  • Online Archive
  • Author Guidelines

All Access

  • Member Home
  • Start Free Trial
  • Gift Membership

Online Learning

  • Courses
  • Project Guides
  • Reader Projects
  • Podcast

More

  • FHB Ambassadors
  • FHB House
  • Customer Support

Account

  • Log In
  • Join

Newsletter

Get home building tips, offers, and expert advice in your inbox

Signing you up...

This site is protected by reCAPTCHA and the Google Privacy Policy and Terms of Service apply.
See all newsletters
See all newsletters

Follow

  • X
  • YouTube
  • instagram
  • facebook
  • pinterest
  • Tiktok

Join All Access

Become a member and get instant access to thousands of videos, how-tos, tool reviews, and design features.

Start Your Free Trial

Subscribe

FHB Magazine

Start your subscription today and save up to 70%

Subscribe

This is your last free article.

Don't miss another expert tip or technique from building pros. Start your free trial today.

Start your FREE trial

Already a member? Log in

We hope you’ve enjoyed your free articles. To keep reading, become a member today.

Get complete site access to expert advice, how-to videos, Code Check, and more, plus the print magazine.

Start your FREE trial

Already a member? Log in

Privacy Policy Update

We use cookies, pixels, script and other tracking technologies to analyze and improve our service, to improve and personalize content, and for advertising to you. We also share information about your use of our site with third-party social media, advertising and analytics partners. You can view our Privacy Policy here and our Terms of Use here.

Cookies

Analytics

These cookies help us track site metrics to improve our sites and provide a better user experience.

Advertising/Social Media

These cookies are used to serve advertisements aligned with your interests.

Essential

These cookies are required to provide basic functions like page navigation and access to secure areas of the website.

Delete My Data

Delete all cookies and associated data