FHB Logo Facebook LinkedIn Email Pinterest Twitter X Instagram Tiktok YouTube Plus Icon Close Icon Navigation Search Icon Navigation Search Icon Arrow Down Icon Video Guide Icon Article Guide Icon Modal Close Icon Guide Search Icon Skip to content
Subscribe
Log In
  • How-To
  • Design
  • Tools & Materials
  • Restoration
  • Videos
  • Blogs
  • Forum
  • Magazine
  • Members
  • FHB House
  • Podcast
Log In
Job Site Diaries

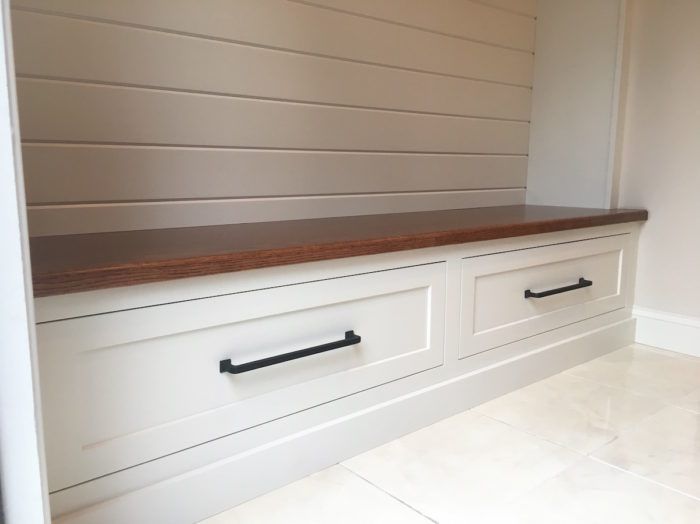
Fitting a Cabinet Between Two Walls

I knew it would be a tricky installation, so I planned to take my time and nail the execution. Here's how.

By Tyler Grace
  • X
  • facebook
  • linkedin
  • pinterest
  • email
  • add to favorites Log in or Sign up to save your favorite articles

One of the toughest cabinet installations has to be fitting a single cabinet between two walls. Add an outside corner or, even worse, two outside corners close to the front of the cabinetry, and it makes it even more difficult. That’s because the corner bead and spackle generally reduce the opening size by at least 1/4 in. So getting the cabinet into the opening and still having it fit tightly once past the corners is nearly impossible.

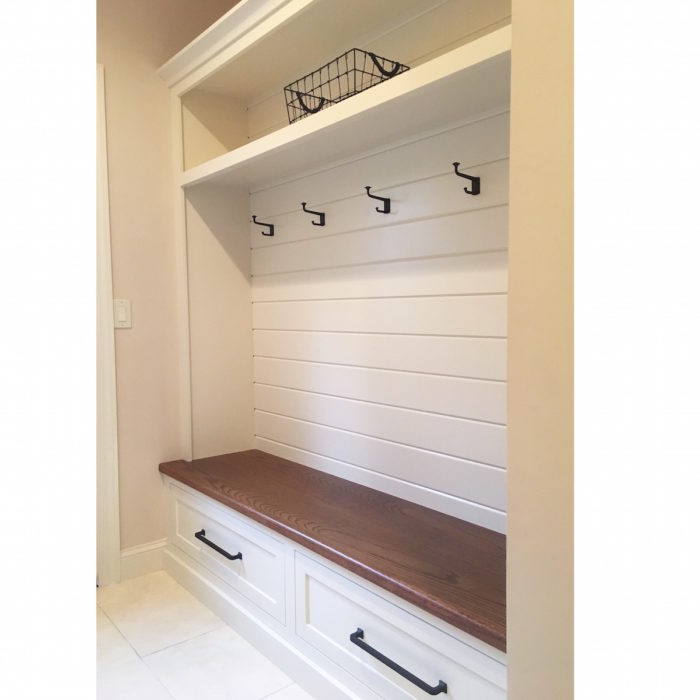
My last built-in installation had one outside corner on the right-hand side, and a door/door casing on the left-hand side. The cabinet itself was almost 7 ft. wide and had oversize stiles for scribing. I knew going into the job that it would be a tricky installation, so I allowed for it in my pricing. I did not want to rush and mess anything up in the process, so I planned to take my time and nail the execution. Here’s how.

My first step is to find a plumb reference line roughly in the center of the space. I then mark where the front of my face frame will intersect with each wall. If the cabinet is 20 in. deep, I take all of my measurements at that 20 in., not at the inside of the wall. I next check my walls on either side for plumb. I take note of how far out the walls are and write/sketch down my findings. Many times you can get away with a top and bottom measurement on either side of your plumb line for your scribe. If the walls are really wavy, you can measure off each side of your reference line every 6 in. or so vertically. This will provide you with multiple measurements on either side of your reference line, which you can then transfer to your face frame and connect the dots so that the cabinet contours to each wall.

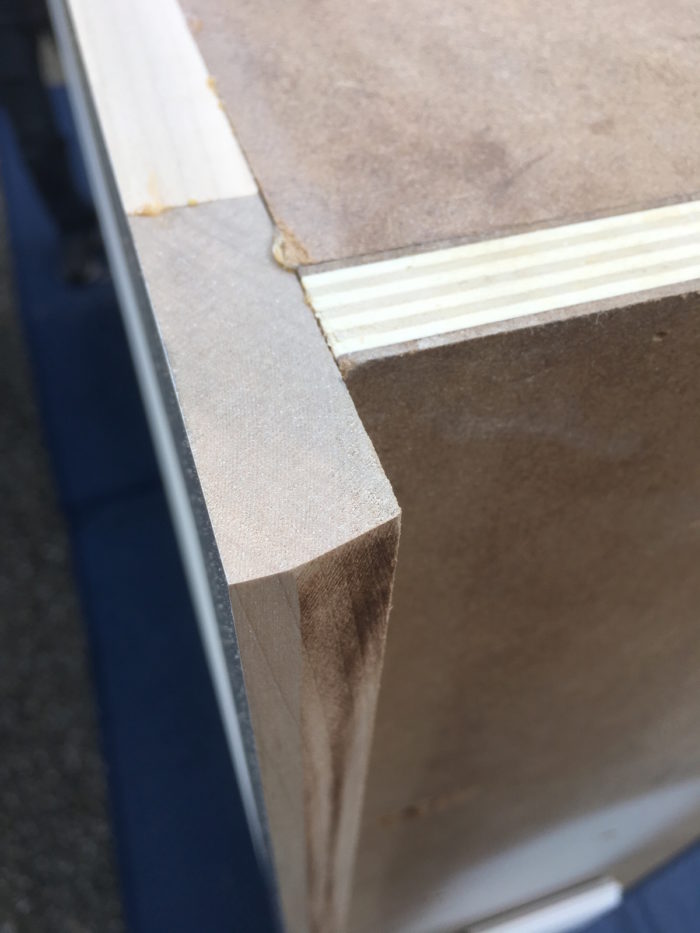
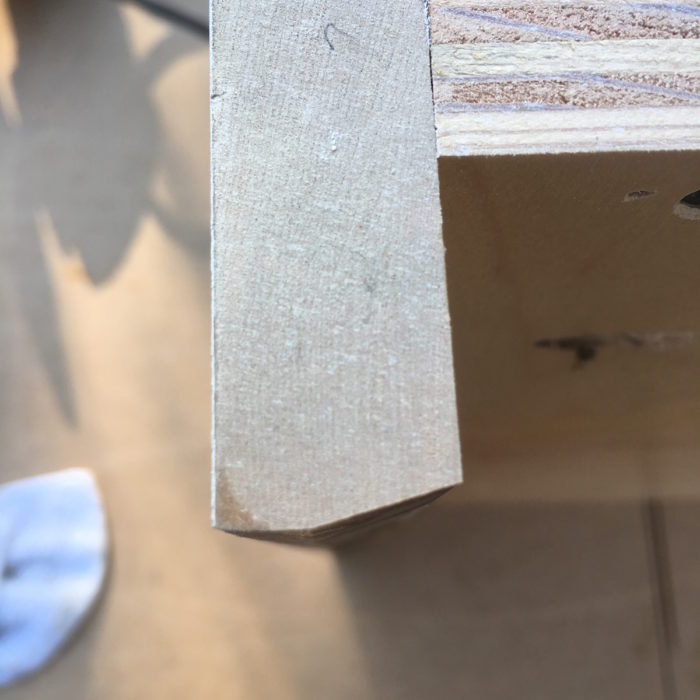
Once all of my measurements are jotted down, I transfer them to my cabinet. I measure from my center reference line on either side and essentially draw the wall contours onto my face frame. I then set my track saw at a steep bevel and rip the contours approximately 1/8 in. proud of my line. Next, I cheat up to the line with a sander or a block plane. This creates a bevel with a flat portion toward the front of the face frame. It helps prevent cracking or chipping the front corner of your scribe. I once had a slight nail pop tear a chunk out of my scribe because it was bulging the drywall just enough for the stile to get hung up on it. Lesson learned.

IMG_9998

IMG_9975

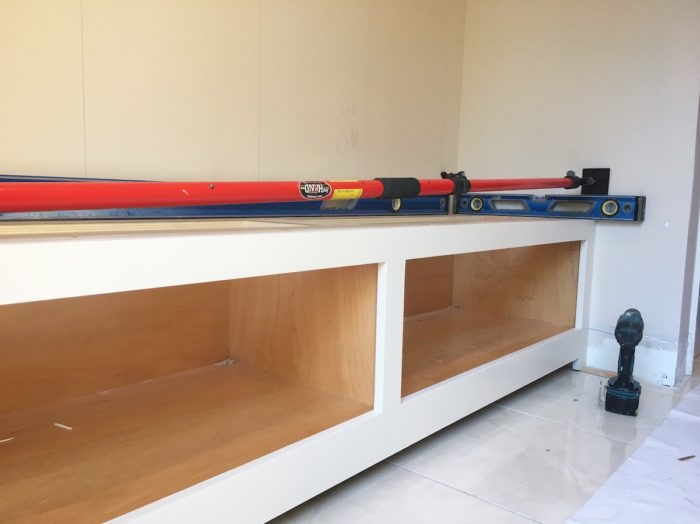
Finally, I position the cabinet near the opening. I try my best to swing the end closer to the outside corner in first (right side) and then push the other side in (left side). You need to keep the cabinet as close to square with the opening when doing this. Too much angle will cause you not to fit. Too little angle will also cause you not to fit. I needed little extra help in this situation, so I grabbed an extendable pole and propped it between the two walls. It gave me just enough clearance to get past the corner bead, and then it was smooth sailing from there.

IMG_0040

IMG_0035

IMG_9996

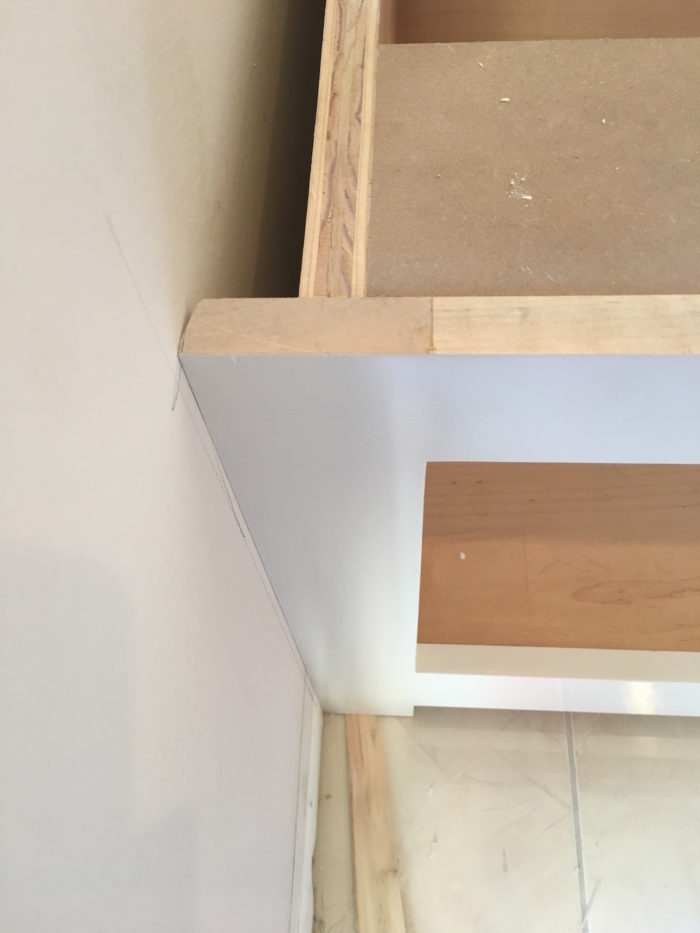
After the cabinet goes in, you will sometimes have slight gaps. You can either tape the face frame and caulk the gaps and then touch them up with your sprayer, or you can spackle the wall to build it up to the side of the face frame. I generally get my scribes extremely tight and do not need anything, but on this job, I needed a small amount of caulk on one or two spots due to contours in the wall. These gaps are 1/16 in. or less, but they are still gaps. If you have anything bigger than that, or if you have gaps along the entire stile, the better option is to build the wall out with spackle. Because there were only two small spots on this job, I taped the stile, caulked the gap, and then touched it up the next day with my HVLP sprayer.

IMG_0003

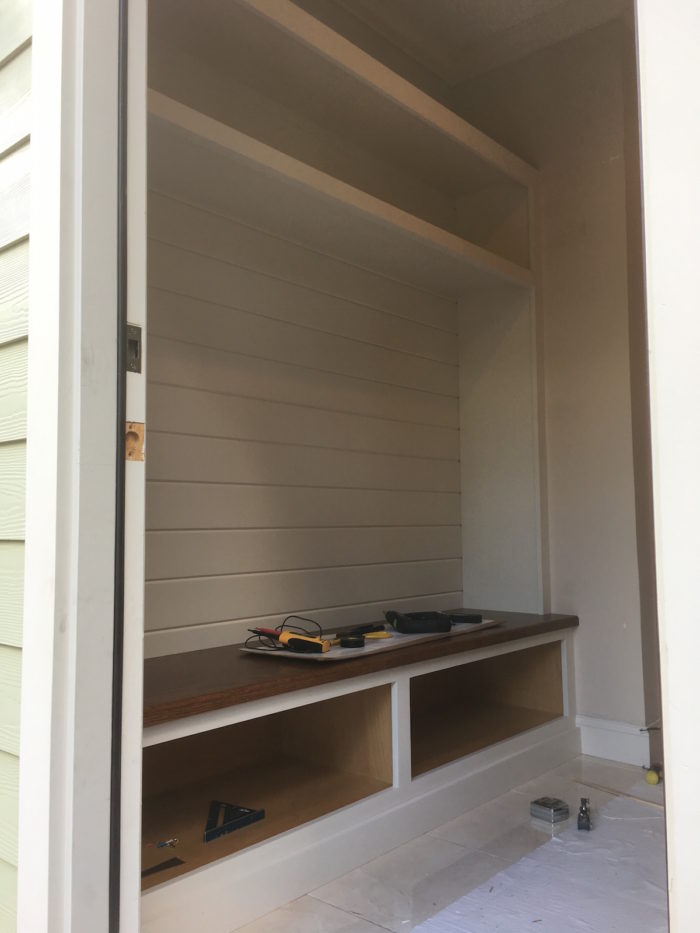
The upper cabinet and lower cabinet go in the same exact same way. Take your time, measure 800 times before cutting, bevel your stile and leave a flat portion on the front, cut it tight, and scrape your way on in for a tight fit!

IMG_0593


Sign up for eletters today and get the latest how-to from Fine Homebuilding, plus special offers.

Signing you up...

This site is protected by reCAPTCHA and the Google Privacy Policy and Terms of Service apply.
See all newsletters
See all newsletters
×

Get home building tips, offers, and expert advice in your inbox

Signing you up...

This site is protected by reCAPTCHA and the Google Privacy Policy and Terms of Service apply.
See all newsletters
See all newsletters

New Feature

Fine Homebuilding Forums

Ask questions, offer advice, and share your work

  • X
  • facebook
  • linkedin
  • pinterest
  • email
  • add to favorites Log in or Sign up to save your favorite articles

View Comments

  1. Suburbanguy | Nov 17, 2016 10:50am | #1

    Interesting. I would not have caulked that gap that was less than 1/16 inch. I prefer to have absolutely straight cut-in paint lines. Much easier than masking every door/window frame and basecap. I simply slip a piece of paper behind the trim.--Just my preference.

  2. Suburbanguy | Nov 17, 2016 10:58am | #2

    I'm not sure why he didn't build the cabinets on-site or even have the cabinet manufacturer leave off the face frame and he could have simply built that on-site.

  3. dradam | Jan 14, 2017 09:15am | #3

    Thank you for this excellent article. In a similar situation I have built the face frame a separate unit ever so slightly proud with the outer edges beveled in back to make removing scribe material easier. The cabinet is prepared beforehand with internal pocket holes. The frame can then be tilted side to side for scribing, careful to err on the side of a hair too long. With two people a gentle bend of the frame shortens it and it can be laid flush against the cabinet. as the pocket hole screws grab it tight and it flattens to the cabinet it compresses nicely against the sidewalls.

  4. patrickklebba | Feb 25, 2017 01:58am | #4

    good interior design

Log in or create an account to post a comment.

Sign up Log in

Become a member and get full access to FineHomebuilding.com

More Job Site Diaries

View All
  • Advantages of a High-Performance Heat-Pump Water Heater
  • Wall-Mounted Fan Coil Unit for an Air-to-Water Heat Pump
  • Efficient Home Heating and Cooling
  • HVAC System for a High-Performance Home
View All

Up Next

Video Shorts

Featured Story

The Trump Administration Wants to Eliminate the Energy Star Program

The end of this program will likely lead to higher energy bills and fewer business opportunities for the American people.

Featured Video

A Modern California Home Wrapped in Rockwool Insulation for Energy Efficiency and Fire Resistance

The designer and builder of the 2018 Fine Homebuilding House detail why they chose mineral-wool batts and high-density boards for all of their insulation needs.

Related Stories

  • Materials Make a Midcentury Remodel
  • Seven Ways to Remove Paint
  • A New Approach for Millwork Finishes
  • Prevent Paint Bridging With Picks

Discussion Forum

Recent Posts and Replies

  • |
  • |
  • |
  • |
  • |
  • |
View More Create Post

Highlights

Fine Homebuilding All Access
Fine Homebuilding Podcast
Tool Tech
Plus, get an extra 20% off with code GIFT20

"I have learned so much thanks to the searchable articles on the FHB website. I can confidently say that I expect to be a life-long subscriber." - M.K.

Get home building tips, offers, and expert advice in your inbox

Signing you up...

This site is protected by reCAPTCHA and the Google Privacy Policy and Terms of Service apply.
See all newsletters
See all newsletters

Video

View All Videos
  • FHB Podcast Segment: A Homemade Radiant Heat Floor Assembly
  • FHB Podcast Segment: Can a Pretty Good House Have a Fireplace?
  • Building a Detached Shop with Full Utilities and HVAC
  • Interior and Exterior Finishing Details for a 1950s Ranch-Style Home
View All

Finish Carpentry

View All Finish Carpentry Articles
  • Sand Smooth Contours
  • That Modern Look
  • Template for Bullnose Base Corners
View All Finish Carpentry Articles

Fine Homebuilding Magazine

  • Issue 331 - June 2025
    • A More Resilient Roof
    • Tool Test: You Need a Drywall Sander
    • Ducted vs. Ductless Heat Pumps
  • Issue 330 - April/May 2025
    • Deck Details for Durability
    • FAQs on HPWHs
    • 10 Tips for a Long-Lasting Paint Job
  • Issue 329 - Feb/Mar 2025
    • Smart Foundation for a Small Addition
    • A Kominka Comes West
    • Making Small Kitchens Work
  • Issue 328 - Dec/Jan 2024
    • How a Pro Replaces Columns
    • Passive House 3.0
    • Tool Test: Compact Line Lasers
  • Issue 327 - November 2024
    • Repairing Damaged Walls and Ceilings
    • Plumbing Protection
    • Talking Shop

Fine Home Building

Newsletter Sign-up

  • Fine Homebuilding

    Home building tips, offers, and expert advice in your inbox.

  • Green Building Advisor

    Building science and energy efficiency advice, plus special offers, in your inbox.

  • Old House Journal

    Repair, renovation, and restoration tips, plus special offers, in your inbox.

Signing you up...

This site is protected by reCAPTCHA and the Google Privacy Policy and Terms of Service apply.
See all newsletters

Follow

  • Fine Homebuilding

    Dig into cutting-edge approaches and decades of proven solutions with total access to our experts and tradespeople.

    Start Free Trial Now
    • Facebook
    • Instagram
    • X
    • LinkedIn
  • GBA Prime

    Get instant access to the latest developments in green building, research, and reports from the field.

    Start Free Trial Now
    • Facebook
    • YouTube
  • Old House Journal

    Learn how to restore, repair, update, and decorate your home.

    Subscribe Now
    • Facebook
    • Instagram
    • X

Membership & Magazine

  • Online Archive
  • Start Free Trial
  • Magazine Subscription
  • Magazine Renewal
  • Gift a Subscription
  • Customer Support
  • Privacy Preferences
  • About
  • Contact
  • Advertise
  • Careers
  • Terms of Use
  • Site Map
  • Do not sell or share my information
  • Privacy Policy
  • Accessibility
  • California Privacy Rights

© 2025 Active Interest Media. All rights reserved.

Fine Homebuilding receives a commission for items purchased through links on this site, including Amazon Associates and other affiliate advertising programs.

  • Home Group
  • Antique Trader
  • Arts & Crafts Homes
  • Bank Note Reporter
  • Cabin Life
  • Cuisine at Home
  • Fine Gardening
  • Fine Woodworking
  • Green Building Advisor
  • Garden Gate
  • Horticulture
  • Keep Craft Alive
  • Log Home Living
  • Military Trader/Vehicles
  • Numismatic News
  • Numismaster
  • Old Cars Weekly
  • Old House Journal
  • Period Homes
  • Popular Woodworking
  • Script
  • ShopNotes
  • Sports Collectors Digest
  • Threads
  • Timber Home Living
  • Traditional Building
  • Woodsmith
  • World Coin News
  • Writer's Digest
Active Interest Media logo
X
X
This is a dialog window which overlays the main content of the page. The modal window is a 'site map' of the most critical areas of the site. Pressing the Escape (ESC) button will close the modal and bring you back to where you were on the page.

Main Menu

  • How-To
  • Design
  • Tools & Materials
  • Video
  • Blogs
  • Forum
  • Project Guides
  • Reader Projects
  • Magazine
  • Members
  • FHB House

Podcasts

  • FHB Podcast
  • ProTalk

Webinars

  • Upcoming and On-Demand

Podcasts

  • FHB Podcast
  • ProTalk

Webinars

  • Upcoming and On-Demand

Popular Topics

  • Kitchens
  • Business
  • Bedrooms
  • Roofs
  • Architecture and Design
  • Green Building
  • Decks
  • Framing
  • Safety
  • Remodeling
  • Bathrooms
  • Windows
  • Tilework
  • Ceilings
  • HVAC

Magazine

  • Current Issue
  • Past Issues
  • Magazine Index
  • Subscribe
  • Online Archive
  • Author Guidelines

All Access

  • Member Home
  • Start Free Trial
  • Gift Membership

Online Learning

  • Courses
  • Project Guides
  • Reader Projects
  • Podcast

More

  • FHB Ambassadors
  • FHB House
  • Customer Support

Account

  • Log In
  • Join

Newsletter

Get home building tips, offers, and expert advice in your inbox

Signing you up...

This site is protected by reCAPTCHA and the Google Privacy Policy and Terms of Service apply.
See all newsletters
See all newsletters

Follow

  • X
  • YouTube
  • instagram
  • facebook
  • pinterest
  • Tiktok

Join All Access

Become a member and get instant access to thousands of videos, how-tos, tool reviews, and design features.

Start Your Free Trial

Subscribe

FHB Magazine

Start your subscription today and save up to 70%

Subscribe

This is your last free article.

Don't miss another expert tip or technique from building pros. Start your free trial today.

Start your FREE trial

Already a member? Log in

We hope you’ve enjoyed your free articles. To keep reading, become a member today.

Get complete site access to expert advice, how-to videos, Code Check, and more, plus the print magazine.

Start your FREE trial

Already a member? Log in

Privacy Policy Update

We use cookies, pixels, script and other tracking technologies to analyze and improve our service, to improve and personalize content, and for advertising to you. We also share information about your use of our site with third-party social media, advertising and analytics partners. You can view our Privacy Policy here and our Terms of Use here.

Cookies

Analytics

These cookies help us track site metrics to improve our sites and provide a better user experience.

Advertising/Social Media

These cookies are used to serve advertisements aligned with your interests.

Essential

These cookies are required to provide basic functions like page navigation and access to secure areas of the website.

Delete My Data

Delete all cookies and associated data