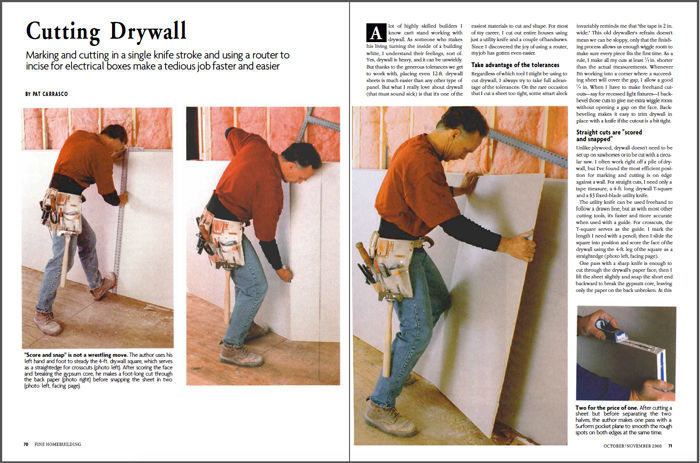
FHB Logo Facebook LinkedIn Email Pinterest Twitter X Instagram Tiktok YouTube Plus Icon Close Icon Navigation Search Icon Navigation Search Icon Arrow Down Icon Video Guide Icon Article Guide Icon Modal Close Icon Guide Search Icon Skip to content
Subscribe
Log In
  • How-To
  • Design
  • Tools & Materials
  • Restoration
  • Videos
  • Blogs
  • Forum
  • Magazine
  • Members
  • FHB House
  • Podcast
Log In
How-To

Cutting Drywall

Marking and cutting in a single knife stroke and using a router to incise for electrical boxes make a tedious job faster and easier.

By Pat Carrasco Issue 134
  • X
  • facebook
  • linkedin
  • pinterest
  • email
  • add to favorites Log in or Sign up to save your favorite articles

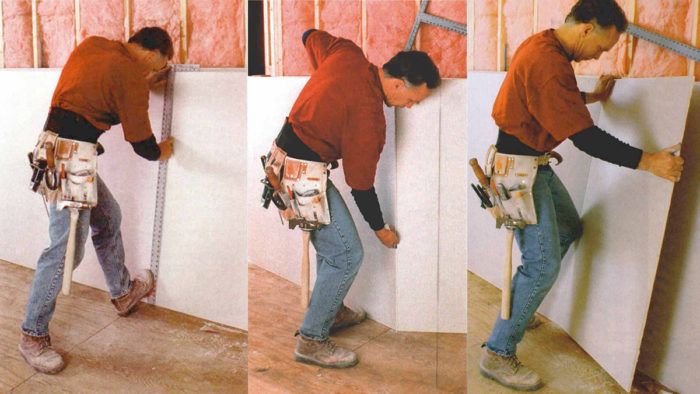
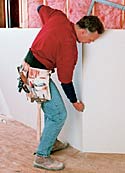
A lot of highly skilled builders I know can’t stand working with drywall. As someone who makes his living turning the inside of a building white, I understand their feelings, sort of. Yes, drywall is heavy, and it can be unwieldy. But thanks to the generous tolerances we get to work with, placing even 12-ft. drywall sheets is much easier than any other type of panel. But what I really love about drywall (that must sound sick) is that it’s one of the easiest materials to cut and shape. For most of my career, I cut out entire houses using just a utility knife and a couple of handsaws. Since I discovered the joy of using a router, my job has gotten even easier.

Take advantage of the tolerances

Regardless of which tool I might be using to cut drywall, I always try to take full advantage of the tolerances: On the rare occasion that I cut a sheet too tight, some smart aleck invariably reminds me that “the tape is 2 in. wide.” This old drywaller’s refrain doesn’t mean we can be sloppy, only that the finishing process allows us enough wiggle room to make sure every piece fits the first time. As a rule, I make all my cuts at least 1/8 in. shorter than the actual measurements. Whenever I’m working into a corner where a succeeding sheet will cover the gap, I allow a good 1/4 in. When I have to make freehand cut-outs — say for recessed light fixtures — I back-bevel those cuts to give me extra wiggle room without opening a gap on the face. Back-beveling makes it easy to trim drywall in place with a knife if the cutout is a bit tight.

Straight cuts are “scored and snapped”

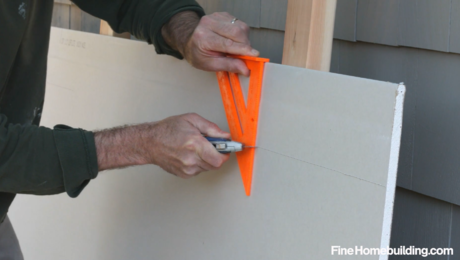
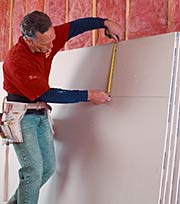
Unlike plywood, drywall doesn’t need to be set up on sawhorses or to be cut with a circular saw. I often work right off a pile of drywall, but I’ve found the most efficient position for marking and cutting is on edge against a wall. For straight cuts, I need only a tape measure, a 4-ft. long drywall T-square and a $3 fixed-blade utility knife.

Author Steadies Drywall Square
“Score and snap” is not a wrestling move. The author uses his left hand and foot to steady the 4-ft. drywall square, which serves as a straightedge for crosscuts.

Cuts through the Back Paper
After scoring the face and breaking the gypsum core, he makes a foot-long cut through the back paper.

Breaking Drywall Sheet in Two
Finally he simply applies pressure to snap the sheet in two.


Surform pocket plane smooths the rough spots
After cutting a sheet but before separating the two halves, the author makes one pass with a Surform pocket plane to smooth the rough spots on both edges at the same time.

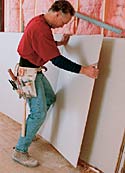
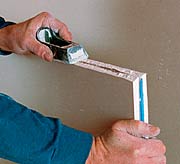
The utility knife can be used freehand to follow a drawn line, but as with most other cutting tools, it’s faster and more accurate when used with a guide. For crosscuts, the T-square serves as the guide. I mark the length I need with a pencil; then I slide the square into position and score the face of the drywall using the 4-ft. leg of the square as a straightedge.

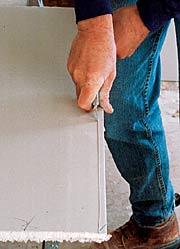
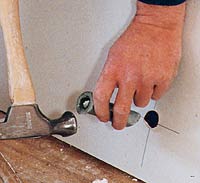
One pass with a sharp knife is enough to cut through the drywall’s paper face; then I lift the sheet slightly and snap the short end backward to break the gypsum core, leaving only the paper on the back unbroken. At this point, it’s perfectly acceptable to reach around and cut the full length of the back paper to separate the two pieces, but there is a faster way: Working from the center of the face side, I make about a foot-long cut through the back paper; then I quickly snap the short end toward me. As long as the board is reasonably dry, the two pieces will separate cleanly. Whenever I cut drywall with a knife, I always make a quick pass over the cut edges with a rasp or a Surform plane (Stanley Tools; 800-648-7654; www.stanleyworks.com) to smooth the rough spots.

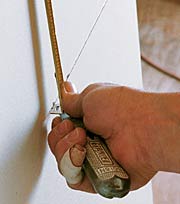
Tape measure serves as a rip guide

When I have to rip a sheet of drywall, I could measure down on both ends, snap a chalkline and cut freehand, but if I did that every time, my kids would go hungry. Professional drywallers avoid all that measuring and marking by using a tape measure as a rip guide for the knife.

Being right-handed, I grasp the tape in my left hand and the knife in my right. After jabbing my knife blade into the board at the correct width, I push the hook on the end of the tape against the knife blade (others prefer to capture the knife blade inside the hook). In my left hand, I hold the tape box with the last three fingers while pinching the tape blade between my index finger and thumb. As I’m making the cut, my index finger slides along the tapered edge of the drywall, effectively becoming a rip fence.

One common error apprentices often make is putting too much tension on the tape, which inevitably throws off the cut. I urge them to forget about the tape blade and to concentrate on moving both hands at the same speed and in the same direction (“Use the force, Luke”). When they finally relax, the tape blade gives just the subtle guidance they need to execute a perfect parallel cut. The left hand slides smoothly along the edge of the drywall, and the knife blade in the right hand gently scores the face of the panel.

Holding Tape Measure to Hook
To make his tape measure serve as a makeshift rip fence, the author pushes the hook on the end of the tape he holds in his right hand.

Measures with Tape Measure
With his left hand, he pinches the tape between his thumb and index finger; the index finger serves as the fence that runs along the factory edge of the board.

Small rips are done one-handed

Scoring backside one handed
For narrow rips, the thumb on the cutting hand serves as the rip guide. Because it’s difficult to remove a narrow piece without damage, the backside must be scored as well as the front.

The previous technique doesn’t work so well when you have to rip only an inch or less from a sheet. First, it’s difficult to get the tape, both hands and a knife into that small of a clump; second, when you try to fold the rip back, it’s so thin and fragile that it often breaks apart in your fingertips. When I have to make a narrow rip, I use my thumb as the guide instead of a tape. After embedding my knife into the drywall at the width I need, I hook my thumb over the tapered edge of the board and consciously “lock” my hand in that position; then I carefully slide my thumb along the edge of the sheet while the knife scores the face. To prevent a narrow rip such as this one from crumbling, I reach around and score the backside the same as I did the front. Then I gradually fold the rip back, working my way up and down the piece until it comes loose all at once.

Sharpness matters

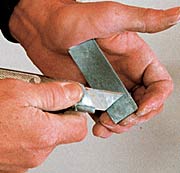
One thing all these cuts require is a sharp knife blade that scores the drywall smoothly. Besides ripping the paper and creating ragged cuts, a dull blade also tends to drift off in directions — and toward body parts — that you never intended.

The simplest solution to this problem is to throw out the blade when it gets dull; on an average workday, I can easily go through three or four blades this way. A less wasteful approach is to whet the blade on a pocket-size sharpening stone whenever it loses its edge. This method doesn’t take much time, and it can keep a blade productive for days. The slickest “sharpening” trick I ever learned, however, was when I saw a fellow worker slip his blade between a pair of trimmer studs and simply snap off the worn tip to access an undamaged portion of the blade. Obviously, this move can’t be done more than once before you have to get a new blade, but if you’re in a hurry, it can’t be beat.

Resharpening Blades
Cutting drywall wears out knife blades quickly. The standard alternative to replacing a dull blade is to resharpen it on a pocket stone.

Snap off worn blade
A more radical, faster approach is to snap off the worn end to access the unused inner part of the blade.

Nowadays, sawcuts are done with a router

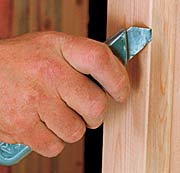
Until fairly recently, if I couldn’t make a cut with a knife, I’d use one of two handsaws. The larger of the two, what I call a “buck saw,” is the drywall equivalent of a carpenter’s rough-cut handsaw. The buck saw is used for large cuts, such as carving out doorways, windows and any large overhanging areas of excess drywall that can’t be scored and snapped off. The smaller of the two saws, which I call a “jab saw,” is basically a keyhole saw for drywall. This saw is intended for plunge-cutting electrical boxes, pipes and other small penetrations. I still keep a jab saw in my tool pouch, but these days, I mostly use it as a makeshift flat-head screwdriver when I need to open my utility knife to change the blade.

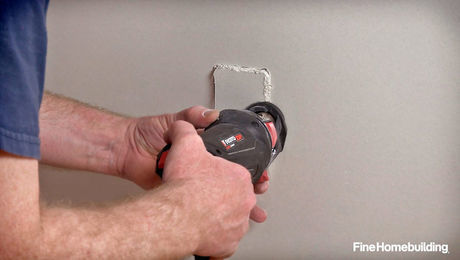
Nowadays, I use a router to make almost all the cuts that I used to make with handsaws (see Use a router to cut drywall). A router not only cuts faster than a handsaw, but it also can follow a pattern (what we call stencil routing), eliminating a great deal of measuring and marking.

Specialty routers need not apply

Router with 1/4-in. adapter chuck and a drywall bit
A 1/4-in. adapter chuck and a drywall bit are all it takes to set up a standard router for drywall.
Uses Router to cut out doorway
To cut out for doorways and electrical boxes, the author uses a piloted bit, which spins alongside the underlying surface without damage or binding.

Routers have become so popular for drywall applications that some power-tool manufacturers now offer drywall-specific models. These tools are not mandatory. The router I’ve been using for years is a homeowner-grade Black & Decker that I picked up used for $25. To outfit a standard router for drywall, all you need is an adapter chuck and a 1/8-in. drywall bit; the piloted version is best (RotoZip; 877-768-6947; www.rotozip.com) is best. Years ago, when drywall bits were hard to find in supply stores, we’d sometimes make do with a drill bit instead. Drill bits will work for drywall, but they tend to clog with gypsum and lose their edge much sooner than drywall bits.

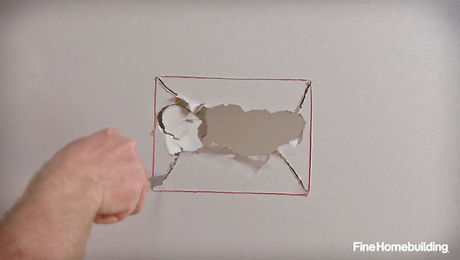
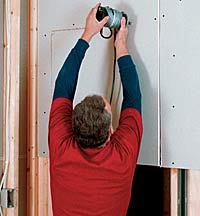
Although I can make freehand cuts much faster with my router than I can with handsaws, stencil cutting is where the router really shines. Cutting a door opening after the drywall has been applied is a basic example of stencil routing. To avoid kickbacks and ragged cuts, doorways, medicine cabinets and other objects that are cut on the inside require a clockwise movement around the opening. Objects such as electrical boxes that are cut on the outside require a counterclockwise movement.

Their ability to cut out electrical boxes after drywall has been applied is the reason routers first appeared on drywall jobs, and that application remains their best use. In a way, it’s kind of sad; old-timers like me used to pride ourselves on how quickly and accurately we could measure and cut our boxes. Now I just cover them over. Before I rout the boxes, however, I use only enough screws to keep the drywall from moving, and I place the screws well away from the boxes.

Cuts out electrical box
Rather than measuring, marking and sawing, a router makes errorproof cutouts after the board is in place. Predrawn arrows on the floor designate the center of each electrical box.

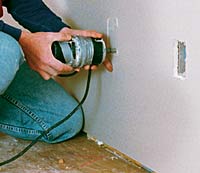
Prior to hanging the board, I use a crayon to mark the centers of the electrical boxes on the floor; then I eyeball the center of the box and plunge in. I move the bit sideways until it contacts the inside edge of the box; then I carefully leapfrog the box to place the bit against its outside edge. Now it’s just a simple matter of traveling along counterclockwise using the outside edge of the electrical box as a stencil to guide the router bit. Once I’ve cut out for all the electrical boxes in a sheet of drywall, I push the sheet tightly against the studs, then drive home the remaining fasteners.

Stencil routing also works as a joinery technique. Sometimes I need to trim an eighth or a quarter of an inch off a sheet of drywall to make it fit flush with an adjoining sheet. Rather than taking the time to trim the sheet with a knife, I can let the new sheet overlap its neighbor and quickly rout away the excess using the underlying sheet as the stencil.

Use router to trim sheet
As an alternative to cutting a small rip, a sheet that’s too large for its intended space is allowed to lap over the adjacent sheet and trimmed using its underlying neighbor as a stencil.

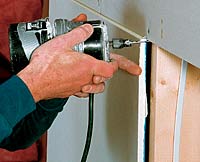
Here’s an example: Once I was drywalling some apartments that had a double layer of 5/8-in. drywall on the ceilings. The extra-thick ceiling brought the distance between the floor and the ceiling down to 95-3/4 in. Rather than cut 1/2 in. off every bottom sheet, I set each one on the floor. Then I put a couple of screws in each sheet to keep it steady and routed off the overlap using the bottom edge of the top sheet as the stencil.

Drywall makes for a much softer stencil than plastic or wood, so this back-routing technique can be tricky. To keep the bit from biting into the stencil, I have to reverse cutting direction and move the router more quickly than I would for other stencil cuts.

For other tips that speed the work, see A bunch of cool drywall tricks.

A bunch of cool drywall tricks

In any trade, it’s often the little things that make the difference between efficient production and grinding misery.

Using a pencil and a drywall nail as a compass
Rotating a pencil around a drywall nail that’s gripped between thumb and forefinger works like a compass for drawing large circular cutouts.

Tearing off end papers
Before starting work on a pile of drywall, tear off all the end papers, tie them together and dispose of them.

Trimming edges
To make butt seams as flat as possible, both edges are trimmed back on a slight bevel to remove loose paper before the drywall is installed.

Punching holes for plumbing
Once their centers are laid out, plumbing supply lines and other small protrusions are quickly punched out with a scrap of 3/4-in. conduit.

Pat Carrasco is a drywall hanger and freelance writer in Bozeman, MT.

Photos: Tom O’Brien

Cutting Drywall PDF Thumbnail


For more photos, drawings, and details, click the View PDF button below:

Sign up for eletters today and get the latest how-to from Fine Homebuilding, plus special offers.

Signing you up...

This site is protected by reCAPTCHA and the Google Privacy Policy and Terms of Service apply.
See all newsletters
See all newsletters
×

Get home building tips, offers, and expert advice in your inbox

Signing you up...

This site is protected by reCAPTCHA and the Google Privacy Policy and Terms of Service apply.
See all newsletters
See all newsletters
View PDF

New Feature

Fine Homebuilding Forums

Ask questions, offer advice, and share your work

  • X
  • facebook
  • linkedin
  • pinterest
  • email
  • add to favorites Log in or Sign up to save your favorite articles

Log in or create an account to post a comment.

Sign up Log in

Become a member and get full access to FineHomebuilding.com

Up Next

Video Shorts

Featured Story

The Trump Administration Wants to Eliminate the Energy Star Program

The end of this program will likely lead to higher energy bills and fewer business opportunities for the American people.

Featured Video

Builder’s Advocate: An Interview With Viewrail

Learn more about affordable, modern floating stairs, from design to manufacturing to installation.

Related Stories

  • Original Woodwork in Old Houses
  • Installing Wainscots
  • FHB Podcast Segment: Building a Paintable Surface Over a Traditional Stone Wall
  • A Barber Queen Anne Victorian

Discussion Forum

Recent Posts and Replies

  • |
  • |
  • |
  • |
  • |
  • |
View More Create Post

Highlights

Fine Homebuilding All Access
Fine Homebuilding Podcast
Tool Tech
Plus, get an extra 20% off with code GIFT20

Video

View All Videos
  • FHB Podcast Segment: Building a Paintable Surface Over a Traditional Stone Wall
  • Cutting Narrow Strips of Drywall
  • How to Patch a Large Hole in Drywall
  • How to Use a Drywall Router
View All

Interior Wall Finish

View All Interior Wall Finish Articles
  • Original Woodwork in Old Houses
  • Installing Wainscots
  • FHB Podcast Segment: Building a Paintable Surface Over a Traditional Stone Wall
View All Interior Wall Finish Articles

Fine Homebuilding Magazine

  • Issue 331 - June 2025
    • A More Resilient Roof
    • Tool Test: You Need a Drywall Sander
    • Ducted vs. Ductless Heat Pumps
  • Issue 330 - April/May 2025
    • Deck Details for Durability
    • FAQs on HPWHs
    • 10 Tips for a Long-Lasting Paint Job
  • Issue 329 - Feb/Mar 2025
    • Smart Foundation for a Small Addition
    • A Kominka Comes West
    • Making Small Kitchens Work
  • Issue 328 - Dec/Jan 2024
    • How a Pro Replaces Columns
    • Passive House 3.0
    • Tool Test: Compact Line Lasers
  • Issue 327 - November 2024
    • Repairing Damaged Walls and Ceilings
    • Plumbing Protection
    • Talking Shop

Fine Home Building

Newsletter Sign-up

  • Fine Homebuilding

    Home building tips, offers, and expert advice in your inbox.

  • Green Building Advisor

    Building science and energy efficiency advice, plus special offers, in your inbox.

  • Old House Journal

    Repair, renovation, and restoration tips, plus special offers, in your inbox.

Signing you up...

This site is protected by reCAPTCHA and the Google Privacy Policy and Terms of Service apply.
See all newsletters

Follow

  • Fine Homebuilding

    Dig into cutting-edge approaches and decades of proven solutions with total access to our experts and tradespeople.

    Start Free Trial Now
    • Facebook
    • Instagram
    • X
    • LinkedIn
  • GBA Prime

    Get instant access to the latest developments in green building, research, and reports from the field.

    Start Free Trial Now
    • Facebook
    • YouTube
  • Old House Journal

    Learn how to restore, repair, update, and decorate your home.

    Subscribe Now
    • Facebook
    • Instagram
    • X

Membership & Magazine

  • Online Archive
  • Start Free Trial
  • Magazine Subscription
  • Magazine Renewal
  • Gift a Subscription
  • Customer Support
  • Privacy Preferences
  • About
  • Contact
  • Advertise
  • Careers
  • Terms of Use
  • Site Map
  • Do not sell or share my information
  • Privacy Policy
  • Accessibility
  • California Privacy Rights

© 2025 Active Interest Media. All rights reserved.

Fine Homebuilding receives a commission for items purchased through links on this site, including Amazon Associates and other affiliate advertising programs.

  • Home Group
  • Antique Trader
  • Arts & Crafts Homes
  • Bank Note Reporter
  • Cabin Life
  • Cuisine at Home
  • Fine Gardening
  • Fine Woodworking
  • Green Building Advisor
  • Garden Gate
  • Horticulture
  • Keep Craft Alive
  • Log Home Living
  • Military Trader/Vehicles
  • Numismatic News
  • Numismaster
  • Old Cars Weekly
  • Old House Journal
  • Period Homes
  • Popular Woodworking
  • Script
  • ShopNotes
  • Sports Collectors Digest
  • Threads
  • Timber Home Living
  • Traditional Building
  • Woodsmith
  • World Coin News
  • Writer's Digest
Active Interest Media logo
X
X
This is a dialog window which overlays the main content of the page. The modal window is a 'site map' of the most critical areas of the site. Pressing the Escape (ESC) button will close the modal and bring you back to where you were on the page.

Main Menu

  • How-To
  • Design
  • Tools & Materials
  • Video
  • Blogs
  • Forum
  • Project Guides
  • Reader Projects
  • Magazine
  • Members
  • FHB House

Podcasts

  • FHB Podcast
  • ProTalk

Webinars

  • Upcoming and On-Demand

Podcasts

  • FHB Podcast
  • ProTalk

Webinars

  • Upcoming and On-Demand

Popular Topics

  • Kitchens
  • Business
  • Bedrooms
  • Roofs
  • Architecture and Design
  • Green Building
  • Decks
  • Framing
  • Safety
  • Remodeling
  • Bathrooms
  • Windows
  • Tilework
  • Ceilings
  • HVAC

Magazine

  • Current Issue
  • Past Issues
  • Magazine Index
  • Subscribe
  • Online Archive
  • Author Guidelines

All Access

  • Member Home
  • Start Free Trial
  • Gift Membership

Online Learning

  • Courses
  • Project Guides
  • Reader Projects
  • Podcast

More

  • FHB Ambassadors
  • FHB House
  • Customer Support

Account

  • Log In
  • Join

Newsletter

Get home building tips, offers, and expert advice in your inbox

Signing you up...

This site is protected by reCAPTCHA and the Google Privacy Policy and Terms of Service apply.
See all newsletters
See all newsletters

Follow

  • X
  • YouTube
  • instagram
  • facebook
  • pinterest
  • Tiktok

Join All Access

Become a member and get instant access to thousands of videos, how-tos, tool reviews, and design features.

Start Your Free Trial

Subscribe

FHB Magazine

Start your subscription today and save up to 70%

Subscribe

We hope you’ve enjoyed your free articles. To keep reading, become a member today.

Get complete site access to expert advice, how-to videos, Code Check, and more, plus the print magazine.

Start your FREE trial

Already a member? Log in

Privacy Policy Update

We use cookies, pixels, script and other tracking technologies to analyze and improve our service, to improve and personalize content, and for advertising to you. We also share information about your use of our site with third-party social media, advertising and analytics partners. You can view our Privacy Policy here and our Terms of Use here.

Cookies

Analytics

These cookies help us track site metrics to improve our sites and provide a better user experience.

Advertising/Social Media

These cookies are used to serve advertisements aligned with your interests.

Essential

These cookies are required to provide basic functions like page navigation and access to secure areas of the website.

Delete My Data

Delete all cookies and associated data