
Master Class in Moldings
Learn the profiles and proper proportions of baseboard, crown, and casing in this illustrated guide from architectural designer Marianne Cusato.
Have you ever flipped (or scrolled) through the pages of a molding catalog and been overwhelmed by the options? If so, you are not alone. And while you may be daunted by the number of options, the fact is that typically only the smallest percentage, sometimes only a dozen or so out of hundreds of profiles, are architecturally correct. Historically, the purpose of a molding was to cover joints and transitions between materials. Over time, the functional needs evolved to become decorative and adapted to different architectural styles and periods, which has only added to the variables. Yet, with a basic understanding of the building blocks that make up molding profiles and their uses, you’ll be able to navigate catalogs and lumber yards and select moldings to compose trim packages for any home.
Building Blocks
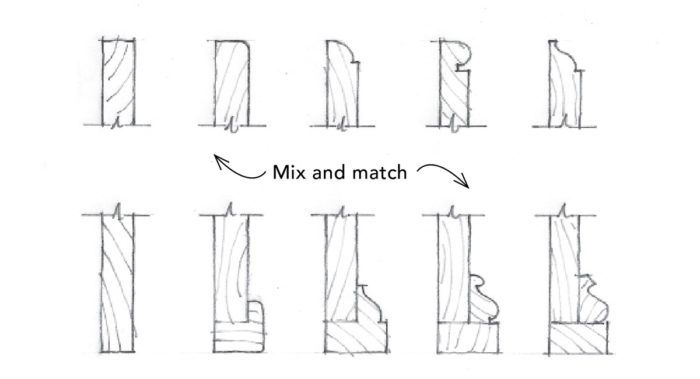
While at a glance, moldings may appear to be a random combination of profiles—and unfortunately, in many modern applications, they are in fact no more than a mishmash of curves—even the most complex molding designs can be broken down into four simple building blocks.
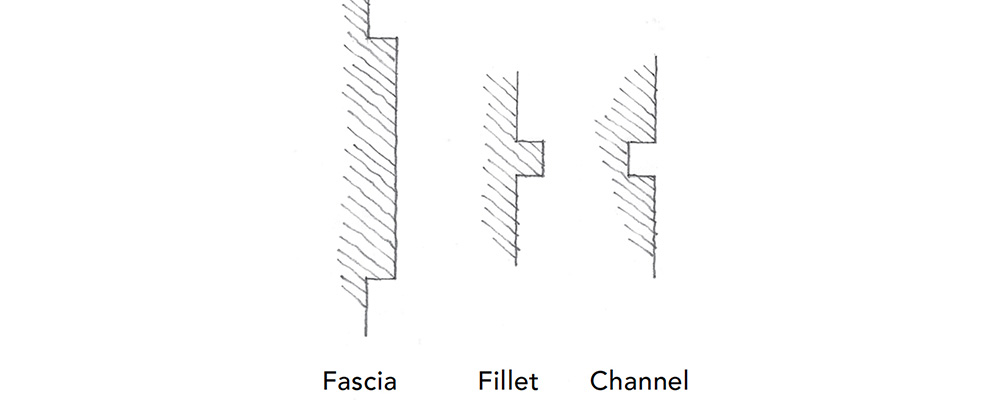
1. Flat moldings
Flat moldings can be projecting, as in the fascia and fillet, or recessed, as in the channel.
2. Curved moldings
Simple curved moldings may be concave, as in the cavetto (also known as a cove) and the scotia, or they may be convex, as in the ovolo (also known as a quarter round) and torus.

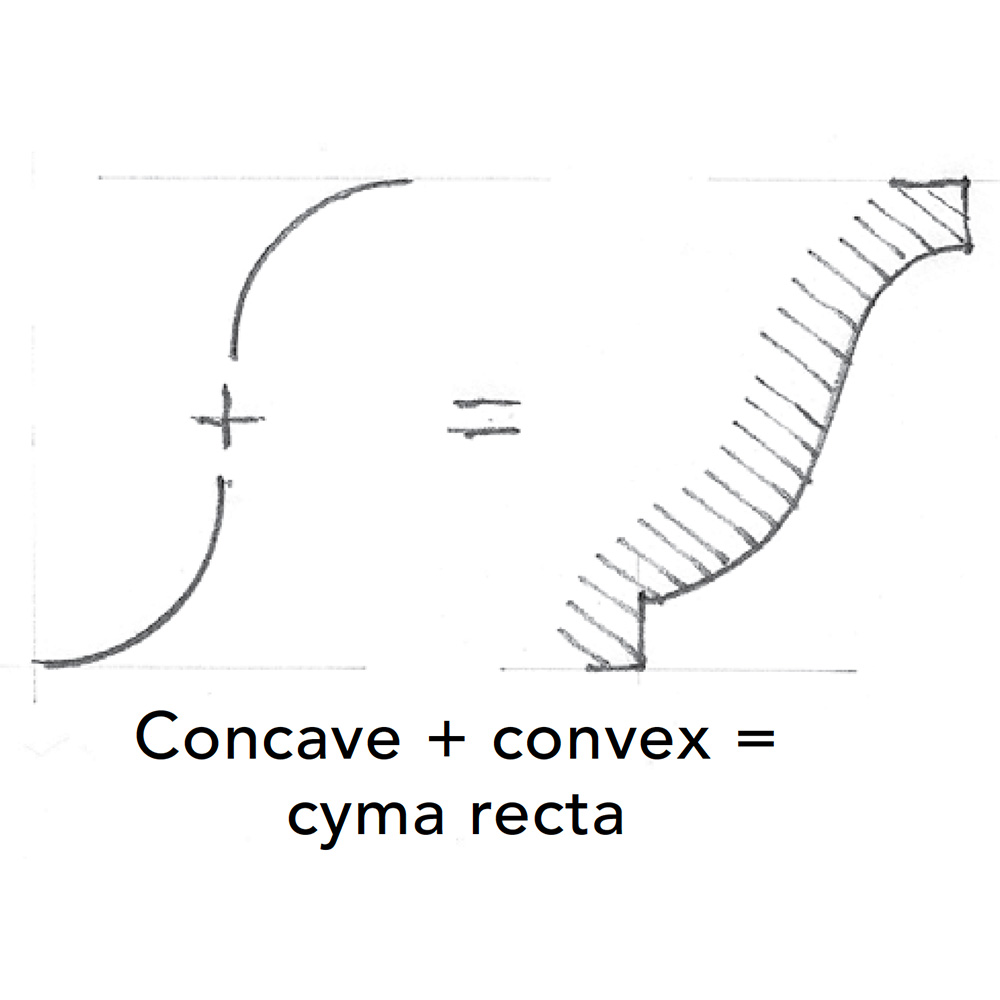
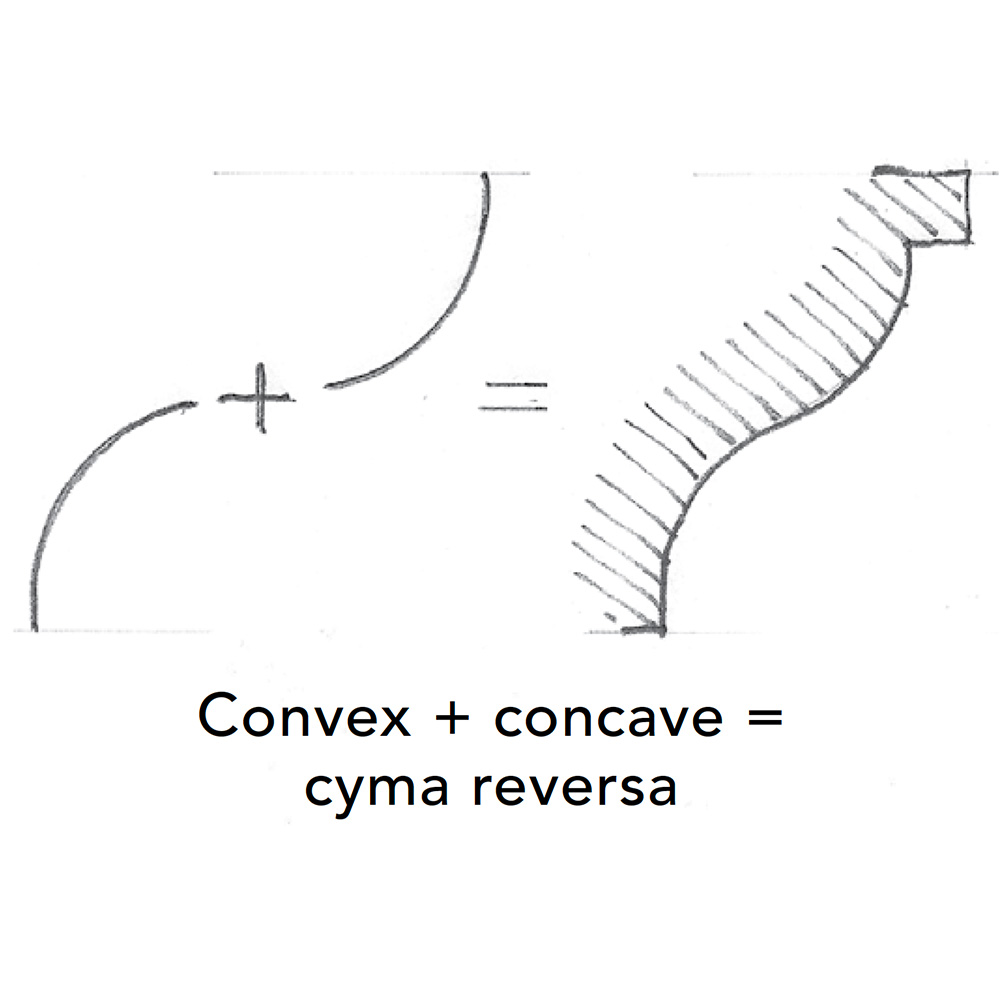
3. Compound moldings
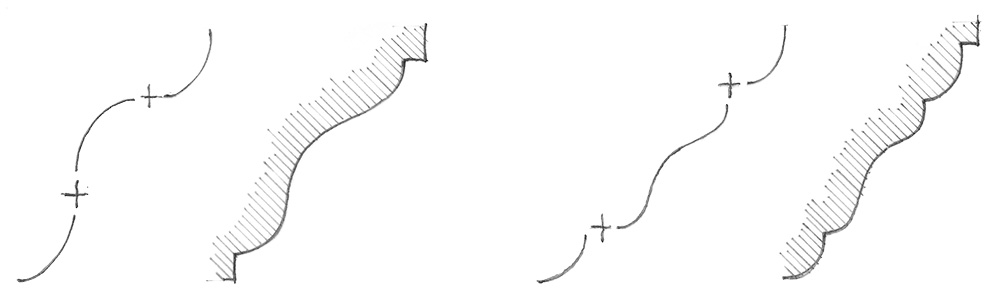
Compound moldings are made of simple curved moldings added together in a continuous line. This is illustrated by the cyma recta and cyma reversa, in which concave and convex curves seamlessly meet to form shapes that give the appearance of a wave.
 |
 |
4. Combined moldings
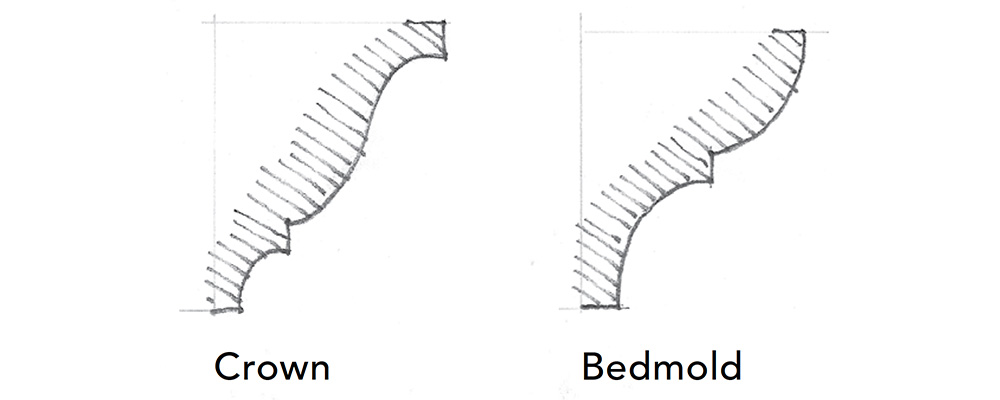
Combined moldings are made of several simple or compound moldings added together and separated by fillets. examples include crown molding (a cyma recta supported by a cove) and bedmold (an ovolo over a cove).
Avoid these compound and combined moldings
 Most profiles in molding catalogs fail because they incoherently link together the simple building blocks. Examples to avoid include linking more than two simple curves together into a compound molding and combined moldings without fillets. |
Categories
The building blocks generate moldings of all shapes and sizes that can be assembled in an infinite number of configurations for uses on nearly every surface of a home, both inside and out. Yet, despite the endless variables, molding profiles can be broken down into four primary categories defined by the job the molding is performing. These categories are terminating, supporting, separating, and translating.
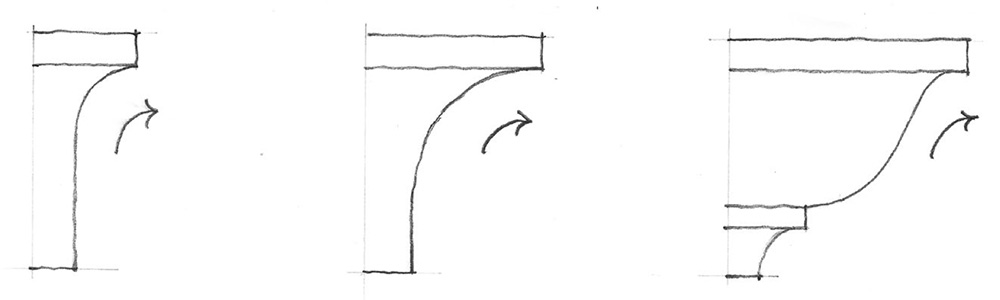
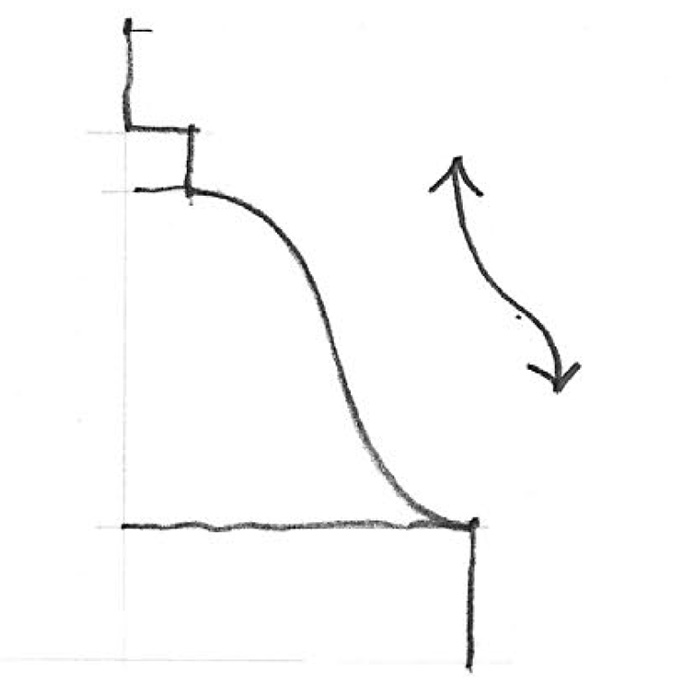
1. Terminating moldings
The most common terminating moldings are cyma recta (crown) moldings and cove moldings. Terminating moldings are identified by an outward emphasis at the top of the profile—the top of the molding is pointing away from the wall or design element. They are only used at the top of a composition. Terminating moldings evolved from the nonstructural elements of classical temples, such as the gutter at the top of the cornice. This historical context is important, because one of the most common mistakes in the application of terminating moldings is using them in supporting positions (see “In Practice,” below)…
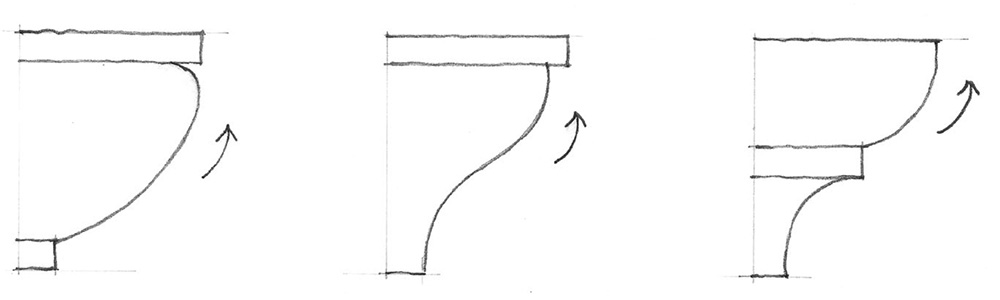
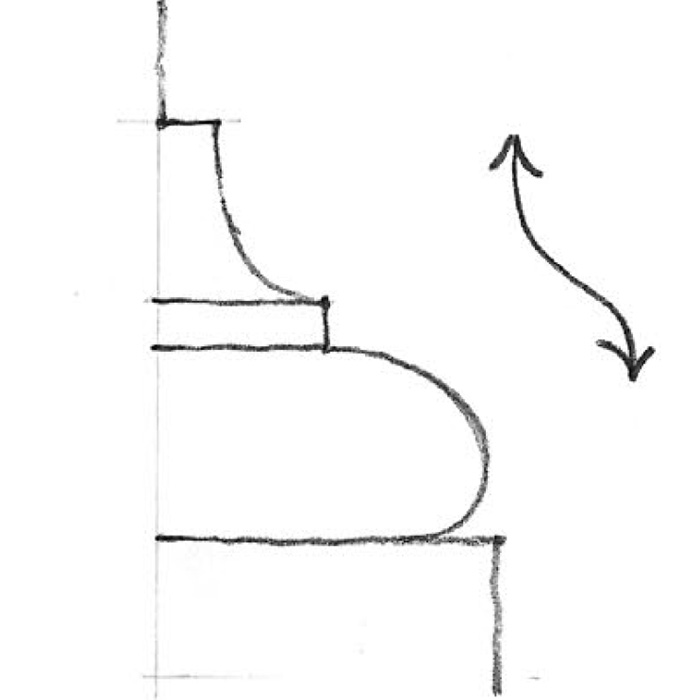
2. Supporting moldings
The most common supporting moldings are bedmolds and cyma reversa moldings. Supporting moldings also evolved from the structural elements of classical temples, specifically the plate, which transitions the ceiling joists to the roof rafters. This historical context is important to remember because bedmolds are often incorrectly replaced with cyma recta moldings within a composition of an eave or porch cornice. This mistake often happens because there may not be a bedmold profile large enough for the design.
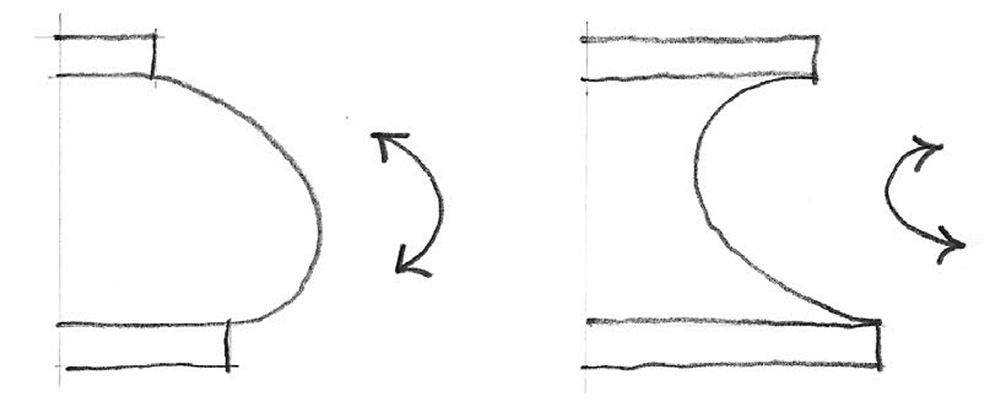
3. Translating moldings
Translating moldings transition between two planes. They operate in the opposite direction as terminating and supporting moldings. Rather than transitioning away or up from the element, translating moldings transition toward the element. In classical temples, translating moldings are most commonly found on the bases of plinth blocks under columns. Today, they are typically found in baseboard and casing.
 |
 |
 |
4. Separating moldings
Separating moldings are the U-turns of molding profiles. Whether convex or concave, the top and bottom of these moldings point in the same direction. Separating moldings may be true half-circles or portions of an ellipse. They are commonly found in column bases.
In Practice
Don’t use terminating moldings in supporting positions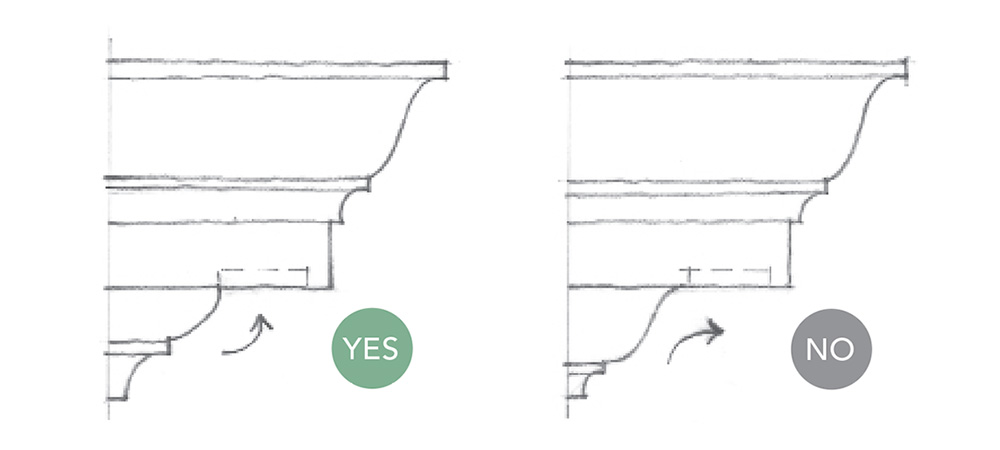
Baseboard
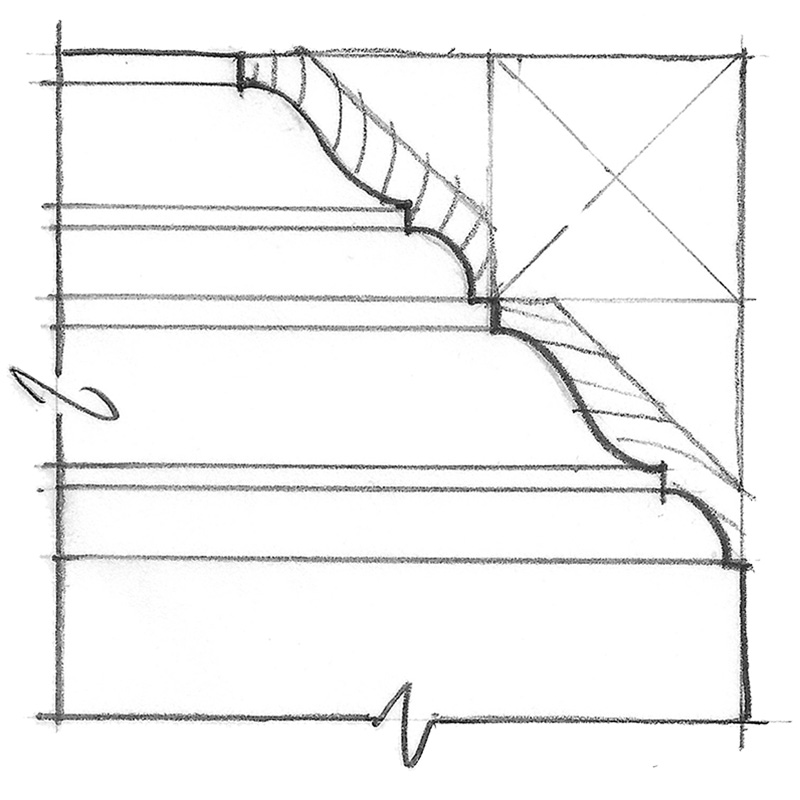
Baseboards cover the transition between the flooring and the walls. The base cap is a translating molding, or a molding that shifts between two planes—in this case, the flat top edge of the baseboard and the wall. The baseboard does not need a base cap; if stock profiles are limited or you want a more streamlined look, use a flat-stock molding throughout the house. If you are adding profiles to your flat stock, consider these rules.
Base cap options start with flat stock
A simple ogee profile keeps the clean lines of the square top but dresses up the look and minimizes surface area for dust to collect. Nose and cove profiles are a combination of a cove molding separated from a half-round profile by a fillet. Often the profiles are elongated and elliptical. When choosing a nose and cove, look for a clearly defined fillet and ideally a cove larger than the nose. Beaded caps may be either rounded or pointed with an ogee. In these designs, make sure the transitions between profiles are clearly defined.
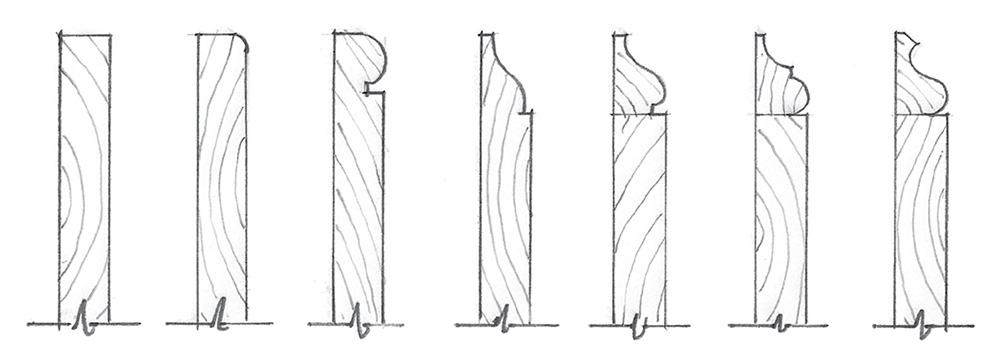
Avoid at all costs
 Often stock baseboard options are not available with an appropriate cap, ideally one-fifth the overall height. Try to avoid baseboards with caps over one-quarter of the overall height. Avoid bases without flats; seek defined edges. Avoid curves on curves, and avoid clamshells. |
In Practice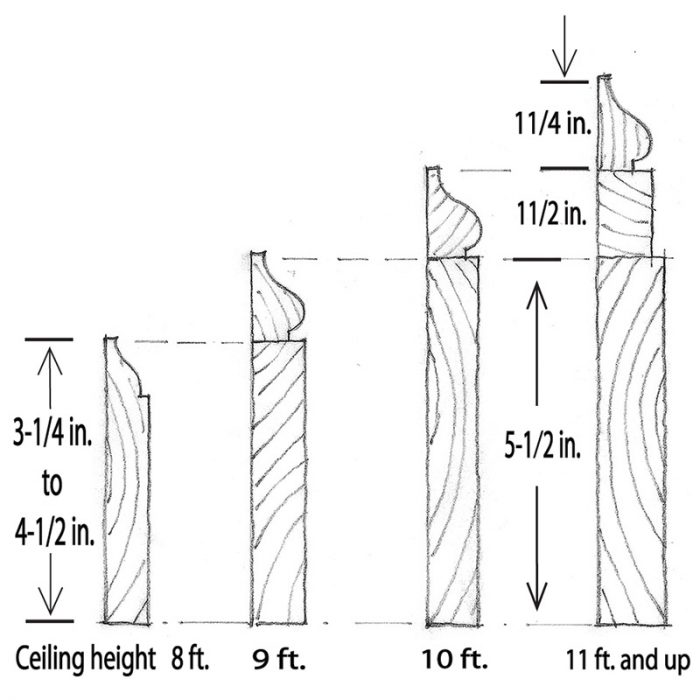

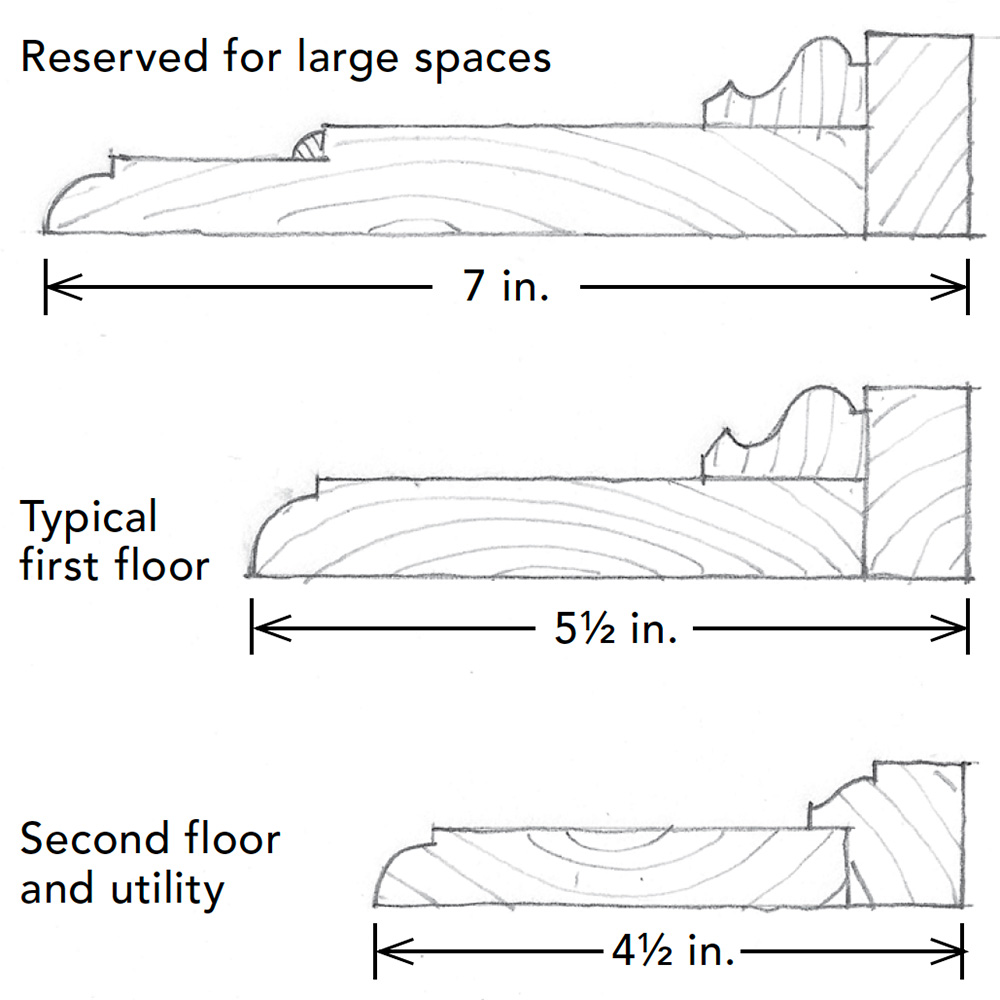
One size doesn’t fit all
The height of the baseboard will depend on both the ceiling height and location in the home. Larger and more important public rooms of a home support larger moldings, while short moldings work best in smaller, secondary rooms. 5-1 ⁄ 2 in. is a common starting point for baseboard. If you have 11-ft. or taller ceilings, add height with a small intermediate block (1-1 ⁄ 4 in. to 1-3 ⁄ 4 in.). This design might also be reserved for the great room in a house with a 10-ft. ceiling. When you make the base shorter for other rooms in the house, set the overall height to match the flat of the taller bases, maintaining the same profiles. This helps to unify elements of different scale, tying the overall composition of a home together.
Crown
While crown moldings are technically in a supporting position holding up the ceiling, because they are located at the top of the interior walls, they have evolved over time to be terminating moldings. Before selecting a crown molding, ask yourself if this is an element that you really need in the house. Unlike baseboard and casing, which bridge between different materials, the walls and the ceiling are typically the same material, so a connection for practical reasons is not necessary. Crown moldings are generally an aesthetic element.
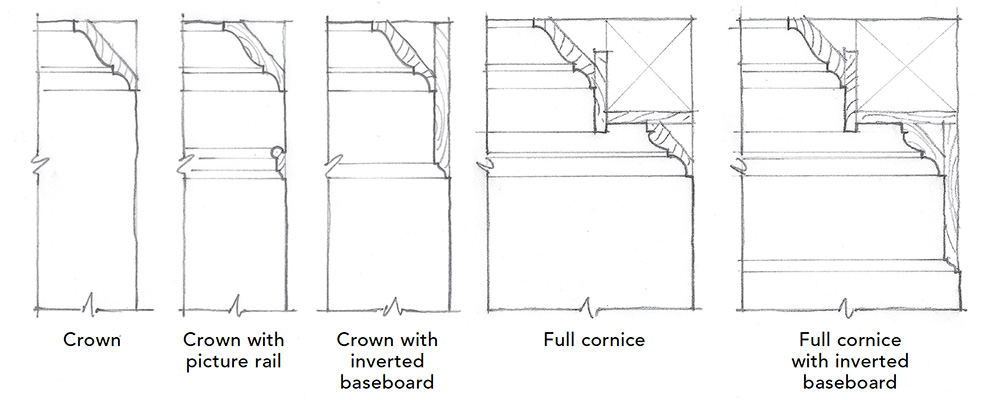
Keep crown simple
The size of the crown is not set in relation to the height of the room. The crown itself is roughly the same size regardless of ceiling height. Additional trim elements are added to make a cornice, and the cornice size relates to the ceiling height. This is an important distinction because one of the most common mistakes is to select a crown molding that overpowers the rest of the room. The simplest method for adding height to a crown is to install a picture rail about 6 in. below the crown, then paint the wall between the crown and the picture rail to match the trim color. This visually elongates the cornice. Another option is to overlap the crown onto an inverted ogee baseboard. This will extend the crown without overpowering the room.
Crown mistakesTo increase the impact of the crown in your room, add height and detail rather than just making it big.
|
Give beams support
While the interior crown is typically a terminating molding, when designing a box-beam ceiling, you will want to use a supporting molding like bedmold, since a beam represents a structural element (even when purely aesthetic).
In Practice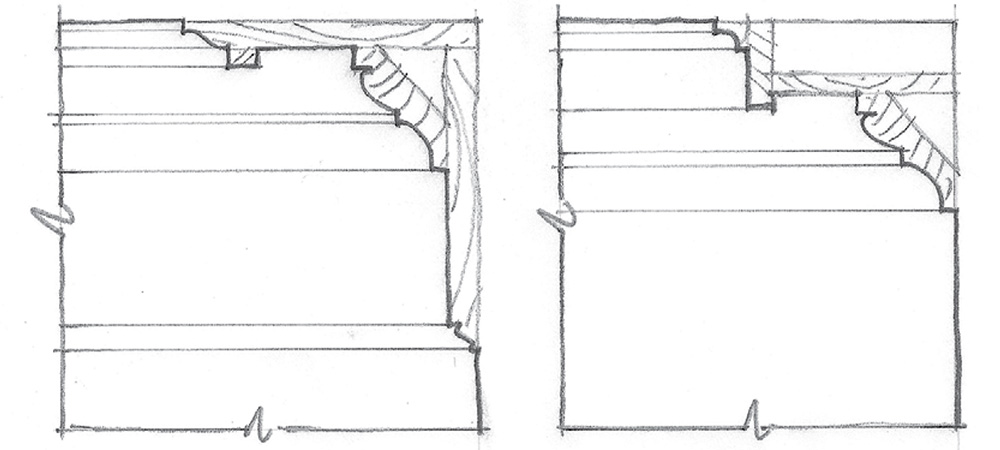
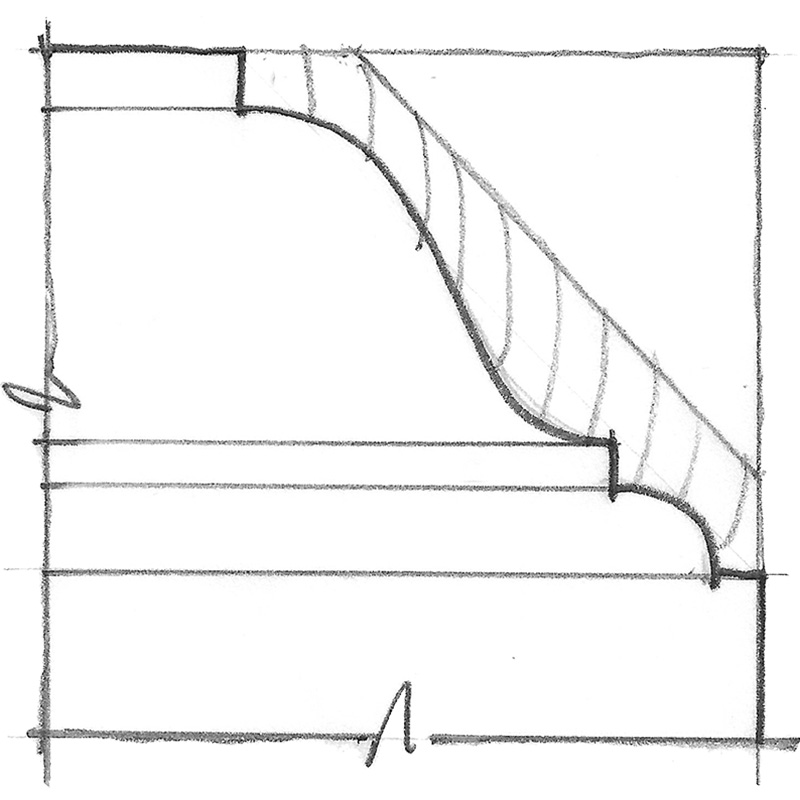
Reduced cornices
A cornice is the top element of an entablature, which also includes a frieze and architrave. The cornice includes a cyma recta, corona, and bedmold. The crown is the top element of a cornice. Today we rarely install a full entablature, or even a full cornice, but the dimensions and proportional systems of the crowns we use find their origins in these traditional elements. An appropriate alternative is to use a reduced stylized cornice. That includes a cyma recta, corona, and bedmold, but in reduced proportions.
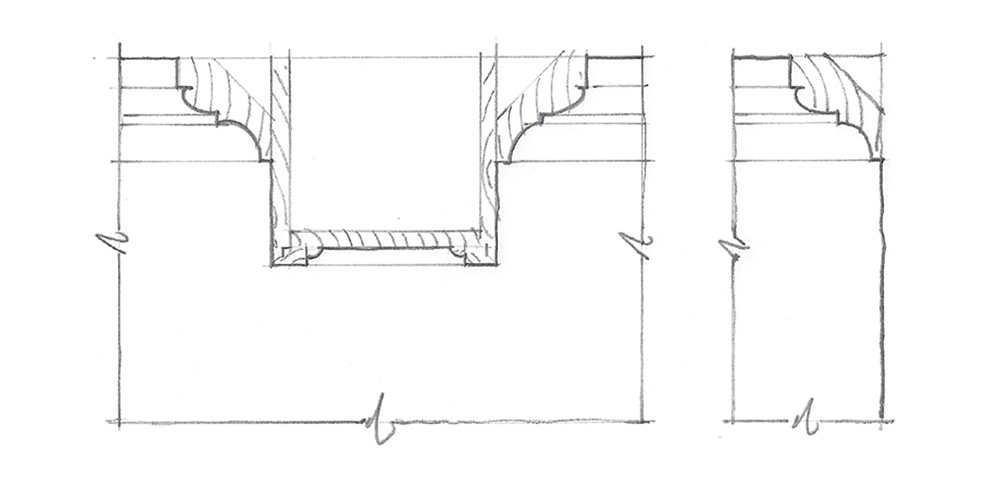
Window and door casings
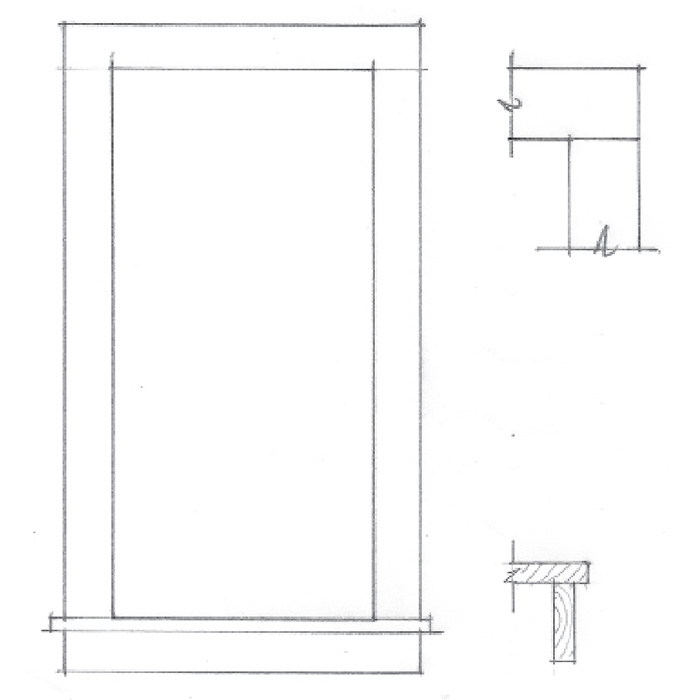
Window and door casings follow many of the same rules of thumb as baseboard. The building blocks of casing are a flat-stock member with detail added in two areas: the backband and the transition to the jamb.
Backband and transition
A good place to start with casing is with a 3-1 ⁄ 2-in. or 5-1 ⁄ 2-in. flat stock. If you choose to use a backband, it should share the same profile as your base cap, and you can add transitions for style. Depending on the size of your home, you may choose to add a hierarchy between the casings in different locations throughout the house. For major rooms, you can add a step in the flat of the casing, making sure that the side closest to the backband is clearly larger than the one closest to the jamb. The alignment between casings in different parts of the home is less pronounced than between baseboards. Nonetheless, as you diminish in scale, seek opportunities to unify the designs through the individual elements and dimensions.
 |
 |
Casings to avoid
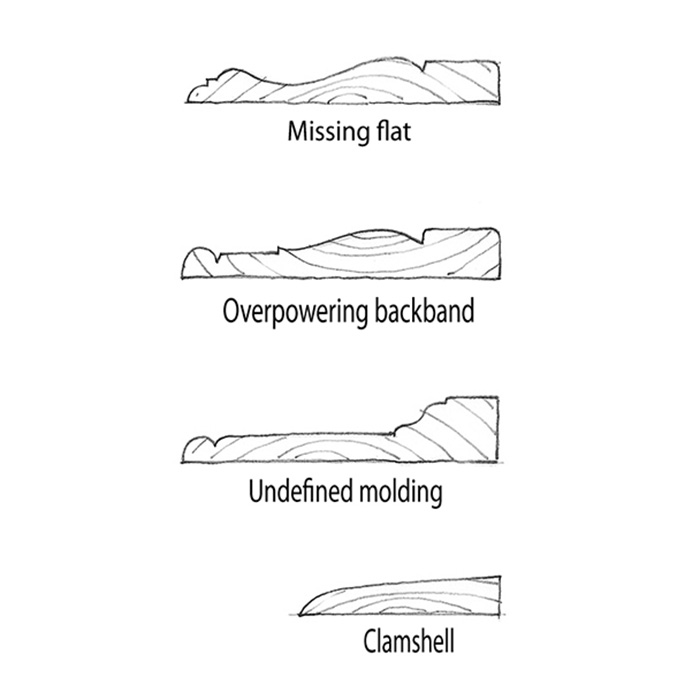 When selecting a casing profile, look for the flat. Many stock casing profiles eliminate the flat, replacing it with a shallow ogee molding. Avoid these options. Additionally, avoid an overpowering backband. It’s not typically possible to purchase a one-piece casing with a correctly proportioned backband. If you want to purchase a one-piece casing, try to find one where the backband is not more than one-quarter of the overall dimension. Avoid melted moldings—those without clearly defined profiles. Many casings are simply a mashup of curves without purpose or definition. Finally, avoid clamshells. |
In Practice
Casing installations
 |
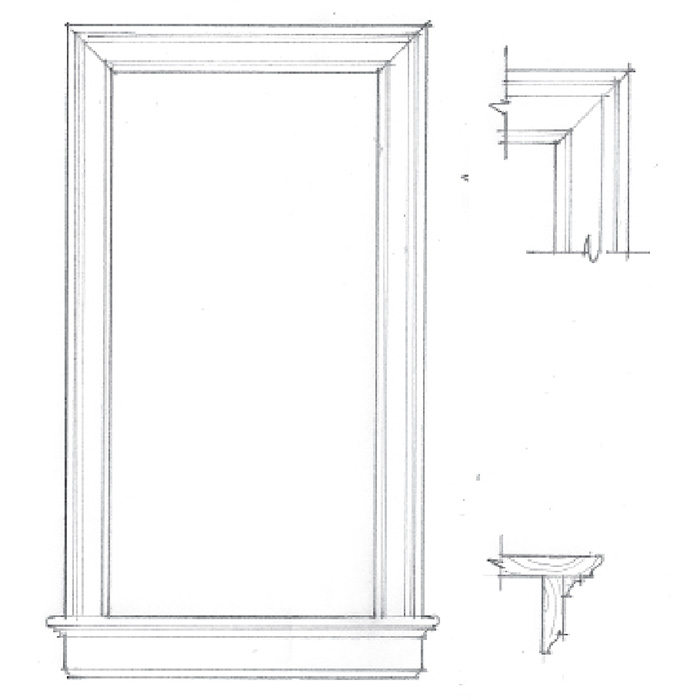 |
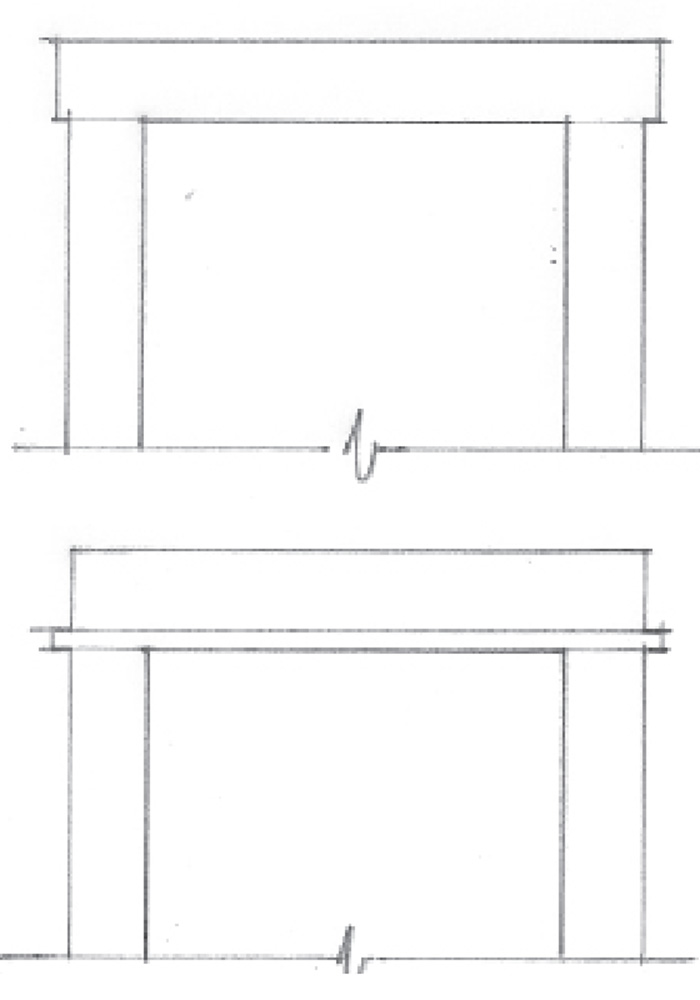 |
Avoid picture framesAvoid casing windows with four mitered corners and no stool. Without the stool, the window looks ungrounded in the wall. 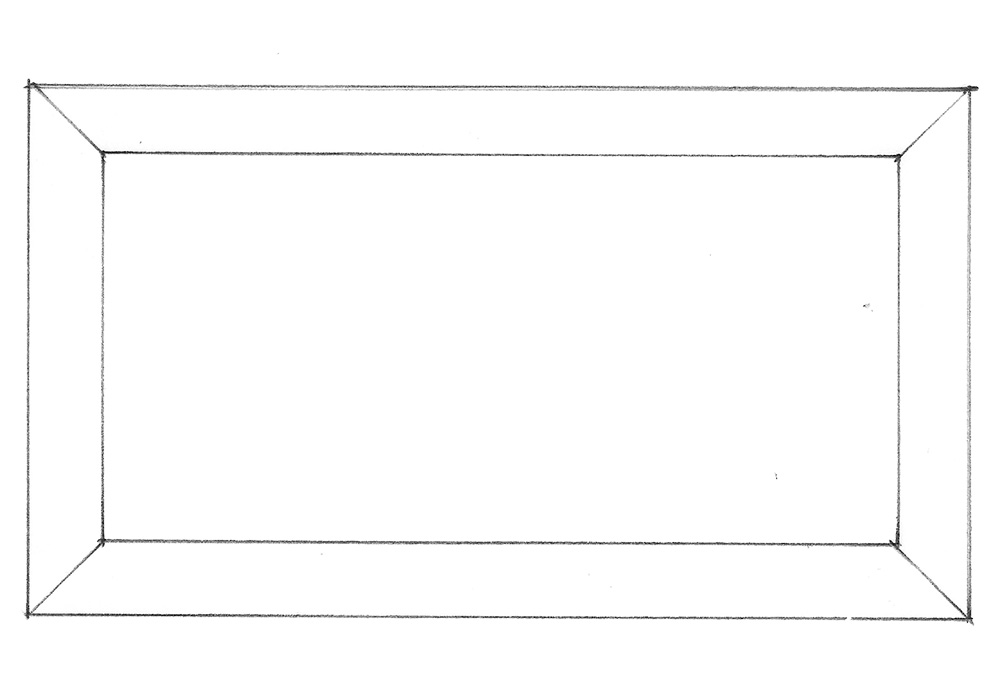 |
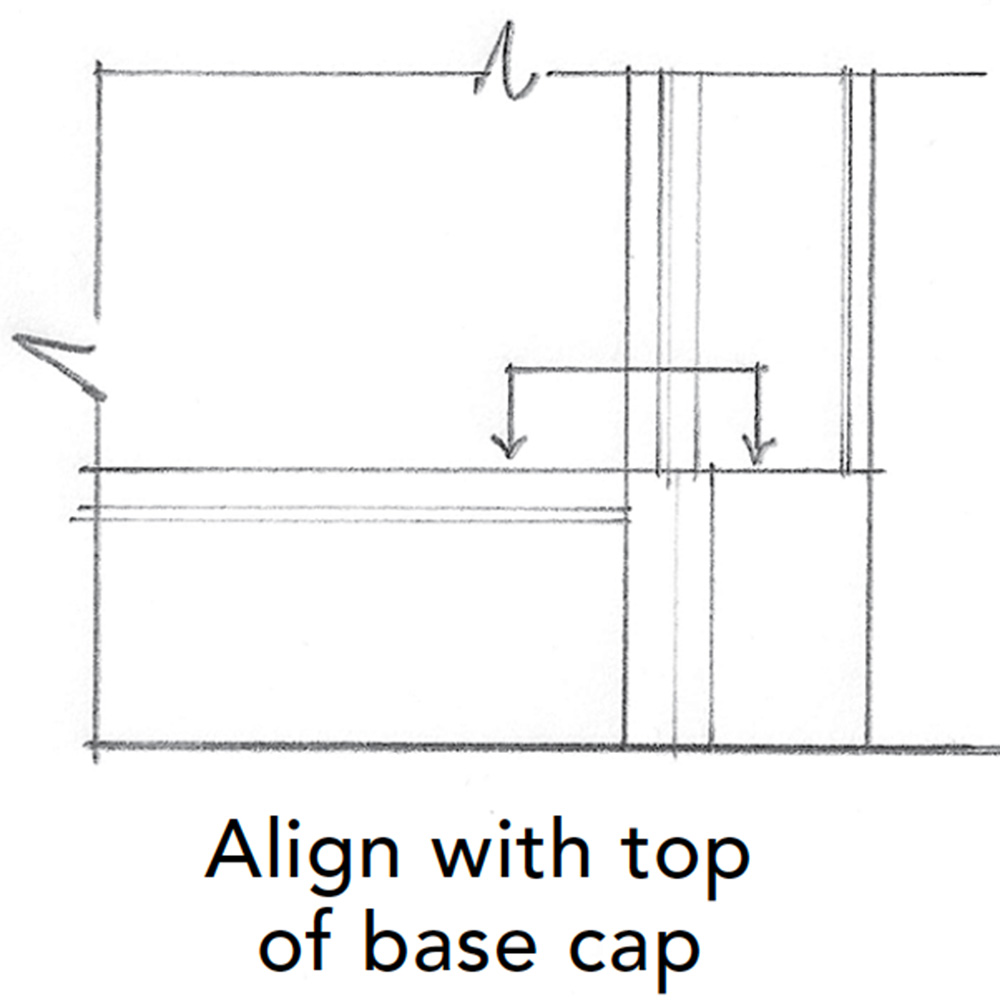
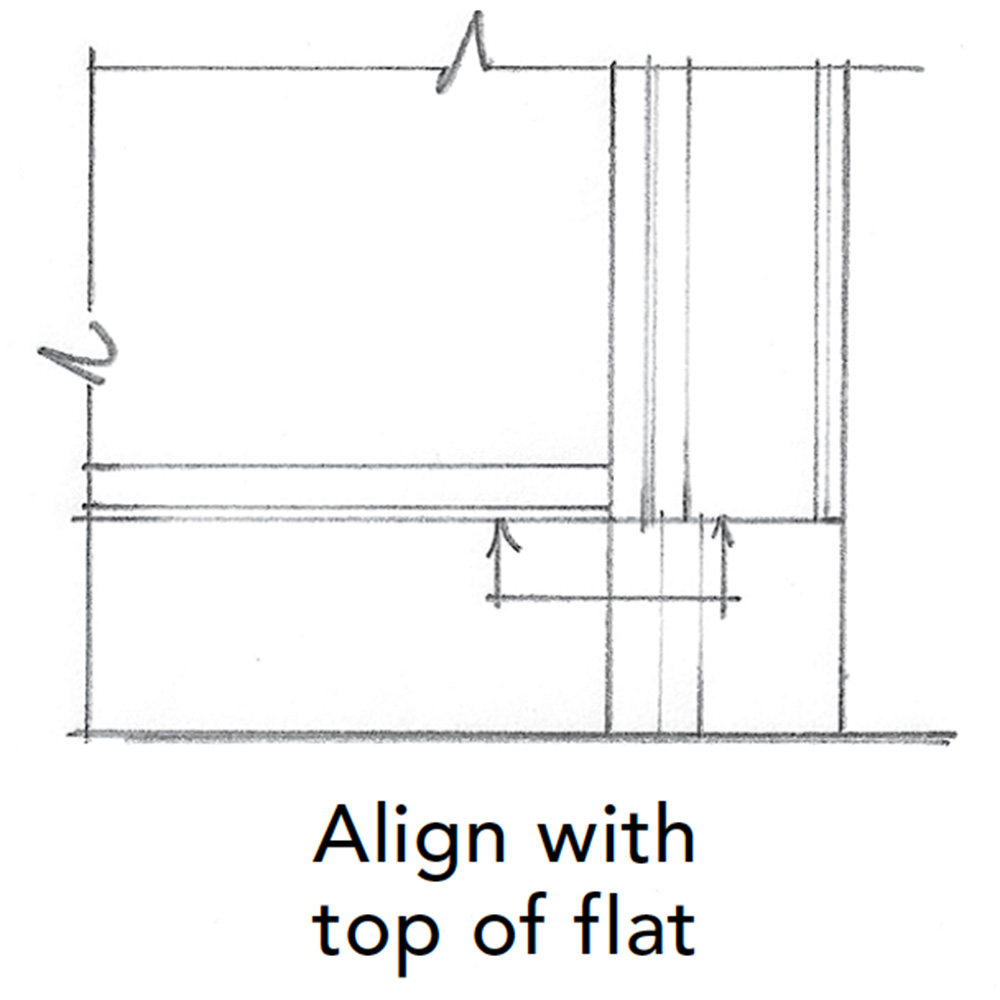
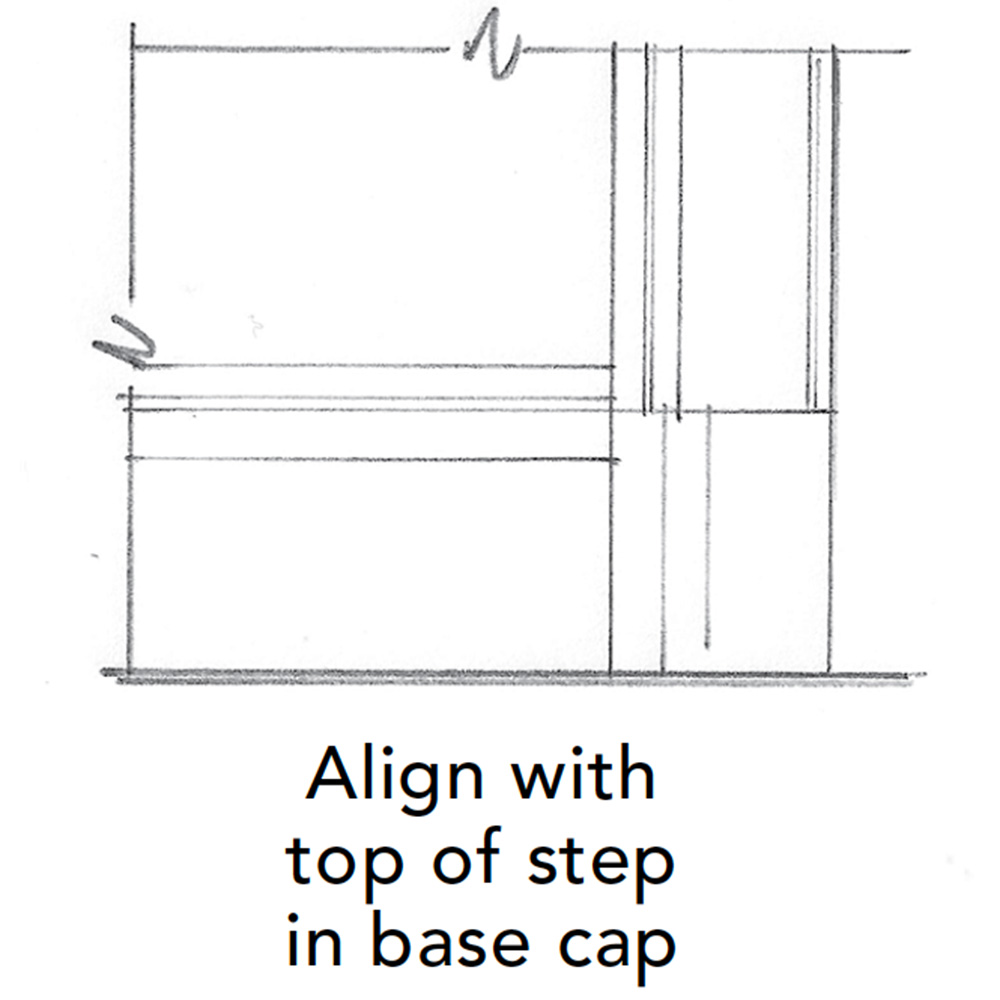
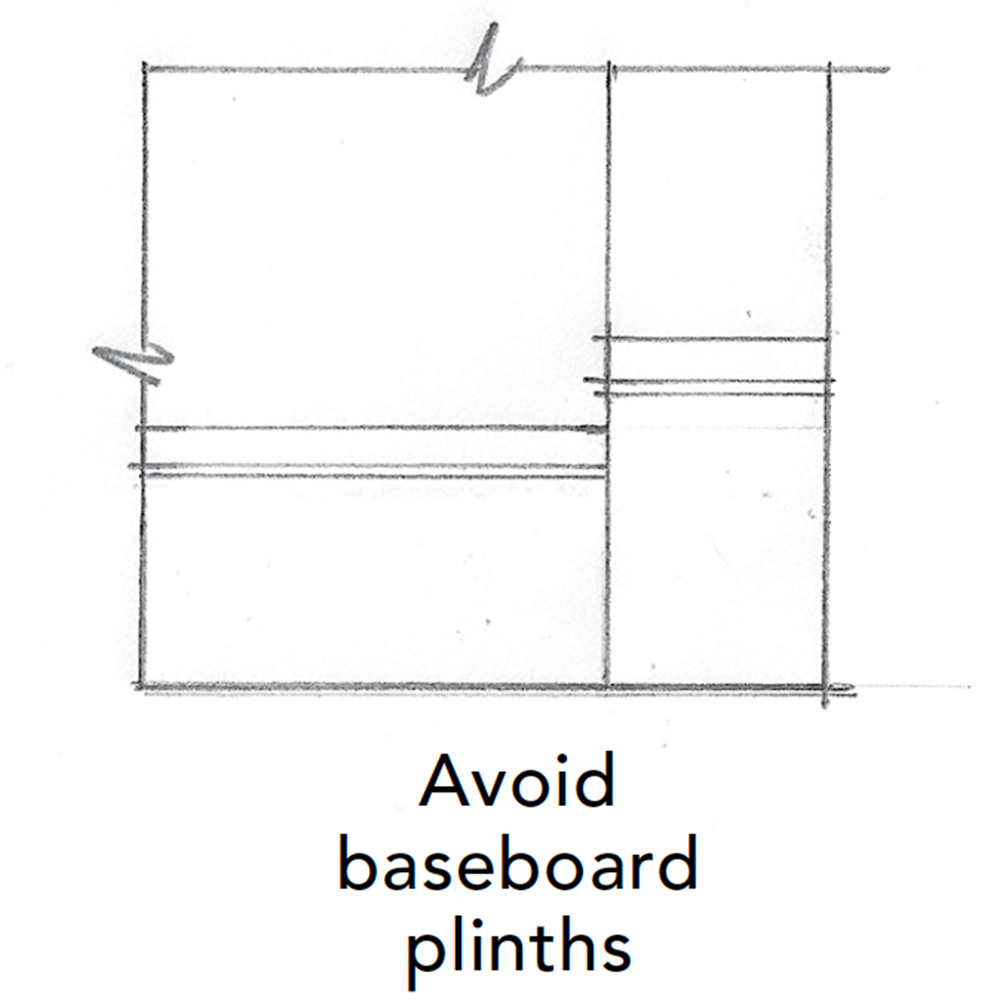
Align plinth blocks with an element of the baseboard
Plinth blocks sit at the bottom of door casing as a transition for the baseboard. They can be set to the overall height of the baseboard or to the flat of the baseboard, leaving the base cap to resolve into the backband of the casing. One good option is to angle the plinth blocks to reduce in depth as they get closer to the door opening.
 |
 |
 |
 |
Contributing editor Marianne Cusato is the author of Get Your House Right: Architectural Elements to Use and Avoid.
Drawings by the author
From Fine Homebuilding #273
For more information, check out this related article: Make the Most of Moldings

View Comments
The rules regarding base boards has change much since I started 38 plus years ago as a young carpenter. My first forays into trim work were with what seemed to me, through the eyes of a young punk, old dinosaurs of men who always thought it was funny to test the kid. I didn't mind...they were supremely talented tradesmen trying to pass on time tested skills that included a real sense of visual proportion relative to the space we worked in for most jobs.
The old classic rule of thumb was an inch of base board height for every foot of wall height...that is just the way it was, it was never questioned. But as time rolled on, and modernity changed perceptions and style, the rule of thumb quickly evolved to an inch of base board for every wall foot minus 2" for upper-mid-level to higher end work. Simple mid-level work and generic track homes got your standard 2-1/4 to 3-1/4 base that snubbed proportion and aesthetic sensibilities because it fit the metrics of the time.
I am glad to see the magazine's "in practice" illustration showing something close to classic proportions...it made this old carpenter smile.
Liked it. keep it up!