FHB Logo Facebook LinkedIn Email Pinterest Twitter X Instagram Tiktok YouTube Plus Icon Close Icon Navigation Search Icon Navigation Search Icon Arrow Down Icon Video Guide Icon Article Guide Icon Modal Close Icon Guide Search Icon Skip to content
Subscribe
Log In
  • How-To
  • Design
  • Tools & Materials
  • Restoration
  • Videos
  • Blogs
  • Forum
  • Magazine
  • Members
  • FHB House
  • Podcast
Log In

Fine Homebuilding Project Guides

Windows & Doors

Guide Home
  • Choosing Windows
  • Installing Windows In New Walls
  • Retrofitting Windows
  • Window Repairs
  • Door Basics
  • Interior Doors
  • Exterior Doors
Job Site Diaries

Drip Cap Design and Installation

The lowly drip cap needs to be taken more seriously to prevent leaks and rot.
By Mike Guertin
  • X
  • facebook
  • linkedin
  • pinterest
  • email
  • add to favorites Log in or Sign up to save your favorite articles

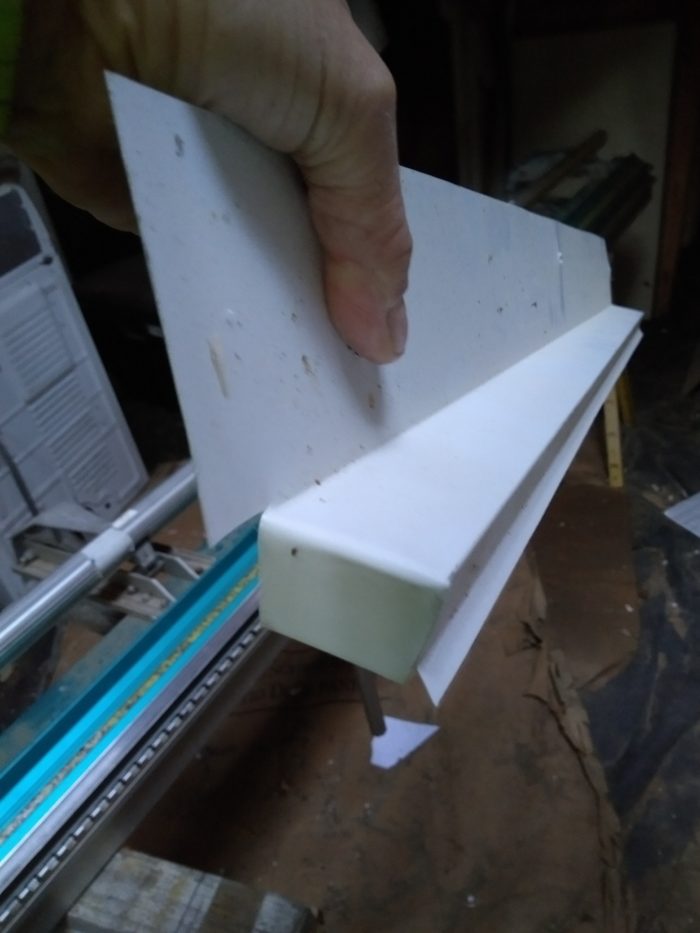
Early in my building career we ordered the stock uncoated aluminum drip caps from our local building materials supplier to install over window and door head trim and skirt boards / band boards. The back leg was only an inch and drip leg was just a square 90 degree 1/4 in. drop — barely large enough to keep wind-driven water from getting behind the siding. And not very durable.

This stock drip cap has a short backleg, minimal drip leg, and is often made from metal too thin to meet code standards.

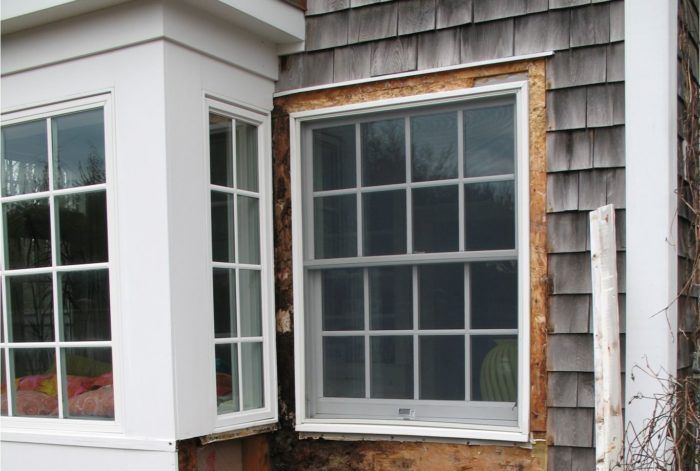
After years of making repairs to homes with insufficient drip caps, where water leaked by the flashing and rotted parts of the wall, I started making my own drip caps and installed them — and the siding over them — to perform their intended function: Keep water out of the wall and drain it away.

The damage from inadequate and improperly installed drip cap flashing can be devastating. Small water leaks into walls generally aren’t noticed by homeowners. Years can go by before a leak is discovered and by then the rot inside can be extensive.

Even if the flashing doesn’t leak it can be installed improperly and lead to siding decay. To work well, the top of a cap flashing has to slope away from the wall so water will drain. Too often the top of cap flashings are flat or even sloped back towards the wall. This is often the case when the siding is installed tight to the top of the cap flashing. Even the small amount of water that sits on a flat cap flashing can wick into the siding and over the years lead to decay.
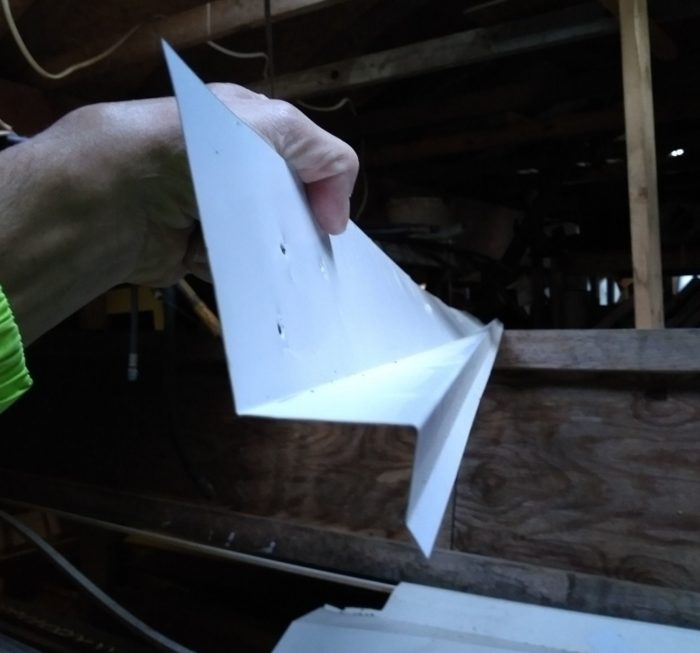
A tall backleg, sloped cap and drip leg that kicks out at the bottom are all features of a well-designed cap flashing

I make my own cap flashings. I start with a minimum of 0.019 in thick aluminum coil stock.   0.019 in. or 26 gauge is the minimum thickness called for in the building code for many specific flashings. Unfortunately, many cap flashings stocked at materials dealers are thinner, so they won’t even meet the code minimum.

I make the wall leg tall — 4 in. to 5 in. This provides for a decent overlap by the housewrap and the siding. A 15 degree slope on the top of the flashing helps water drain off rapidly. The drip leg is at least 3/4 in. and I include a 1/4 in. to 3/8 in. outward kick along the bottom. This does two things — it pushes the water a little further out away from the trim the flashing is protecting, and it helps stiffen the bottom edge so it stay straight as the metal expands and contracts with temperature.
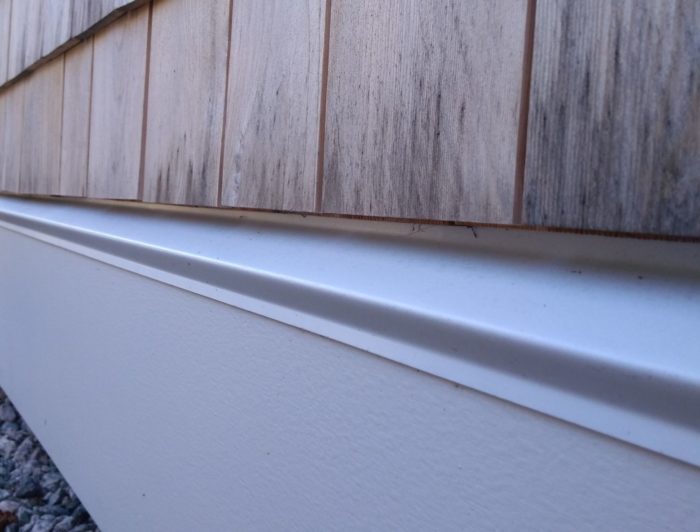
A well designed cap flashing has to be installed properly. Here the slope away from the wall is preserved and the siding is kept up off the top of the flashing by at least 3/8 in.

Then when it comes to installing the siding, I make sure to leave at least 3/8 in. gap between the flashing and bottom of the siding so water won’t wick.
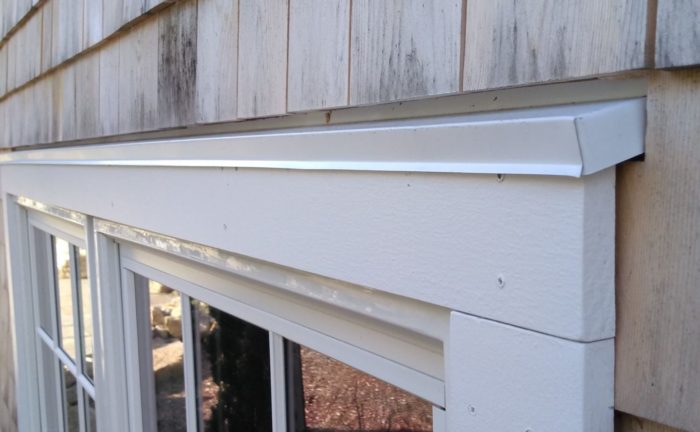
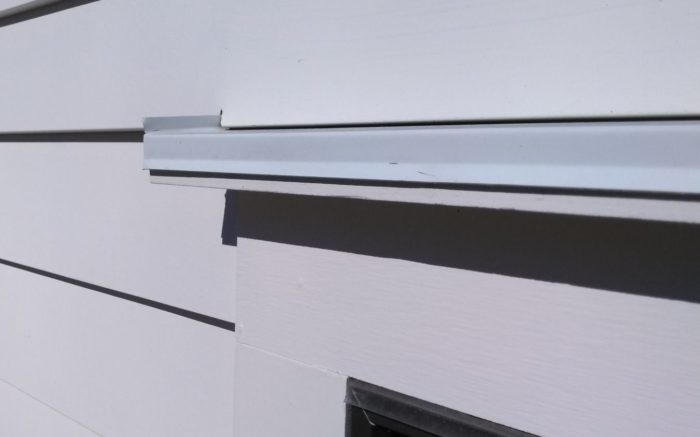
Fold-down at the end of the flashing caps it off.
Instead of folding down the end of the cap flashing it can be upturned into an end-dam preventing water from rolling off the end.
End fold on cap flashing.

It takes a little more time to bend a nice drip cap flashing but it’s the right thing to do. And it no extra time to install a good cap flashing properly and the siding over it to avoid problems later – so there are no excuses.

www.mikeguertin.com  @mike_guertin

Previous: How to Install a Better Window Head Trim and Drip Cap Next: Flashing on a Curve

Guide

Windows & Doors

Chapter

Installing Windows In New Walls

Sign up for eletters today and get the latest how-to from Fine Homebuilding, plus special offers.

Signing you up...

This site is protected by reCAPTCHA and the Google Privacy Policy and Terms of Service apply.
See all newsletters
See all newsletters

View Comments

  1. Kevin Ten-thumbs | May 02, 2018 08:46pm | #1

    Mike:
    This makes a lot of sense, and even more so in the coastal area in which we've built. Any chance you'll be posting more details about what is involved in rolling your own that way? That looks like some very clean edges on that cap, and would appreciate seeing how that's done.

    1. Mike_Guertin | May 29, 2018 12:02pm | #2

      Kevin,
      These cap flashings are just bent using a regular aluminum break. The ends are formed using a pair of hand seamers. Nothing special otherwise.

  2. dynamwebz | Jan 07, 2019 07:43pm | #3

    Good work dude! Can lead be substituted? I would rather use copper but have read red cedar shingles will degrade the copper quickly. Thoughts?

Log in or create an account to post a comment.

Sign up Log in

Become a member and get full access to FineHomebuilding.com

Windows & Doors

Windows & Doors

Trusted, comprehensive guidance from the pros for choosing, installing, replacing, and repairing windows and doors on any house

View Project Guide

View All Project Guides »

Become a member and get unlimited site access, including the Windows & Doors Project Guide.

Start Free Trial

Choosing Windows
  • Window Types
  • Design and Materials
  • Energy-Efficient Windows
Installing Windows In New Walls
  • Installation, Start to Finish
  • Head Flashing for Windows
  • Video Series: Nail-Fin Window over Zip System Sheathing
  • Video Series: Nail-Fin Window over Exterior Rigid-Foam Insulation
  • Video Series: Nail-Fin Window over Housewrap
  • Video Series: Nail-Fin Window over Peel-and-Stick Housewrap
  • Video Series: Nail-Fin Window over a Fluid-Applied WRB
  • Video Series: Weatherproof Window Installation
Retrofitting Windows
  • Removing the Old, Installing the New
  • Video Series: How to Replace a Window
  • Video Series: Install a Full-Frame Replacement Window in a Brick Wall
  • Video Series: Install an Insert Replacement Window in a Brick Wall
  • Video Series: Retrofit a Flanged Window
Window Repairs
  • Restoring Old Windows
  • Repairs and Upgrades
Door Basics
  • Tools & Jigs for Door Hanging
  • How to Install Doors
  • Hinges
  • Handles, Knobs, and Locksets
  • Fixing Door Problems
Interior Doors
  • Prehung Doors
  • Pocket Doors
  • Other Types of Doors
  • Custom-Built Doors
Exterior Doors
  • Door Choices and Design
  • Installing Entry Doors
  • Building Exterior Doors
  • Installing French Doors
  • Replacing a Door
  • Adding Weatherstripping and Sweeps

Fine Home Building

Newsletter Sign-up

  • Fine Homebuilding

    Home building tips, offers, and expert advice in your inbox.

  • Green Building Advisor

    Building science and energy efficiency advice, plus special offers, in your inbox.

  • Old House Journal

    Repair, renovation, and restoration tips, plus special offers, in your inbox.

Signing you up...

This site is protected by reCAPTCHA and the Google Privacy Policy and Terms of Service apply.
See all newsletters

Follow

  • Fine Homebuilding

    Dig into cutting-edge approaches and decades of proven solutions with total access to our experts and tradespeople.

    Start Free Trial Now
    • Facebook
    • Instagram
    • X
    • LinkedIn
  • GBA Prime

    Get instant access to the latest developments in green building, research, and reports from the field.

    Start Free Trial Now
    • Facebook
    • YouTube
  • Old House Journal

    Learn how to restore, repair, update, and decorate your home.

    Subscribe Now
    • Facebook
    • Instagram
    • X

Membership & Magazine

  • Online Archive
  • Start Free Trial
  • Magazine Subscription
  • Magazine Renewal
  • Gift a Subscription
  • Customer Support
  • Privacy Preferences
  • About
  • Contact
  • Advertise
  • Careers
  • Terms of Use
  • Site Map
  • Do not sell or share my information
  • Privacy Policy
  • Accessibility
  • California Privacy Rights

© 2025 Active Interest Media. All rights reserved.

Fine Homebuilding receives a commission for items purchased through links on this site, including Amazon Associates and other affiliate advertising programs.

  • Home Group
  • Antique Trader
  • Arts & Crafts Homes
  • Bank Note Reporter
  • Cabin Life
  • Cuisine at Home
  • Fine Gardening
  • Fine Woodworking
  • Green Building Advisor
  • Garden Gate
  • Horticulture
  • Keep Craft Alive
  • Log Home Living
  • Military Trader/Vehicles
  • Numismatic News
  • Numismaster
  • Old Cars Weekly
  • Old House Journal
  • Period Homes
  • Popular Woodworking
  • Script
  • ShopNotes
  • Sports Collectors Digest
  • Threads
  • Timber Home Living
  • Traditional Building
  • Woodsmith
  • World Coin News
  • Writer's Digest
Active Interest Media logo
X
X
This is a dialog window which overlays the main content of the page. The modal window is a 'site map' of the most critical areas of the site. Pressing the Escape (ESC) button will close the modal and bring you back to where you were on the page.

Main Menu

  • How-To
  • Design
  • Tools & Materials
  • Video
  • Blogs
  • Forum
  • Project Guides
  • Reader Projects
  • Magazine
  • Members
  • FHB House

Podcasts

  • FHB Podcast
  • ProTalk

Webinars

  • Upcoming and On-Demand

Podcasts

  • FHB Podcast
  • ProTalk

Webinars

  • Upcoming and On-Demand

Popular Topics

  • Kitchens
  • Business
  • Bedrooms
  • Roofs
  • Architecture and Design
  • Green Building
  • Decks
  • Framing
  • Safety
  • Remodeling
  • Bathrooms
  • Windows
  • Tilework
  • Ceilings
  • HVAC

Magazine

  • Current Issue
  • Past Issues
  • Magazine Index
  • Subscribe
  • Online Archive
  • Author Guidelines

All Access

  • Member Home
  • Start Free Trial
  • Gift Membership

Online Learning

  • Courses
  • Project Guides
  • Reader Projects
  • Podcast

More

  • FHB Ambassadors
  • FHB House
  • Customer Support

Account

  • Log In
  • Join

Newsletter

Get home building tips, offers, and expert advice in your inbox

Signing you up...

This site is protected by reCAPTCHA and the Google Privacy Policy and Terms of Service apply.
See all newsletters
See all newsletters

Follow

  • X
  • YouTube
  • instagram
  • facebook
  • pinterest
  • Tiktok

Join All Access

Become a member and get instant access to thousands of videos, how-tos, tool reviews, and design features.

Start Your Free Trial

Subscribe

FHB Magazine

Start your subscription today and save up to 70%

Subscribe

We hope you’ve enjoyed your free articles. To keep reading, become a member today.

Get complete site access to expert advice, how-to videos, Code Check, and more, plus the print magazine.

Start your FREE trial

Already a member? Log in

Privacy Policy Update

We use cookies, pixels, script and other tracking technologies to analyze and improve our service, to improve and personalize content, and for advertising to you. We also share information about your use of our site with third-party social media, advertising and analytics partners. You can view our Privacy Policy here and our Terms of Use here.

Cookies

Analytics

These cookies help us track site metrics to improve our sites and provide a better user experience.

Advertising/Social Media

These cookies are used to serve advertisements aligned with your interests.

Essential

These cookies are required to provide basic functions like page navigation and access to secure areas of the website.

Delete My Data

Delete all cookies and associated data