FHB Logo Facebook LinkedIn Email Pinterest Twitter X Instagram Tiktok YouTube Plus Icon Close Icon Navigation Search Icon Navigation Search Icon Arrow Down Icon Video Guide Icon Article Guide Icon Modal Close Icon Guide Search Icon Skip to content
Subscribe
Log In
  • How-To
  • Design
  • Tools & Materials
  • Restoration
  • Videos
  • Blogs
  • Forum
  • Magazine
  • Members
  • FHB House
  • Podcast
Log In

Fine Homebuilding Project Guides

Decks

Guide Home
  • Design & Planning
  • Tools & Materials
  • Footings & Foundations
  • Framing a Deck
  • Installing Decking
  • Installing Railings
  • Deck Stairs
  • Custom Details
  • Finishes, Repairs, and Maintenance
  • Complete Deck Builds
Editor's Notepad

9 Tips for Building a Better Deck

Tips for building better decks given to us and now passed along to you.

By Fine Homebuilding Editors
  • X
  • facebook
  • linkedin
  • pinterest
  • email
  • add to favorites Log in or Sign up to save your favorite articles

Building a deck is a fantastic project for a homeowner, and a great way to add outdoor space for family and friends to enjoy. It’s also a basic project to learn the ins and outs of building. Part of the battle is understanding what problems could pop up and how to deal with them. With that in mind, here is some of our best advice for building a deck that will last and look great.
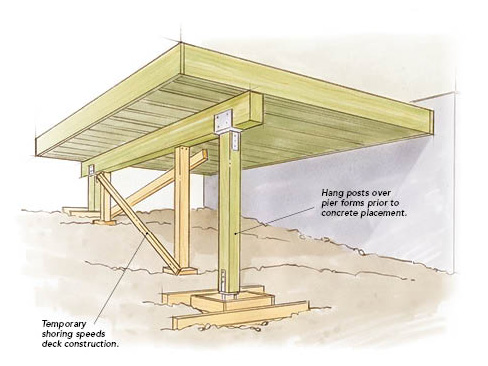
1) Labor-saving deck-building strategy

The temporary beam support shown in the drawing saved us money and a full day of time. Here’s how it worked. A typical deck project begins by digging the holes for the footings, getting them inspected, and then placing the concrete. We tweaked this sequence by putting the forms in place on day one and by continuing with our framing by supporting the beam with the temporary braces shown in the drawing. The posts are measured and cut to fit, and are hung from the beam with the base and cap hardware already attached. Using this method, we framed the entire 12-ft.-sq. deck on day one. On day two, we had our footing inspection, poured the concrete piers with quick-set concrete, and installed the decking and railing. We were done in two long days. —Brian Brophy, Lockeford, Calif.
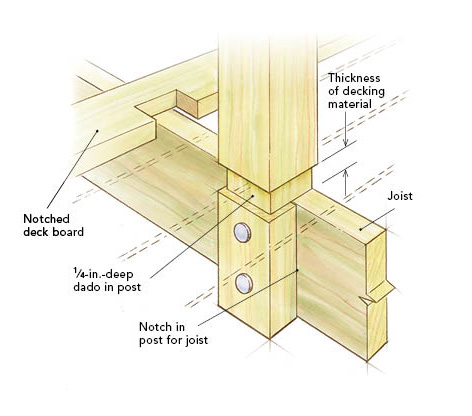
Illustration of deck support beams under decking

2) Precision-fit deck posts

I have long been frustrated trying to get a decent fit while installing decking around deck posts. The drawing shows how I finally solved the problem. Before installing the posts, I simply cut a 1/4-in.-deep dado around the post. The width of the dado is equal to the thickness of the decking, and the bottom of the dado is flush with the tops of the deck joists. I cut the dado by making multiple kerfs with my circular saw. Then I clean up the stray bits with a chisel. Installing the decking is now a matter of loosely fitting the deck boards to the bottom of the dado. This method saves time and frustration, and best of all, the posts look as though they grew there. —Mike Nolin, Brewster, Mass.

Labeled illusration of deck posts

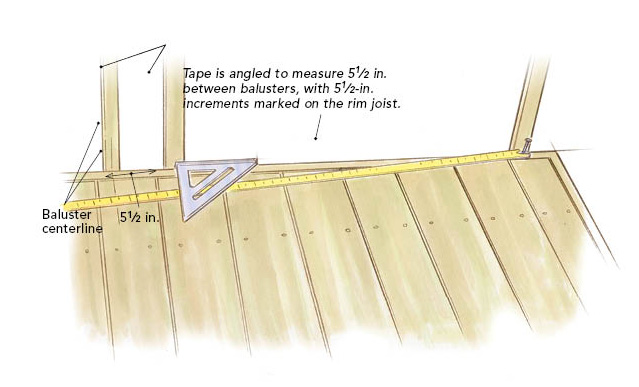
3) Another angle on spacing deck-railing balusters

I have struggled many a time in the past to create equal, code-approved spacing between deck balusters. The method I’ve come to rely on—the slant-rule technique—has taken all the frustration out of the problem. With one baluster installed at each end of the railing, I start by measuring the distance between their centers. Next, I divide this number by the desired spacing between the centers of the balusters. Around here, the space can be no more than 4 in. With 2×2 balusters, I divide the railing length by 5-1/2 in. That’s because 5-1/2-in. centers on 2×2 balusters results in a 4-in. space between them. Let’s say, for example, the length is 158-3/8 in. I divide it by 5-1/2, which equals about 28-3/4. I round up to the next highest whole number: 29. Now I multiply 5-1/2 by 29, which equals 159-1/2. At one end of the deck, I drive a nail into the center of the first baluster. At the other end of the deck, I place my framing square with the long blade parallel to the rim joist and the short blade aligned with center of the last baluster. With my tape hooked to the nail, I find the point on the short blade of the square where 159-1/2 in. falls. The tape is now at a slight angle to the rim joist, and I can measure off 5-1/2-in. increments with my framing square and mark them on the rim joist to locate the center of each baluster. It helps if you have a calculator that has an add-on function to speed the layout sequence. Once I began using this method, I was surprised by how fast and effortless it is. With a little ingenuity, I think this technique could be applied to a staircase as well. —Mike Hoffman, Portland, Ore.

Spacing deck railing balusters


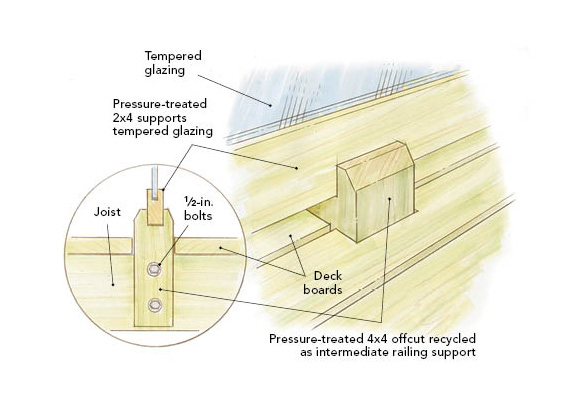
4) Using leftover pressure-treated lumber

When building my deck, I had some short 4×4 pressure-treated offcuts. To help reduce waste and alleviate envi­ronmental concerns when disposing of pressure-treated lumber, I found the short 4x4s made excellent intermediate supports for the tempered-glass balustrade. I notched the ends to receive the frames and cut chamfers on the edges to make strong and attractive deck elements that saved the cost of buying commercially made brackets. —Robert Gunn, Mississauga, Ont., Canada
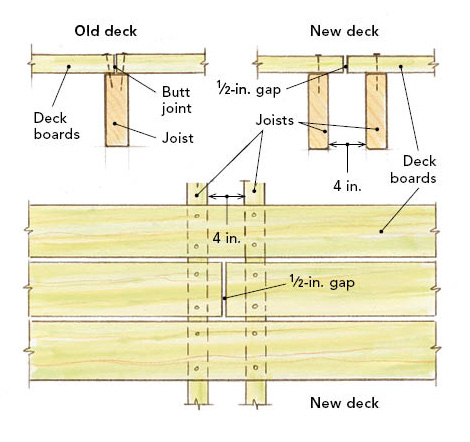
Labeled illustration of using pressure-treated lumber

5) Double decking

When our house was built in 1958, the plan included large decks on two sides. They were built conventionally: 2×8 joists covered with 2×6 planks set on 6-in. centers. By 1980 I had to replace the decking, primarily because of rot that started wherever two 2x6s butted each other over a joist. My design involved doubling up the joists as shown in the drawing. This simple change accomplishes the following: no tight butts in planking, no butts over joists, no split 2x6s from nailing them at their ends, and the entire structure can now “breathe.” The deck has a width of 15 2x6s. With careful layout using lengths up to 20 ft., I have no more than four joints at any station, minimizing waste. I used pressure-treated southern yellow pine. At the time, all the lumber cost about $1000, and only $64 was added by doubling up on the 2x8s. —James B. French, Portsmouth, R.I.

Illustration of doublig up deck joists

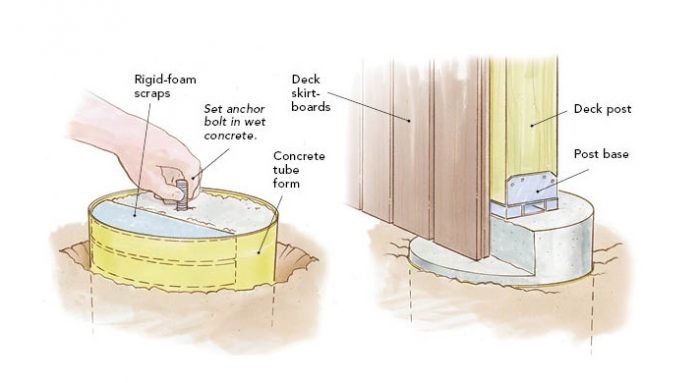
6) Planning ahead for skirtboards

If you’re pouring piers for a deck that extends above the grade—and that deck calls for decorative skirting to hide the underside of the deck—you could install those skirtboards right up to the pier and then have to notch them over the ugly protruding concrete, but there’s a better way. By using some scrap rigid foam and wet-setting the anchor bolts, you can create a template that helps you easily avoid this eyesore from the start when pouring concrete piers. —Kevin Ireton, New Milford, Conn.

Illustration of deck skirtboards

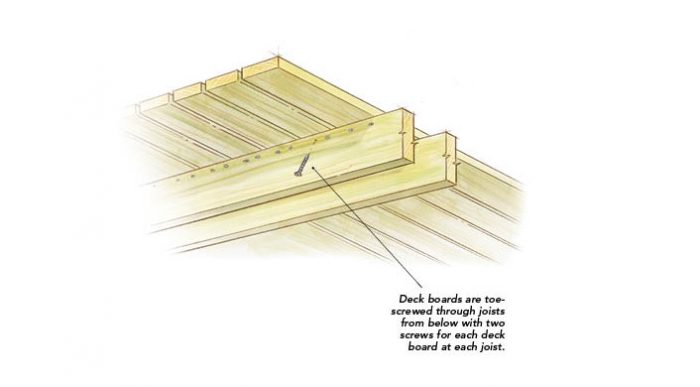
7) A low-cost alternative to hidden deck fasteners

When I built my own deck, I wanted to conceal the fasteners for aesthetic reasons as well as for function (not catching something on a protruding fastener) and durability (not creating an entry point for moisture to penetrate the decking). I looked at all the edgemount and bottom-mount systems, and was turned off by their tediousness and taken aback by their price. Instead of investing in one of these proprietary systems, I used GRK R4 Multi-Purpose Screws to affix each deck board to its joist from below. As shown in the drawing, I used two 8-in. by 2-1/2-in. screws per board at each joist. Working from below, I started the screws about 1-1/2 in. from the top edge of the joist and angled them at about 30°. That put about 3/4 in. of each screw into the 5/4 deck boards. The sharp “zip-tip” points of the screws eliminated the need to drill pilot holes. It has been a couple of years since I installed the decking, and it looks great. The decking is solid as a rock without a single squeak, and I saved about $1500 on mounting gizmos. —Steve Carle, Edina, Minn.
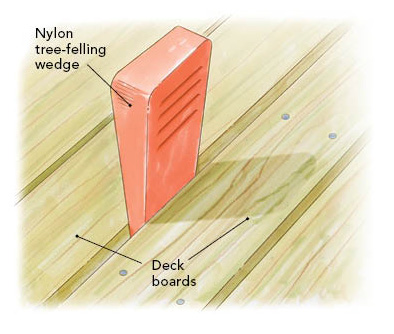
Illustration of toe screw through joists

8) Spacing deck boards with a wedge

My company builds a fair number of decks, and we spend a lot of time trying to straighten boards and adjust the gaps between them. Most of our decks are made of cedar, which mars easily, so we’ve tried just about every technique in the book to coax the deck boards into alignment without damaging them. The results have always been mixed. One day we had a nylon felling wedge on site, and a crew member used it to separate a couple of deck boards that were too close (see drawing). We all became instant converts. Nylon felling wedges are available at any store that sells chainsaws and related equipment. The wedges sell for only a few dollars. A felling wedge tapers to a good, sharp edge, and it is extremely tough. If you pick one with smooth sides, the wedge will not mar even the softest of woods. Best of all, felling wedges are typically bright orange, and therefore they are nearly impossible to lose. —Grant Johnson, Heriot Bay, B.C., Canada
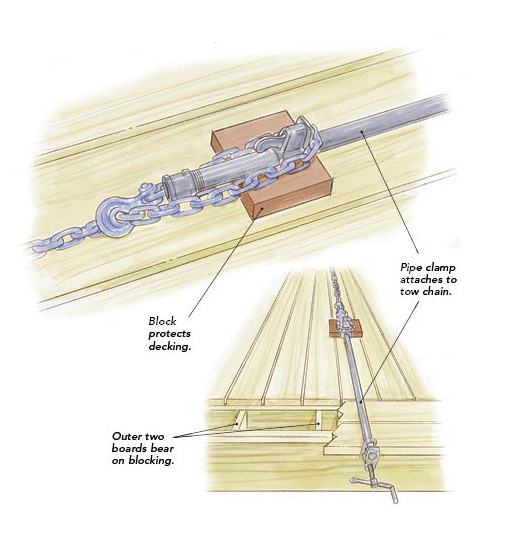
Illustration of spacig deck boards with a wedge

9) A tow chain meets a pipe clamp

On a deck made of a Brazilian hardwood called Tigerwood, I was able to force all boards into place using a tip from a past issue in which a pipe clamp is anchored against a pry bar inserted between previously installed boards. This deck, however, has two outside rows of deck boards oriented perpendicular to the field boards and parallel to the main floor joists. I had no desire to purchase 20 ft. of 3/4-in. pipe for my pipe clamps to span the width of the deck. Instead, I placed a pipe clamp on each side of the deck and then joined them together using a length of tow chain with grab hooks at each end. I placed a block under each of these intersections to prevent damage to the beautiful wood. —Stephen Beese, Winston-Salem, N.C.

Illustration of using a tow chain and a pipe clamp on decking

Fine Homebuilding Recommended Products

Fine Homebuilding receives a commission for items purchased through links on this site, including Amazon Associates and other affiliate advertising programs.

Flashing and Joist Tape

Flashing joists is a great way to prolong the life of a deck frame — after all, moisture management is key to longevity.
Buy at Amazon

FastenMaster Screw Bolt Fastening System

These solid, time-saving bolts don't require pre-drilling and come in very handy when it comes to guard rail posts.
Buy at Amazon

4-Gallon Piston Backpack Sprayer

This sprayer holds a large amount of solution and the backpack design keeps your hands free, making maintaining and cleaning a deck a breeze.
Buy at Amazon
Next: Framing a Grade-Level Deck

Guide

Decks

Chapter

Framing a Deck

Sign up for eletters today and get the latest how-to from Fine Homebuilding, plus special offers.

Signing you up...

This site is protected by reCAPTCHA and the Google Privacy Policy and Terms of Service apply.
See all newsletters
See all newsletters

View Comments

  1. JanRDelgado | May 30, 2018 10:54pm | #1

    Good idea!

Log in or create an account to post a comment.

Sign up Log in

Become a member and get full access to FineHomebuilding.com

Decks

Decks

Hundreds of articles and videos by top deck-building pros on how to design and build a beautiful, sturdy, and safe deck

View Project Guide

View All Project Guides »

Become a member and get unlimited site access, including the Decks Project Guide.

Start Free Trial

Design & Planning
  • Basic Design Options
  • Generating Plans
  • Calculating Deck Loads
  • Code Compliance
Tools & Materials
  • Deck Building Tools
  • Foundation and Framing Materials
  • Decking Materials
  • Fasteners and Hardware
Footings & Foundations
  • Choosing a Foundation
  • Sizing and Laying Out Footings
  • Excavation
  • Pouring the Foundation
Framing a Deck
  • Framing Overview
  • Installing the Ledger
  • Setting Posts and Beams
  • Installing Joists
Installing Decking
  • Decking Basics
  • Installation Process
  • Adding Fascia and Other Decorative Elements
Installing Railings
  • Installing Deck Railing Posts
  • Building Wood Rails and Balustrades
  • Non-Wood Railing Options
  • Installing Nonwood Balustrades
Deck Stairs
  • Deck Stairs Overview
  • Laying Out, Cutting, and Installing the Stringers
  • Installing Treads, Risers, and Stair Railings
Custom Details
  • Benches, Planters, and Privacy Features
  • Pergolas
  • Lighting
Finishes, Repairs, and Maintenance
  • Deck Finishes
  • Cleaning and Refinishing
  • Inspection and Repair
Complete Deck Builds
  • Grade-Level Decks
  • Raised Decks

Fine Home Building

Newsletter Sign-up

  • Fine Homebuilding

    Home building tips, offers, and expert advice in your inbox.

  • Green Building Advisor

    Building science and energy efficiency advice, plus special offers, in your inbox.

  • Old House Journal

    Repair, renovation, and restoration tips, plus special offers, in your inbox.

Signing you up...

This site is protected by reCAPTCHA and the Google Privacy Policy and Terms of Service apply.
See all newsletters

Follow

  • Fine Homebuilding

    Dig into cutting-edge approaches and decades of proven solutions with total access to our experts and tradespeople.

    Start Free Trial Now
    • Facebook
    • Instagram
    • X
    • LinkedIn
  • GBA Prime

    Get instant access to the latest developments in green building, research, and reports from the field.

    Start Free Trial Now
    • Facebook
    • YouTube
  • Old House Journal

    Learn how to restore, repair, update, and decorate your home.

    Subscribe Now
    • Facebook
    • Instagram
    • X

Membership & Magazine

  • Online Archive
  • Start Free Trial
  • Magazine Subscription
  • Magazine Renewal
  • Gift a Subscription
  • Customer Support
  • Privacy Preferences
  • About
  • Contact
  • Advertise
  • Careers
  • Terms of Use
  • Site Map
  • Do not sell or share my information
  • Privacy Policy
  • Accessibility
  • California Privacy Rights

© 2025 Active Interest Media. All rights reserved.

Fine Homebuilding receives a commission for items purchased through links on this site, including Amazon Associates and other affiliate advertising programs.

  • Home Group
  • Antique Trader
  • Arts & Crafts Homes
  • Bank Note Reporter
  • Cabin Life
  • Cuisine at Home
  • Fine Gardening
  • Fine Woodworking
  • Green Building Advisor
  • Garden Gate
  • Horticulture
  • Keep Craft Alive
  • Log Home Living
  • Military Trader/Vehicles
  • Numismatic News
  • Numismaster
  • Old Cars Weekly
  • Old House Journal
  • Period Homes
  • Popular Woodworking
  • Script
  • ShopNotes
  • Sports Collectors Digest
  • Threads
  • Timber Home Living
  • Traditional Building
  • Woodsmith
  • World Coin News
  • Writer's Digest
Active Interest Media logo
X
X
This is a dialog window which overlays the main content of the page. The modal window is a 'site map' of the most critical areas of the site. Pressing the Escape (ESC) button will close the modal and bring you back to where you were on the page.

Main Menu

  • How-To
  • Design
  • Tools & Materials
  • Video
  • Blogs
  • Forum
  • Project Guides
  • Reader Projects
  • Magazine
  • Members
  • FHB House

Podcasts

  • FHB Podcast
  • ProTalk

Webinars

  • Upcoming and On-Demand

Podcasts

  • FHB Podcast
  • ProTalk

Webinars

  • Upcoming and On-Demand

Popular Topics

  • Kitchens
  • Business
  • Bedrooms
  • Roofs
  • Architecture and Design
  • Green Building
  • Decks
  • Framing
  • Safety
  • Remodeling
  • Bathrooms
  • Windows
  • Tilework
  • Ceilings
  • HVAC

Magazine

  • Current Issue
  • Past Issues
  • Magazine Index
  • Subscribe
  • Online Archive
  • Author Guidelines

All Access

  • Member Home
  • Start Free Trial
  • Gift Membership

Online Learning

  • Courses
  • Project Guides
  • Reader Projects
  • Podcast

More

  • FHB Ambassadors
  • FHB House
  • Customer Support

Account

  • Log In
  • Join

Newsletter

Get home building tips, offers, and expert advice in your inbox

Signing you up...

This site is protected by reCAPTCHA and the Google Privacy Policy and Terms of Service apply.
See all newsletters
See all newsletters

Follow

  • X
  • YouTube
  • instagram
  • facebook
  • pinterest
  • Tiktok

Join All Access

Become a member and get instant access to thousands of videos, how-tos, tool reviews, and design features.

Start Your Free Trial

Subscribe

FHB Magazine

Start your subscription today and save up to 70%

Subscribe

We hope you’ve enjoyed your free articles. To keep reading, become a member today.

Get complete site access to expert advice, how-to videos, Code Check, and more, plus the print magazine.

Start your FREE trial

Already a member? Log in

Privacy Policy Update

We use cookies, pixels, script and other tracking technologies to analyze and improve our service, to improve and personalize content, and for advertising to you. We also share information about your use of our site with third-party social media, advertising and analytics partners. You can view our Privacy Policy here and our Terms of Use here.

Cookies

Analytics

These cookies help us track site metrics to improve our sites and provide a better user experience.

Advertising/Social Media

These cookies are used to serve advertisements aligned with your interests.

Essential

These cookies are required to provide basic functions like page navigation and access to secure areas of the website.

Delete My Data

Delete all cookies and associated data