FHB Logo Facebook LinkedIn Email Pinterest Twitter X Instagram Tiktok YouTube Plus Icon Close Icon Navigation Search Icon Navigation Search Icon Arrow Down Icon Video Guide Icon Article Guide Icon Modal Close Icon Guide Search Icon Skip to content
Subscribe
Log In
  • How-To
  • Design
  • Tools & Materials
  • Restoration
  • Videos
  • Blogs
  • Forum
  • Magazine
  • Members
  • FHB House
  • Podcast
Log In

Fine Homebuilding Project Guides

Finish & Trim Carpentry

Guide Home
  • Trim Design
  • Tools and Materials
  • Interior Trim Basics
  • Window and Door Casings
  • Baseboard and Crown Molding
  • Wainscot and Paneling
  • Mantels and Fireplace Surrounds
  • Coffered Ceilings
How-To

6 Reasons Every Carpenter Should Own a Block Plane

Finish carpenter Kit Camp describes several pros of having a block plane in your tool belt, plus offers tips on choosing and maintaining one.

By Kit Camp Issue 278 - Oct/Nov 2018
  • X
  • facebook
  • linkedin
  • pinterest
  • email
  • add to favorites Log in or Sign up to save your favorite articles

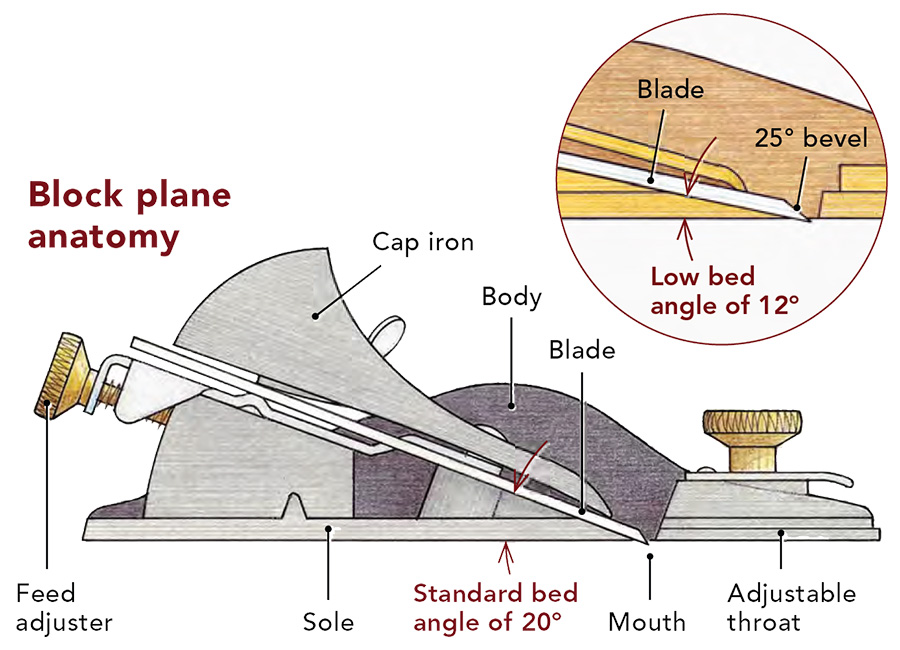
Synopsis: Finish carpenter Kit Camp describes the many pros of having a block plane in your tool belt. He details six different uses for block planes, including closing gaps, backing out (removing material from the back of a piece), easing edges (including creating chamfers and roundovers), removing saw marks, making scribes, and flushing up two pieces. He then explains how to tune up a block plane by flattening, sanding, filing, and sharpening the plane. The article includes a detailed illustration of a block plane and recommendations for three types of block planes currently on the market.


After many years working as a finish carpenter, I can tell a lot about someone by the tools in their tool belt. If I see them using a sharp chisel or block plane, I know we’re probably going to get along fine, because it shows me that me that they’re interested in producing the best work they can.
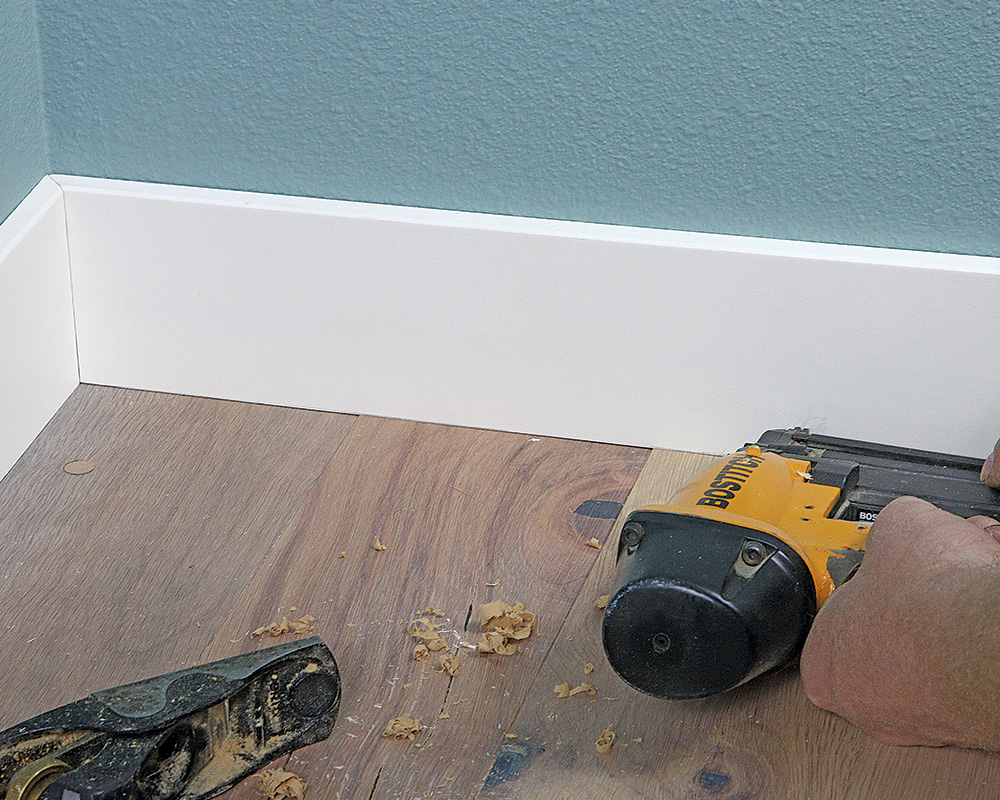
Closing gapsClosing Gaps

Brace the hand holding the plane against your chest and plane from the short point of the miter toward the long point. Remove material from the short point to close the gap at the outside corner of the miter, and from the long point to close the gap at the inside corner of the miter. Darkening the miter with a pencil shows where you’re cutting. On end grain, take light cuts and dampen brittle woods with denatured alcohol.

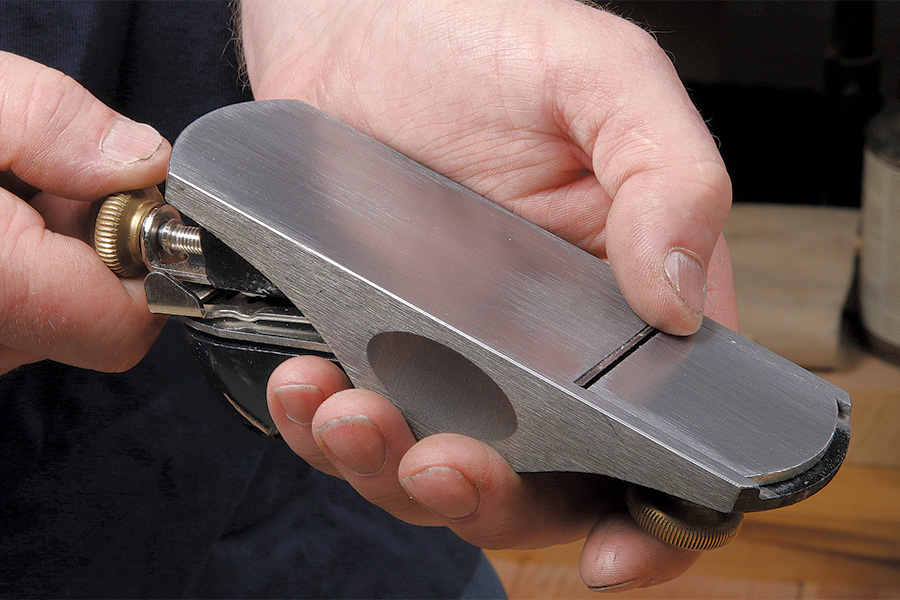
No other tools I own have attracted as much attention over the years as my block planes. I prefer the low-angle variation, which I keep in the front hammer loop of my tool belt. I use it for fitting casing, crown, and baseboard, and it’s an ideal tool for making tapered extension jambs. It’s also great for scribing stock to old plaster walls and it gives me great control when I’m flushing one surface to another (think edge banding, wood plugs, etc.). Keep in mind that planing is like petting a cat—planing in one direction generally produces a smooth surface, cutting and pushing the wood fibers down, while planing in the other direction (against the grain) does not. If your blade is sharp and you’re taking a light cut and getting tearout, try reversing the planing direction.

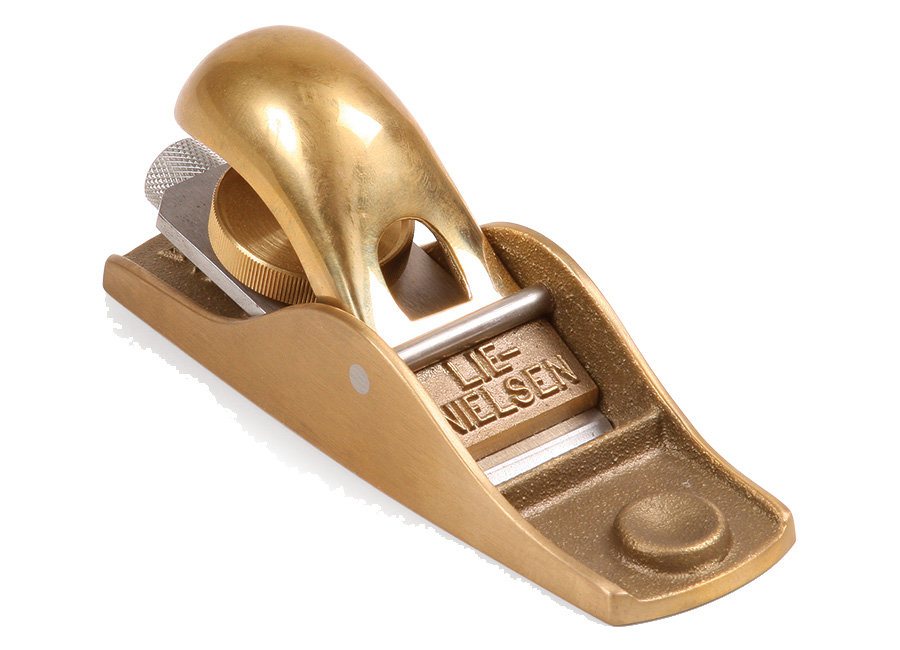
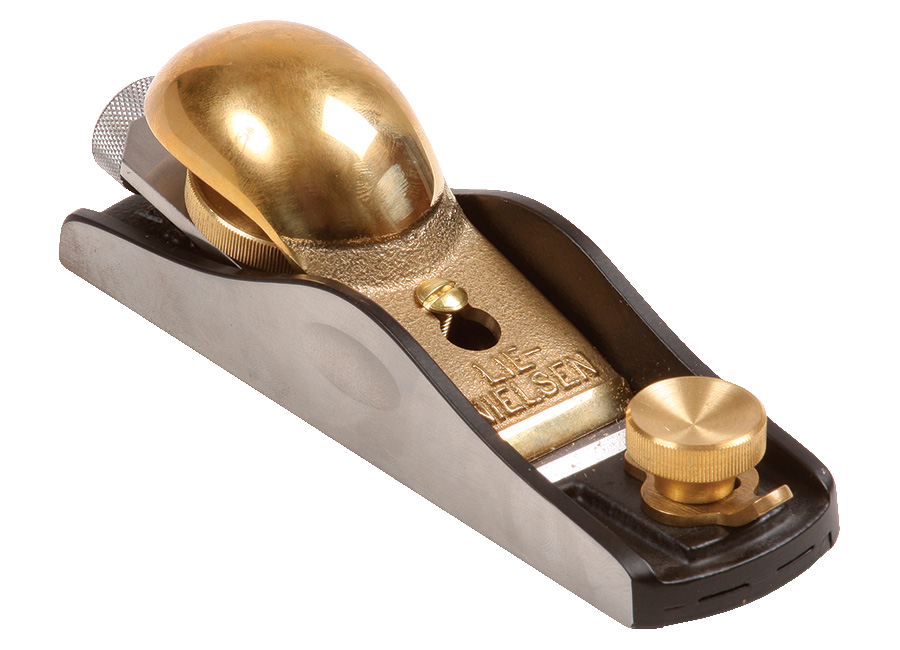
My recommendations for block planes come from my experience using these tools for many years. My favorites for job-site work are the Lie-Nielsen No. 102 and the Veritas Apron Plane from Lee Valley. Both are durable and have high-quality blades that are impeccably machined for easy honing, and their bodies are compact enough to carry easily. If I want a wider blade and an adjustable mouth—nice if you often work with figured or difficult woods, or if you are taking heavy cuts in softwood like cedar—my top choice is Lie-Nielsen’s No. 60-1 ⁄ 2. Should a block plane be one of the first tools you buy when starting out as a carpenter? Maybe not. But if you’re interested in working more precisely, breathing less dust, and getting out fewer tools at the beginning of the day, a block plane should be in your tool belt.

Block plane best bets

The difference between a good plane and an average one is the quality of the machining. With a high-quality plane, you’ll only need to hone the blade for perfect results. All of these are low-angle block planes, which is your best bet for the times you need to shave end grain, especially as the blade dulls with use. For most tasks, however, there is very little difference in performance between low-angle and standard-angle planes, as long as the blade has been properly sharpened.

Lie-Nielsen block plane
Lie-Nielsen No. 102 $115 lie-nielsen.com

Veritas Apron block plane
Veritas Apron Plane $95 leevalley.com

Lie-Nielsen block plane
Lie-Nielsen No. 60-1⁄2 $165 lie-nielsen.com

Five more tasks where a sharp plane shines
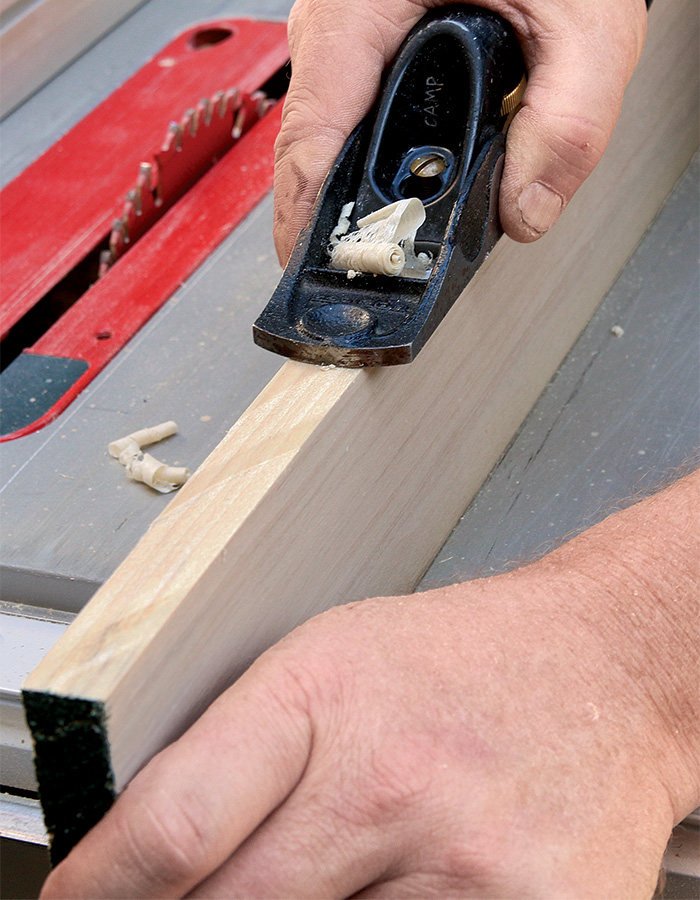
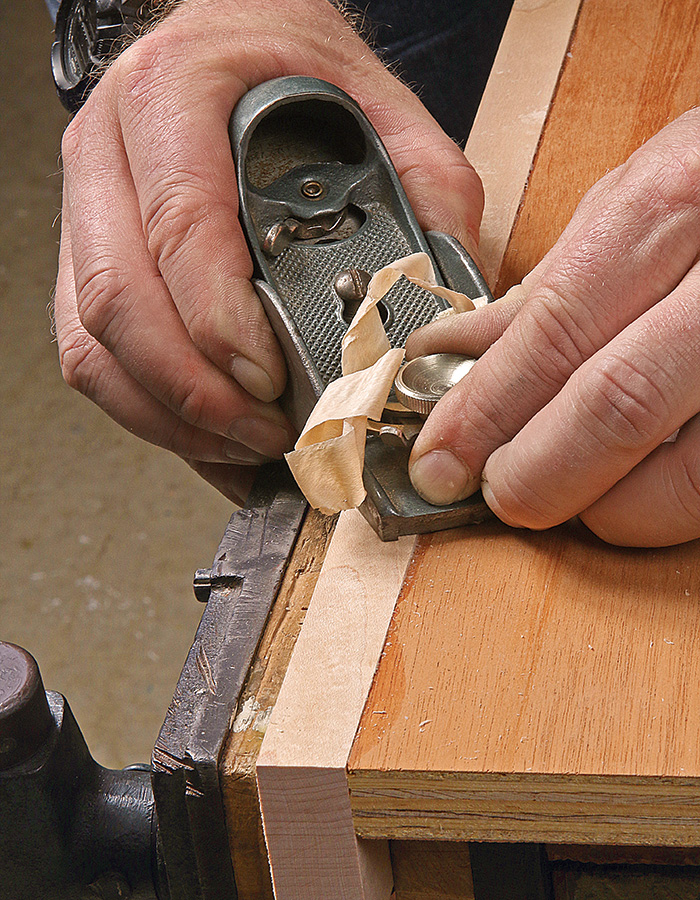
1. Backing out

Remove material strategically from the back of a piece to get it to lie flat—this is called “backing out.” Push the blade out far and take
a heavy cut (it’s OK, the planed surface won’t show). If your plane has an adjustable mouth, open it wide to let the big shavings escape.

backing out

before and after frame

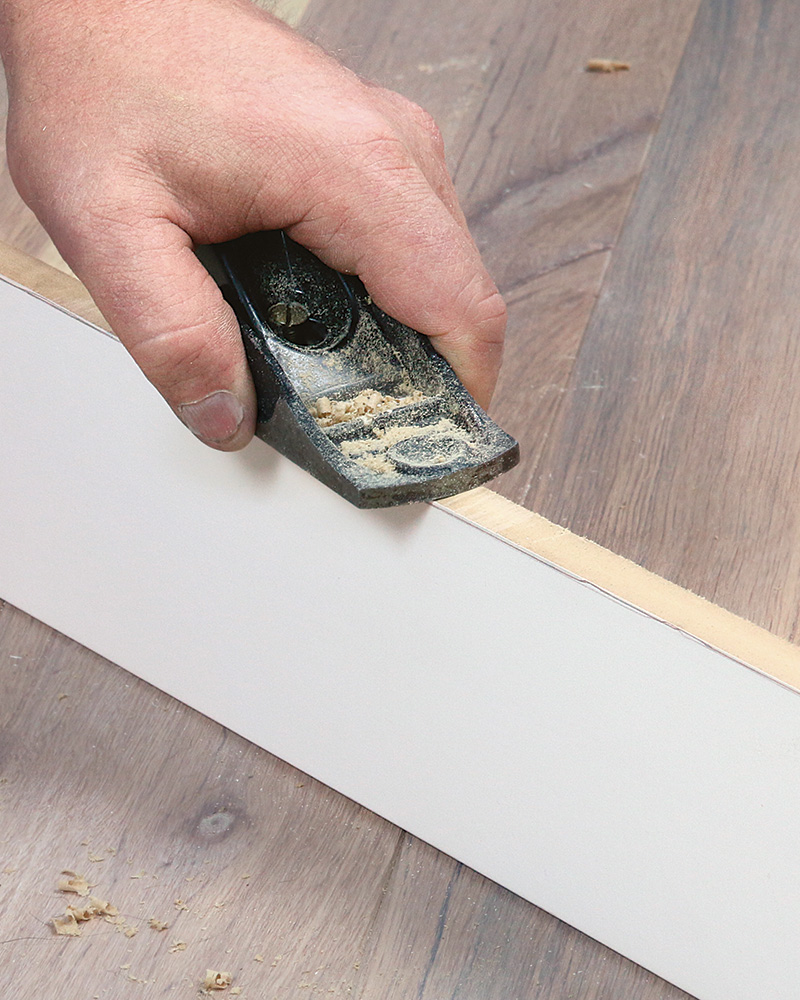
2. Easing edges— a little or a lot

Even simple flat-stock trim looks and feels better with its sharp edge broken slightly. One light pass will do, and should produce a tiny spiral shaving. Chamfers take a few more passes; for cutting big ones, draw layout lines to help guide your cuts. These lines are especially important if the angle is anything other than a simple 45°. Roundovers are also possible, simply by planing a series of small bevels, which can be blended together into a smooth curve with some sanding.

chamfer
roundover

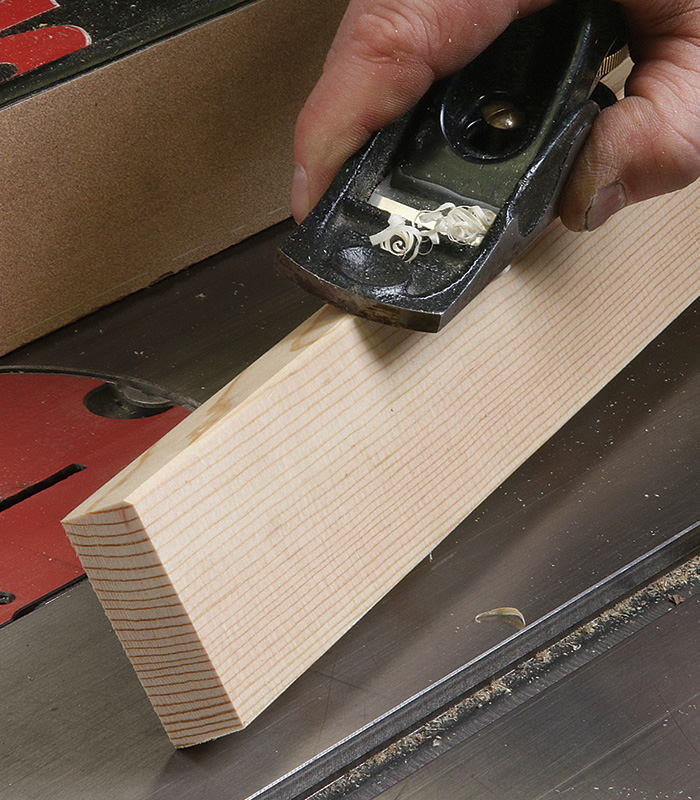
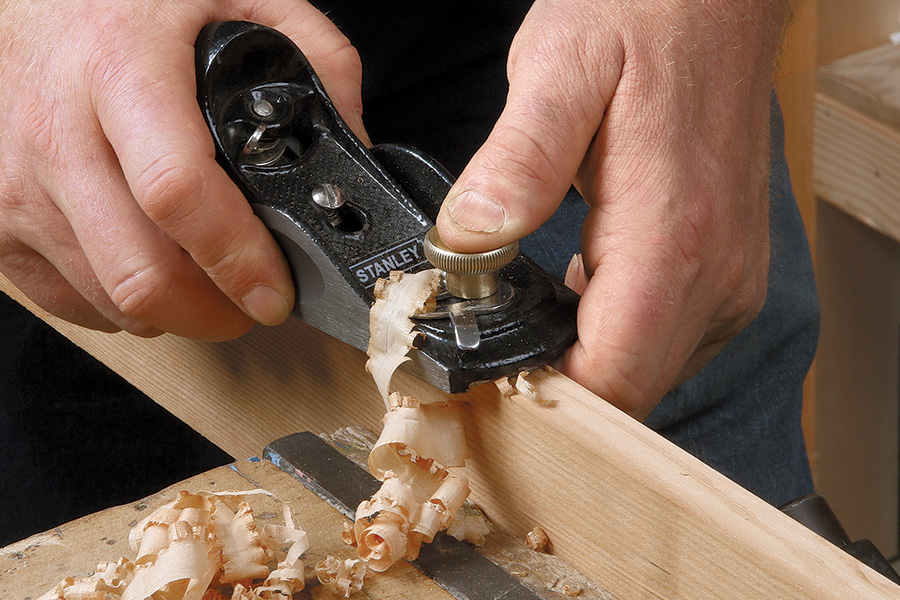
3. Removing saw marks

Your block plane offers a fast and quiet way to remove saw marks from the edges of stock you have sawn to width. I do this task onehanded, and if I’m sawing the stock to width, right there on the tablesaw. Doing this work with a plane yields a crisper edge than you will get with sandpaper, and leaves you with a glass-smooth surface.

removing saw marks

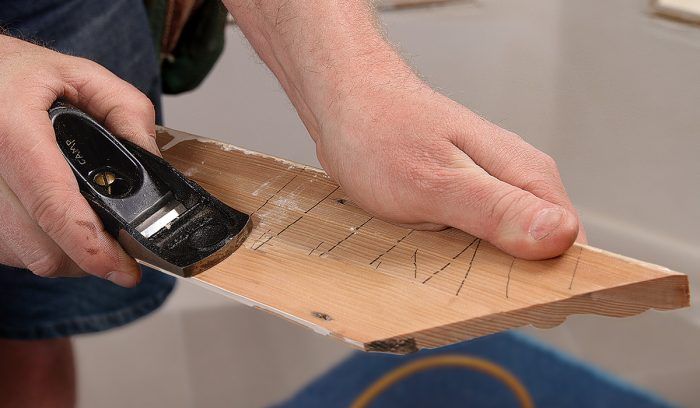
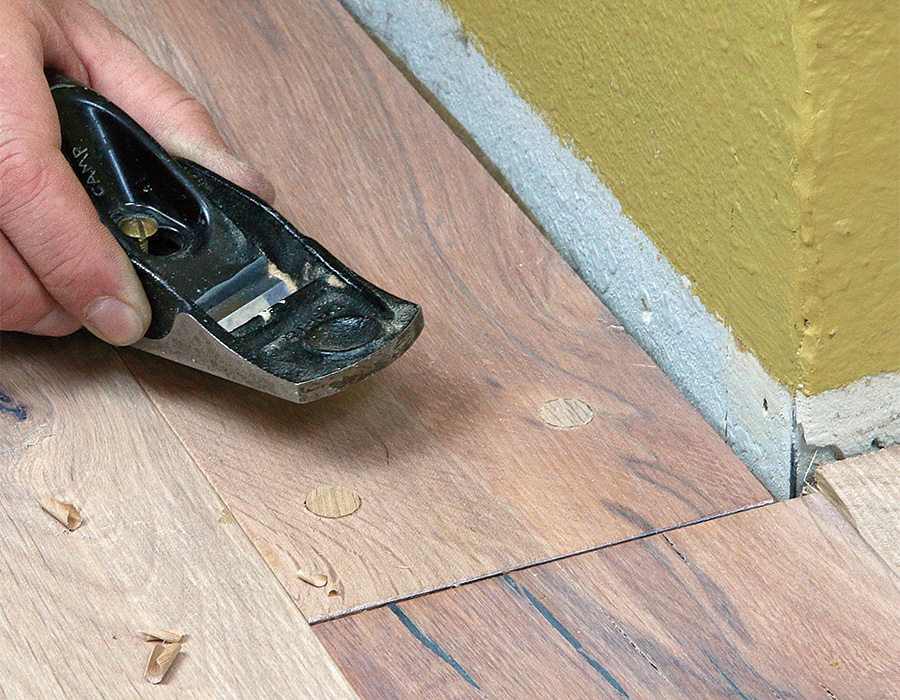
4. Making perfect scribes

Scribes start by back-cutting the piece 10° to 15° on the tablesaw, so there’s less stock to plane away. Begin planing where you need to remove the most material and gradually lengthen your cuts as you get closer to the scribe line. To create an inside curve, hold the plane at an angle to the stock. The more you angle it, the tighter the curve you can plane.
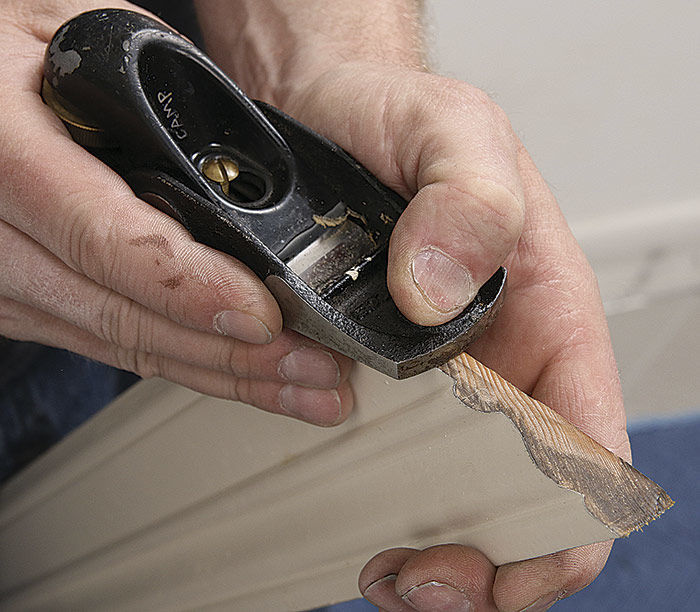
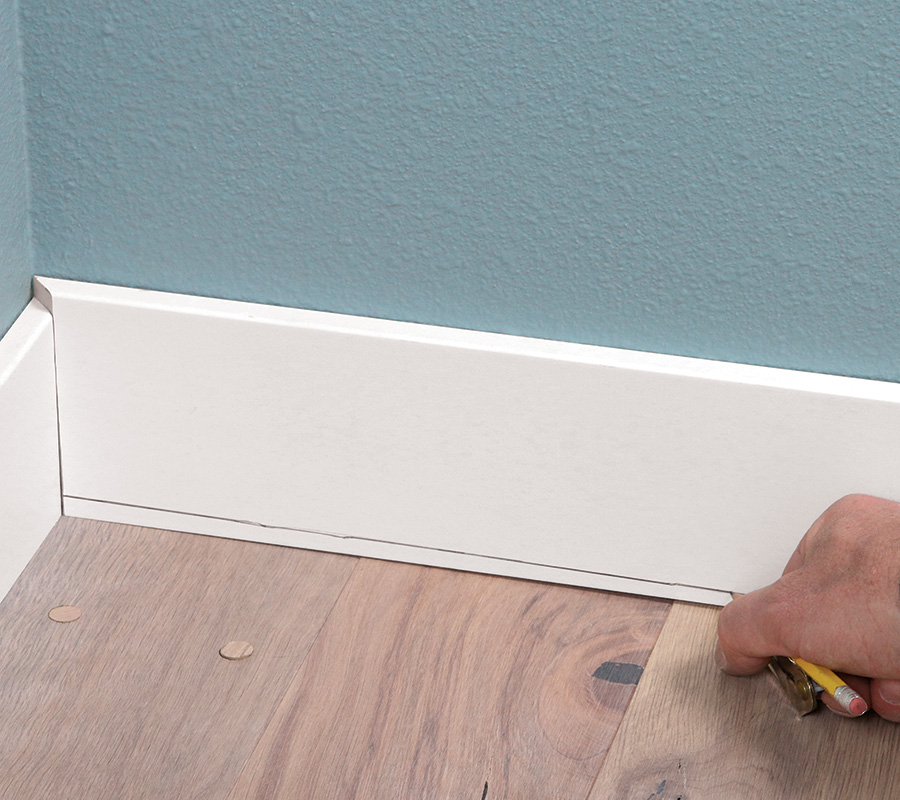
penciling line
back cutting stock on angle
fastening plane

5. Flushing up

To flush up two pieces of stock glued together, like solid-wood edging glued to a plywood shelf, skew the plane so the toe rides on the plywood and the heel hangs off the work. This position may seem backward, but trust me, it’s less likely to result in tearout. Be sure to switch to sandpaper when the edging is just a hair proud of the ply. The same technique works for wood plugs, too.

flushing stock
flushing stock

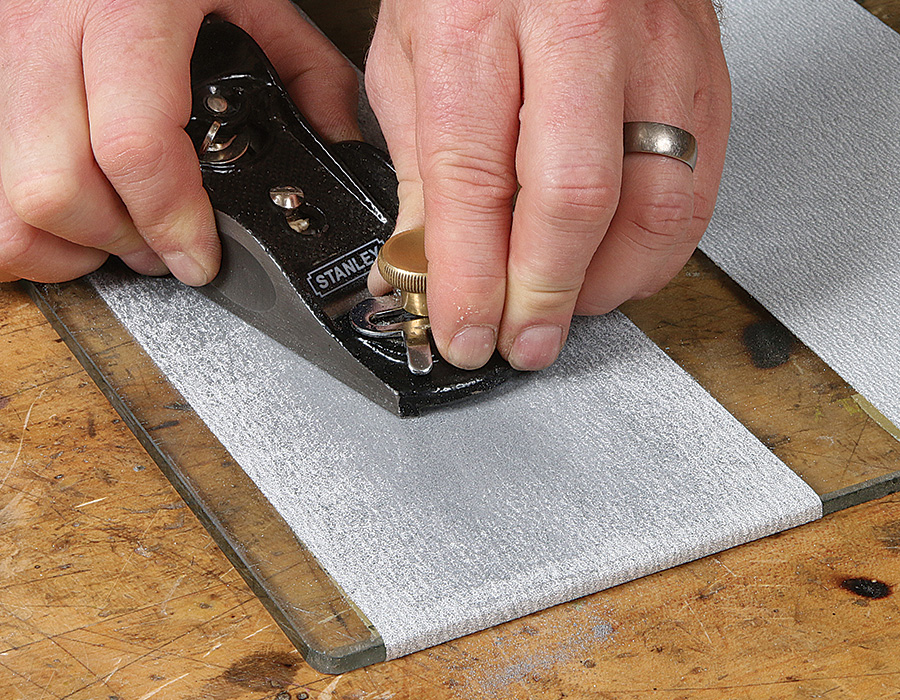
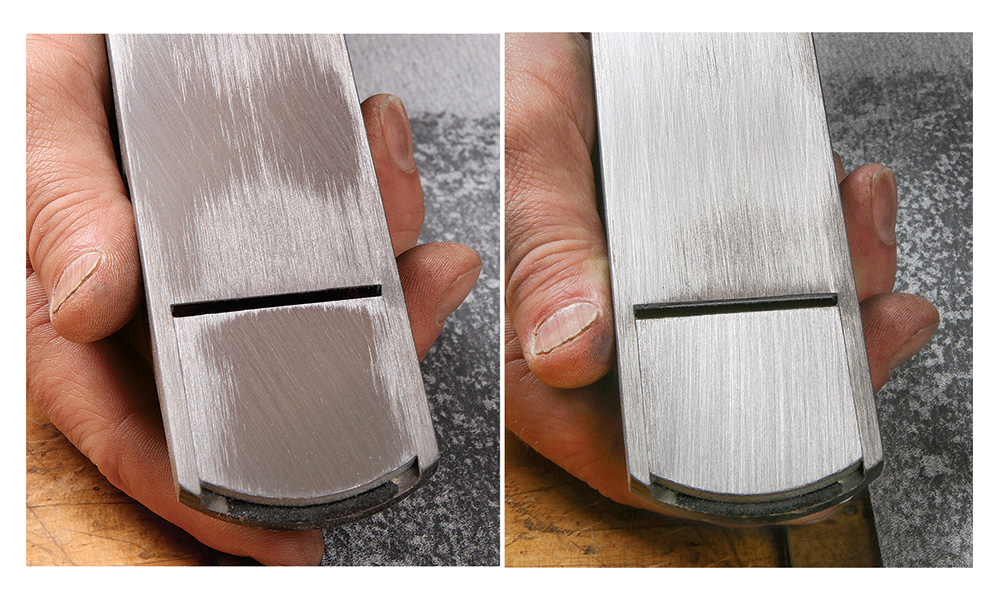
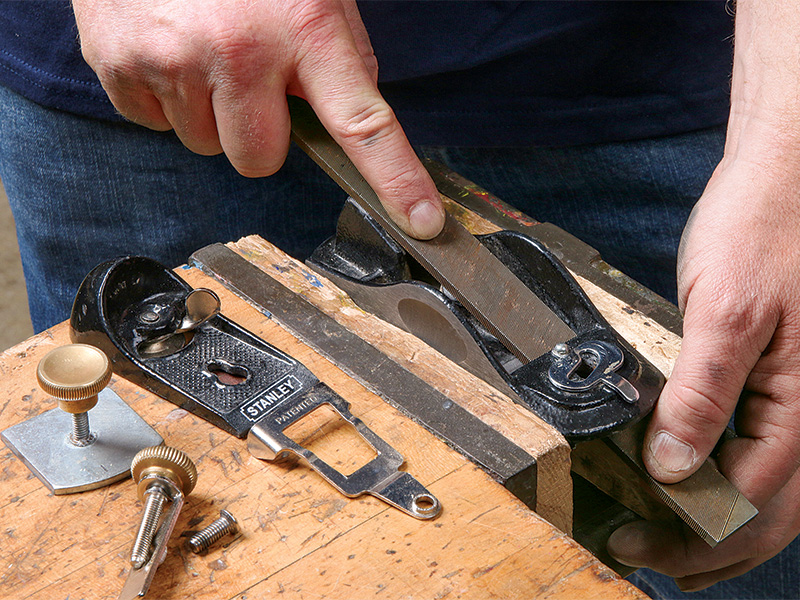
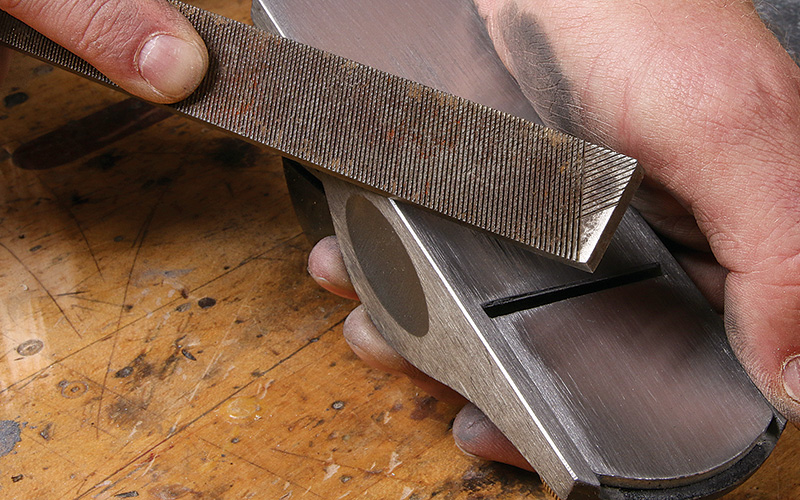
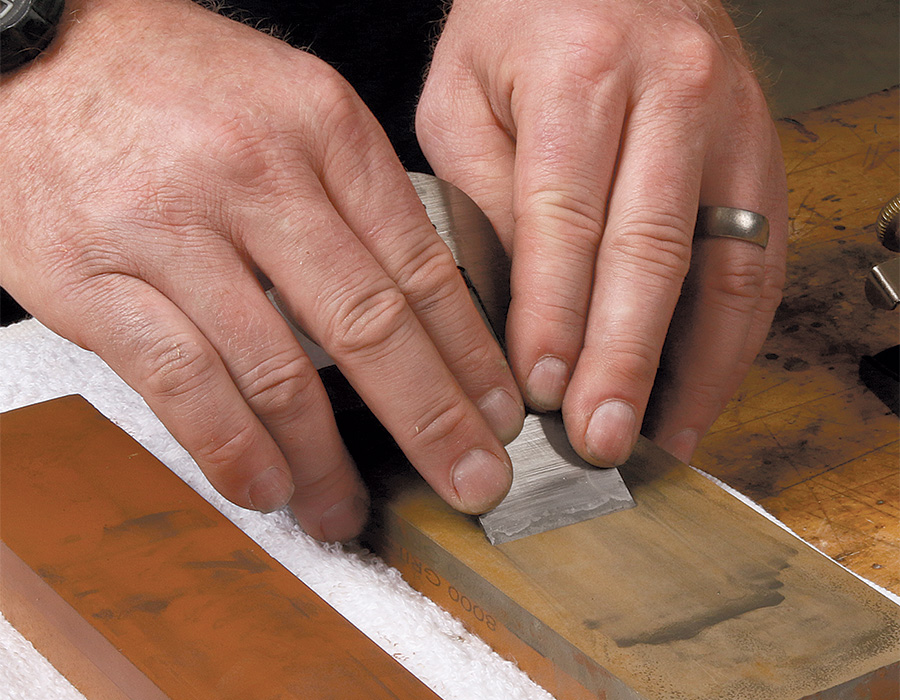
Tune up an old or inexpensive plane

The new planes I recommend below will only require a quick honing of the blade before being put to work (See “Tune up a block plane,” FHB #234). But a middle-of-the-road or vintage plane will require some initial rehab to produce fine results. So, in addition to flattening the back of the blade, you’ll need to spend some time on the plane’s sole, mouth, and edges.

block plane anatomy illustration
Drawings: Vince Babak

Flattening

Flatten the sole
Flatten the sole. Retract the blade and lock it in place. Then, with even pressure, swipe the sole back and forth over 120-grit or 150-grit sandpaper adhered to a piece of glass or granite, or a cast-iron machine surface.
surfaces of flatten sole
Focus on the mouth. Ideally, the entire surface of the sole is evenly abraded. But at a minimum, you want the area directly in front of the cutting edge to be flat and a good percentage of the rest of the sole flat as well. When the bottom shows nearly uniform scratch marks, switch to 220-grit paper and sand again until the sole shows a uniform polish.

Filing

smoothing bed with a fine file
Smooth the bed. Burrs from the machining process and paint overspray will prevent the blade from sitting flat on the bed. Smooth these inconsistencies with a fine file. Also look at the bottom of the lever cap and file it flat where it contacts the blade. Finish by cleaning and oiling the adjustment screws.
Softening edges with block plane
Soften the edges. Unlike a larger plane, a block plane is small enough to fit in one hand. Make the planing experience more comfortable by easing the edges with a file. Doing this file work on the bottom edges will also help the plane glide more smoothly on the wood.

Sharpening

honing blade
Hone the blade. Once the plane body is tuned, hone the blade with diamond stones or water stones. If you want to soup up your old or less expensive plane, buy a replacement blade from Hock Tools (hocktools.com). These high-carbon-steel replacement blades get sharper and hold an edge longer than most stock irons.
Straightening blade
Straighten the blade. After sharpening, install the iron and either sight down the sole or feel with your fingers to be sure the cutting edge is parallel to the mouth. Some planes have an adjustment lever for this and others require tapping the blade to and fro until you get it parallel.
wood shavings
Aim for thin shavings. For best results, adjust the blade so it’s a hair proud of the sole, and if your plane has an adjustable throat, set it to about 1 ⁄ 32 in. or so. Ninety-nine percent of the problems experienced by beginners come down to a dull blade or too heavy of a cut, so get in the habit of taking light cuts, and practice patience. It may take a few more passes, but you’ll have to sharpen less and the finished surface will be better.

Kit Camp is a finish carpenter and teaches middle- and high-school woodworking in Portland, Ore.

Photos by Asa Christiana, except where noted.

Product photos: The Taunton Press staff.

Originally published in Fine Homebuilding #278 titled “Tighten Up Your Trimwork”

To view the magazine version of the article, please click the View PDF button below.

View PDF
Previous: Grex and Hitachi Cordless Brad Nailers Next: Reproducing Traditional Molding: Four Essential Planes

Guide

Finish & Trim Carpentry

Chapter

Tools and Materials

Sign up for eletters today and get the latest how-to from Fine Homebuilding, plus special offers.

Signing you up...

This site is protected by reCAPTCHA and the Google Privacy Policy and Terms of Service apply.
See all newsletters
See all newsletters

Log in or create an account to post a comment.

Sign up Log in

Become a member and get full access to FineHomebuilding.com

Finish & Trim Carpentry

Finish & Trim Carpentry

Trusted, comprehensive guidance from the pros for creating perfect trim details in any room of the house

View Project Guide

View All Project Guides »

Become a member and get unlimited site access, including the Finish & Trim Carpentry Project Guide.

Start Free Trial

Trim Design
  • Trim Style and Design
Tools and Materials
  • Tools
  • Materials
Interior Trim Basics
  • Tips and Tricks
  • Techniques
  • Using Jigs
Window and Door Casings
  • Windows
  • Doors
Baseboard and Crown Molding
  • Baseboard
  • Crown Molding
  • Specialty Crown Situations
Wainscot and Paneling
  • Beadboard Wainscot
  • Paneled Wainscot
  • Chair Rails
  • Wall Treatments
Mantels and Fireplace Surrounds
  • Design
  • Installing Mantels and Surrounds
Coffered Ceilings

Fine Home Building

Newsletter Sign-up

  • Fine Homebuilding

    Home building tips, offers, and expert advice in your inbox.

  • Green Building Advisor

    Building science and energy efficiency advice, plus special offers, in your inbox.

  • Old House Journal

    Repair, renovation, and restoration tips, plus special offers, in your inbox.

Signing you up...

This site is protected by reCAPTCHA and the Google Privacy Policy and Terms of Service apply.
See all newsletters

Follow

  • Fine Homebuilding

    Dig into cutting-edge approaches and decades of proven solutions with total access to our experts and tradespeople.

    Start Free Trial Now
    • Facebook
    • Instagram
    • X
    • LinkedIn
  • GBA Prime

    Get instant access to the latest developments in green building, research, and reports from the field.

    Start Free Trial Now
    • Facebook
    • YouTube
  • Old House Journal

    Learn how to restore, repair, update, and decorate your home.

    Subscribe Now
    • Facebook
    • Instagram
    • X

Membership & Magazine

  • Online Archive
  • Start Free Trial
  • Magazine Subscription
  • Magazine Renewal
  • Gift a Subscription
  • Customer Support
  • Privacy Preferences
  • About
  • Contact
  • Advertise
  • Careers
  • Terms of Use
  • Site Map
  • Do not sell or share my information
  • Privacy Policy
  • Accessibility
  • California Privacy Rights

© 2025 Active Interest Media. All rights reserved.

Fine Homebuilding receives a commission for items purchased through links on this site, including Amazon Associates and other affiliate advertising programs.

  • Home Group
  • Antique Trader
  • Arts & Crafts Homes
  • Bank Note Reporter
  • Cabin Life
  • Cuisine at Home
  • Fine Gardening
  • Fine Woodworking
  • Green Building Advisor
  • Garden Gate
  • Horticulture
  • Keep Craft Alive
  • Log Home Living
  • Military Trader/Vehicles
  • Numismatic News
  • Numismaster
  • Old Cars Weekly
  • Old House Journal
  • Period Homes
  • Popular Woodworking
  • Script
  • ShopNotes
  • Sports Collectors Digest
  • Threads
  • Timber Home Living
  • Traditional Building
  • Woodsmith
  • World Coin News
  • Writer's Digest
Active Interest Media logo
X
X
This is a dialog window which overlays the main content of the page. The modal window is a 'site map' of the most critical areas of the site. Pressing the Escape (ESC) button will close the modal and bring you back to where you were on the page.

Main Menu

  • How-To
  • Design
  • Tools & Materials
  • Video
  • Blogs
  • Forum
  • Project Guides
  • Reader Projects
  • Magazine
  • Members
  • FHB House

Podcasts

  • FHB Podcast
  • ProTalk

Webinars

  • Upcoming and On-Demand

Podcasts

  • FHB Podcast
  • ProTalk

Webinars

  • Upcoming and On-Demand

Popular Topics

  • Kitchens
  • Business
  • Bedrooms
  • Roofs
  • Architecture and Design
  • Green Building
  • Decks
  • Framing
  • Safety
  • Remodeling
  • Bathrooms
  • Windows
  • Tilework
  • Ceilings
  • HVAC

Magazine

  • Current Issue
  • Past Issues
  • Magazine Index
  • Subscribe
  • Online Archive
  • Author Guidelines

All Access

  • Member Home
  • Start Free Trial
  • Gift Membership

Online Learning

  • Courses
  • Project Guides
  • Reader Projects
  • Podcast

More

  • FHB Ambassadors
  • FHB House
  • Customer Support

Account

  • Log In
  • Join

Newsletter

Get home building tips, offers, and expert advice in your inbox

Signing you up...

This site is protected by reCAPTCHA and the Google Privacy Policy and Terms of Service apply.
See all newsletters
See all newsletters

Follow

  • X
  • YouTube
  • instagram
  • facebook
  • pinterest
  • Tiktok

Join All Access

Become a member and get instant access to thousands of videos, how-tos, tool reviews, and design features.

Start Your Free Trial

Subscribe

FHB Magazine

Start your subscription today and save up to 70%

Subscribe

We hope you’ve enjoyed your free articles. To keep reading, become a member today.

Get complete site access to expert advice, how-to videos, Code Check, and more, plus the print magazine.

Start your FREE trial

Already a member? Log in

Privacy Policy Update

We use cookies, pixels, script and other tracking technologies to analyze and improve our service, to improve and personalize content, and for advertising to you. We also share information about your use of our site with third-party social media, advertising and analytics partners. You can view our Privacy Policy here and our Terms of Use here.

Cookies

Analytics

These cookies help us track site metrics to improve our sites and provide a better user experience.

Advertising/Social Media

These cookies are used to serve advertisements aligned with your interests.

Essential

These cookies are required to provide basic functions like page navigation and access to secure areas of the website.

Delete My Data

Delete all cookies and associated data