
Job-Site Router Jigs
Made from material you likely have on hand, these router jigs add speed, accuracy, and detail to your trimwork.

Trim carpenter Gary Striegler loves routers. He uses them every day and on all sorts of projects. To enable him to make consistent cuts quickly and safely, he has created a number of jigs. In this article, he shares four of them: one each designed to cut flutes, shelf dados, dentil moldings, and curves. For each jig, he explains what it does, the router setup it requires (including the bits needed), how to make it, and how to use it.
If you were to visit my shop or job site, you’d know how much I love routers. I have them with standard bases and plunge bases; I have double-knob and D-handles; I have and use every size from light-duty laminate trimmers to 3-hp beasts. I use them to prep doors for hanging, to rout stair stringers, to dado bookshelves, and to create all kinds of details for custom trim and cabinetry. I use routers every day, and they are among the most versatile power tools that I own.
Over the years, I’ve accumulated a lot of jigs to go with my selection of routers. A good jig helps me make consistent cuts safely and with more speed. And the best part is that once I make a jig, I can use it over and over again. I just hang it from a nail in my shop so it’s there when I need it. Some, like my dado jig, get used on nearly every job. Others are more design-specific and allow me to use my router to add custom details to my work. For each jig depicted here, I describe the router setup. But in general , you’ll want to use at least a 11 ⁄ 2-hp router and, if possible, a 1 ⁄ 2-in. collet for these tasks. A powerful router and sharp 1 ⁄ 2-in.-shank bit minimize vibration and give you more control for better results.
If you were to visit my shop or job site, you’d know how much I love routers. I have them with standard bases and plunge bases; I have double-knob and D-handles; I have and use every size from light-duty laminate trimmers to 3-hp beasts. I use them to prep doors for hanging, to rout stair stringers, to dado bookshelves, and to create all kinds of details for custom trim and cabinetry. I use routers every day, and they are among the most versatile power
tools that I own.
Over the years, I’ve accumulated a lot of jigs to go with my selection of routers. A good jig helps me make consistent cuts safely and with more speed. And the best part is that once I make a jig, I can use it over and over again. I just hang it from a nail in my shop so it’s there when I need it. Some, like my dado jig, get used on nearly every job. Others are more design-specific and allow me to use my router to add custom details to my work. For each jig depicted here, I describe the router setup. But in general, you’ll want to use at least a 1-1⁄2-hp router and, if possible, a 1⁄2-in. collet for these tasks. A powerful router and sharp 1⁄2-in.-shank bit minimize vibration and give you more control for better results.
Flutes perfectly spaced, every time
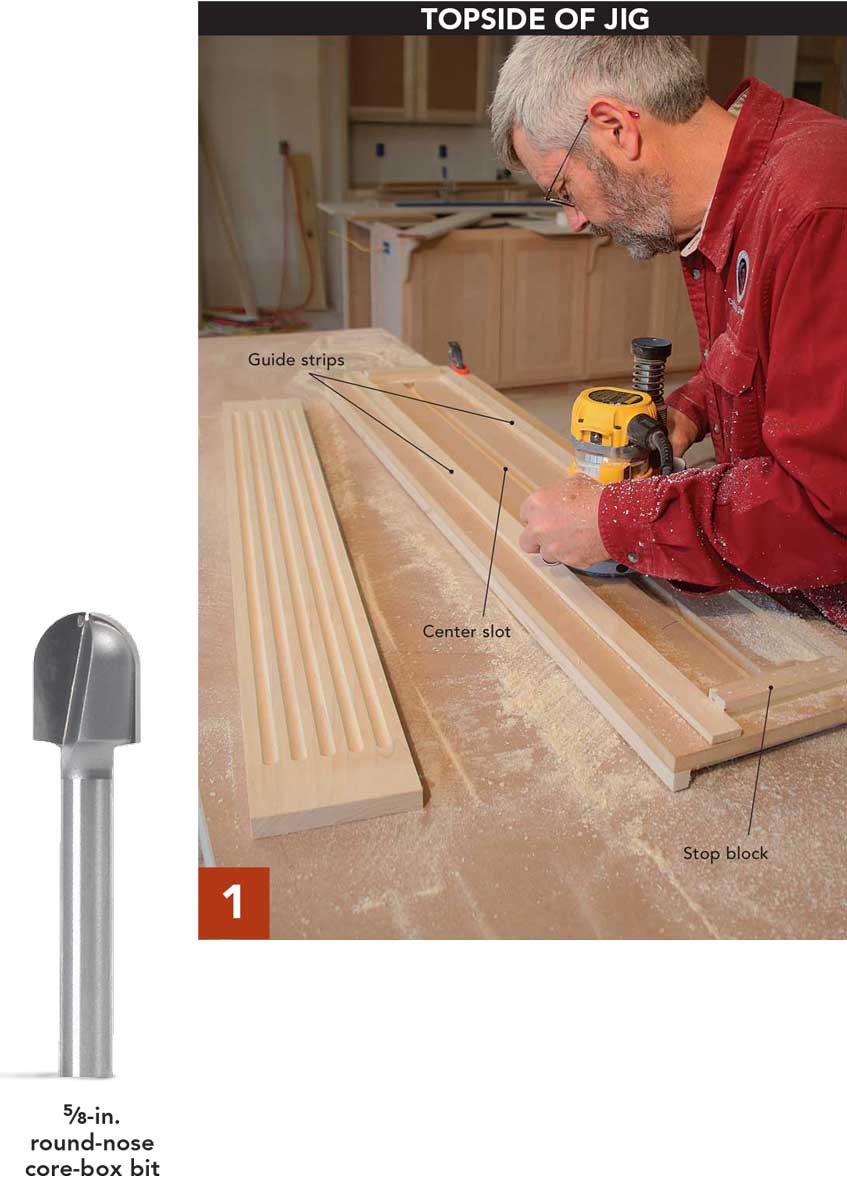
Router setup. For this jig, you’ll need a plunge router with a round-nose core-box bit. For smaller flutes, use a 1⁄4-in.-dia. bit. For larger flutes, use a 5⁄8-in.-dia. bit. I typically set the depth of cut to about 1⁄4 in.
Make it. The top of the jig is a piece of 3⁄4-in. MDF with a center slot cut to within 4 in. of each end. There’s a 3⁄4-in. by 3⁄4-in. strip of wood nailed under each edge. The jig shown here is set up for 5-1⁄2-in.-wide fluted mantel pilasters—it is 40 in. long and meant to make five flutes—but you can modify it for any length, width, and number of flutes you need to make. The base of a plunge router rides between two guide strips nailed to the top of the jig (1). The strips are spaced with just enough play for the router to slide, but with no extra wiggle room. A stop block between the strips at each end sets the start and stop points for the flutes.
Use it. The real magic is the aspect of the jig that helps you to nail the flute spacing without using a tape measure. This happens on the underside of the jig, where three sets of spacers hold the workpiece within a frame nailed around the perimeter. The spacers in the first set are each 2-5⁄16 in. wide to center a flute on the pilaster (2). The next set has one spacer 1-5⁄16 in. wide and another 3-5⁄16 in. wide to cut the flutes to the right and left of the center flute (3). After cutting a flute to one side of the center, swap the spacers to cut the flute to the opposite side of center. The final flutes are made with 4-1⁄4-in. and 3⁄8-in. spacers that push the jig over to make the outside cuts. Again, after you make the first cut, swap the spacers to cut the last flute (4).

Fast, straight shelf dados
What it does. If you build cabinets or bookshelves on site, at some point you’ll likely need to cut some dados. A great way to make dados is with a router and a straightedge to guide the cut. While any straightedge will work, you’ll have to mark an offset for each dado equal to the distance from the edge of your router base to the bit. That wastes a lot of time and is not very accurate. This simple jig eliminates the measuring and reduces the possibility of error.
Router setup. Use a fixed-base router and a straight bit with a diameter that matches the thickness of the shelves you’ll be installing. The depth of cut depends on how you’ll be building the shelves and what they will be used for. For example, if the shelves will also be screwed to the side panels, or if they’ll be holding only lightweight display items, a 1⁄8-in.-deep dado will do. If they’ll only be glued or will be loaded up with books, make your dado 3⁄8 in. deep.
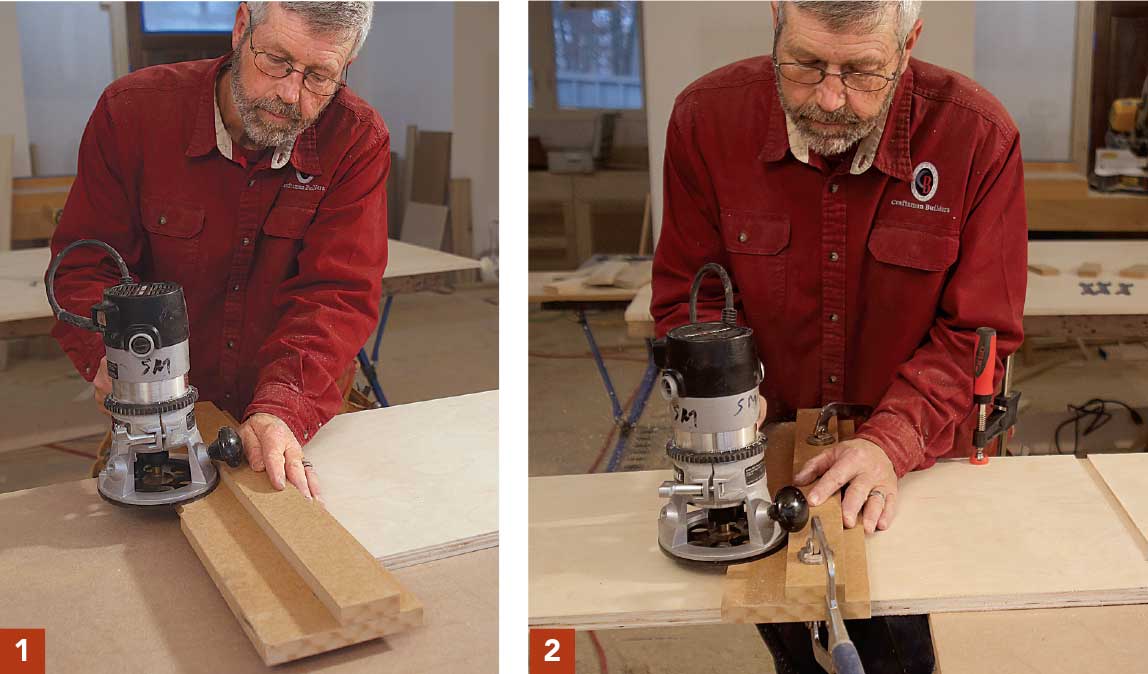
Make it. Use a 6-in.-wide piece of 3⁄4-in. MDF for the base of the jig and a 2-in.-wide strip as the edge guide. Nail the 2-in. strip on top of the base about 2-3⁄4 in. back from the edge. Set the router bit a little over 3⁄4 in. deep, and run the router along the 2-in. strip, trimming the edge of the base (1). This fresh edge can now be used to align one side of your dados.
Use it. Lay out the dados on your workpiece with pencil marks on both edges, then place the jig’s edge on each pencil mark and clamp it in place. Now it’s just a matter of setting the router depth and making the cut, keeping consistent pressure to maintain contact between the router base and the fence (2).
 Dentil molding at a production pace
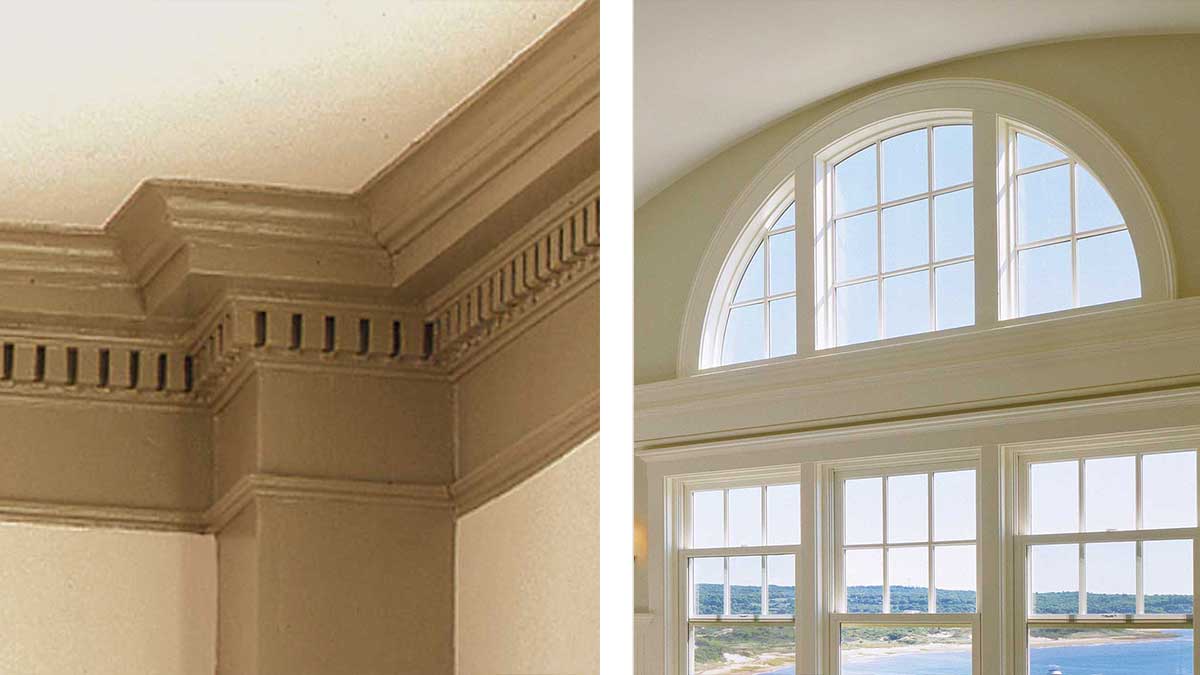
What it does. Dentil molding is a classic detail to add to a mantel cornice or to built-up crown molding. Though you can buy dentil molding, custom trimwork often calls for custom proportions.
Router setup. For most dentil molding, you’ll want a 1⁄2-in.-dia. mortise bit, but you can adjust the look by using a bigger or smaller bit. A fixed-based router is best, and the depth of cut should be at least 1⁄4 in., with 3⁄8 in. being more common. If you go for a deeper cut, you may have to make multiple passes to cut cleanly and safely.
Make it. The jig is just a plywood subbase with a guide strip attached to the base of the router. If you use a 1⁄2-in. bit and make the dentil cuts 3⁄8 in. deep, the guide strip should be 5⁄16 in. deep and just a whisker under 1⁄2 in. wide. This way the guide strip will slide nicely through the previous cut. You can also wax the guide strip to help it slide smoothly.
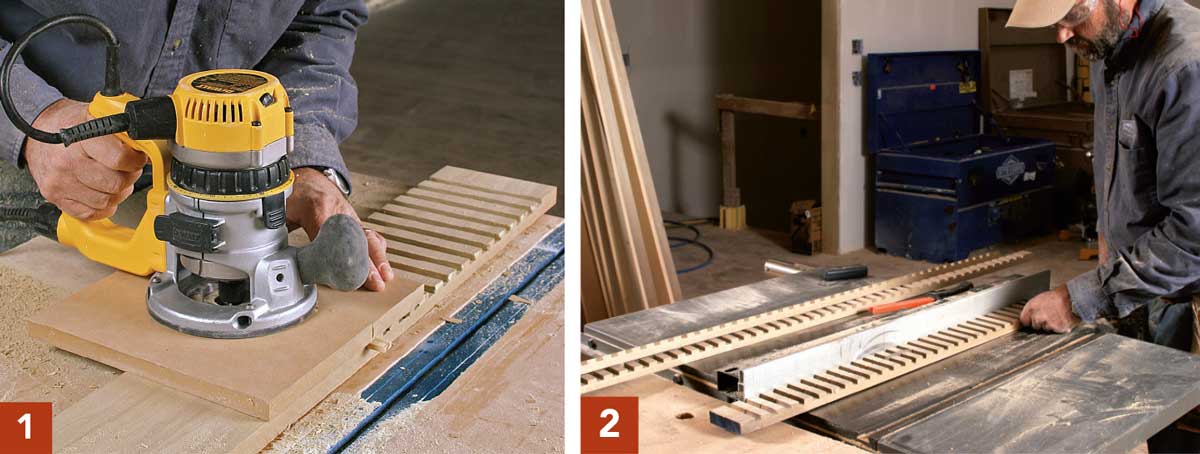
Use it. Make your first cut with the guide strip riding on the edge of your workpiece. Then run the guide strip in the first cut to make your second cut. Work your way down the workpiece as the guide strip rides in the previous cut (1). In this way, the spacing of the dentil cuts is set by the distance between the guide strip and the router bit. If you need a lot of molding, make your dentil cuts through an extrawide board and then rip it on the tablesaw to create individual strips (2).
Clean curves with a strip of plywood
What it does. There are lots of ways to make curved millwork. Some methods require expensive tools and a shop space to work in; others require less expensive tools but are more labor intensive. But you can also make a lot of curved trim right on site with a trammel made from a 48-in. rip of plywood.
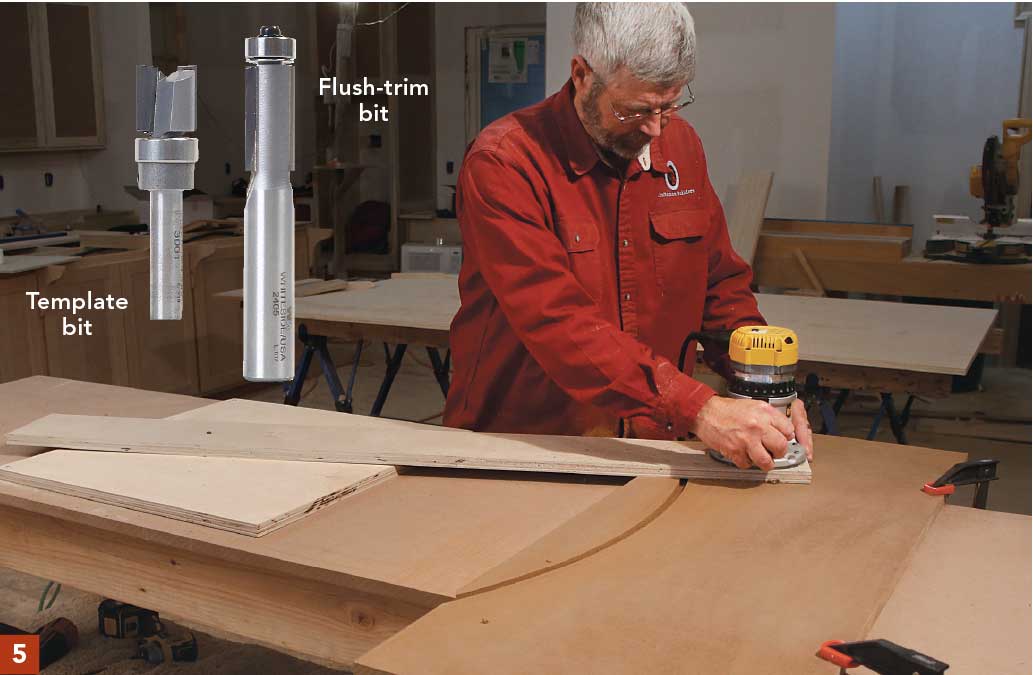
Router setup. For this jig, you’ll use a fixed-base router with a 1⁄2-in.-dia. template bit to rout the curve, and a flush-trim bit to finish the job. Set the template-bit depth to 3⁄8 in., just deep enough to establish a clean edge for the bearing of the flush-trim bit to ride along later as you clean up the curve.
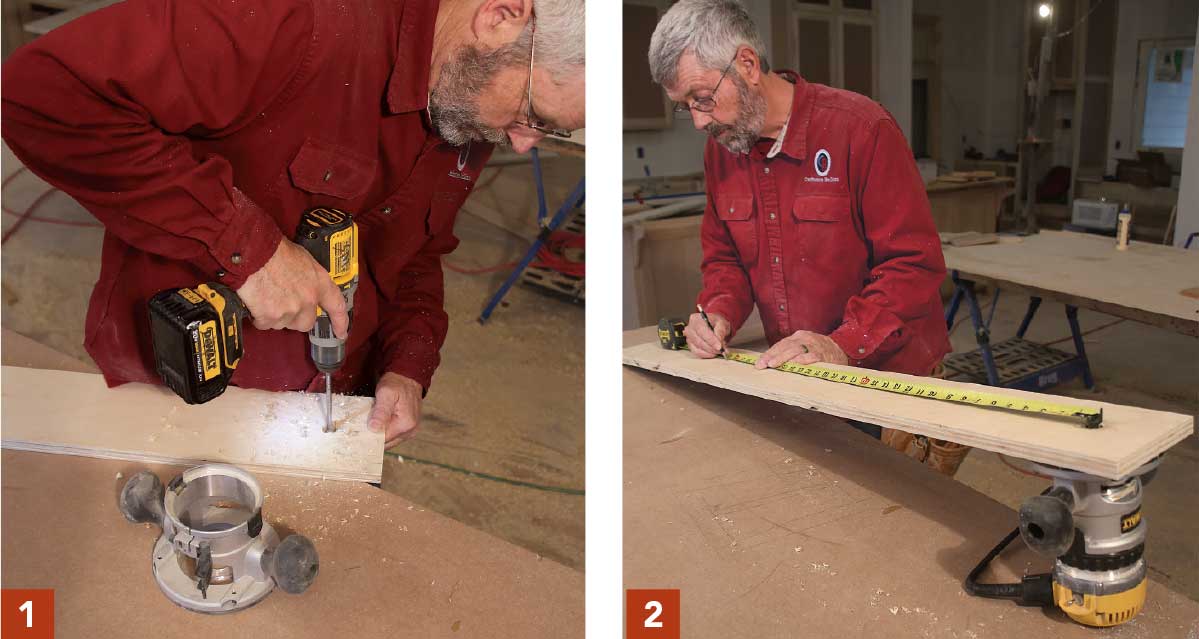
Make it. Almost all routers have a 6-in.-dia. base, so a 6-in.-wide strip of plywood is an ideal trammel arm. Drill a 3⁄4-in. hole—centered 3 in. from the leading edge—and then mount the router base to the plywood, flushed up with all three edges (1). If your router base doesn’t have holes that you can put screws through, drill them yourself.
Use it. Measure from the farthest edge of the bit to mark a point that matches the radius of the curve you want to cut, and then drive a long screw into the center of the jig at that spot (2). Pivoting the trammel from this point will cut the inside edge of the curve. Add the width of the trim you need plus the diameter of the router bit, then measure this distance from the inside edge of the bit. Pivoting the trammel from this point will cut the outside edge of the curve.
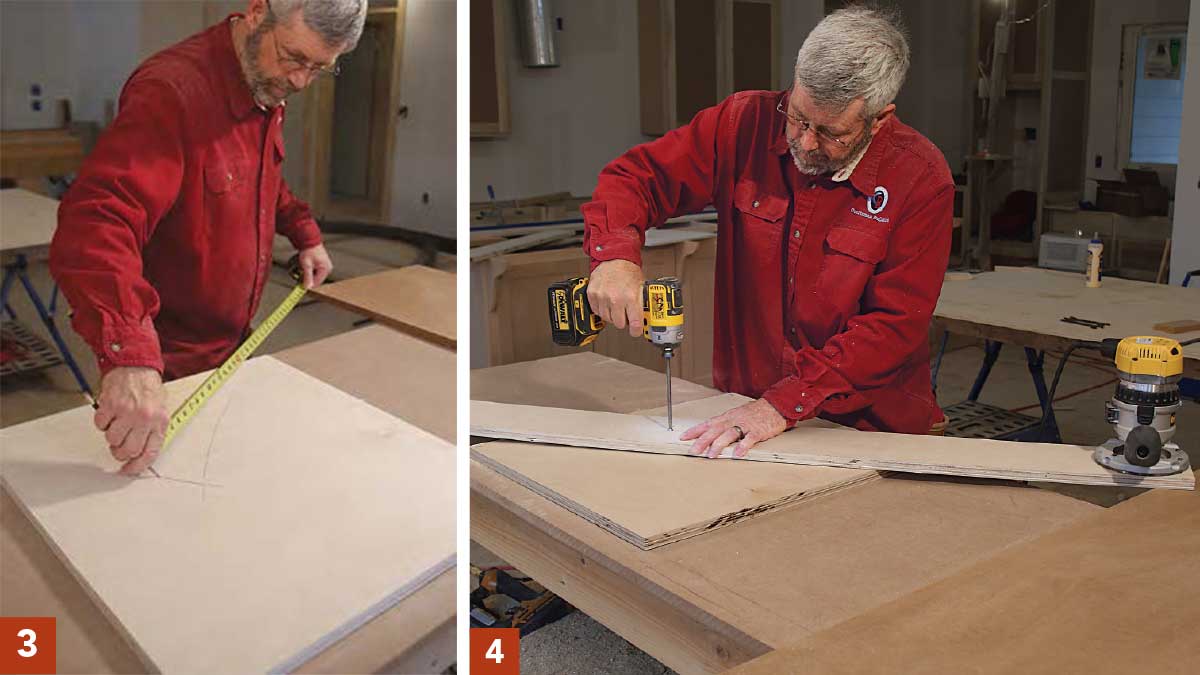
To locate the pivot point, measure the radius from each corner of your workpiece and sweep the tape left and right to create an arc (3). The point where the two arcs cross is the pivot point, which doesn’t change. Drive the first screw into the pivot point and make the first cut (4). You don’t need to rout the first pass any deeper than 3⁄8 in. After your first cut, remove the pivot screw from the pivot point and drive back into the pivot point at the second mark to cut the other edge of your trim (5).
After one pass with the router and trammel jig on the inside radius and one pass on the outside radius, cut the piece out with a jigsaw, staying about 1⁄8 in. from the clean edge cut by the router. Clean up the edge with a router and a pattern-cutting bit.
Gary Striegler is a trim carpenter in Fayetteville, Ark. Photos by Brian Pontolilo, except where noted. Product photos: Melinda Sonido
From Fine Homebuilding #280
More on FineHomebuilding.com about routers:
- Video How To: Fast and Accurate Hinge Mortises
- How to Cut Window and Door Openings With a Router
- Tool Test: Compact Routers
Fine Homebuilding Recommended Products
Fine Homebuilding receives a commission for items purchased through links on this site, including Amazon Associates and other affiliate advertising programs.

Hitachi Pin Nailer (NP35A)

Reliable Crimp Connectors

Milwaukee 18v Cordless Reciprocating Saw (2720)
