FHB Logo Facebook LinkedIn Email Pinterest Twitter X Instagram Tiktok YouTube Plus Icon Close Icon Navigation Search Icon Navigation Search Icon Arrow Down Icon Video Guide Icon Article Guide Icon Modal Close Icon Guide Search Icon Skip to content
Subscribe
Log In
  • How-To
  • Design
  • Tools & Materials
  • Restoration
  • Videos
  • Blogs
  • Forum
  • Magazine
  • Members
  • FHB House
  • Podcast
Log In

Fine Homebuilding Project Guides

Finish & Trim Carpentry

Guide Home
  • Trim Design
  • Tools and Materials
  • Interior Trim Basics
  • Window and Door Casings
  • Baseboard and Crown Molding
  • Wainscot and Paneling
  • Mantels and Fireplace Surrounds
  • Coffered Ceilings
How-To

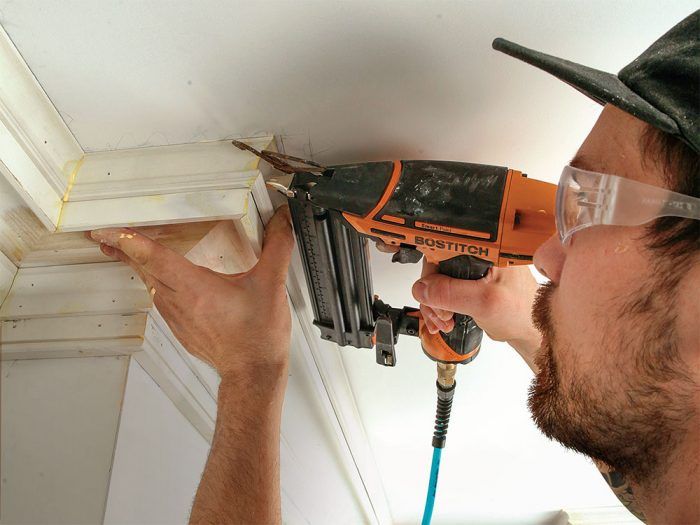
How to Install Built-up Crown Molding

Use these time-tested design principles and basic carpentry techniques to create beautiful layered crown and cornice trim details that will dress up any room in your house.

By Tyler Grace Issue 286 - Oct/Nov 2019
  • X
  • facebook
  • linkedin
  • pinterest
  • email
  • add to favorites Log in or Sign up to save your favorite articles

Synopsis: Built-up molding assemblies may seem complex to install, but as remodeler Tyler Grace describes, the work is really just layering molding profiles using simple carpentry. With the example of a shallow cornice molding he installed in a small bathroom, Grace walks through the steps of installing the frieze, soffit, bed molding, fascia, and cove molding, and gives solutions for wavy walls and ceilings. The article includes an explanation of proper architectural profiling with examples of molding designs, as well as tips and techniques for installing a layered buildup.


At first glance, installing a built-up cornice or crown molding assembly may seem complex or daunting for even the most experienced carpenters. Whether it’s the layers of profiles, blocking, copes, miters, angles, or existing conditions, you are contending with a lot of variables during planning and installation. The fact of the matter is that when you break down the assembly, it’s all just basic carpentry. The most difficult aspect of the entire job may very well be nailing the proportions (pun intended) and properly layering the profiles. Once you inventory the space, locate your pinch points, and determine the layout, you’re basically just circling the room one molding profile at a time. Often, at least some of the layers of the buildup can be downright simple. For example, several of the layers used here are installed on reference lines snapped on just the wall or the ceiling.

Kuiken brothers federal shallow cornice

Before touching a saw, take a look at the room, assess what’s there and what’s going to be there, and figure out what’s going to be a problem. Will the molding bump into window or door casing? Will it overlap a can light? In this bathroom, a bath fan near the end of a narrow corridor to a walk-in shower was a potential pinch point. We had to ensure that the buildup wouldn’t bump into the fan and that the fan was dead center in the space—otherwise the molding would highlight the asymmetry.

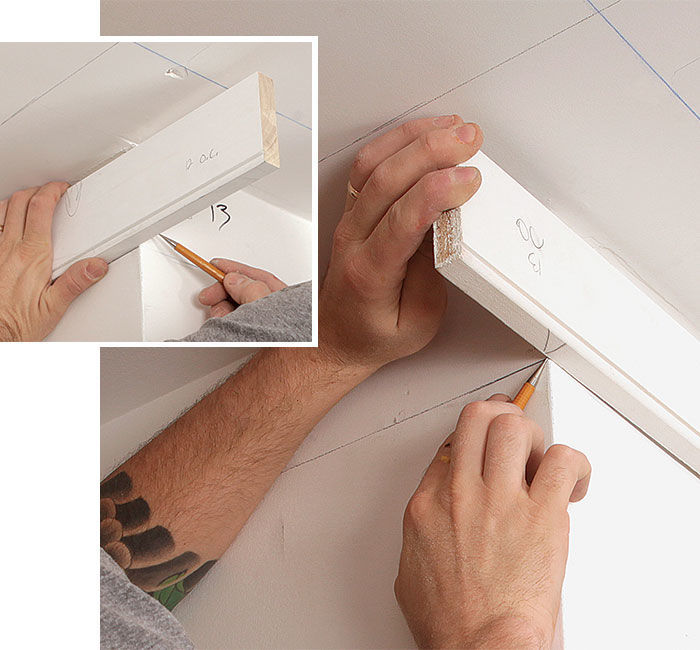
This may be obvious, but is worth noting: As you add layers to built-up moldings, the lengths change. Where you may start with, say, 10 ft. between inside corners, the length will shrink as you add layers to the buildup. Likewise, the lengths between outside corners will grow as you add layers.

Architectural profiling

Kuiken brothers contemporary farmhouse cornice

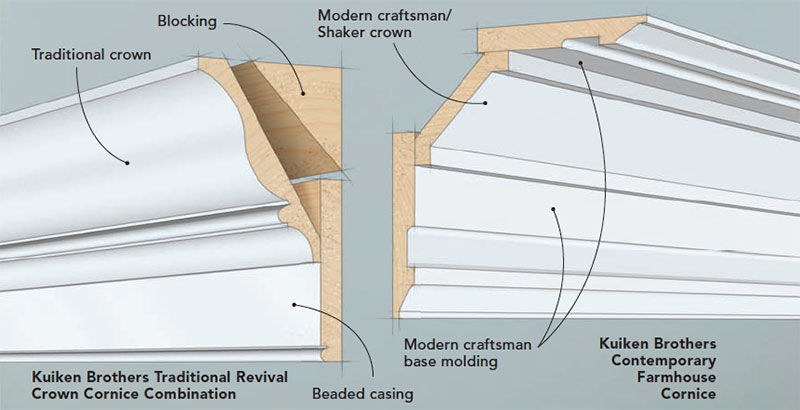
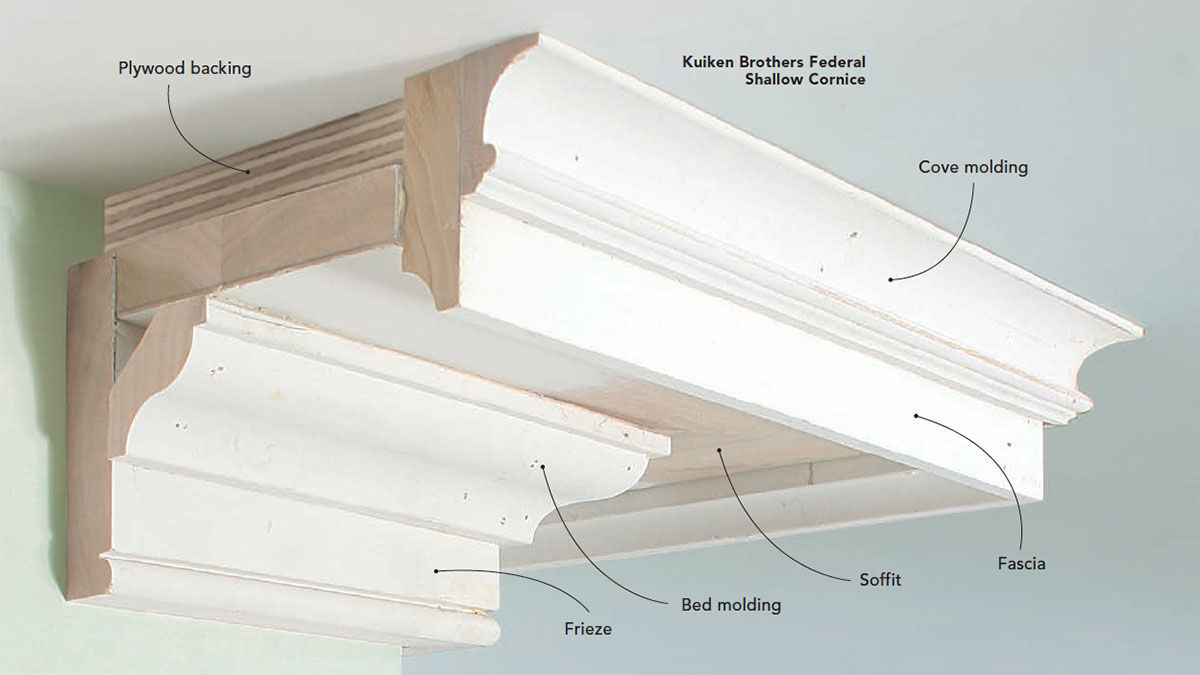
Layering trim profiles without an understanding of the orders of architecture can have mixed results. As a starting point, look to traditional Greek and Roman architecture for guidance on profiles and their arrangements, and proportion the buildup to the room. Various buildups are made by arranging pieces from families of related moldings. There’s no shame in outsourcing the molding design to someone who knows what they’re doing. Kuiken Brothers, an East Coast building supplier, created the authentic Federal-style cornice featured here, and scaled it down to work with the 8-ft. ceilings in our 200-sq.-ft. bathroom.
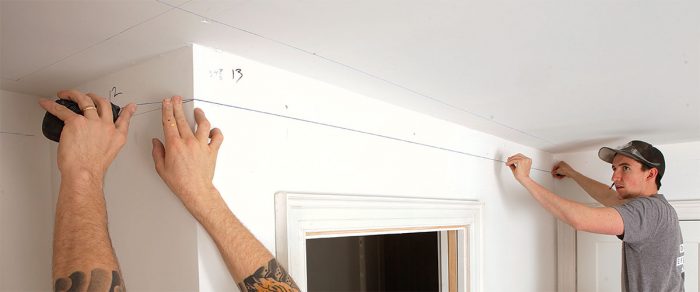
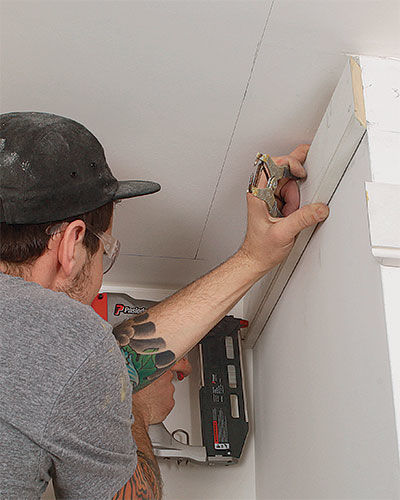
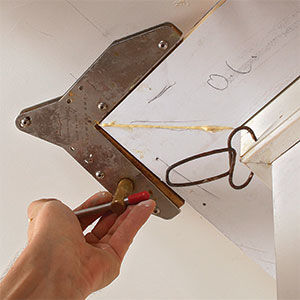
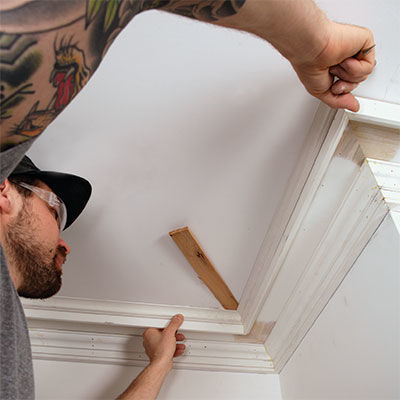
Part 1: The frieze

using pencil and gauge blocks to mark corners
Gauge down and out. For accuracy, use a sharp pencil and gauge blocks, rather than a tape or combination square, to mark every corner. Bevel the blocks so they make clean contact with the walls and ceiling rather than the wall-to-ceiling joint, where built-up drywall compound can throw off measurements.

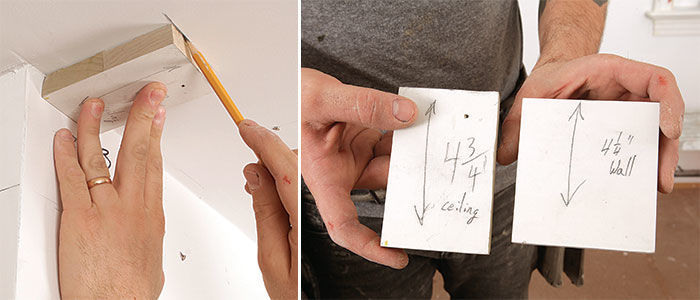
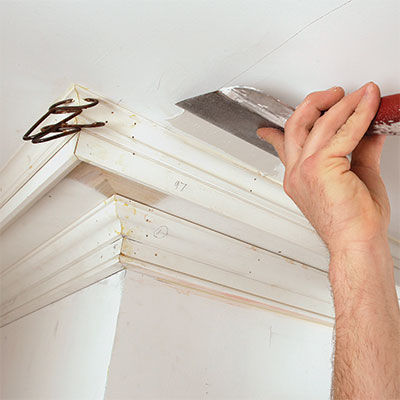
Lines snapped on the ceiling and walls help keep everything on track. Use gauge blocks to set reference marks at every corner, but don’t mark in between corners. Instead, connect the points between corners. This way, you can establish straight lines even if the walls or ceiling are wavy. The bottom of the frieze aligns with the lines on the walls; the lines on the ceiling represent the front of the blocking for the soffit and fascia.
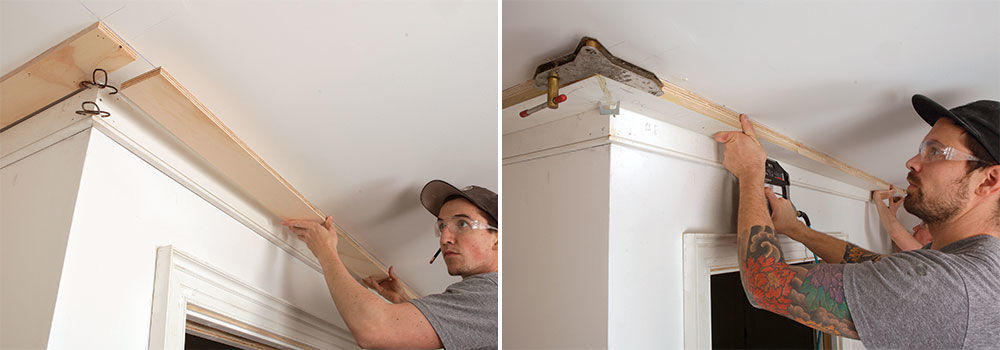
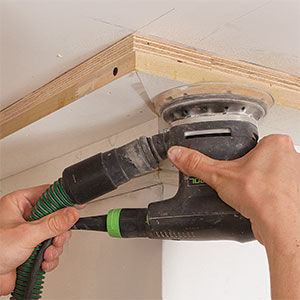
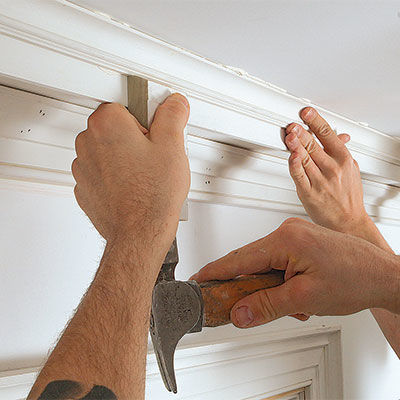
connecting gauge-block marks at corners with chalklines or level and pencil
Connect the dots. Connect the gauge-block marks at the corners with chalklines or a level and pencil.

cutting frieze stock
Cope inside corners. Cut the frieze stock to rough lengths, mark each piece, and cut all of the copes in one shot. I rough-cut the cope with a miter saw and jigsaw, and clean it up with files.

fitting coped joints
Miter outside corners. Mark cuts for outside corners in place, fitting coped joints tightly before marking.

dry-fit joints
Line it up. Dry-fit joints before fastening the pieces. This often requires having the pieces they intersect at the far ends either installed or dry-fit to ensure the lengths and miters are spot on. A helper or two is required for this step.

Applying beads of polyurethane adhesive
Fastened but free. Apply beads of polyurethane adhesive to the back of the piece and to the coped joint to provide reinforcement. Don’t fasten the mitered end to the wall until that joint is assembled.
Assembling the joints using wood glue and miter clamps
Assemble and nail. Assemble the joints using wood glue and miter clamps, then put two 2 1/2-in. 16-ga. nails in the frieze on both sides of the joint, about 2 in. from the miter. On long runs, continue nailing about halfway down the length, leaving the far end free to fit the next joint. (If you need to remove clamps before the glue sets, drill a pilot hole and sink a trim screw.)

Part 2: The soffit

Just as with standard crown, backing and blocking are important elements for a solid installation. If you’re able to open up the ceiling, install blocking between joists so you have something solid to nail to on runs parallel to the joists. In the buildup itself, backing fills voids between molding elements and the substrate for a more robust assembly. Moldings that run perpendicular to floor or ceiling joists can usually be fastened to those framing members. Additional backing or blocking is required for some, but not all, buildups on walls parallel to framing.

installing plywood
Back it up. Install strips of 3/4-in. plywood to fill the gap between the soffit and the ceiling, creating a solid gluing and nailing surface for both the soffit and the fascia that comes later. Fasten the backer with PL glue and 2 1/2-in. 16-ga. nails. Then glue and nail. Fasten the soffit to the plywood backer using beads of PL glue and pairs of 2 1/2-in. 16-ga. finish nails every 12 in. Again, leave the far end free until the miter is assembled. Note that the backer is slightly narrower than the soffit to ensure it doesn’t interfere with the fascia.

pinch dogs and miters
Pinch and lever. Use pinch dogs to draw miters tight where traditional clamps can’t reach. A stiff putty knife is useful to adjust pieces into plane and hold them there while hammering in pinch dogs or nailing.

Biscuiting miter in the soffit
Reinforce miters. Biscuit every miter in the soffit, and cut the slots closer to the edge that faces into the room. Glue both slots and the faces of the miters before assembling.

clamping multiple clamps to hold joint
Clamp combo. Install all clamps before nailing off either side of the joint. Clam clamps hold the joint tight and stabilize it; a pinch dog an inch off the back of the miter helps hold the short points tight.

sanding the soffit
Sand or be sorry. Make your life (or at least the painter’s life) easier by sanding the soffit before installing the next layers. It’ll be hard to get in there later.

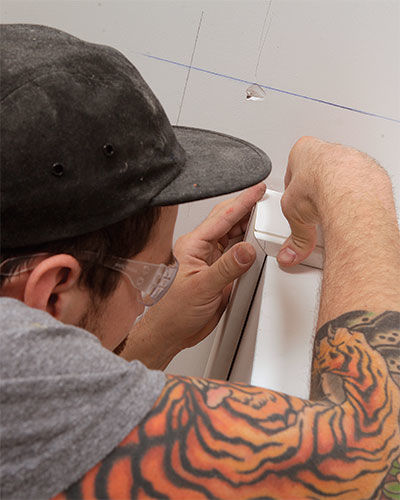
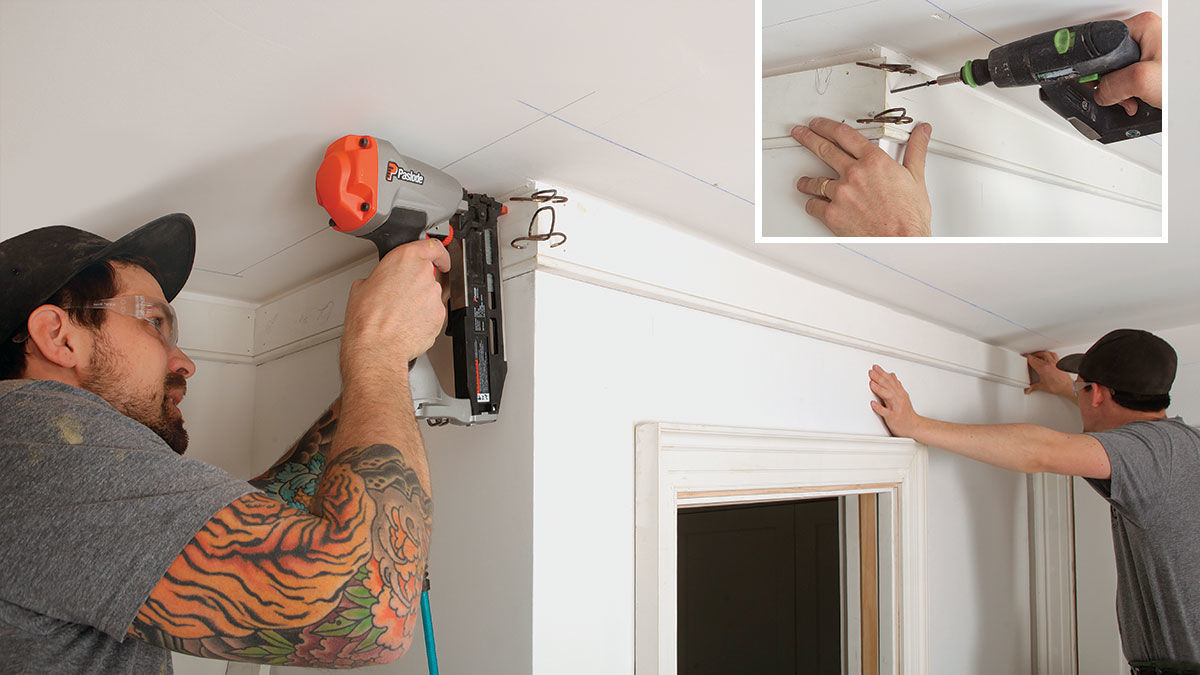
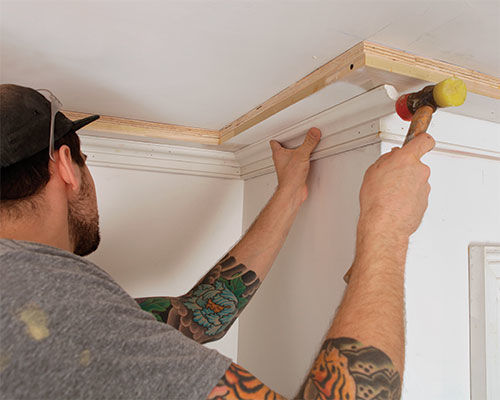
Part 3: The bed molding

Things can get tricky when layers bridge the wall and ceiling planes. If there are irregularities in either surface, you may be tempted to split the difference—don’t. Keep reveals between moldings consistent on the wall plane. Here, for instance, the eye will more easily pick up if the bed molding is out of parallel with the frieze than with the back of the fascia. Fasten every 12 in. with pairs of 1 1/2-in. 18-ga. finish nails through the meatier parts of the molding and into the soffit and frieze.
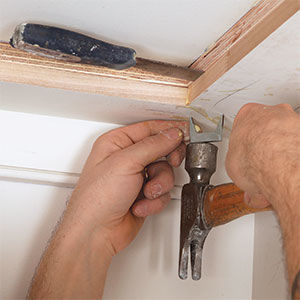
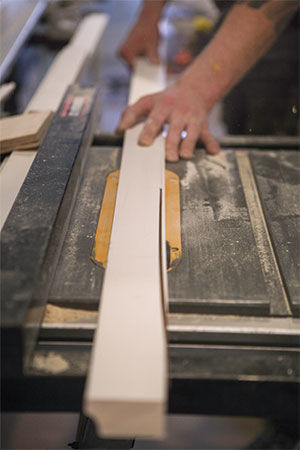
eyeing frieze to bed molding
Set control lines. Set a combination square to the distance from the bottom of the frieze to the bottom of the bed molding, and mark this reveal on both sides of every corner and every 2 ft. or so along the frieze. Assemble using the same basic procedure used for the frieze, using wood glue and pinch clamps on outside miters, and nailing only after miters are tight.

hammer to tighten miters
Drive to fit. Use a soft hammer to coax inside miters tight before marking the cut for an outside miter and fastening the free end of the intersecting piece.

dry-fitting to align miters cleanly
Fit and fiddle. Before fastening, dry-fit to ensure that miters meet cleanly and to see if the top of the molding needs to be scribed to accommodate a wavy ceiling/soffit.

Part 4: The fascia

When joints are going to get buried behind other moldings, don’t waste time getting them perfect.

L-shaped gauge block
Gauge and mark. Use an L-shaped gauge block set to the reveal below the soffit to establish the height of the fascia, and mark the reveal and the outside miter cut at the same time.

cutting scribe using tablesaw
Rough-cut scribes. After making a scribe in place, cut it quickly using a tablesaw, a sander with roughgrit paper, or a jigsaw. The cuts don’t need to be perfect; they won’t show.

dab glue
Dab glue. Apply dabs of PL glue every 12 in. to bolster the fascia’s connection to the rest of the assembly.

clamp both sides
Clamp inside and out. Use wood glue and pinch clamps on both outside and, because they’re accessible, inside miters.

fastening with finish nails into soffit
Pin it. Double-check the reveal, then fasten with 1 1/2-in. 18-ga. finish nails into both the backing and the soffit.

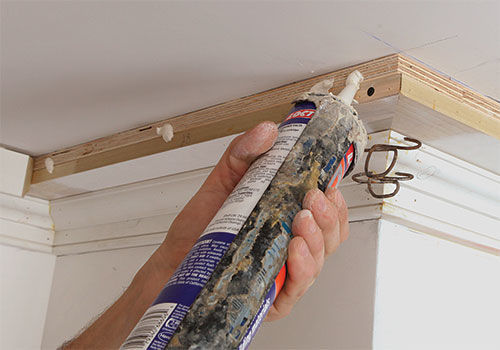
Part 5: The cove molding

installing cove

The procedure for installing the cove is similar to the bed molding. At this step, though, I add dabs of PL glue at the joint between the ceiling and fascia to bond the cove to both. Rather than rehash more of the same, here are some additional tips that can work just as well with some, if not all, of the preceding layers.

dap rag and toothbrush to clean wood
Wet cleanup. Use a damp rag and toothbrush to clean wood glue squeeze-out from joints while it’s still wet.

shimming above a miter
Shim it tight. When there’s not much meat at the top of a molding to scribe it to a wavy ceiling without biting through the profile, shimming above a miter can help bring intersecting moldings into plane. After fastening the moldings, carefully trim the shim in place with a sharp utility knife.

hammer and beater block
Drive to the line. Use a hammer and beater block to nudge moldings to their marks. This technique works even better with the bed molding than with the cove.

combination of floating, scribing, and caulking
Float it down. Use a combination of floating, scribing, and caulking to make the buildup look perfect. Floating the ceiling down with all-purpose joint compound in one spot means less scribing in another, leaving a more even profile at the top of the cove.

From Fine Homebuilding #286

installing built-up crown spreadsheet

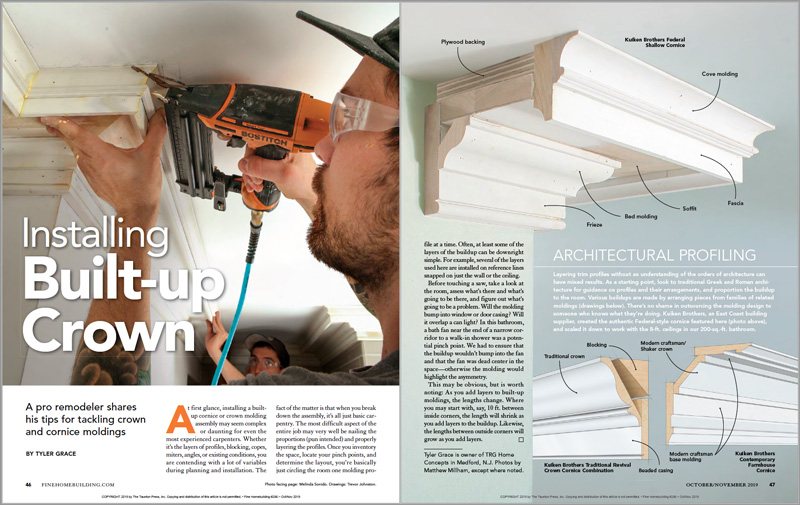
To view the entire article, please click the View PDF button below.


More about crown molding:

How to Cut Crown Molding – Follow a few basic techniques and there should be no guesswork involved in cutting crown.

Video Series: Installing Built-up Crown Molding – An impressive crown molding profile, or cornice, is an easy way to add defining character to a room. Combine profiles into a stacked profile for a big impact.

Hiding a Wavy Ceiling in Crown Molding

View PDF
Previous: Mastering Complex Crown Molding Next: Designing Built-up Crown Molding

Guide

Finish & Trim Carpentry

Chapter

Baseboard and Crown Molding

Sign up for eletters today and get the latest how-to from Fine Homebuilding, plus special offers.

Signing you up...

This site is protected by reCAPTCHA and the Google Privacy Policy and Terms of Service apply.
See all newsletters
See all newsletters

View Comments

  1. gavsdad | Nov 22, 2021 10:22am | #1

    Great article, and very well shown and explained. There are way to many people installing cornice es that have 0 idea of the architectural standards used. That may be why I cringe when I see some of the stuff being presented on some sites and on job photos. I spent at least 25 years of my career installing and making high end trim and I love to see it done right.

Log in or create an account to post a comment.

Sign up Log in

Become a member and get full access to FineHomebuilding.com

Finish & Trim Carpentry

Finish & Trim Carpentry

Trusted, comprehensive guidance from the pros for creating perfect trim details in any room of the house

View Project Guide

View All Project Guides »

Become a member and get unlimited site access, including the Finish & Trim Carpentry Project Guide.

Start Free Trial

Trim Design
  • Trim Style and Design
Tools and Materials
  • Tools
  • Materials
Interior Trim Basics
  • Tips and Tricks
  • Techniques
  • Using Jigs
Window and Door Casings
  • Windows
  • Doors
Baseboard and Crown Molding
  • Baseboard
  • Crown Molding
  • Specialty Crown Situations
Wainscot and Paneling
  • Beadboard Wainscot
  • Paneled Wainscot
  • Chair Rails
  • Wall Treatments
Mantels and Fireplace Surrounds
  • Design
  • Installing Mantels and Surrounds
Coffered Ceilings

Fine Home Building

Newsletter Sign-up

  • Fine Homebuilding

    Home building tips, offers, and expert advice in your inbox.

  • Green Building Advisor

    Building science and energy efficiency advice, plus special offers, in your inbox.

  • Old House Journal

    Repair, renovation, and restoration tips, plus special offers, in your inbox.

Signing you up...

This site is protected by reCAPTCHA and the Google Privacy Policy and Terms of Service apply.
See all newsletters

Follow

  • Fine Homebuilding

    Dig into cutting-edge approaches and decades of proven solutions with total access to our experts and tradespeople.

    Start Free Trial Now
    • Facebook
    • Instagram
    • X
    • LinkedIn
  • GBA Prime

    Get instant access to the latest developments in green building, research, and reports from the field.

    Start Free Trial Now
    • Facebook
    • YouTube
  • Old House Journal

    Learn how to restore, repair, update, and decorate your home.

    Subscribe Now
    • Facebook
    • Instagram
    • X

Membership & Magazine

  • Online Archive
  • Start Free Trial
  • Magazine Subscription
  • Magazine Renewal
  • Gift a Subscription
  • Customer Support
  • Privacy Preferences
  • About
  • Contact
  • Advertise
  • Careers
  • Terms of Use
  • Site Map
  • Do not sell or share my information
  • Privacy Policy
  • Accessibility
  • California Privacy Rights

© 2025 Active Interest Media. All rights reserved.

Fine Homebuilding receives a commission for items purchased through links on this site, including Amazon Associates and other affiliate advertising programs.

  • Home Group
  • Antique Trader
  • Arts & Crafts Homes
  • Bank Note Reporter
  • Cabin Life
  • Cuisine at Home
  • Fine Gardening
  • Fine Woodworking
  • Green Building Advisor
  • Garden Gate
  • Horticulture
  • Keep Craft Alive
  • Log Home Living
  • Military Trader/Vehicles
  • Numismatic News
  • Numismaster
  • Old Cars Weekly
  • Old House Journal
  • Period Homes
  • Popular Woodworking
  • Script
  • ShopNotes
  • Sports Collectors Digest
  • Threads
  • Timber Home Living
  • Traditional Building
  • Woodsmith
  • World Coin News
  • Writer's Digest
Active Interest Media logo
X
X
This is a dialog window which overlays the main content of the page. The modal window is a 'site map' of the most critical areas of the site. Pressing the Escape (ESC) button will close the modal and bring you back to where you were on the page.

Main Menu

  • How-To
  • Design
  • Tools & Materials
  • Video
  • Blogs
  • Forum
  • Project Guides
  • Reader Projects
  • Magazine
  • Members
  • FHB House

Podcasts

  • FHB Podcast
  • ProTalk

Webinars

  • Upcoming and On-Demand

Podcasts

  • FHB Podcast
  • ProTalk

Webinars

  • Upcoming and On-Demand

Popular Topics

  • Kitchens
  • Business
  • Bedrooms
  • Roofs
  • Architecture and Design
  • Green Building
  • Decks
  • Framing
  • Safety
  • Remodeling
  • Bathrooms
  • Windows
  • Tilework
  • Ceilings
  • HVAC

Magazine

  • Current Issue
  • Past Issues
  • Magazine Index
  • Subscribe
  • Online Archive
  • Author Guidelines

All Access

  • Member Home
  • Start Free Trial
  • Gift Membership

Online Learning

  • Courses
  • Project Guides
  • Reader Projects
  • Podcast

More

  • FHB Ambassadors
  • FHB House
  • Customer Support

Account

  • Log In
  • Join

Newsletter

Get home building tips, offers, and expert advice in your inbox

Signing you up...

This site is protected by reCAPTCHA and the Google Privacy Policy and Terms of Service apply.
See all newsletters
See all newsletters

Follow

  • X
  • YouTube
  • instagram
  • facebook
  • pinterest
  • Tiktok

Join All Access

Become a member and get instant access to thousands of videos, how-tos, tool reviews, and design features.

Start Your Free Trial

Subscribe

FHB Magazine

Start your subscription today and save up to 70%

Subscribe

We hope you’ve enjoyed your free articles. To keep reading, become a member today.

Get complete site access to expert advice, how-to videos, Code Check, and more, plus the print magazine.

Start your FREE trial

Already a member? Log in

Privacy Policy Update

We use cookies, pixels, script and other tracking technologies to analyze and improve our service, to improve and personalize content, and for advertising to you. We also share information about your use of our site with third-party social media, advertising and analytics partners. You can view our Privacy Policy here and our Terms of Use here.

Cookies

Analytics

These cookies help us track site metrics to improve our sites and provide a better user experience.

Advertising/Social Media

These cookies are used to serve advertisements aligned with your interests.

Essential

These cookies are required to provide basic functions like page navigation and access to secure areas of the website.

Delete My Data

Delete all cookies and associated data