FHB Logo Facebook LinkedIn Email Pinterest Twitter X Instagram Tiktok YouTube Plus Icon Close Icon Navigation Search Icon Navigation Search Icon Arrow Down Icon Video Guide Icon Article Guide Icon Modal Close Icon Guide Search Icon Skip to content
Subscribe
Log In
  • How-To
  • Design
  • Tools & Materials
  • Restoration
  • Videos
  • Blogs
  • Forum
  • Magazine
  • Members
  • FHB House
  • Podcast
Log In
How-To

How to Add a Laundry Chute to Your Home

Learn how to plan, fabricate, and install a chute to conveniently send your dirty clothes from an upstairs bathroom or hallway to your laundry room below.

By Steve Pink, Asa Christiana Issue 287 - Kitchens & Baths
  • X
  • facebook
  • linkedin
  • pinterest
  • email
  • add to favorites Log in or Sign up to save your favorite articles

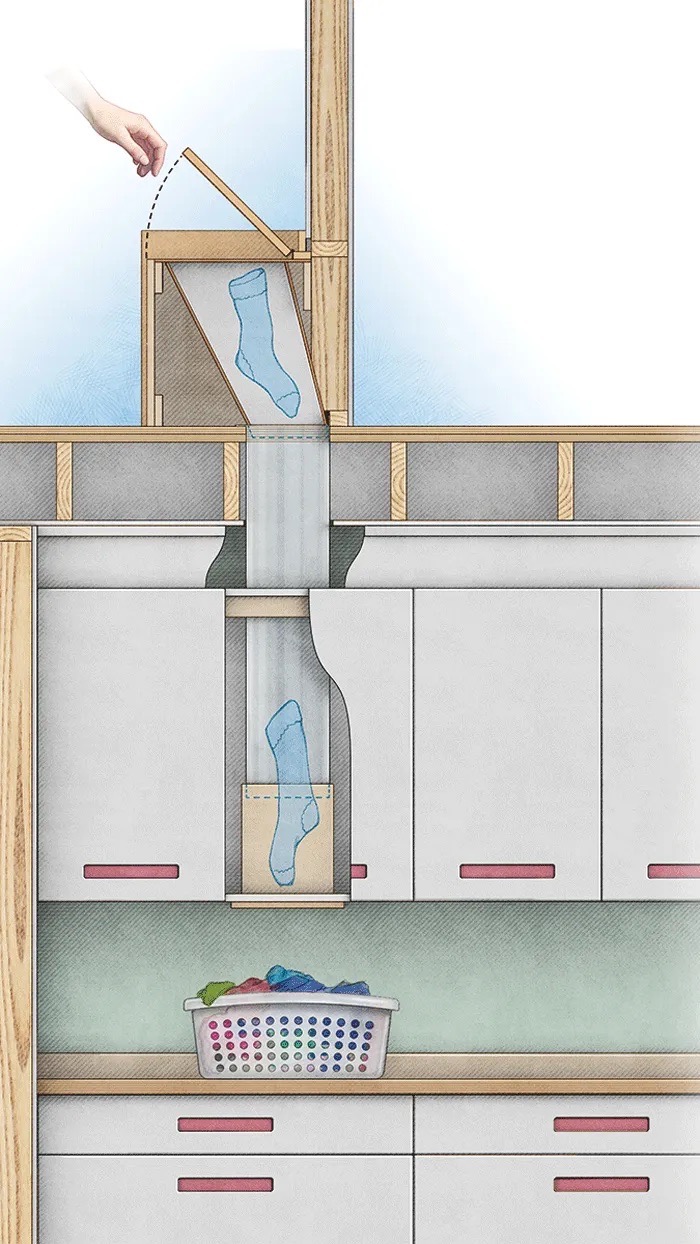
Project manager Steve Pink and woodworker Asa Christiana show the steps to building a basic laundry chute, from locating the chute on each floor, to cutting the inlet and installing the metal chute, to building the upstairs and downstairs cabinets.

Make Your Laundry Process More Efficient

In modern homes with automated lighting, smart appliances, and any number of other high-tech features, having to carry a laundry basket down two flights of stairs to the laundry room is an obvious disconnect. As a project manager for a large design/build firm in Portland, Ore., I’ve installed dozens of laundry chutes into homes both old and new. The chute shown in this article is a collaboration between myself and Asa Christiana, who is a contributing editor for FHB and a skilled woodworker. He built the bench/chest that acts as a top hatch, and adapted a set of IKEA cabinets to accommodate the bottom end. Both solutions work well in remodels and new construction.

Chute basics

I get requests for laundry chutes so often—sometimes midstream in the construction process—that I now ask clients if they want one when I review a set of plans. Obviously, it’s much easier to plan for a properly sized chute from the beginning. As a retrofit, one story is usually the limit, as it is much easier to cut through one floor than it is to send a properly sized chute from second floor to basement. The chute featured in this article drops from the main-floor master-bedroom closet into the basement laundry room below.

Clients want their chute to end as close as possible to the washer, so it’s best if you can make it terminate in or very near the laundry area. The top of the chute should go in the master bath or main hallway, with the latter affording easier access from other bedrooms.

Dimensions also play a deciding role. Installing a laundry chute in the stud bay of a 2×4 doesn’t work. Socks and underwear will drop just fine, but larger items like jeans and sweatshirts will leave the client jamming a broomstick down the hole and cursing the contractor. I’ve found the ideal size is 12 in. by 12 in. Often this requires stealing space from a closet or elsewhere to install a chase. Sometimes clients won’t or can’t give up this much space, so I have to settle for 8 in. by 8 in.

A laundry chute must be smooth, with no exposed joints or protrusions. Although I’ve tried drywall and finished plywood, I prefer metal ductwork because it’s smooth and quick to install. Also, it can be angled and formed to avoid obstacles. In new construction, I ask the HVAC tech to build the duct and I install it during the HVAC rough-in stage. Be sure to mark the installed duct with signs, so electricians and low-voltage techs aren’t tempted to use it for their own needs. For remodels, my local fabricator knocks out custom pieces at a fair price.

If you’re building a laundry or trash chute in a commercial building, get ready to decipher a host of code requirements. In the residential world, you must comply with IRC section 602.8, which addresses fireblocking. Basically, any penetrations you make for the chute must be headed off with approved materials. I typically fireblock with 2x framing lumber before installing the chute. An upstairs hatch is a minimum for blocking the actual chute in case of fire—and saving your cat from an unexpected ride. Having the bottom end empty out behind a cabinet or closet door will add a measure of soundproofing.

Building new

If you’re considering a laundry chute in a new home, there are two spots that often present the easiest path from upstairs to downstairs or the basement. I start looking near the main waste line coming from the master bathroom because it’s generally a 2×6 wall, but you’ll still need to make it deeper to accommodate an 8-in. or 12-in. duct. One way to do that is to steal space from a nearby linen closet.

With the chute starting in the wet wall, you often have the option to place the hatch in the master bath or an adjacent hallway. In both cases, I usually place the top of the chute in a small wall cabinet with a pull-down door, resulting in a hopper that makes loading easier. Another way to locate the upper hatch in the upstairs hall is to build a small chase into the back of a bedroom closet, stealing less than a foot of space with a flat-framed 2×4 wall.

Instant payoff

The new setup has improved life at the Christiana home in multiple ways. As promised, it makes laundry and wet workout gear disappear upstairs and reappear in a basket by the washing machine. What Asa didn’t anticipate is how the chute tames clutter on both floors, with no piles or baskets underfoot in either place.

Clear a Path for Clothes

Connecting the chute’s two levels starts with planning the route from upstairs to downstairs and searching for obstructions like pipes, ducts, or wires that would block the path.

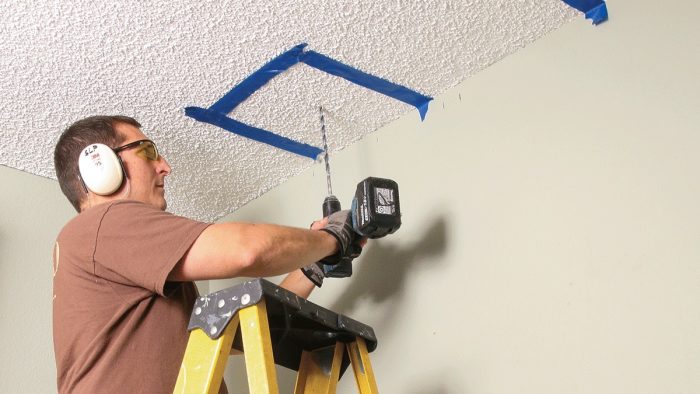
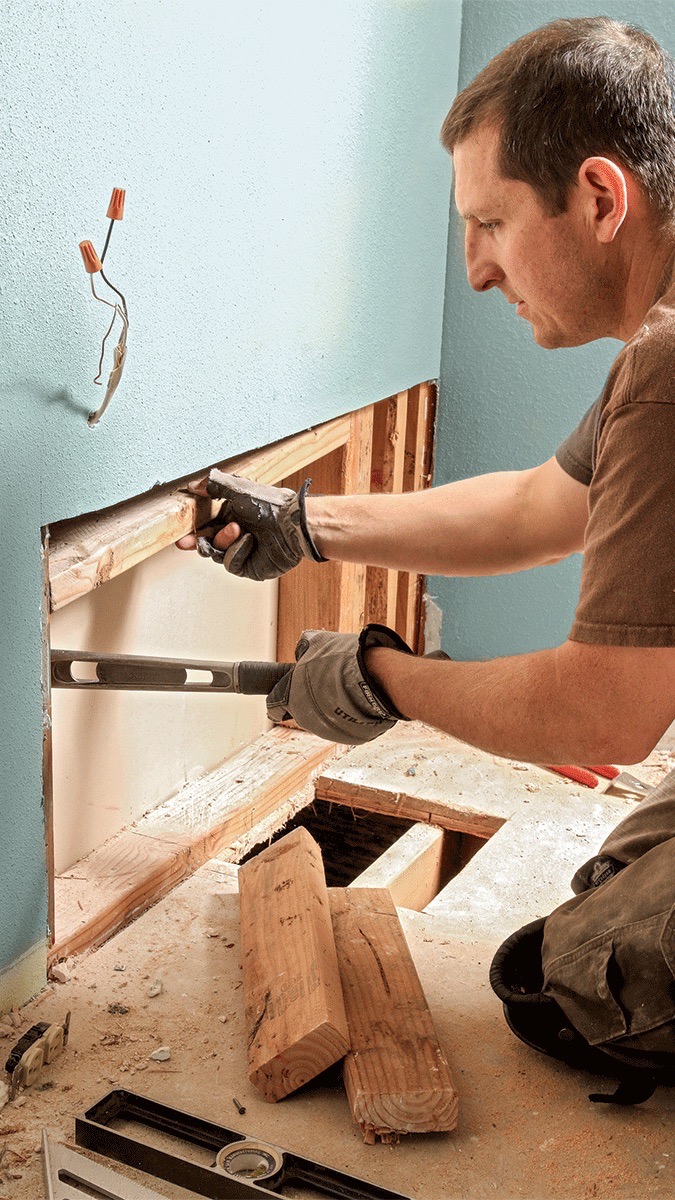
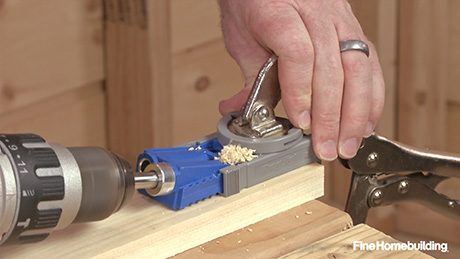
Play it safe: Start with a pilot hole to confirm the chute will align as planned— if you’re wrong, a small hole is easier to fix than a large cutout. Use a long bit, and take care to keep it plumb to ensure you transfer the location accurately from ceiling to floor above.

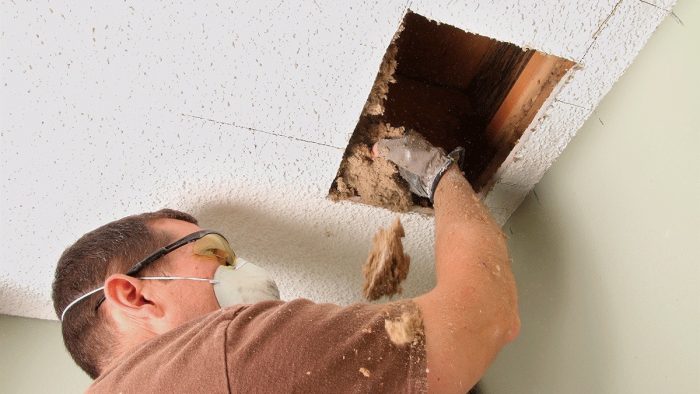
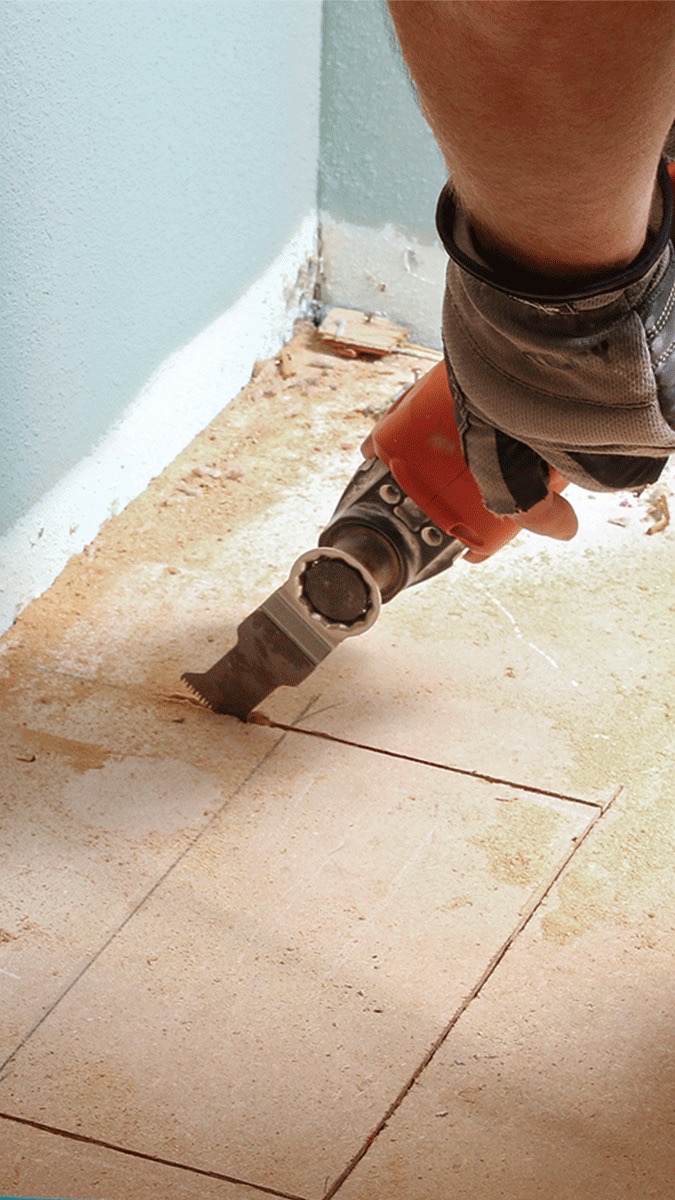
Enlarge the hole: After confirming the location is correct, use a wallboard saw to enlarge the hole in the ceiling. Once this cutout is established, you can move upstairs to cut through the floor for the chute inlet.


Cut the inlet: Use the location hole to lay out the 8-in. by 11-in. rectangle for the duct, and then cut through the subfloor and underlayment with a circular saw and oscillating multitool.


Be ready to adapt: When a floor joist was revealed in the inlet path, we moved part of the inlet into the adjacent nonbearing partition wall. A horizontal 2×4 heads off the two stud cavities that became part of the chute inlet.


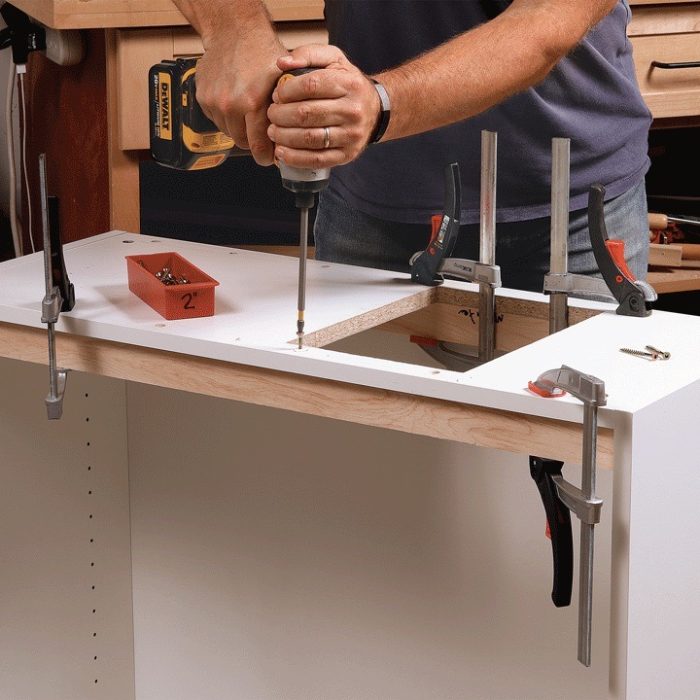
Build the Upstairs Cabinet 

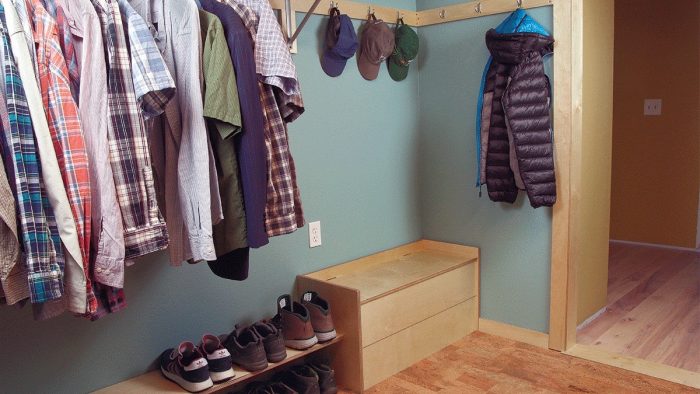
Made from Russian birch plywood, this small bench houses the chute inlet, and its 3⁄4-in.-thick self-closing lid slows a downstairs fire from spreading upstairs. The completed bench is wide enough to seat two, creating the perfect spot to put on or take off a pair of shoes.

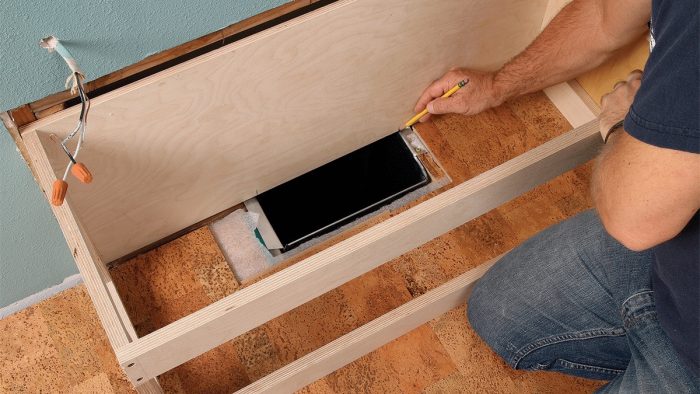
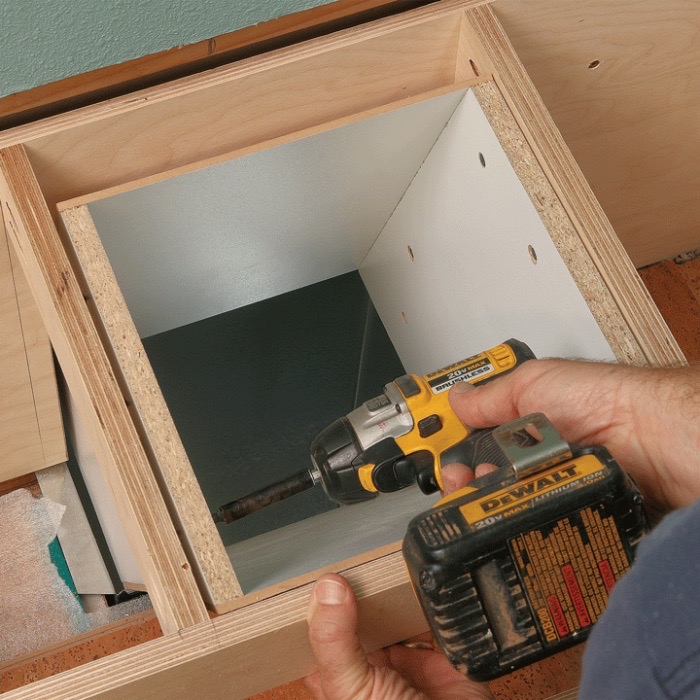
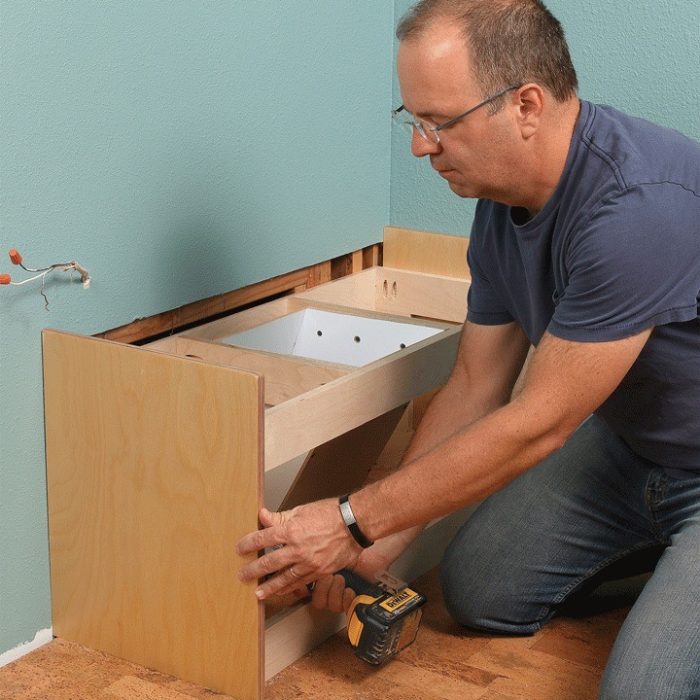
Sturdy skeleton: The bench is built around a frame of the same Russian birch plywood. Cut back the drywall and slide the frame into place against the studs to mark the duct location. Remove it again to cut out the back and add rails for the hopper.

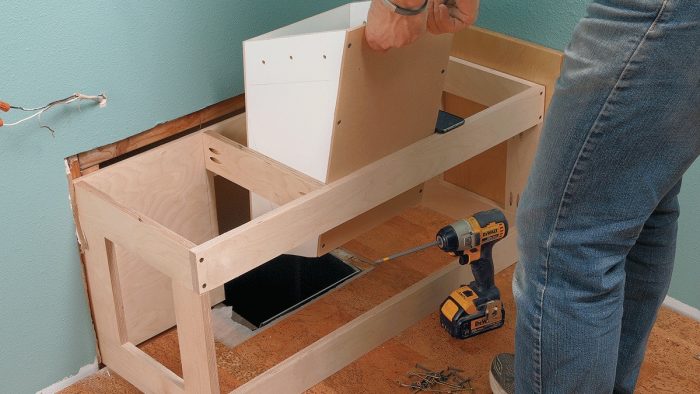
Tapered hopper: Made from a combination of screwed-together 3⁄4-in. and 1⁄4-in. melamine, the hopper fits into the top of the duct and provides a larger opening at lid level. In this case, it also extends back into the wall cavity to reach the duct.​

Fasten the hopper: The tapered hopper connects the bench to the ductwork below. It’s screwed to rails that connect the front and back of the cabinet.

Install the exterior: The bench’s right side is screwed to the adjacent wall; the left side and front are screwed to the frame from the back. The lid is hinged onto an L-shaped backsplash.

Clutter control: The bench’s interior includes the laundry-chute inlet in the center and a pair of storage bins on the sides. The bins hold special laundry items until there’s a full load to wash.

Build the Downstairs Cabinet

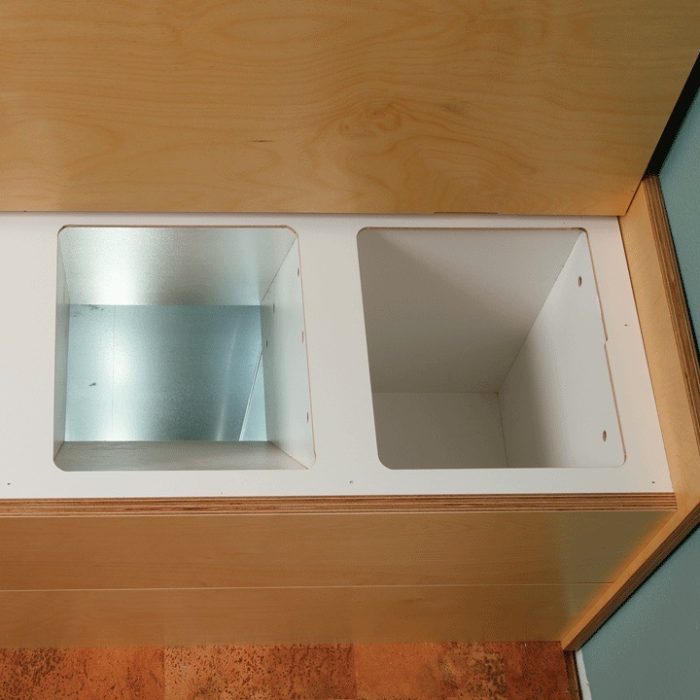
The chute outlet emerges from the bottom of a 36-in. wall cabinet from IKEA. The bank of cabinets provides a convenient spot for soap and other laundry products.

Cut the top: A hole in the top of the cabinet allows the 8-in. by 11-in. duct to pass through. To prevent chipping of the melamine face, drill the corners and score with a utility knife before cutting.

Reinforce the top: The particleboard top is flimsy once there’s a big hole in it, so reinforce it with hardwood ribs screwed to the top at the front and back of the hole.

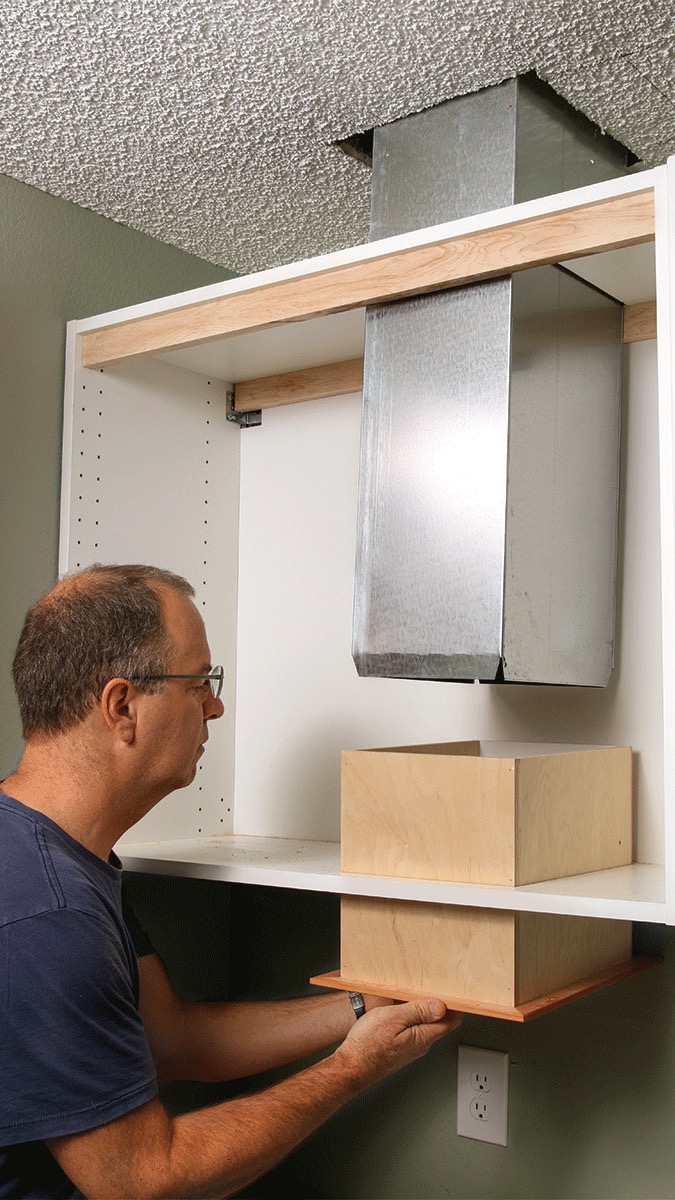
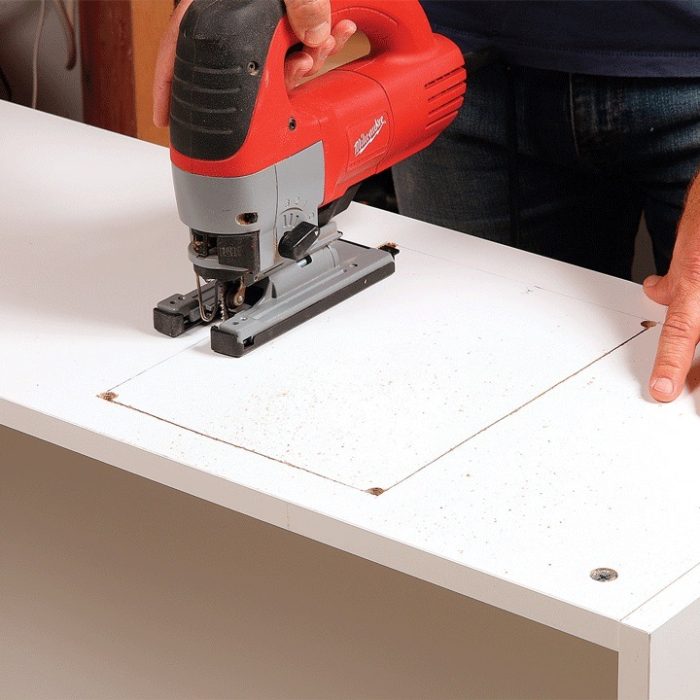
Finish off the bottom. The 5-ft. piece of ductwork is extended with a plywood box that carries the laundry through the bottom of the cabinet. The box is trimmed with mitered hardwood, which finishes off the cut in the cabinet bottom.

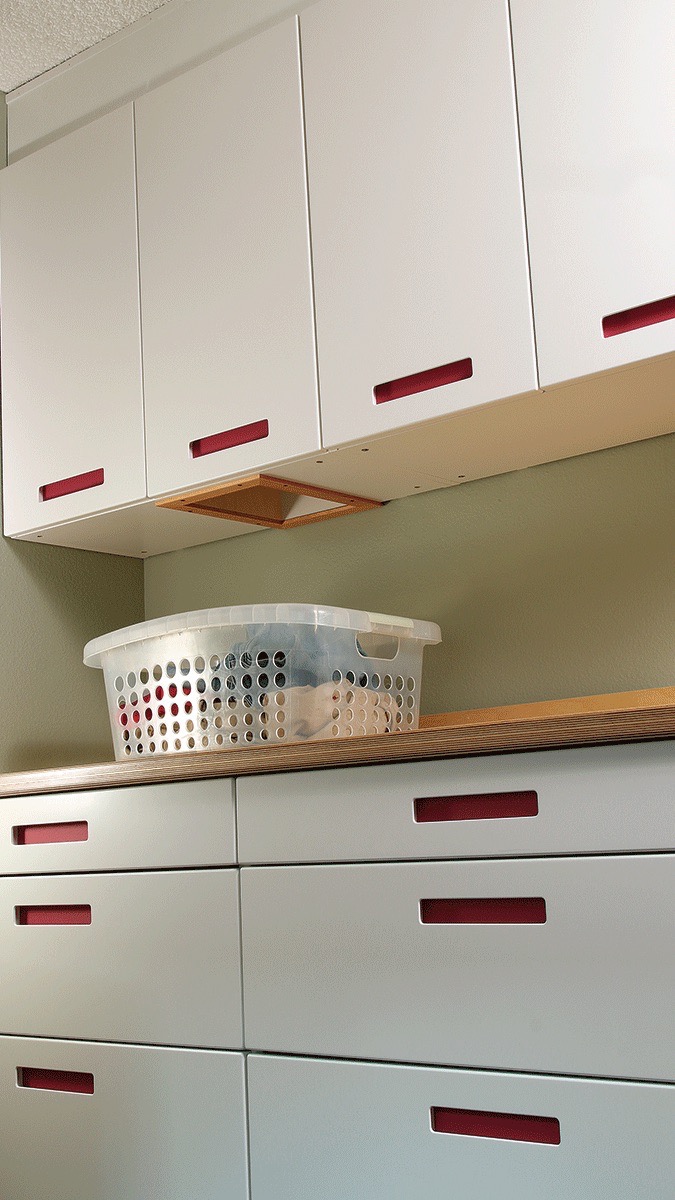
Ready for the washer. Clothes emerging from the chute land in a basket that can be carried to the washing machine. The counter creates the perfect spot for folding.


— Steve Pink, lead project manager for Hammer & Hand, a custom construction firm in Portland, OR and Asa Christiana, contributing editor and former editor of Fine Woodworking magazine.

From Fine Homebuilding #287

RELATED STORIES:

  • The Modern Laundry Chute
  • Laundry Alcove Does Double Duty
  • Laundry Closets

Published October 10, 2019. Updated May 8, 2024.

Fine Homebuilding Recommended Products

Fine Homebuilding receives a commission for items purchased through links on this site, including Amazon Associates and other affiliate advertising programs.

Reliable Crimp Connectors

These reliable, high-quality connectors from Wirefy work on 10-22-gauge wire have heat-shrink insulation to keep out water and road salt.
Buy at Amazon

Affordable IR Camera

This camera is super useful for tracking down air leaks in buildings. The one-hand pistol grip arrangement frees your other hand for steadying yourself while maneuvering tricky job sites.
Buy at Amazon

8067 All-Weather Flashing Tape

Available in 2- to 12-in. widths, this is a good general-purpose flashing tape that sticks well to most things. It features a two-piece release paper, water-shedding layers, and good UV resistance.
Buy at Amazon

Sign up for eletters today and get the latest how-to from Fine Homebuilding, plus special offers.

Signing you up...

This site is protected by reCAPTCHA and the Google Privacy Policy and Terms of Service apply.
See all newsletters
See all newsletters
×

Get home building tips, offers, and expert advice in your inbox

Signing you up...

This site is protected by reCAPTCHA and the Google Privacy Policy and Terms of Service apply.
See all newsletters
See all newsletters
View PDF

New Feature

Fine Homebuilding Forums

Ask questions, offer advice, and share your work

  • X
  • facebook
  • linkedin
  • pinterest
  • email
  • add to favorites Log in or Sign up to save your favorite articles

View Comments

  1. Homerr | Apr 16, 2022 12:54pm | #1

    My 1955 home has a laundry chute in the base of a 24"w x 16"d broom closet in the hall just outside the bathroom. It is just a horizontal board about 8" up off the floor level that becomes the bottom shelf of the closet. Under this is a top hinged vertical flap. The nice things about this arrangement are the closet is still has 95% of its volume and dirty clothes are easily shoved into the chute with a foot - hands free!

  2. ct_yankee | Nov 10, 2022 01:29pm | #2

    Whatever the top flap for the chute is made from, I would explore how to provide a foot-operated level or pedal (like a waste basket) to flip the lid out of the way when dropping items into the chute.

Log in or create an account to post a comment.

Sign up Log in

Become a member and get full access to FineHomebuilding.com

Up Next

Video Shorts

Featured Story

The Trump Administration Wants to Eliminate the Energy Star Program

The end of this program will likely lead to higher energy bills and fewer business opportunities for the American people.

Featured Video

Builder’s Advocate: An Interview With Viewrail

Learn more about affordable, modern floating stairs, from design to manufacturing to installation.

Related Stories

  • Podcast Episode 685: Patching Drywall, Adding Air Barriers, and Rotted Walls
  • Podcast Episode 684: Masonry Heaters, Whole-House Ventilation, and Porch Flooring
  • Podcast Episode 683: Barndominiums, ERVs, and Radon Mitigation
  • Podcast Episode 682: Basement Flooring, Architectural Salvage, and HVAC Ducts

Discussion Forum

Recent Posts and Replies

  • |
  • |
  • |
  • |
  • |
  • |
View More Create Post

Highlights

Fine Homebuilding All Access
Fine Homebuilding Podcast
Tool Tech
Plus, get an extra 20% off with code GIFT20

"I have learned so much thanks to the searchable articles on the FHB website. I can confidently say that I expect to be a life-long subscriber." - M.K.

Get home building tips, offers, and expert advice in your inbox

Signing you up...

This site is protected by reCAPTCHA and the Google Privacy Policy and Terms of Service apply.
See all newsletters
See all newsletters

Video

View All Videos
  • Building Custom Kitchen Cabinets
  • Podcast 331: PRO TALK With Cabinetmaker Ben Scott
  • How to Use a Pocket-Hole Jig
  • Podcast 128: Worst. Photo. Shoot. Ever.
View All

Cabinets and Built-ins

View All Cabinets and Built-ins Articles
  • A New Approach for Millwork Finishes
  • Prevent Paint Bridging With Picks
  • Bunk Beds and Built Ins
View All Cabinets and Built-ins Articles

Fine Homebuilding Magazine

  • Issue 331 - June 2025
    • A More Resilient Roof
    • Tool Test: You Need a Drywall Sander
    • Ducted vs. Ductless Heat Pumps
  • Issue 330 - April/May 2025
    • Deck Details for Durability
    • FAQs on HPWHs
    • 10 Tips for a Long-Lasting Paint Job
  • Issue 329 - Feb/Mar 2025
    • Smart Foundation for a Small Addition
    • A Kominka Comes West
    • Making Small Kitchens Work
  • Issue 328 - Dec/Jan 2024
    • How a Pro Replaces Columns
    • Passive House 3.0
    • Tool Test: Compact Line Lasers
  • Issue 327 - November 2024
    • Repairing Damaged Walls and Ceilings
    • Plumbing Protection
    • Talking Shop

Fine Home Building

Newsletter Sign-up

  • Fine Homebuilding

    Home building tips, offers, and expert advice in your inbox.

  • Green Building Advisor

    Building science and energy efficiency advice, plus special offers, in your inbox.

  • Old House Journal

    Repair, renovation, and restoration tips, plus special offers, in your inbox.

Signing you up...

This site is protected by reCAPTCHA and the Google Privacy Policy and Terms of Service apply.
See all newsletters

Follow

  • Fine Homebuilding

    Dig into cutting-edge approaches and decades of proven solutions with total access to our experts and tradespeople.

    Start Free Trial Now
    • Facebook
    • Instagram
    • X
    • LinkedIn
  • GBA Prime

    Get instant access to the latest developments in green building, research, and reports from the field.

    Start Free Trial Now
    • Facebook
    • YouTube
  • Old House Journal

    Learn how to restore, repair, update, and decorate your home.

    Subscribe Now
    • Facebook
    • Instagram
    • X

Membership & Magazine

  • Online Archive
  • Start Free Trial
  • Magazine Subscription
  • Magazine Renewal
  • Gift a Subscription
  • Customer Support
  • Privacy Preferences
  • About
  • Contact
  • Advertise
  • Careers
  • Terms of Use
  • Site Map
  • Do not sell or share my information
  • Privacy Policy
  • Accessibility
  • California Privacy Rights

© 2025 Active Interest Media. All rights reserved.

Fine Homebuilding receives a commission for items purchased through links on this site, including Amazon Associates and other affiliate advertising programs.

  • Home Group
  • Antique Trader
  • Arts & Crafts Homes
  • Bank Note Reporter
  • Cabin Life
  • Cuisine at Home
  • Fine Gardening
  • Fine Woodworking
  • Green Building Advisor
  • Garden Gate
  • Horticulture
  • Keep Craft Alive
  • Log Home Living
  • Military Trader/Vehicles
  • Numismatic News
  • Numismaster
  • Old Cars Weekly
  • Old House Journal
  • Period Homes
  • Popular Woodworking
  • Script
  • ShopNotes
  • Sports Collectors Digest
  • Threads
  • Timber Home Living
  • Traditional Building
  • Woodsmith
  • World Coin News
  • Writer's Digest
Active Interest Media logo
X
X
This is a dialog window which overlays the main content of the page. The modal window is a 'site map' of the most critical areas of the site. Pressing the Escape (ESC) button will close the modal and bring you back to where you were on the page.

Main Menu

  • How-To
  • Design
  • Tools & Materials
  • Video
  • Blogs
  • Forum
  • Project Guides
  • Reader Projects
  • Magazine
  • Members
  • FHB House

Podcasts

  • FHB Podcast
  • ProTalk

Webinars

  • Upcoming and On-Demand

Podcasts

  • FHB Podcast
  • ProTalk

Webinars

  • Upcoming and On-Demand

Popular Topics

  • Kitchens
  • Business
  • Bedrooms
  • Roofs
  • Architecture and Design
  • Green Building
  • Decks
  • Framing
  • Safety
  • Remodeling
  • Bathrooms
  • Windows
  • Tilework
  • Ceilings
  • HVAC

Magazine

  • Current Issue
  • Past Issues
  • Magazine Index
  • Subscribe
  • Online Archive
  • Author Guidelines

All Access

  • Member Home
  • Start Free Trial
  • Gift Membership

Online Learning

  • Courses
  • Project Guides
  • Reader Projects
  • Podcast

More

  • FHB Ambassadors
  • FHB House
  • Customer Support

Account

  • Log In
  • Join

Newsletter

Get home building tips, offers, and expert advice in your inbox

Signing you up...

This site is protected by reCAPTCHA and the Google Privacy Policy and Terms of Service apply.
See all newsletters
See all newsletters

Follow

  • X
  • YouTube
  • instagram
  • facebook
  • pinterest
  • Tiktok

Join All Access

Become a member and get instant access to thousands of videos, how-tos, tool reviews, and design features.

Start Your Free Trial

Subscribe

FHB Magazine

Start your subscription today and save up to 70%

Subscribe

This is your last free article.

Don't miss another expert tip or technique from building pros. Start your free trial today.

Start your FREE trial

Already a member? Log in

We hope you’ve enjoyed your free articles. To keep reading, become a member today.

Get complete site access to expert advice, how-to videos, Code Check, and more, plus the print magazine.

Start your FREE trial

Already a member? Log in

Privacy Policy Update

We use cookies, pixels, script and other tracking technologies to analyze and improve our service, to improve and personalize content, and for advertising to you. We also share information about your use of our site with third-party social media, advertising and analytics partners. You can view our Privacy Policy here and our Terms of Use here.

Cookies

Analytics

These cookies help us track site metrics to improve our sites and provide a better user experience.

Advertising/Social Media

These cookies are used to serve advertisements aligned with your interests.

Essential

These cookies are required to provide basic functions like page navigation and access to secure areas of the website.

Delete My Data

Delete all cookies and associated data