
Crash Course in Control Layers
You need to carefully manage water, air, vapor, and temperature in order to build a home that is durable and comfortable.
Synopsis: There are four control layers in a building envelope that must be managed to build a durable and comfortable home: water, air, vapor, and temperature. Controlling water is the first priority, and involves creating a drainage plane using a water-resistive barrier outside of the framing that is integrated with flashings to keep water from getting in the walls. Air control is often the job of the sheathing, which should air-seal a home as tightly as possible and be verified with a blower-door test. Vapor control involves avoiding condensation in the walls with vapor retarders, and temperature control is about insulating walls to specific R-values that will increase both comfort and energy-efficiency. The article includes notes on code requirements for the different control layers, as well as examples of different assemblies that control each of the four layers.
The first time I came by the term “control layer” was in a 2010 Building Science Corporation article called “The Perfect Wall,” written by the firm’s principal, Joseph Lstiburek. In Lstiburek’s perfect wall, all the control layers are on the exterior side of the framing, creating a durable assembly. But this is rarely the way walls are built—most homes have insulation inside the wall cavities, and many have an interior vapor retarder of some sort.
Regardless of the controls’ locations, to design and build a durable, comfortable, and efficient home, you must consider how you are going to manage water, air, vapor, and temperature (thermal movement). These are the four primary control layers in a building envelope, which separates the indoor conditioned space of a home from the outdoors.
In the following pages, I’ll describe each control layer, its purpose, the materials commonly used to create it, and what the 2018 International Residential Code (IRC) has to say about it. To keep this introduction to a reasonable length, we’ll look at the control layers of wood-framed wall assemblies only. As you’re reading, though, keep in mind that slabs and roofs need control layers too. That is one of the neat aspects of Lstiburek’s Perfect Wall: lying down, it makes the perfect slab; tilted, it makes the perfect roof.
The bottom line is that there are a few proven wall assemblies, and we don’t need to reinvent how we build every time we start a project. Yet there are times—such as when remodeling, when trying to use particular materials, or when designing an above-code, high-performance wall—when we need to think through the plan. In these cases, ask these questions: Am I doing everything possible to keep water out? Is the air barrier continuous around all six sides of the house? Am I protecting the walls from vapor drive, and/or can the walls dry when they get wet? And do I have adequate levels of insulation to make the home both comfortable and energy efficient?
If you can answer yes to each one, you are putting the four control layers to good use in your building envelope. You can use the IRC as a guide, but know that many builders strive to do even better.
More than one way to build a wall
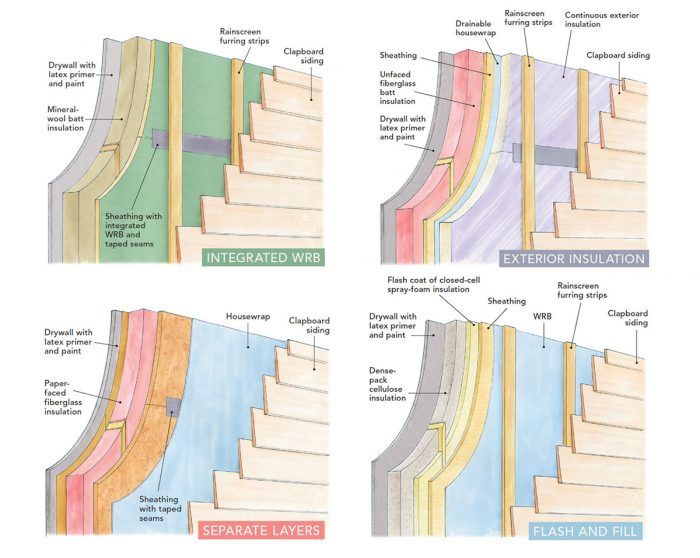
It’s certainly possible to build a house in which a separate product is used to create each control layer, but many products collapse several of these functions into a single membrane, coating, or panel. Here are four common wall assemblies that illustrate different ways to effectively control water, air, vapor, and temperature.
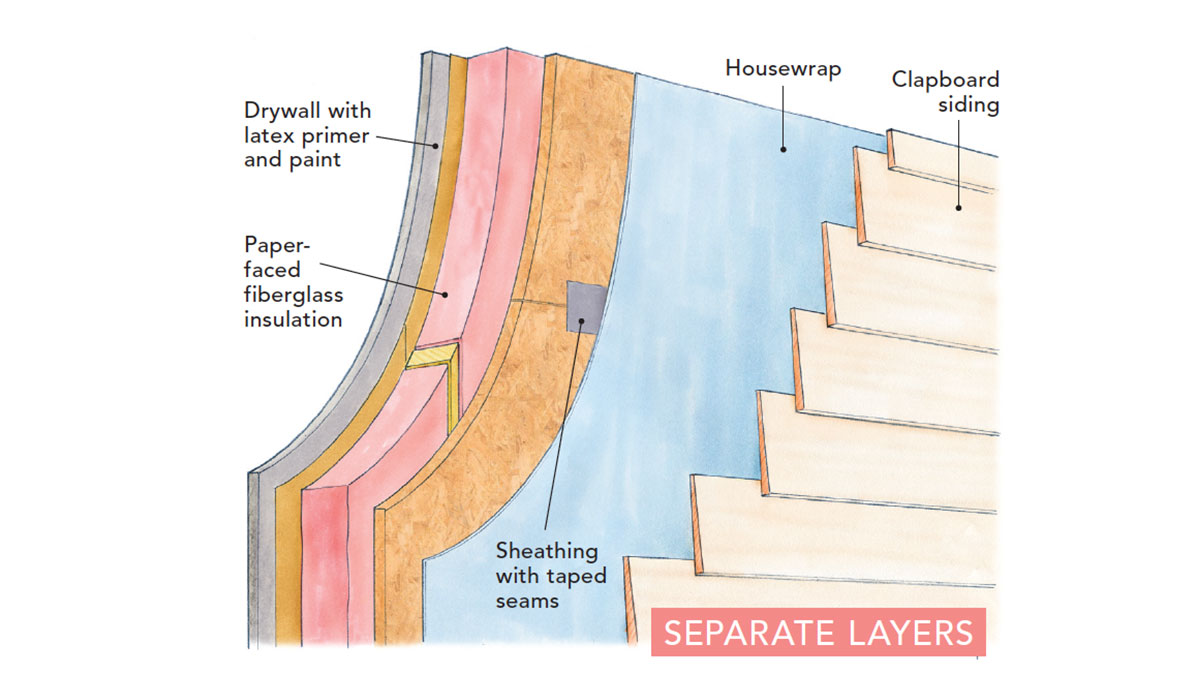
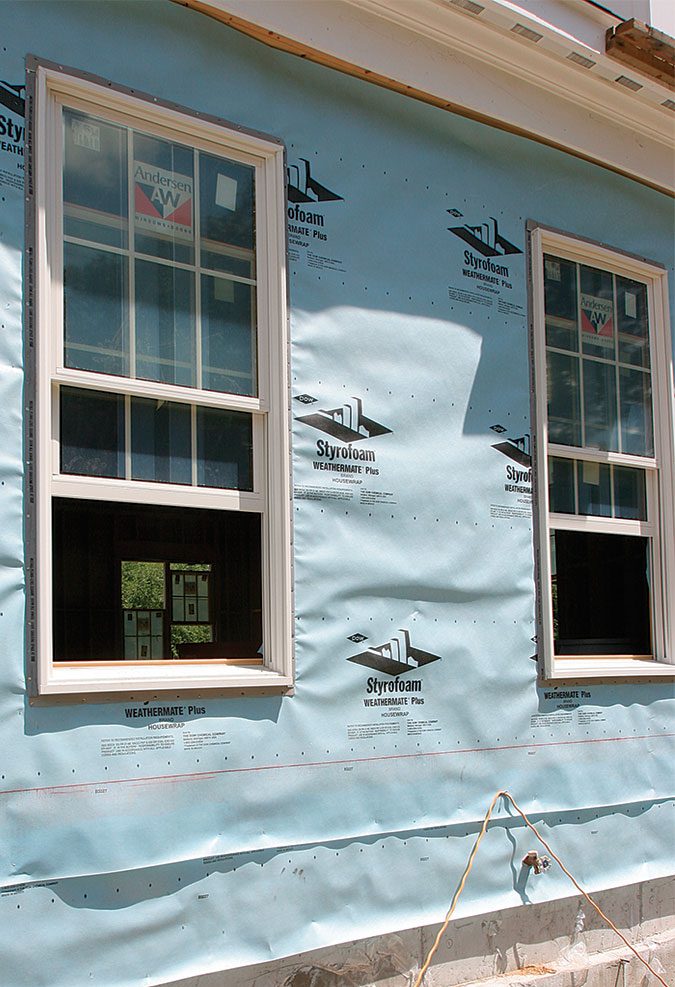
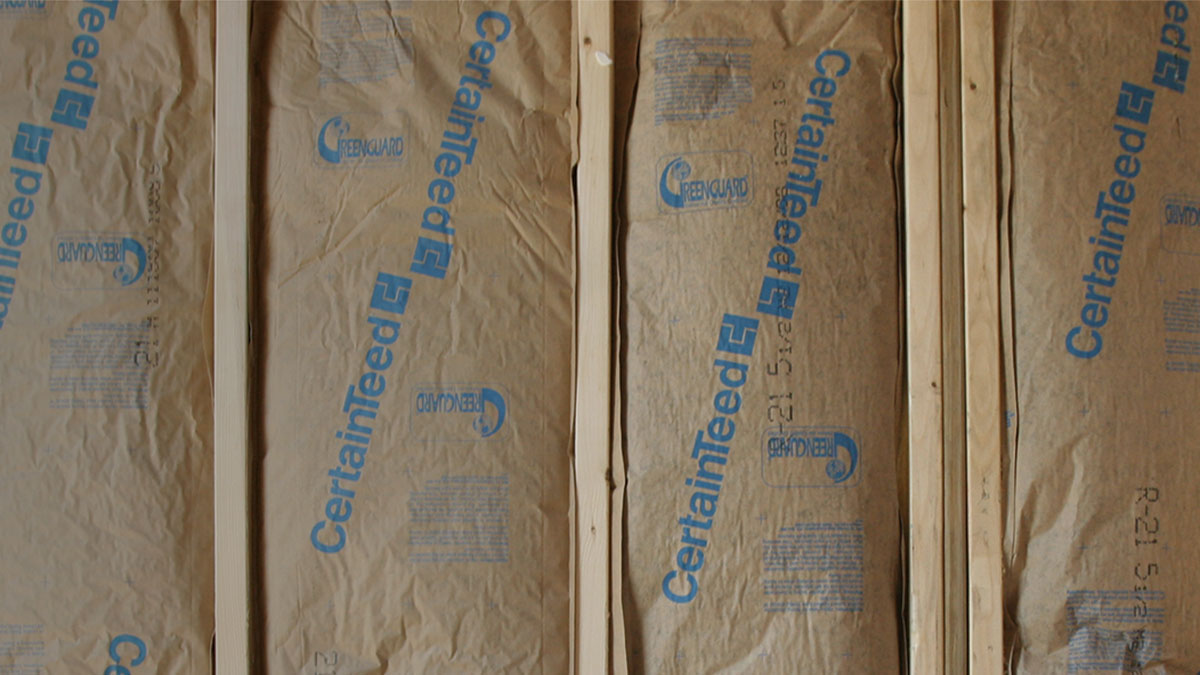
This is likely the most common wall built in America today, and the control layers are easy to identify as separate elements. Water is controlled by a mechanically fastened housewrap, air is controlled by taping the sheathing joints, temperature is controlled by fiberglass cavity insulation, and vapor is controlled by the kraft-paper facing on the insulation, which is a Class II vapor retarder. Note that this may be a 2×4 wall in warmer climates or a 2×6 wall in colder climates, to allow for more R-value in the wall cavities. In warmer climates, the interior vapor retarder may be omitted by using unfaced batts, though the painted drywall will still create a Class III vapor retarder.
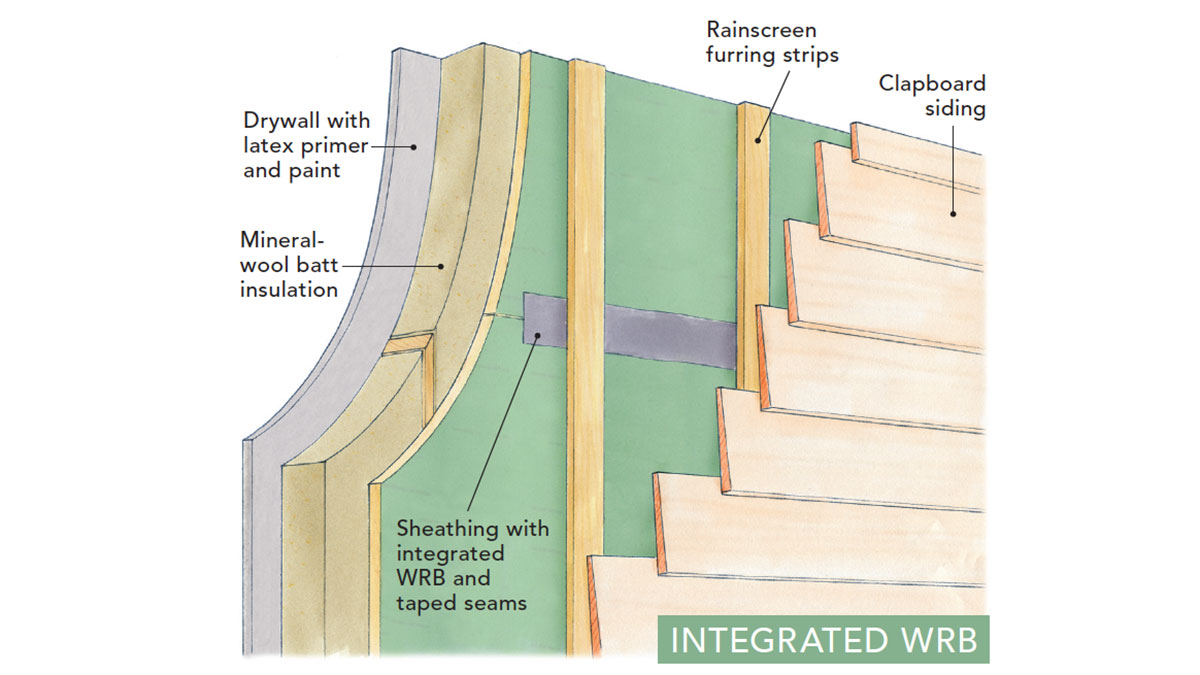
Many builders who like the efficiency of installing the water and air controls in one step use sheathing with an integrated WRB, such as Zip System. Mineral-wool batts offer a higher R-value than fiberglass, but they don’t include kraft facing as an option, so they are vapor open. With a ventilated rainscreen gap between the sheathing and siding, the IRC allows the use of a Class III vapor retarder, which is as simple as standard latex paint on the drywall. Still, in colder climates, some builders prefer the insurance of a variable-perm vapor retarder, like CertainTeed’s MemBrain or Pro Clima’s Intello membrane, which slow outward vapor drive in the winter, but allow inward drying in the summer.

In a flash-and-fill assembly like this, the thin layer of closed-cell spray foam offers air, vapor, and some of the temperature control. Blown-in fibrous insulation like cellulose is a good choice for the rest of the insulation because it is cost-effective and will fill the irregular surface of the cured foam better than batt insulation can. Any vapor-open WRB is acceptable on the outside of the sheathing. Although this wall does not require any interior vapor control beyond the usual painted drywall, it is important to install enough closed-cell spray foam against the sheathing to prevent condensation from occurring in the wall. These R-values are dependent on your climate, and are specified in the IRC.
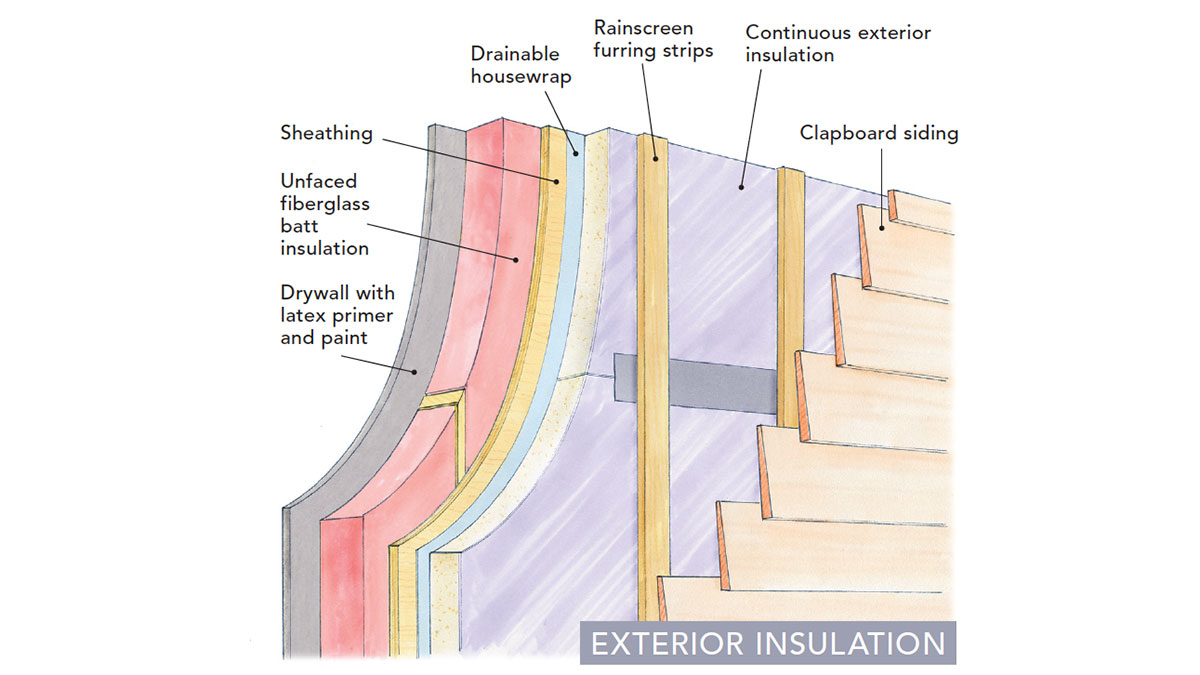
The advantage of continuous exterior insulation is that it mitigates thermal bridging and increases the whole-wall R-value. Though other types of insulation can be used, rigid foam is the most common choice. Some rigid-insulation products meet the IRC criteria for use as a WRB and can be detailed as an air barrier, but many builders choose to install a drainable housewrap behind the foam as a belt-and- suspenders approach. If the exterior insulation has an adequate R-value, the IRC allows these walls to have a Class III interior vapor retarder—a good idea if the chosen insulation will limit outward drying. For this to work, the cavity insulation must be vapor open.
Controlling water is always first priority
The first control layer is for bulk water or liquid water, synonymous terms used to make a clear distinction between water and water vapor, which is the third control. The water control layer is often referred to as the “drainage plane.”
Architect Steve Baczek tells me that water is the first and most important control, followed in order by air, vapor, and temperature. Baczek is not the only professional who expresses this opinion. Lstiburek says that one of his mentors, Gus Handegord, was known to say that there are three problems with buildings: “rain, rain, and rain.” Code expert and educator Glenn Mathewson puts it this way: “Who cares if you put a sweater on if you don’t have an umbrella?”
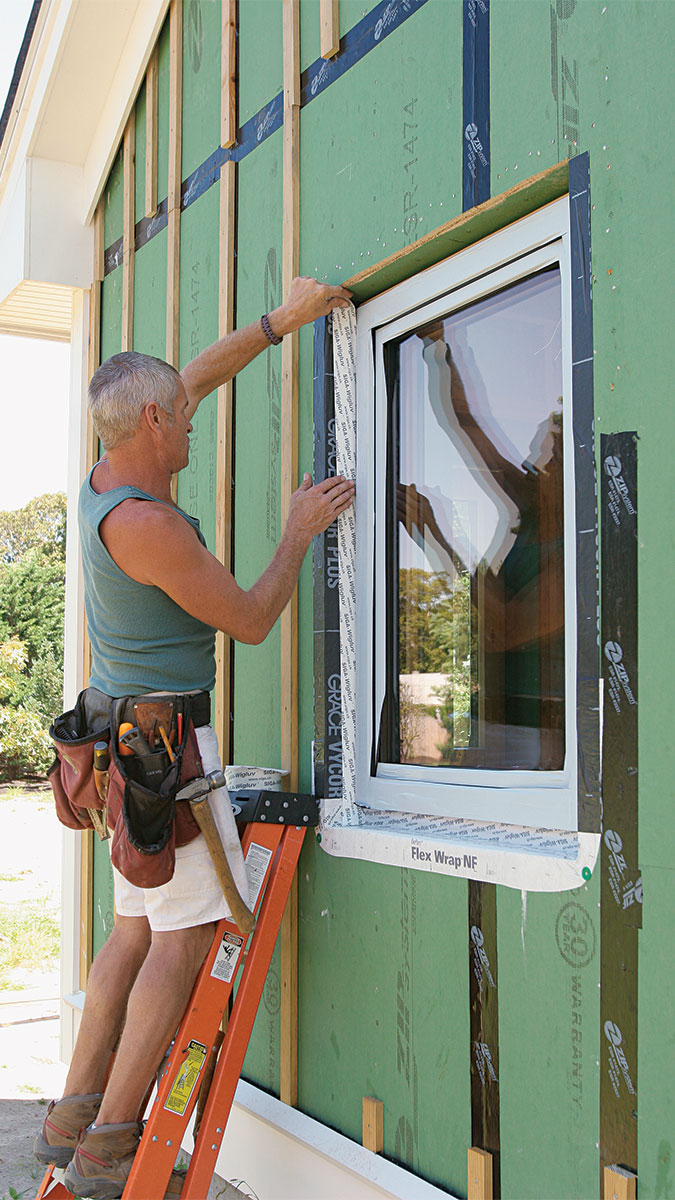
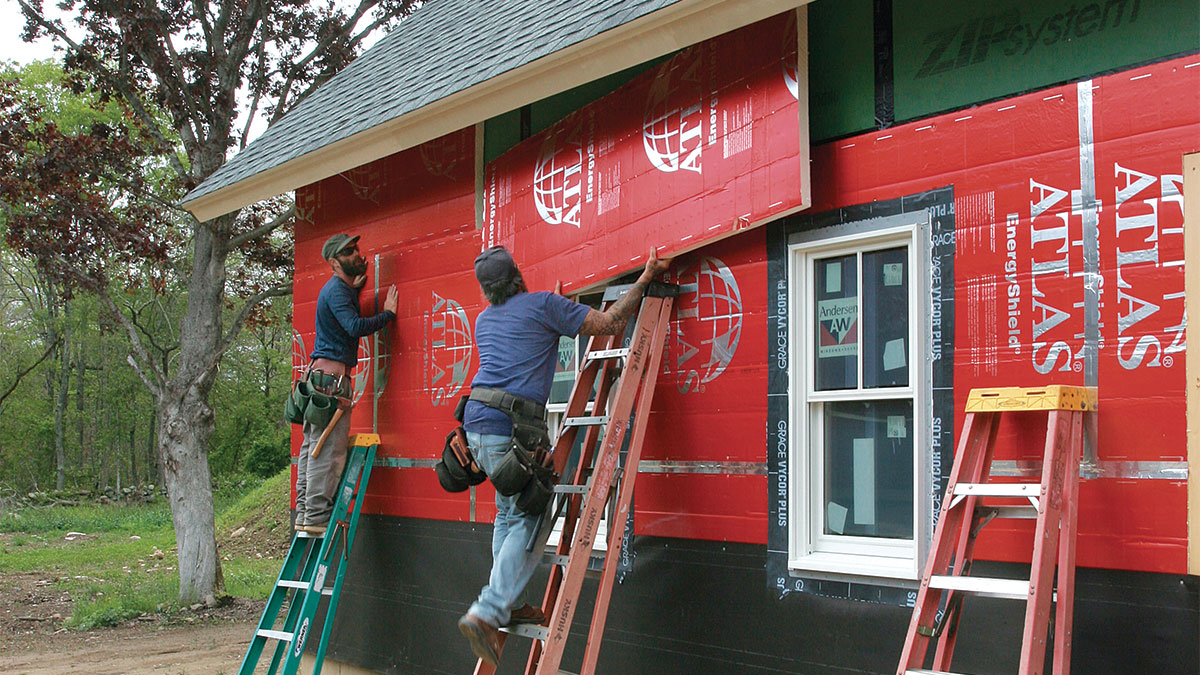
A wall’s water control layer is always located to the outside of the framing and includes the siding, windows and doors, and flashing. Yet beneath the siding, most of a wall’s surface is covered with a single product responsible for the work of this control layer—a water-resistive barrier (WRB). It must be properly integrated with flashings to keep rain and snowmelt from getting into the walls.
Mechanically fastened housewraps, like Tyvek HomeWrap, are the primary water control layer on many homes. Other common WRBs include integrated panels, like ZIP System sheathing. There are drainable WRBs like Benjamin Obdyke’s HydroGap, self-adhering WRBs like Henry Blueskin, and fluid-applied WRBs like Prosoco Cat 5; and some rigid-foam insulation is approved for use as a WRB (see “The IRC on WRBs,” below).
During installation, the WRB is integrated with flashings at windows, doors, and other penetrations to complete the water control layer. In all but the driest climates, most experts agree that WRBs are most successful at keeping water out of the walls when the building assembly includes a vented rainscreen, or a gap between the WRB and the siding.

The IRC on WRBs
About water control, the IRC says, “The exterior wall envelope shall be designed and constructed in a manner that prevents the accumulation of water within the wall assembly by providing a water-resistant barrier behind the exterior cladding … and a means of draining to the exterior water that penetrates the exterior cladding.” The WRB can be No. 15 asphalt felt or another “approved” product. “Approved” means “acceptable to the local building official,” according to Mathewson. While the IRC describes the installation of No. 15 felt, for other approved products, the manufacturer’s installation instructions become the code requirement—and, as was recently brought to my attention by editorial advisor Mike Guertin, building inspectors can require builders to have the instructions on their job site.
To control the air focus on continuity
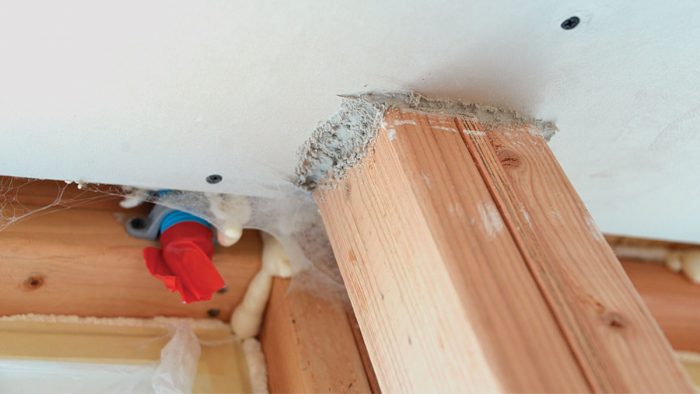
Architects and builders of high-performance homes agree that we should air-seal our houses as tightly as possible and verify that work with blower-door tests. The benefits of building this way are many. A tight house conserves energy, saves the homeowners money, and is more comfortable to live in. In a tight house, we can control humidity and ventilation, filtering incoming air for better indoor air quality. And we can provide that fresh air efficiently with a heat-recovery ventilator or an energy-recovery ventilator. Moreover, an airtight assembly allows other systems to work. For example, common roof venting relies on the stack effect to exhaust air from the ridge vents and draw air in through soffit vents. A leaky ceiling can short-circuit this system by instead pulling air out of the conditioned environment of the house.
Many builders today are using sheathing as the primary air control layer, or air barrier, on the walls. With caulks, tape, fluid-applied sealants, and other air-sealing products, common plywood and OSB sheathing can be detailed as an air barrier. Some WRBs can also double as an air barrier. Integrated panel products, fully adhered WRBs, and fluid-applied WRBs can work well as air barriers. Mechanically fastened WRBs like Tyvek HomeWrap are more difficult to make work as part of the air control layer.
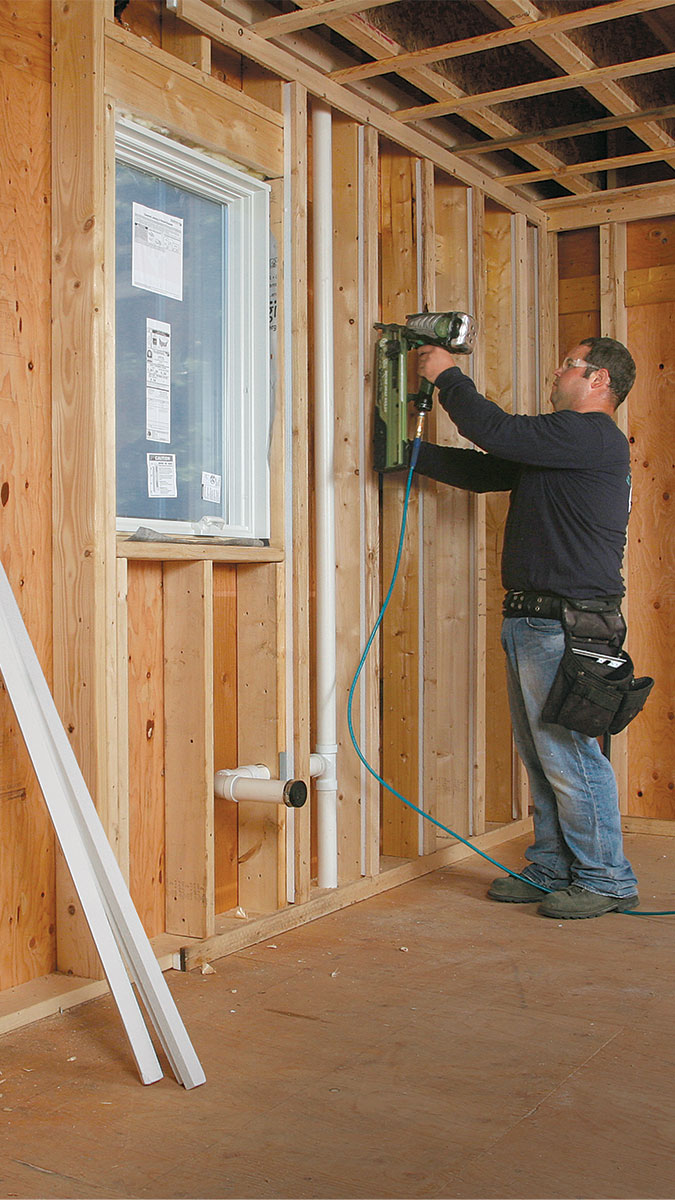
Regardless of the materials, it is imperative that an air barrier be continuous. Many architects use a “red pen test” to ensure air-control-layer continuity. They trace a red pen around the air barrier on a section drawing of the home, and make sure there are no points at which they need to lift the pen. Because the drawing includes transitions, they use this test to ensure that they have considered areas like the sill plate, where the air barrier may be caulk or tape; windows and doors, where the air barrier may be air-sealing tape, caulk, or canned spray foam; and the top plate, where they often must determine how to transition from an exterior to an interior air barrier.
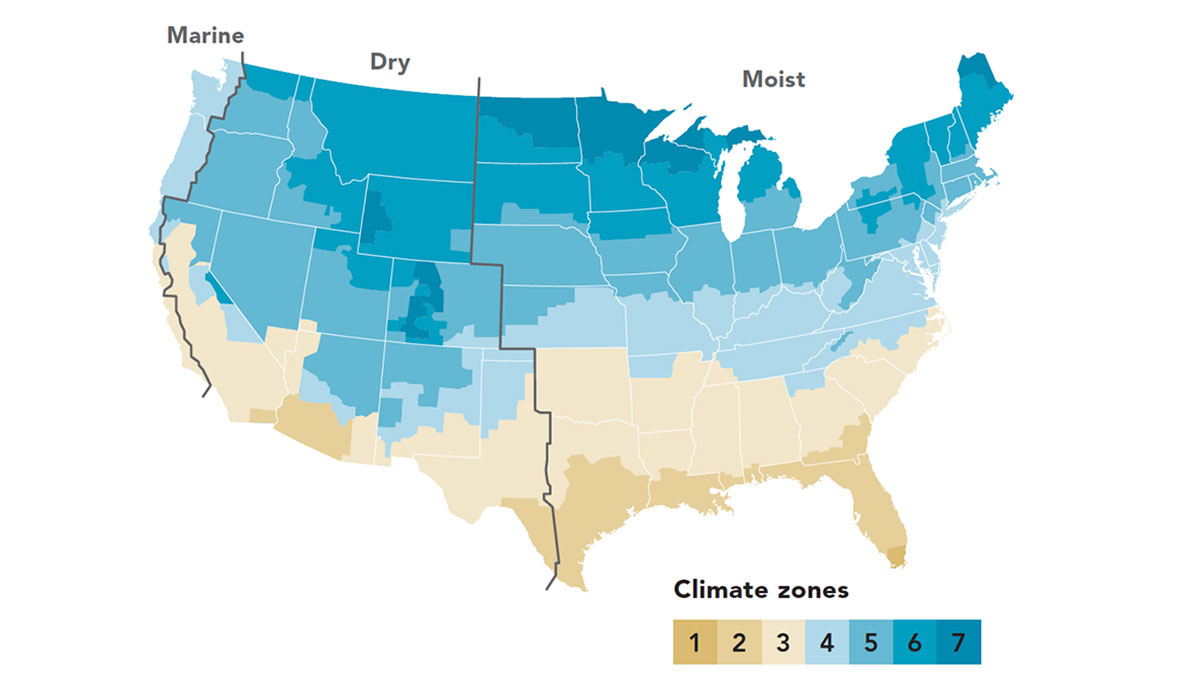
The IRC requires the air control layer be tested. In climate zones 1 and 2, homes must test at 5 or less air changes per hour at 50 pascals (ACH50). In all other climate zones, results must meet or beat 3 ACH50. High-performance builders typically far exceed this requirement.
Before moving on to vapor control, it’s important to note that a leaky wall is more likely to have condensation-related issues than a tight wall. This is part of the argument for air-sealing all six sides of wall cavities. In other words, even if you have a perfect exterior air barrier, it’s advantageous to seal penetrations in the bottom and top plates of a wall and to detail your interior vapor retarder or drywall to prevent interior air from entering the wall.
Verify air-sealing with a blower door
High-performance builders typically perform more than one blower-door test on a project and hit numbers far below the IRC’s requirements. Jake Bruton of Aarow Building in Columbia, Missouri, performs three blower-door tests on every project. The first test happens once the envelope is complete but before openings are cut for windows and doors and before insulation is installed. The second happens once the windows and doors are installed. And the final test is done when the house is complete. This way, leaks in the air barrier can be found and fixed before they are covered by drywall and finishes.
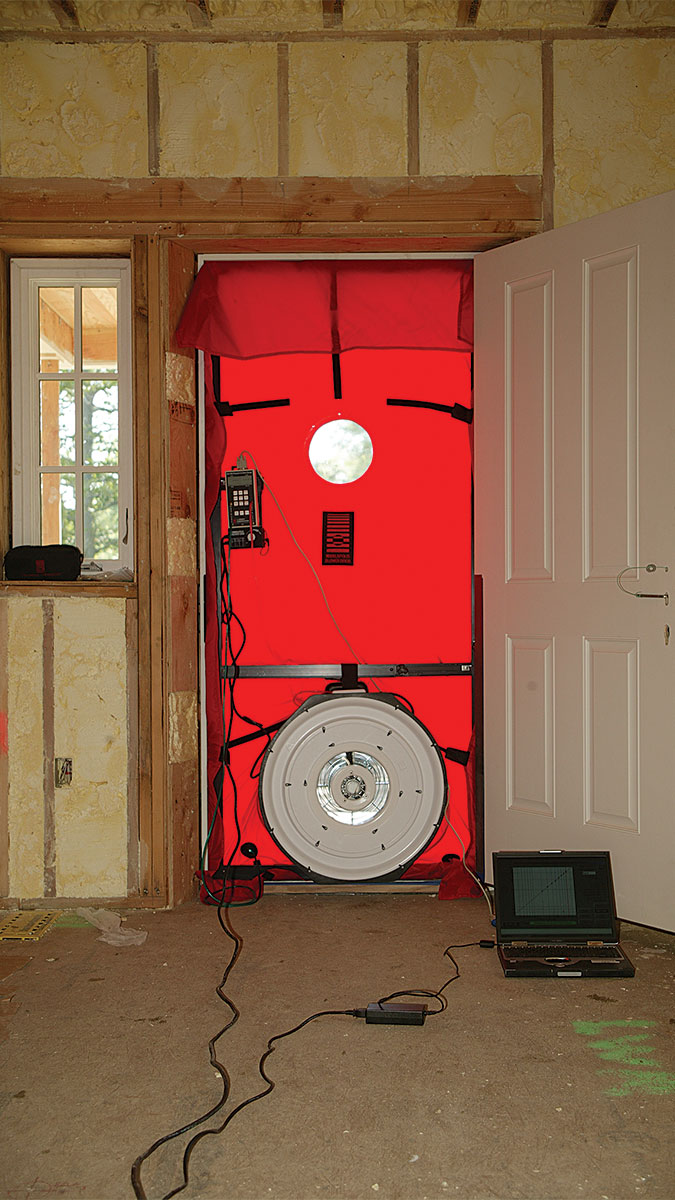
“We are getting to extremely low numbers without much effort,” Bruton says. “We are building a 2600-sq.-ft. house right now, we have less than eight man-hours in that house when it comes to air-sealing, and we hit 0.3 ACH50.”
Bruton both pressurizes and depressurizes the house with the blower door and averages the test results. “If you have casement windows and you depressurize the house, you are sucking everything in, and the windows perform better,” he says. “But if you have double-hung windows, the windows perform worse when the house is depressurized.”
Vapor control prevents wetting and promotes drying
WRBs and air barriers are meant to completely stop liquid water and air from moving into the building envelope. Vapor control is more nuanced. Water vapor can pass through many building materials by diffusion, from areas of high vapor pressure to low and from warmer temperatures to cooler. Vapor retarders are used to prevent water-vapor diffusion into wall assemblies.
All building materials have a permeance rating, given in perms. The lower the number, the less easily water vapor can pass through the material. You’ll often find four general categories of material permeability, but the IRC defines three classes of vapor retarders .
The IRC requires a Class I or Class II vapor retarder on the interior side of the wall framing in climate zones 5, 6, 7, 8, and marine 4. The code goes on to outline two conditions that allow builders to use Class III vapor retarders instead: when using vented cladding (a rainscreen assembly), or when using continuous exterior insulation with a specified R-value for each climate zone.
 Semi-permeable materials (Class III vapor retarders), including most cured latex paint, plywood, and OS B, have a perm rating greater than 1 and up to 10. |
 Vaporpermeable materials, including many modern WRBs, have a perm rating greater than 10. |
These two conditions accomplish different things. Exterior insulation keeps the sheathing above the dew point, narrowing the chances of the wall getting wet from condensation. Rainscreen gaps allow vapor-open assemblies to work without putting the siding at risk. “The gap controls hydrostatic pressure, offers a capillary break, and increases the life of the siding in a flow-through assembly,” says Lstiburek. Many high-performance builders do both.
Anyone who has worked on old houses knows that a wet wall is generally only a problem if it can’t dry. For this reason, we not only need to think about keeping water vapor out of the assembly, but also letting it out of the assembly when the wall gets wet.
For example, a common energy-retrofit strategy in cold climates is to add foil-faced insulation over the wall sheathing. This approach increases thermal performance, minimizes thermal bridging, can tighten a leaky assembly, and keeps the sheathing warm to prevent condensation from occurring within the wall. But aluminum foil is vapor impermeable. This wall can no longer dry to the exterior. If the wall has a Class I vapor retarder inside, the wall cannot dry in either direction.
Oliver Klein, an architect, Passive House consultant, and sales consultant at 475 High Performance Building Supply, recommends that walls be able to dry outward as well as inward. “One of the problems,” he says, “is that we use a lot of plywood and OSB as our exterior sheathing, and these are not very vapor-open materials.”
For this reason, he prefers plywood over OSB sheathing. Though both are vapor retarders, plywood becomes more permeable when it gets wet. For an interior vapor retarder, Klein recommends a variable-perm product. His company sells Pro Clima’s Intello membrane. CertainTeed’s MemBrain is another option.
Temperature control is about comfort and efficiency
With the other three controls worked out, “thermal is easy,” says Steve Baczek. “It’s about comfort.” And it’s about energy efficiency, of course. You’ll find the IRC requirements for R-values below, but before you consider the options, it is worth taking the time to understand the significance of thermal bridging.
When compared to insulation, studs, plates, headers, and other framing members are highways for heat transfer. The insulating value of a 2×6 stud is around R-7, and the walls of an average stick-framed home are 25% to 30% framing lumber. Let’s say you were building a relatively square Colonial-style home. You’d never accept that one of the four walls was going to be insulated only to R-7. So why would you accept the penalty of thermal bridging on any walls?
Many builders mitigate thermal bridging with continuous exterior insulation. Some builders raise staggered-stud or double-stud walls, which are designed to break the thermal bridge within the wall cavity. Other builders pad the interior face of studs with rigid-foam insulation, which also creates a deeper cavity for insulation. There is even a manufacturer now that offers thermally broken studs, called Tstuds.
When it comes time to choose insulation materials, it’s important to do your homework. Each material has a different R-value per inch. Insulation, and/or its facing, can create a vapor retarder that you may or may not want in your wall. Some insulation creates an air barrier, some can be detailed to create an air barrier, and some is air permeable. Some installs must be left to trained subcontractors, others are more homeowner-friendly, and some are simply difficult to install well. Finally, insulation costs vary widely, as does the global warming potential of different insulations.
Have R-values reached their peak?
If you’ve been paying attention to code changes in the last couple of decades, you may be wondering how the writers of the IRC land on the R-values for insulation for wood-framed walls and why have they’ve increased so much of late. According to Mathewson, it’s a balance of staying true to the purpose of the code and satisfying the federal government.
“The Department of Energy gave an ultimatum to the code industry: Either up the energy efficiency of buildings, or we’re going to create federal legislation and we’re going to supersede your control,” says Mathewson. “In the purpose statement for the codes is the objective of maintaining affordability. The code industry definitely didn’t want the federal government getting involved, so we saw an increase. Now I think we are at a point where people realize that the return on investment, specific to increasing insulation R-value, is no longer there.”
Insulation by the numbers
In climate zones 1 and 2, the minimum R-value for cavity insulation is R-13. There is no minimum for continuous exterior insulation, so builders can add any amount they like.
In climate zones 3, 4, 5, and marine 4, the minimum requirement for cavity insulation is R-20, or you can meet the code by installing R-13 cavity insulation plus R-5 continuous insulation.
In climate zones 6, 7, and 8, you must include continuous insulation to meet the IRC requirements. The table offers two options—R-20 cavity insulation plus R-5 continuous insulation, or R-13 cavity insulation plus R-10 continuous insulation.
To view the entire article, please click the View PDF button below.
More about control layers
The Complicated Role of a Water-Resistive Barrier – Choose the right WRB product and install it well, because if you’re not keeping water out, nothing else matters.
Are Drainable Housewraps enough? — They’re a good start, but keeping your house dry and free of rot may require more than just drainage.
Making Sense of Housewraps — These plastic-based barriers help to keep wind and water at bay, but only if you choose the right product and install it correctly.
Is Your Exterior Rigid Foam Too Thin? — Energy Nerd: More builders are adding a layer of rigid foam insulation on the outside of homes. The idea makes sense, done correctly.

View Comments
Thank you! This article helped me a lot.