FHB Logo Facebook LinkedIn Email Pinterest Twitter X Instagram Tiktok YouTube Plus Icon Close Icon Navigation Search Icon Navigation Search Icon Arrow Down Icon Video Guide Icon Article Guide Icon Modal Close Icon Guide Search Icon Skip to content
Subscribe
Log In
  • How-To
  • Design
  • Tools & Materials
  • Restoration
  • Videos
  • Blogs
  • Forum
  • Magazine
  • Members
  • FHB House
  • Podcast
Log In

Fine Homebuilding Project Guides

Decks

Guide Home
  • Design & Planning
  • Tools & Materials
  • Footings & Foundations
  • Framing a Deck
  • Installing Decking
  • Installing Railings
  • Deck Stairs
  • Custom Details
  • Finishes, Repairs, and Maintenance
  • Complete Deck Builds

Installing Deck Stringers

A secure connection at top and a solid base to land on is key for a sturdy deck stair.

By Scott Grice
  • X
  • facebook
  • linkedin
  • pinterest
  • email
  • add to favorites Log in or Sign up to save your favorite articles

There are three important aspects to installing stringers. First, the connection to the framing at the top of the stringer must be secure and able to support the weight of the stairs plus the considerable weight of additional loads. Second, the stringer must land on a solid base that, like the top, must support the load. In addition, the bottom connection must also resist the tendency of the stairs to kick away from the deck. And third, the geometry of the installation must agree with how the stringers were cut—that is, the run of each step must be level or nearly so.


Options for securing stringers

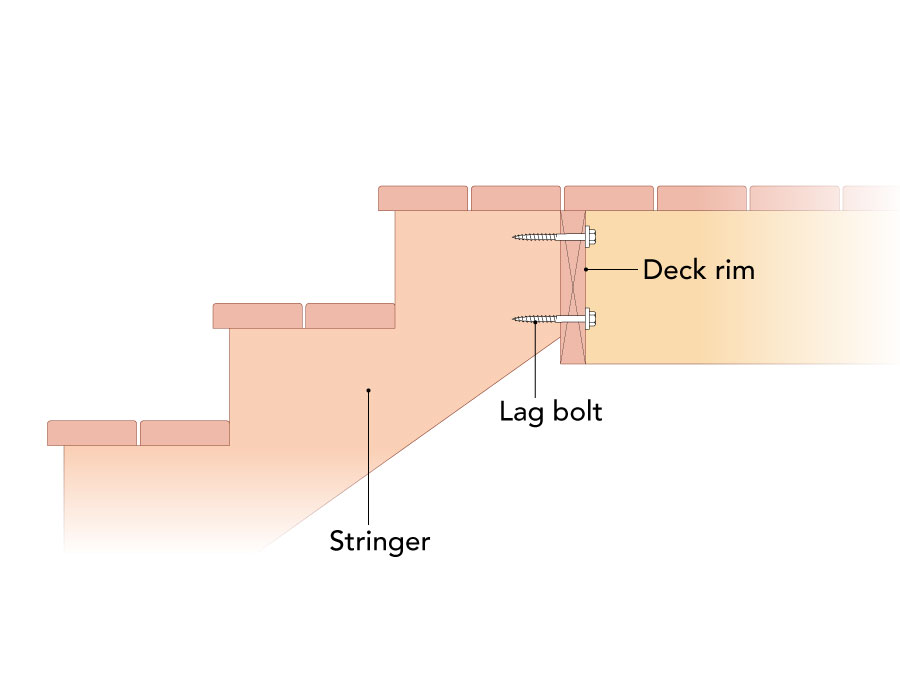
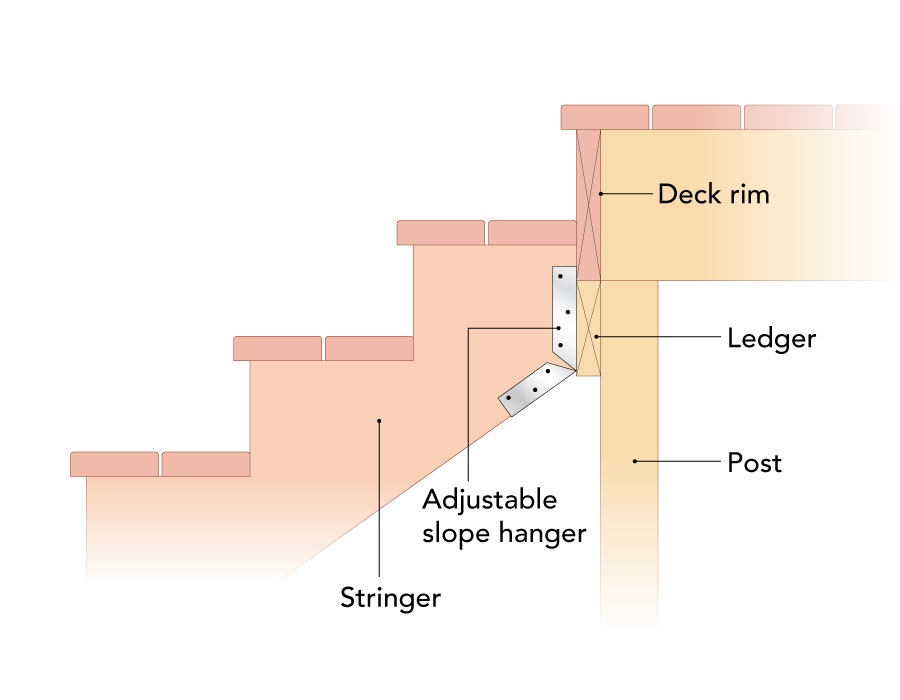
How you choose to attach the stringer to the deck framing will depend on your preference and on the project details. Shown here are three popular ways to secure stair stringers. One is to lag the butt ends of the stringer directly to the deck rim. This method extends the deck surface over the stringers. A second method is to add a supplemental ledger below the deck framing and support that ledger with posts. This method has the advantage of not putting additional load on the deck framing and is a good choice for a long run of stairs. The third choice is to extend the stringers beyond the ledger and attach them directly to the deck joists. This is a straightforward and secure way to attach stringers.

Three ways to secure stringers
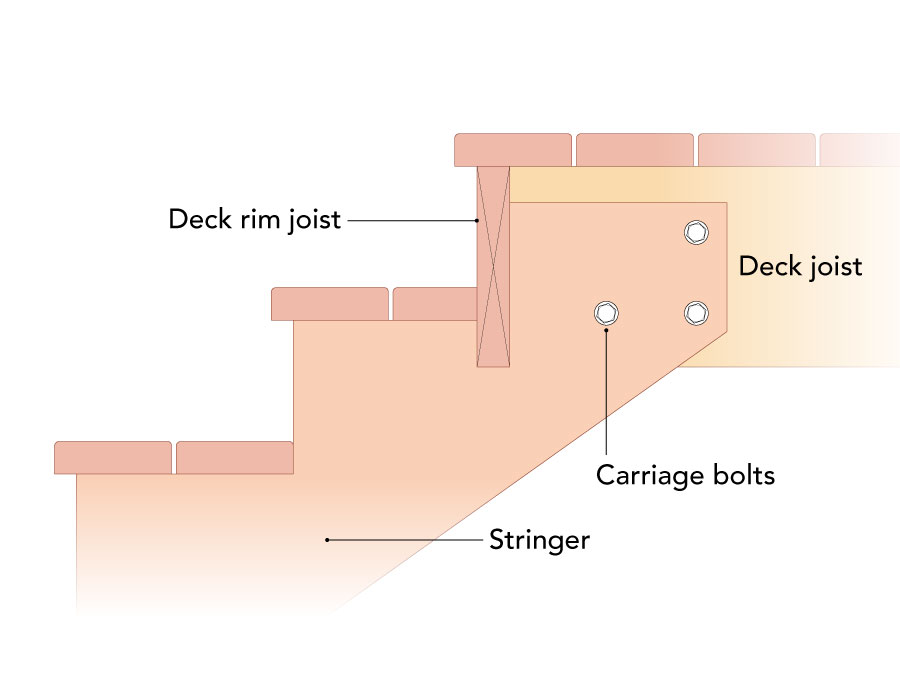
Lag to Rim Use Ledger with Posts Bolt to Deck Joists

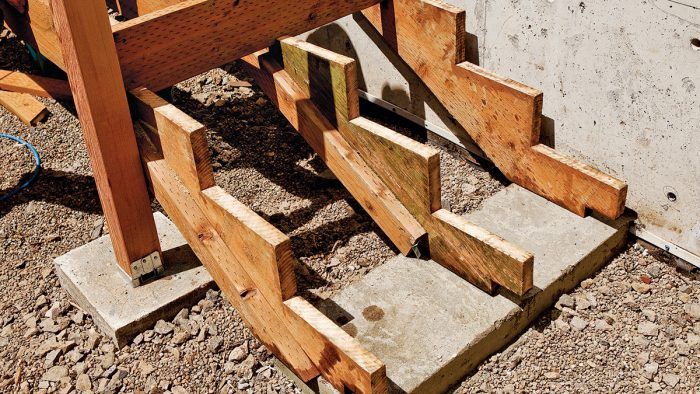
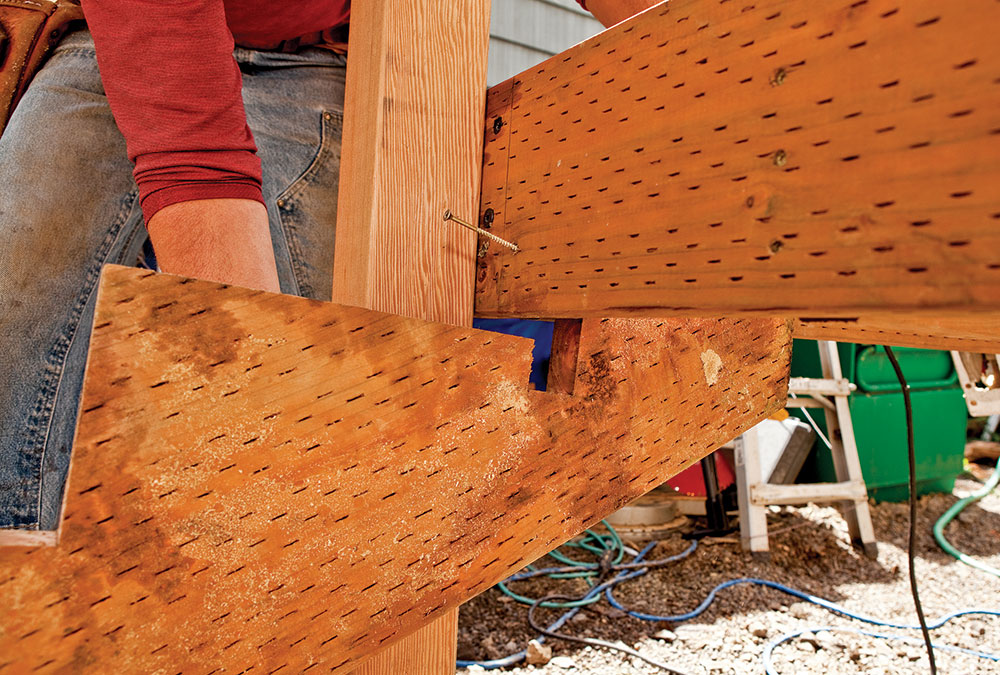
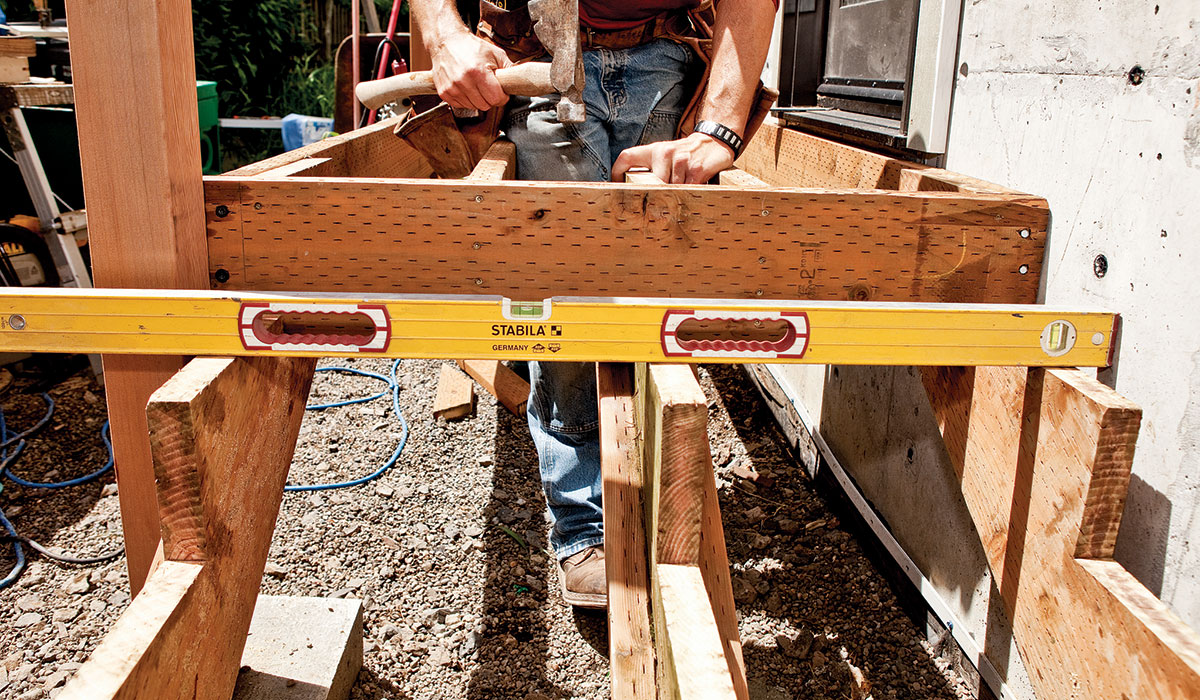
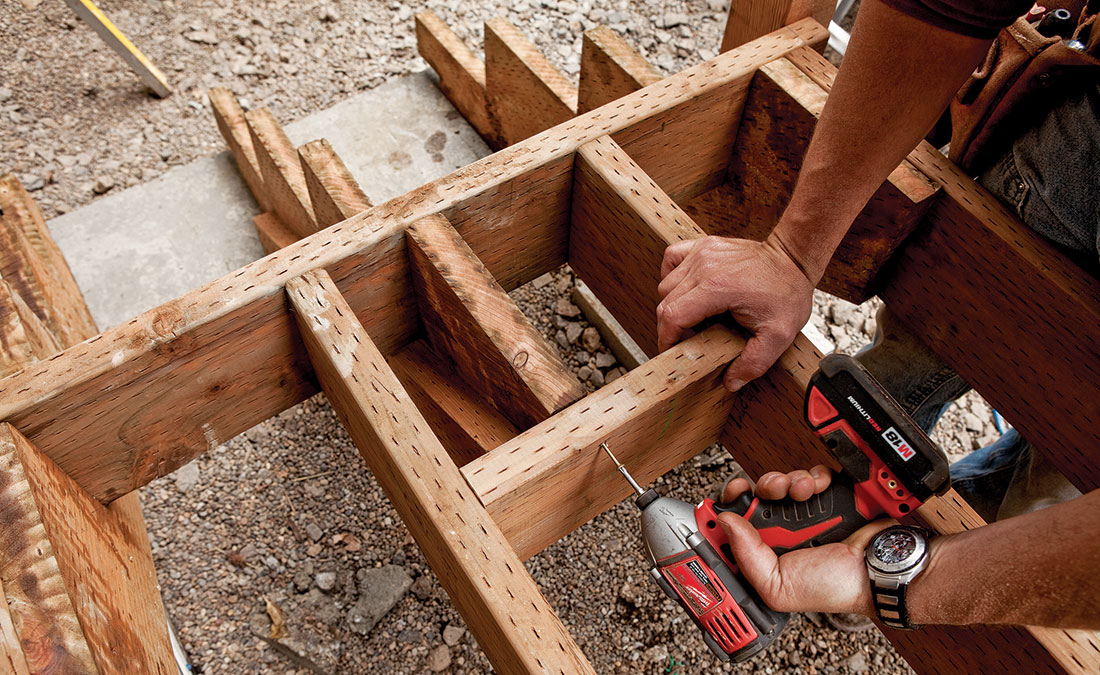
No matter what attachment method you choose, it’s a good idea to fit the stringers before permanently securing them, as seen in the photos below. Locate the temporary screw low in the notch to reduce the risk of splitting the stringer before it’s permanently attached. With one stringer in place and resting on the landing, check the run for level. If the stringer’s run is level or pitched slightly toward the stringer bottom, that’s acceptable. If the slope is back, meaning the edge of the step closest to you when you walk up the steps is higher, then adjust the stringer position until the stringer run is level.

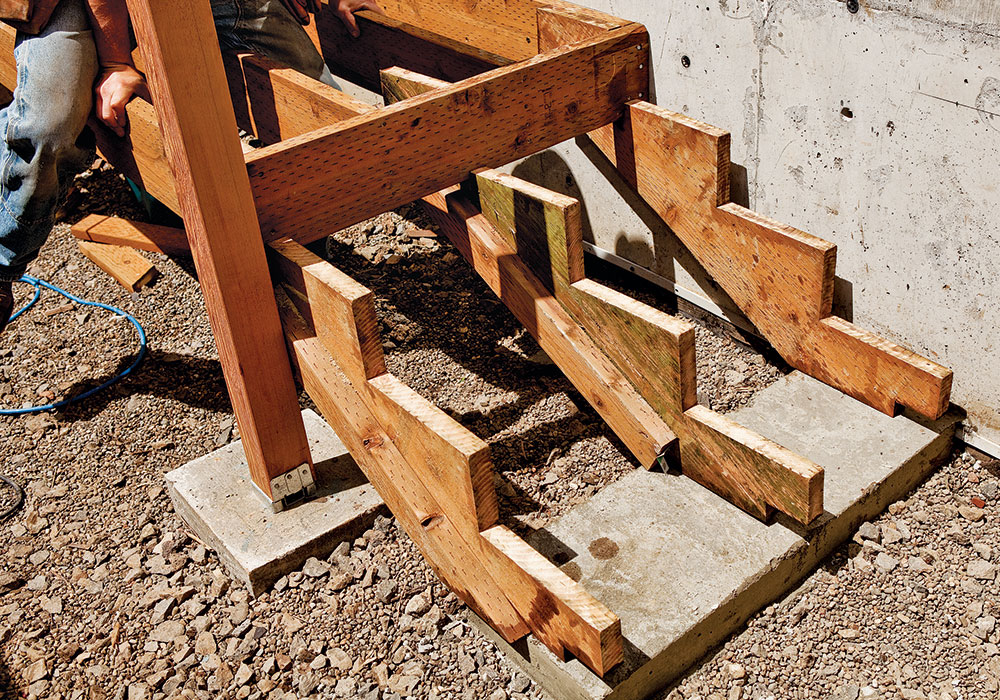
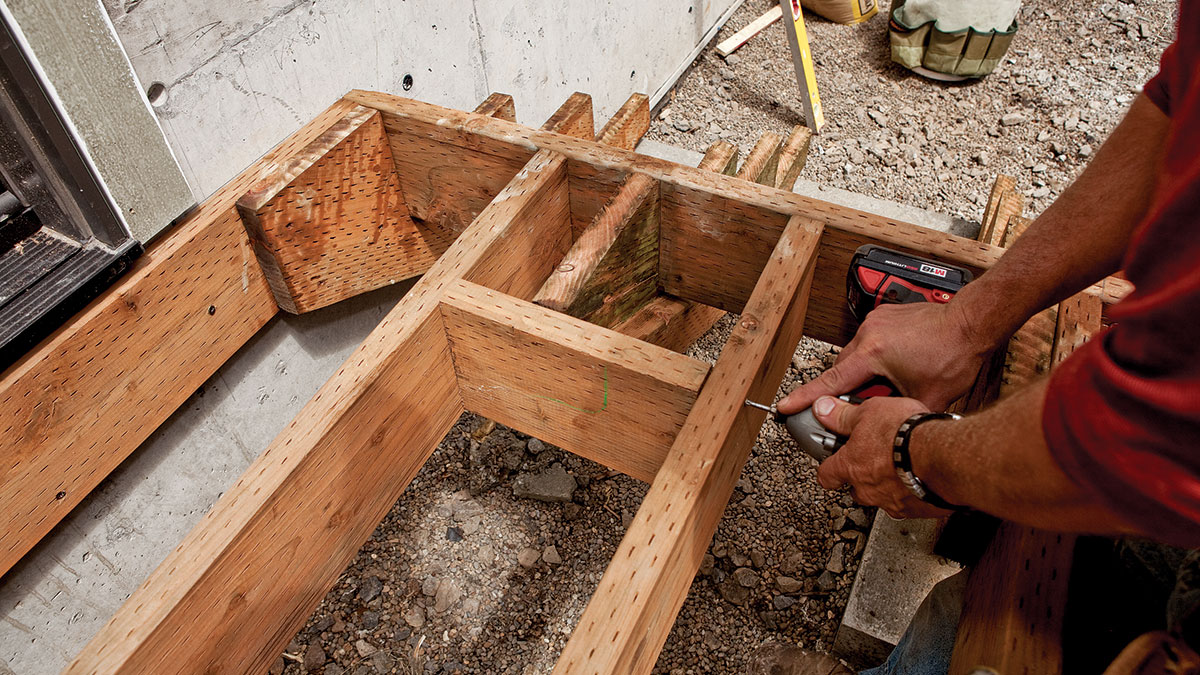
Temporarily attach all three stringers in place and double-check that they are located correctly. Often stringers will have slight variations. To account for this, level across all the stringers at the top step and adjust the middle stringer until it is even with the outside stringers. Level across the stringers at the bottom and adjust the low stringer up with shims until all three stringers are level. Also check the rise face across the stringers to make sure that they are aligned and make any adjustment necessary. When the stringers are positioned properly, permanently secure them to the deck framing.

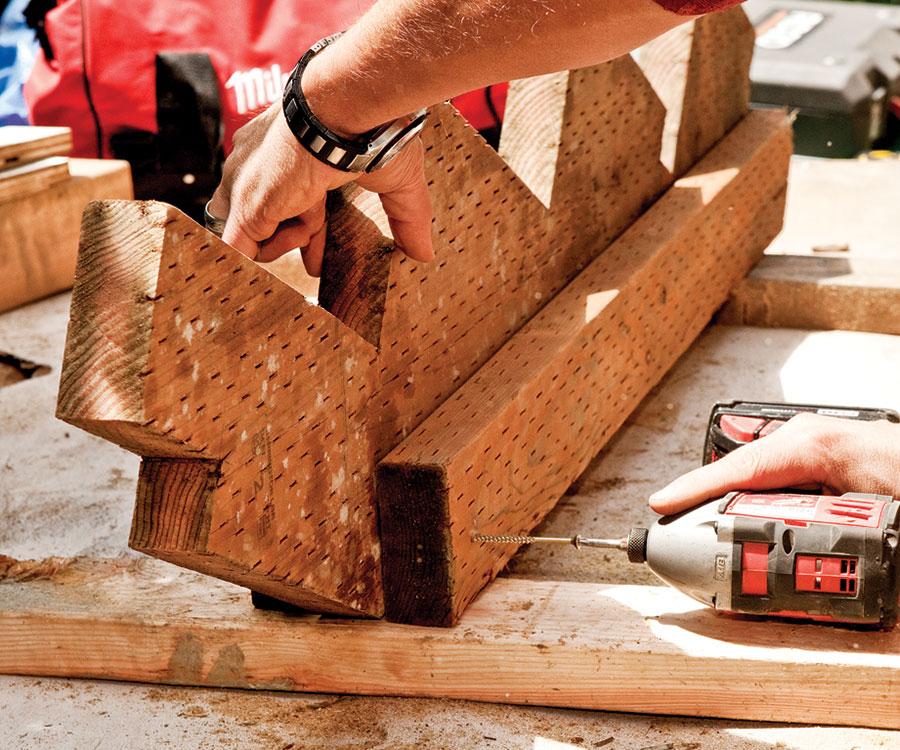
For the project shown here, the joists ran parallel to the stringers, so the simplest attachment method was to run the stringer long and sister it to the joist. Whatever attachment method you choose, it is crucial that the fasteners or hangers secure the stringer near the bottom edge. Any portion of the stringer on the teeth side has no strength. To secure a stringer that does not align with a joist, install blocking to header off the joist end. Then secure the stringer to the blocking with through screws.

1. Test-fit the stringers before permanently securing them, being careful not to force the stringer into position.

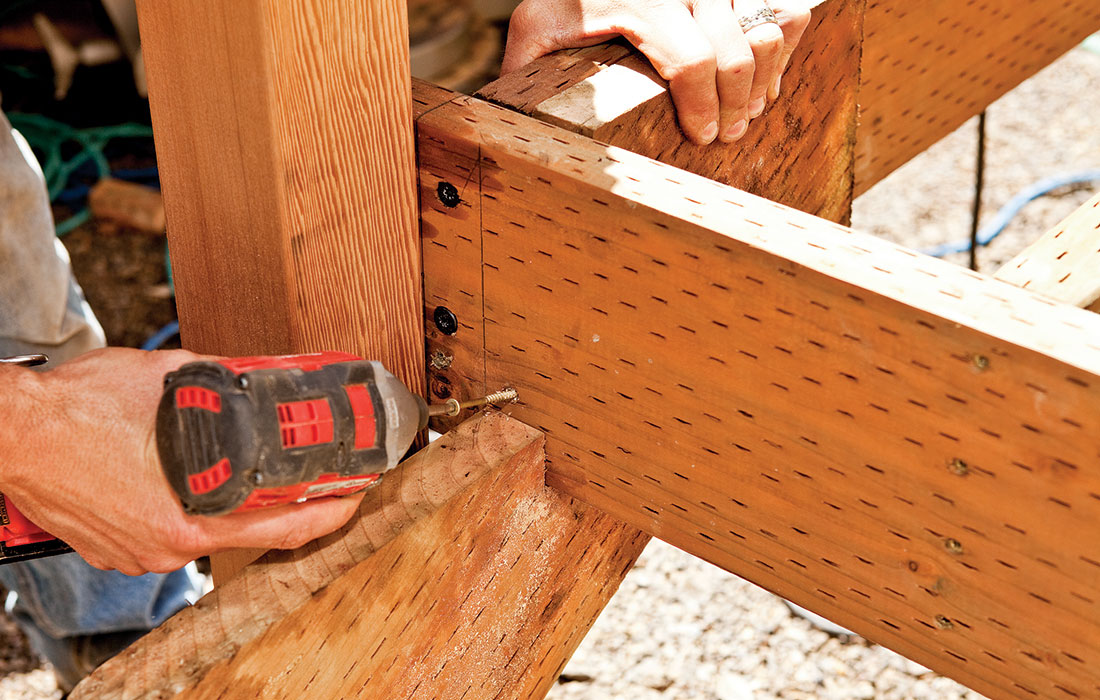
2. Attach the stringer to the framing with temporary screws and register all three stringers from the same attachment point.

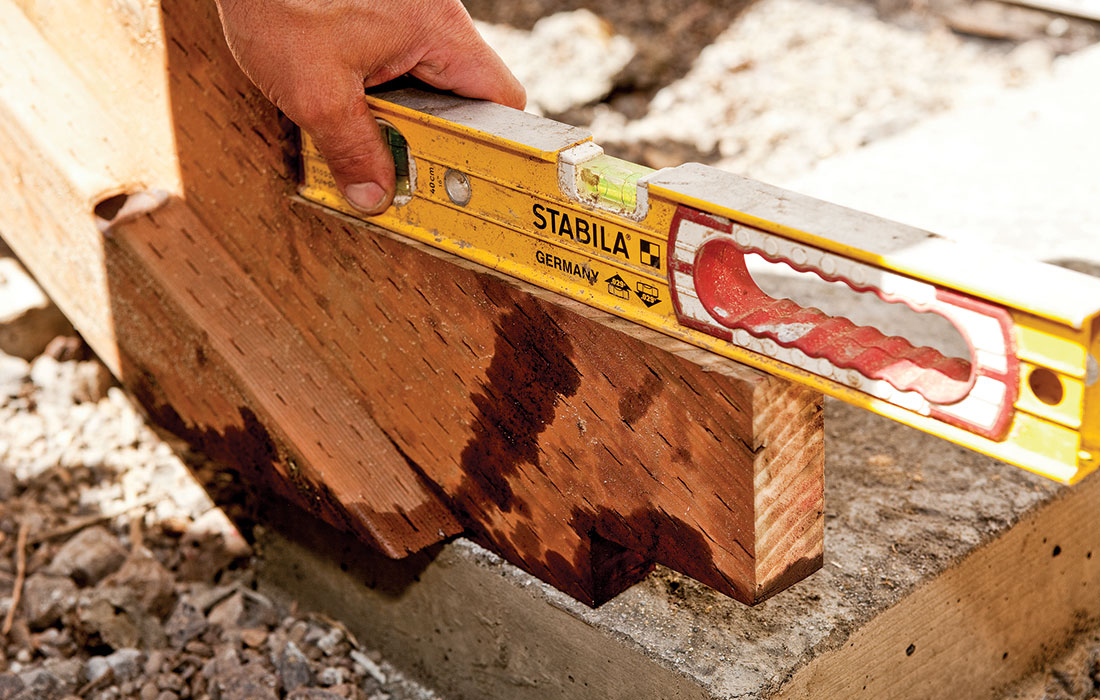
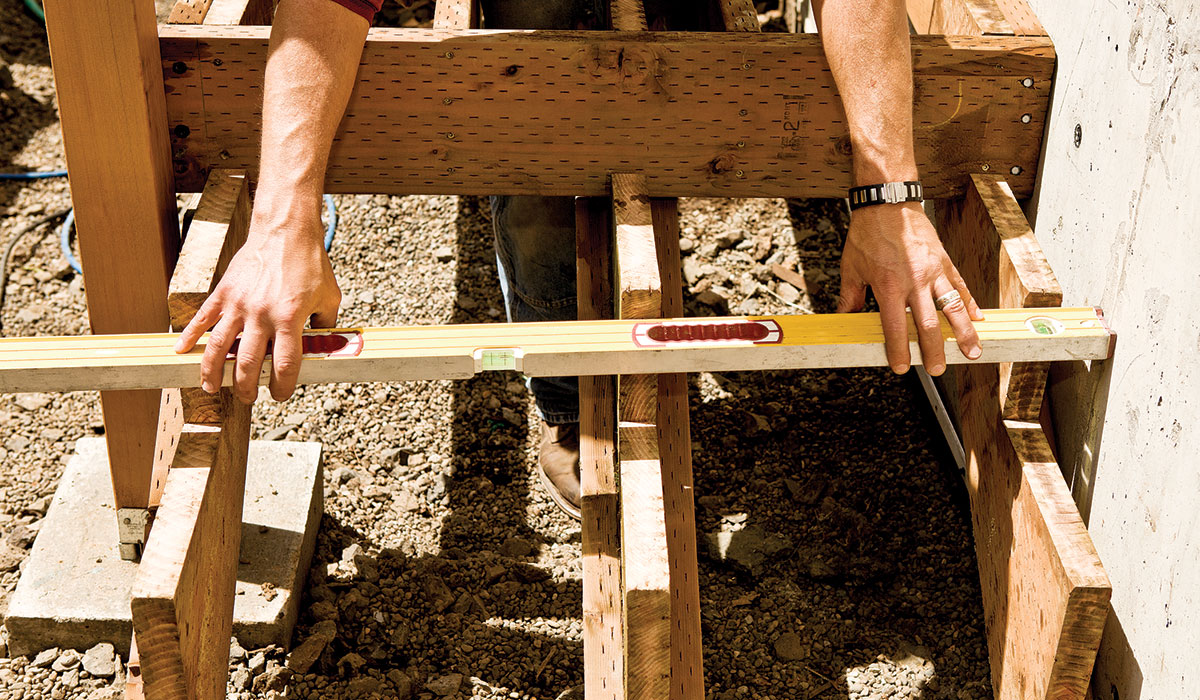
3. Check the stringer for a level run. If the run slopes back, the bottom of the stringer needs to drop in relation to the top.

4. Position all three stringers temporarily and repeat checks for overall fit and levelness of the run.

5. Level across all three stringers. The stringers should be within 1/16 in. If not, adjust the low stringer up if possible.

6. Check the rise alignment of all three stringers at each step and make adjustments so that they are within 1/16 in. at every step.

7. Attach the stringers to the deck framing with screws positioned low on the stringer.

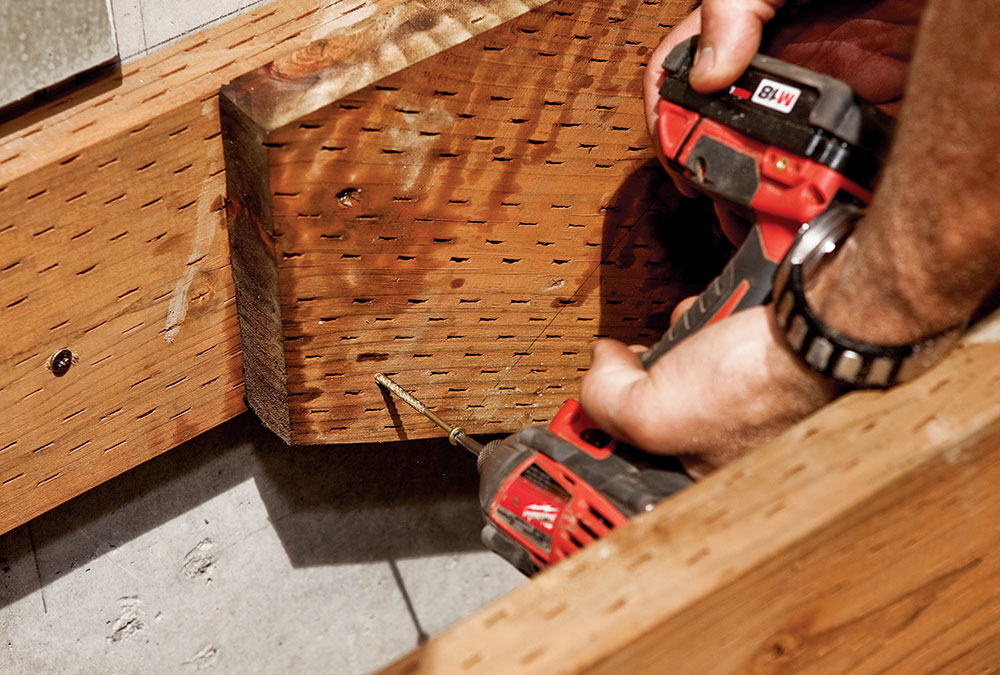
8. Install blocking for joists that do not align with a deck joist. Secure the blocking with through screws or hardware.

9. Screw through the blocking to secure the joist. Fasteners positioned low on the stringer will carry more load.


Trade Secret: I like to add a strongback–a 2×4 board screwed to the side of the stringer to add stiffness–to every set of stairs I build. It’s an inexpensive way to make a noticeable difference in the feel of the finished stair assembly.


Securing stringers to the landing

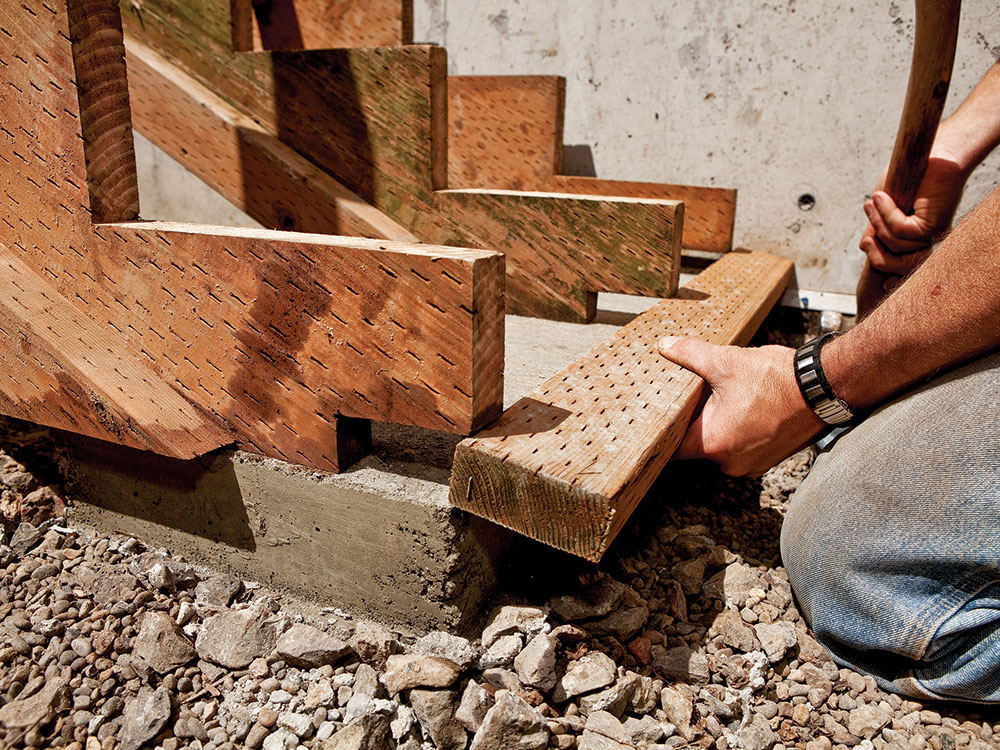
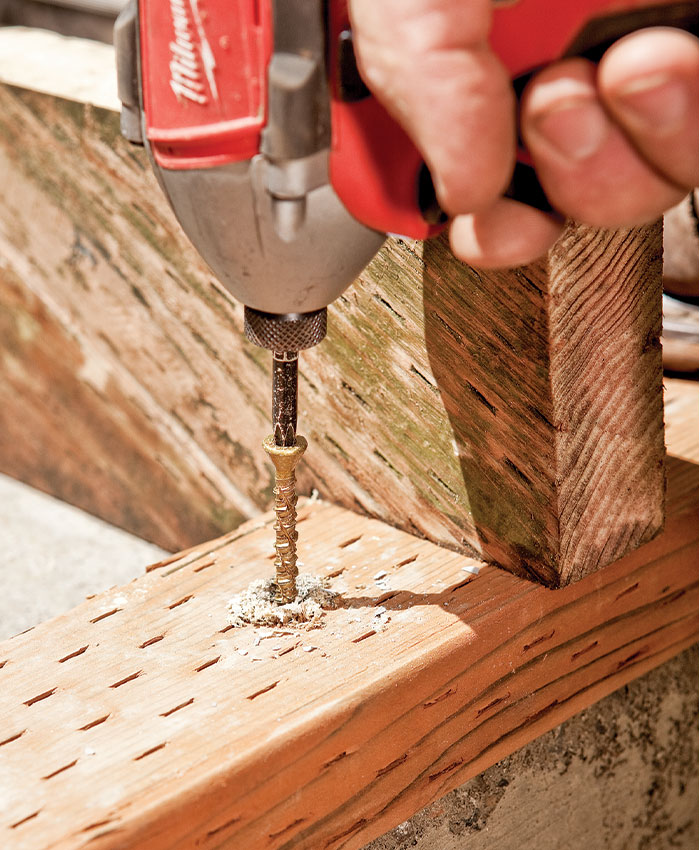
The easiest way to secure the stringers to the landing is with a kicker board. The kicker board is typically located on the landing at the front of the bottom step. Before securing the kicker, check the fit in the kicker recess. With the stringer positioned, use a masonry bit to drill through the kicker into the concrete pad. Then use an appropriately sized masonry bit to fasten the kicker to the pad. The position of the kicker does most of the work by preventing the stringer from moving forward. The connection of the stringer to the kicker is primarily to keep the stair assembly from bouncing or moving side to side, so using screws to fasten the stringer is sufficient. To reduce the chance of splitting the stringer drill a pilot hole for this connection.

1. Fit the kicker board into the notches at the bottom of the stringer and then check for level across the stringers.

2. Drill a hole through the kicker board and into the concrete with an appropriately sized masonry bit.

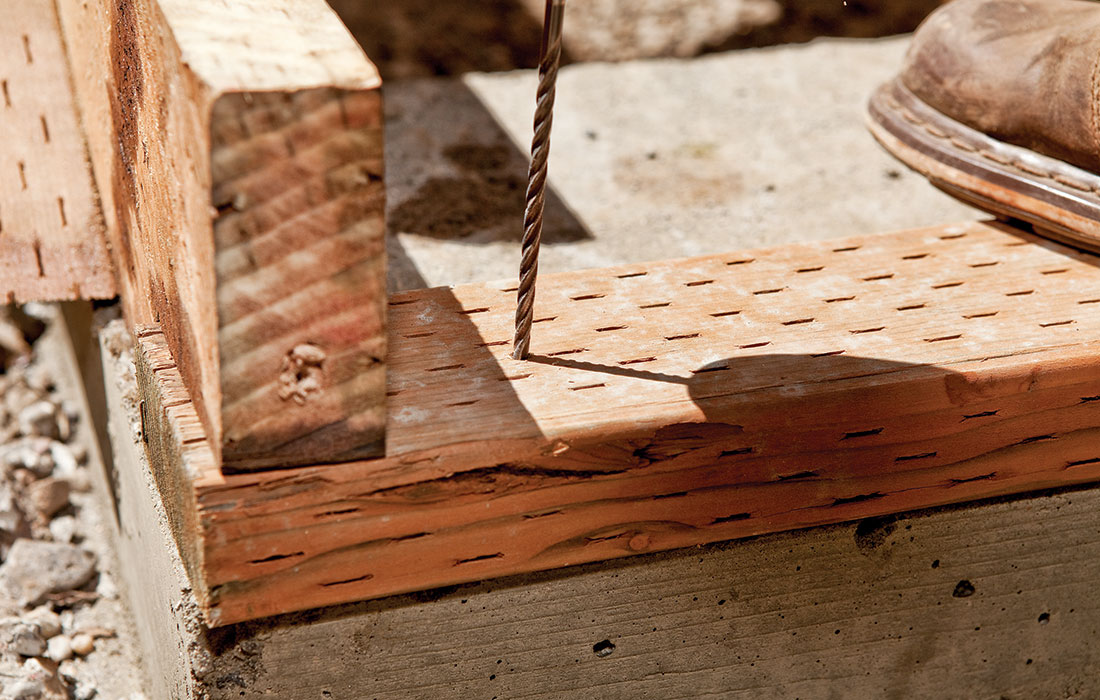
3. Drive a masonry fastener into the concrete to secure the kicker board.

4. Secure the stringer bottom to the kicker with toe screws, being careful not to split the stringer end.


Options for securing the stringers to the landing

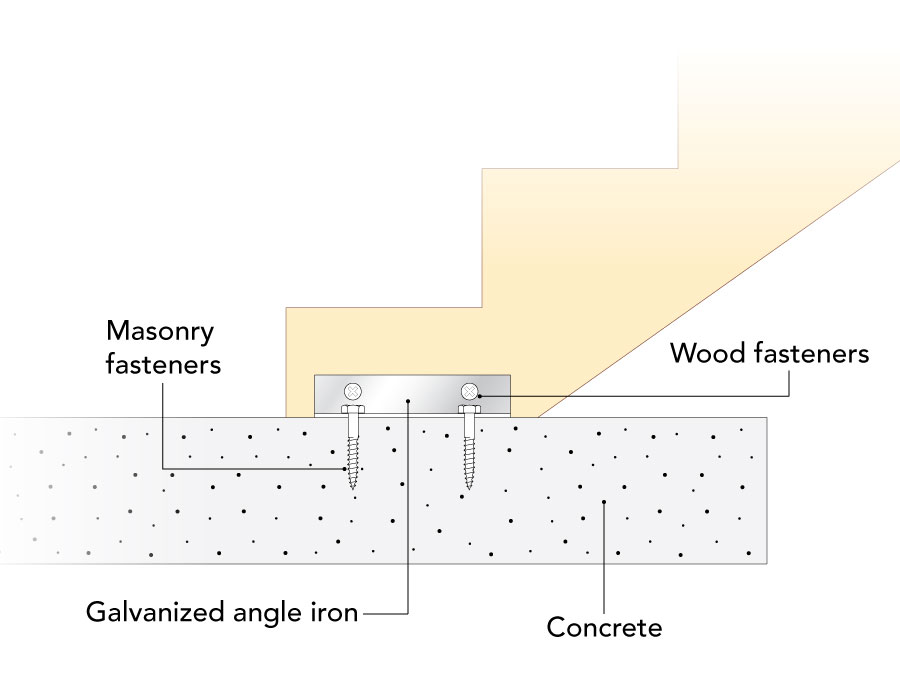
It’s important to land the stairs on a secure pad that will resist lateral movement. There are three main ways to secure the stringer to the pad to transfer that lateral load. One way is to use galvanized brackets secured to both the stringer and the concrete. This has the advantage that no modifications need to be made when pouring the concrete pad or cutting the stringers. Another method is to secure a pressure-treated kicker board to the pad with masonry bolts. This is a very secure connection because the force of the stringer load pushes directly on the kicker’s face. Finally, in drier climates that are less prone to rot, you can choose to embed the kickers in the concrete and secure the stringers with brackets. This method avoids the need for using masonry fasteners.

Two ways to land stringers

With Hardware With a Surface Kicker


Fine Homebuilding Recommended Products

Fine Homebuilding receives a commission for items purchased through links on this site, including Amazon Associates and other affiliate advertising programs.

Standard Marking Chalk

We like white chalk because it’s non-permanent and wears off easily — this is especially helpful when marks are exposed and need to disappear.
Buy at Amazon

Lithium-Ion Cordless Palm Nailer

This tool is nice to have for fitting in tight spaces when fastening hardware. While you may not use it often, you'll be glad you have it when you need it.
Buy at Amazon

N95 Respirator

PPE is a must, especially when cutting and sanding. We recommend you always have a box of respirator masks on the job site.
Buy at Amazon
Previous: Stairs to a Pitched Landing Next: Critical Deck-Framing Connections, Part 5: Stairs

Guide

Decks

Chapter

Deck Stairs

Sign up for eletters today and get the latest how-to from Fine Homebuilding, plus special offers.

Signing you up...

This site is protected by reCAPTCHA and the Google Privacy Policy and Terms of Service apply.
See all newsletters
See all newsletters

Log in or create an account to post a comment.

Sign up Log in

Become a member and get full access to FineHomebuilding.com

Decks

Decks

Hundreds of articles and videos by top deck-building pros on how to design and build a beautiful, sturdy, and safe deck

View Project Guide

View All Project Guides »

Become a member and get unlimited site access, including the Decks Project Guide.

Start Free Trial

Design & Planning
  • Basic Design Options
  • Generating Plans
  • Calculating Deck Loads
  • Code Compliance
Tools & Materials
  • Deck Building Tools
  • Foundation and Framing Materials
  • Decking Materials
  • Fasteners and Hardware
Footings & Foundations
  • Choosing a Foundation
  • Sizing and Laying Out Footings
  • Excavation
  • Pouring the Foundation
Framing a Deck
  • Framing Overview
  • Installing the Ledger
  • Setting Posts and Beams
  • Installing Joists
Installing Decking
  • Decking Basics
  • Installation Process
  • Adding Fascia and Other Decorative Elements
Installing Railings
  • Installing Deck Railing Posts
  • Building Wood Rails and Balustrades
  • Non-Wood Railing Options
  • Installing Nonwood Balustrades
Deck Stairs
  • Deck Stairs Overview
  • Laying Out, Cutting, and Installing the Stringers
  • Installing Treads, Risers, and Stair Railings
Custom Details
  • Benches, Planters, and Privacy Features
  • Pergolas
  • Lighting
Finishes, Repairs, and Maintenance
  • Deck Finishes
  • Cleaning and Refinishing
  • Inspection and Repair
Complete Deck Builds
  • Grade-Level Decks
  • Raised Decks

Fine Home Building

Newsletter Sign-up

  • Fine Homebuilding

    Home building tips, offers, and expert advice in your inbox.

  • Green Building Advisor

    Building science and energy efficiency advice, plus special offers, in your inbox.

  • Old House Journal

    Repair, renovation, and restoration tips, plus special offers, in your inbox.

Signing you up...

This site is protected by reCAPTCHA and the Google Privacy Policy and Terms of Service apply.
See all newsletters

Follow

  • Fine Homebuilding

    Dig into cutting-edge approaches and decades of proven solutions with total access to our experts and tradespeople.

    Start Free Trial Now
    • Facebook
    • Instagram
    • X
    • LinkedIn
  • GBA Prime

    Get instant access to the latest developments in green building, research, and reports from the field.

    Start Free Trial Now
    • Facebook
    • YouTube
  • Old House Journal

    Learn how to restore, repair, update, and decorate your home.

    Subscribe Now
    • Facebook
    • Instagram
    • X

Membership & Magazine

  • Online Archive
  • Start Free Trial
  • Magazine Subscription
  • Magazine Renewal
  • Gift a Subscription
  • Customer Support
  • Privacy Preferences
  • About
  • Contact
  • Advertise
  • Careers
  • Terms of Use
  • Site Map
  • Do not sell or share my information
  • Privacy Policy
  • Accessibility
  • California Privacy Rights

© 2025 Active Interest Media. All rights reserved.

Fine Homebuilding receives a commission for items purchased through links on this site, including Amazon Associates and other affiliate advertising programs.

  • Home Group
  • Antique Trader
  • Arts & Crafts Homes
  • Bank Note Reporter
  • Cabin Life
  • Cuisine at Home
  • Fine Gardening
  • Fine Woodworking
  • Green Building Advisor
  • Garden Gate
  • Horticulture
  • Keep Craft Alive
  • Log Home Living
  • Military Trader/Vehicles
  • Numismatic News
  • Numismaster
  • Old Cars Weekly
  • Old House Journal
  • Period Homes
  • Popular Woodworking
  • Script
  • ShopNotes
  • Sports Collectors Digest
  • Threads
  • Timber Home Living
  • Traditional Building
  • Woodsmith
  • World Coin News
  • Writer's Digest
Active Interest Media logo
X
X
This is a dialog window which overlays the main content of the page. The modal window is a 'site map' of the most critical areas of the site. Pressing the Escape (ESC) button will close the modal and bring you back to where you were on the page.

Main Menu

  • How-To
  • Design
  • Tools & Materials
  • Video
  • Blogs
  • Forum
  • Project Guides
  • Reader Projects
  • Magazine
  • Members
  • FHB House

Podcasts

  • FHB Podcast
  • ProTalk

Webinars

  • Upcoming and On-Demand

Podcasts

  • FHB Podcast
  • ProTalk

Webinars

  • Upcoming and On-Demand

Popular Topics

  • Kitchens
  • Business
  • Bedrooms
  • Roofs
  • Architecture and Design
  • Green Building
  • Decks
  • Framing
  • Safety
  • Remodeling
  • Bathrooms
  • Windows
  • Tilework
  • Ceilings
  • HVAC

Magazine

  • Current Issue
  • Past Issues
  • Magazine Index
  • Subscribe
  • Online Archive
  • Author Guidelines

All Access

  • Member Home
  • Start Free Trial
  • Gift Membership

Online Learning

  • Courses
  • Project Guides
  • Reader Projects
  • Podcast

More

  • FHB Ambassadors
  • FHB House
  • Customer Support

Account

  • Log In
  • Join

Newsletter

Get home building tips, offers, and expert advice in your inbox

Signing you up...

This site is protected by reCAPTCHA and the Google Privacy Policy and Terms of Service apply.
See all newsletters
See all newsletters

Follow

  • X
  • YouTube
  • instagram
  • facebook
  • pinterest
  • Tiktok

Join All Access

Become a member and get instant access to thousands of videos, how-tos, tool reviews, and design features.

Start Your Free Trial

Subscribe

FHB Magazine

Start your subscription today and save up to 70%

Subscribe

You have 1 free article remaining.

Get complete site access, including thousands of videos, how-to tips, tool reviews, and design features.

Start your FREE trial

Already a member? Log in

We hope you’ve enjoyed your free articles. To keep reading, become a member today.

Get complete site access to expert advice, how-to videos, Code Check, and more, plus the print magazine.

Start your FREE trial

Already a member? Log in

Privacy Policy Update

We use cookies, pixels, script and other tracking technologies to analyze and improve our service, to improve and personalize content, and for advertising to you. We also share information about your use of our site with third-party social media, advertising and analytics partners. You can view our Privacy Policy here and our Terms of Use here.

Cookies

Analytics

These cookies help us track site metrics to improve our sites and provide a better user experience.

Advertising/Social Media

These cookies are used to serve advertisements aligned with your interests.

Essential

These cookies are required to provide basic functions like page navigation and access to secure areas of the website.

Delete My Data

Delete all cookies and associated data