FHB Logo Facebook LinkedIn Email Pinterest Twitter X Instagram Tiktok YouTube Plus Icon Close Icon Navigation Search Icon Navigation Search Icon Arrow Down Icon Video Guide Icon Article Guide Icon Modal Close Icon Guide Search Icon Skip to content
Subscribe
Log In
  • How-To
  • Design
  • Tools & Materials
  • Restoration
  • Videos
  • Blogs
  • Forum
  • Magazine
  • Members
  • FHB House
  • Podcast
Log In

Fine Homebuilding Project Guides

Siding & Exterior Trim

Guide Home
  • Choosing Siding
  • Installing Siding
  • Choosing Exterior Trim
  • Installing Exterior Trim
  • Repairing Siding & Trim
How-To

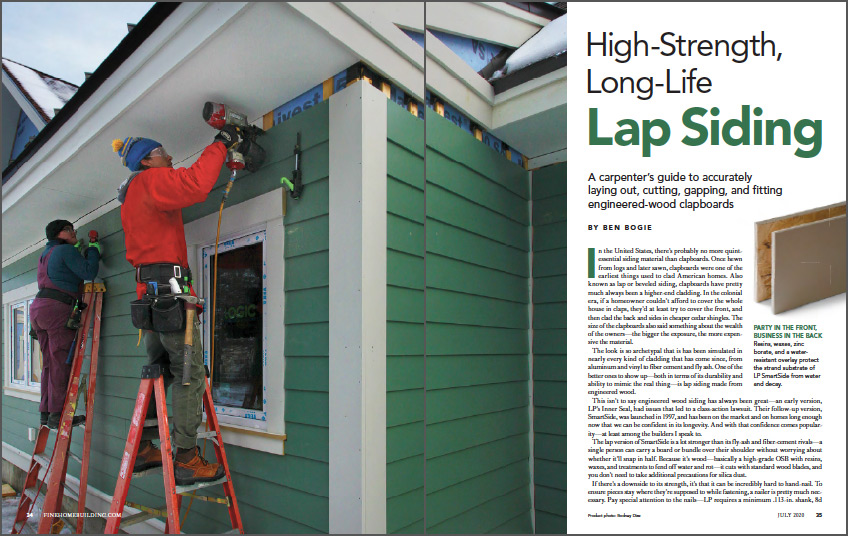
High-Strength, Long-Life Lap Siding

A carpenter's guide to accurately laying out, cutting, gapping, and fitting engineered-wood clapboards.

By Ben Bogie Issue 292 - July 2020
  • X
  • facebook
  • linkedin
  • pinterest
  • email
  • add to favorites Log in or Sign up to save your favorite articles
Party in the front, business in the back. Resins, waxes, zinc borate, and a water-resistant overlay protect the strand substrate of LP SmartSide from water and decay.

Synopsis: Engineered-wood lap siding is a durable alternative to clapboards, and has been on the market long enough that we can be confident in its longevity. Carpenter Ben Bogie details an installation of LP SmartSide engineered-wood clapboards, covering the basics of setup, tools for installing and nailing the courses, the process of marking and cutting for cutouts and trim, and the final step of sealing the seams.


In the United States, there’s probably no more quintessential siding material than clapboards. Once hewn from logs and later sawn, clapboards were one of the earliest things used to clad American homes. Also known as lap or beveled siding, clapboards have pretty much always been a higher-end cladding. In the colonial era, if a homeowner couldn’t afford to cover the whole house in claps, they’d at least try to cover the front, and then clad the back and sides in cheaper cedar shingles. The size of the clapboards also said something about the wealth of the owners—the bigger the exposure, the more expensive the material.

The look is so archetypal that is has been simulated in nearly every kind of cladding that has come since, from aluminum and vinyl to fiber cement and fly ash. One of the better ones to show up—both in terms of its durability and ability to mimic the real thing—is lap siding made from engineered wood.

This isn’t to say engineered wood siding has always been great—an early version, LP’s Inner Seal, had issues that led to a class-action lawsuit. Their follow-up version, SmartSide, was launched in 1997, and has been on the market and on homes long enough now that we can be confident in its longevity. And with that confidence comes popularity— at least among the builders I speak to.

saw setup
Saw setup. Use a dialed-in miter saw with a finish blade and long extension tables to make crosscuts. The extension tables double as surfaces for rip cuts made with a track saw.

installing a starter stripof siding
Start and gap. Before installing the first course, and above windows and other long horizontals that break up siding courses, install a starter strip of siding material roughly equal to the height of the overlap between courses. Use 3/16-in. spacers at the ends to keep the courses spaced evenly from the corner boards, and install the first course 3/8 in. above the water table (if present).

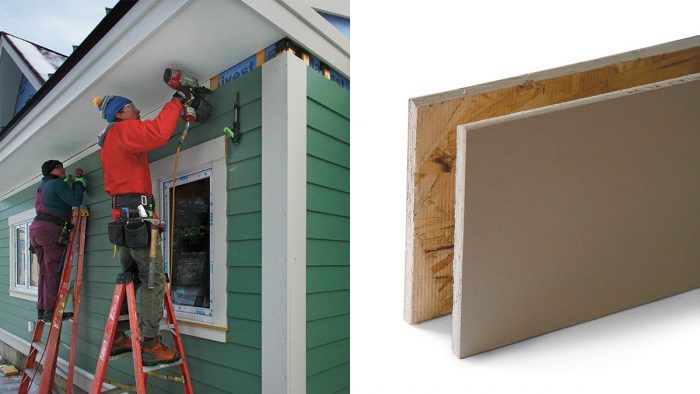
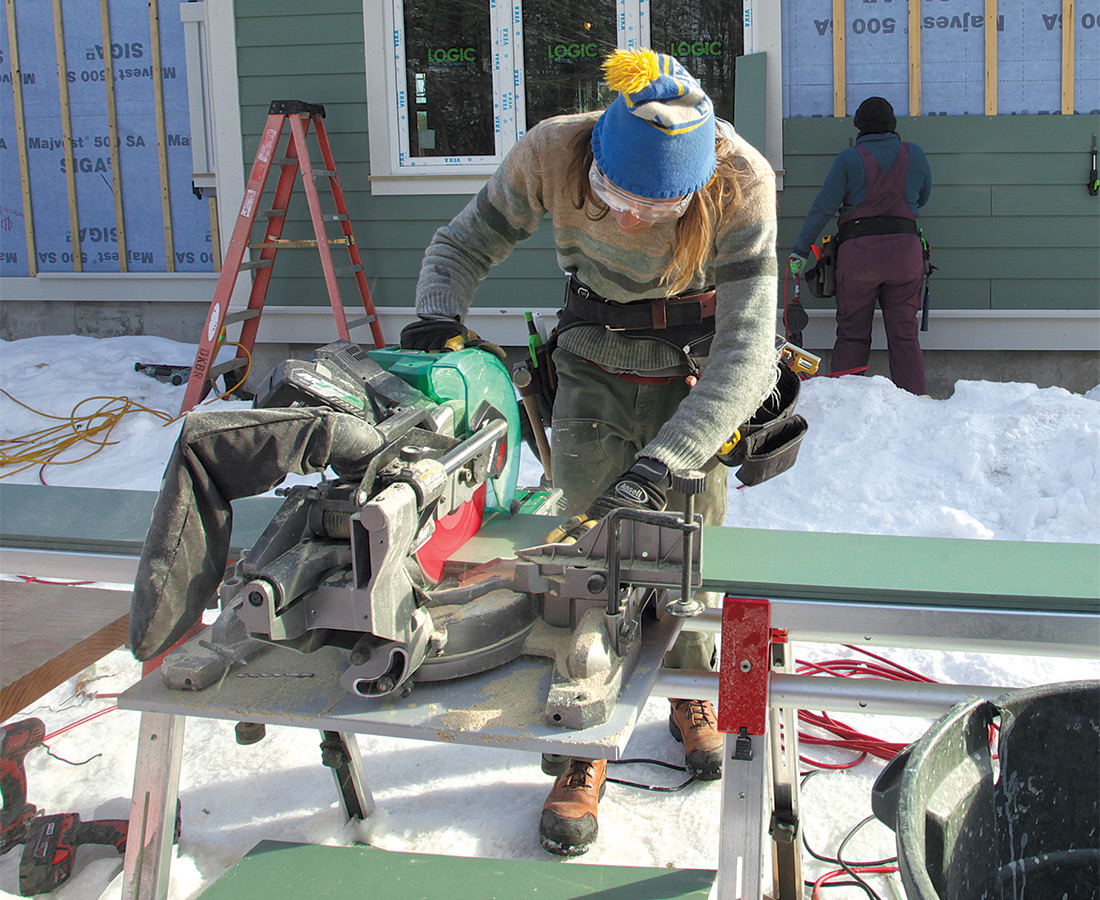
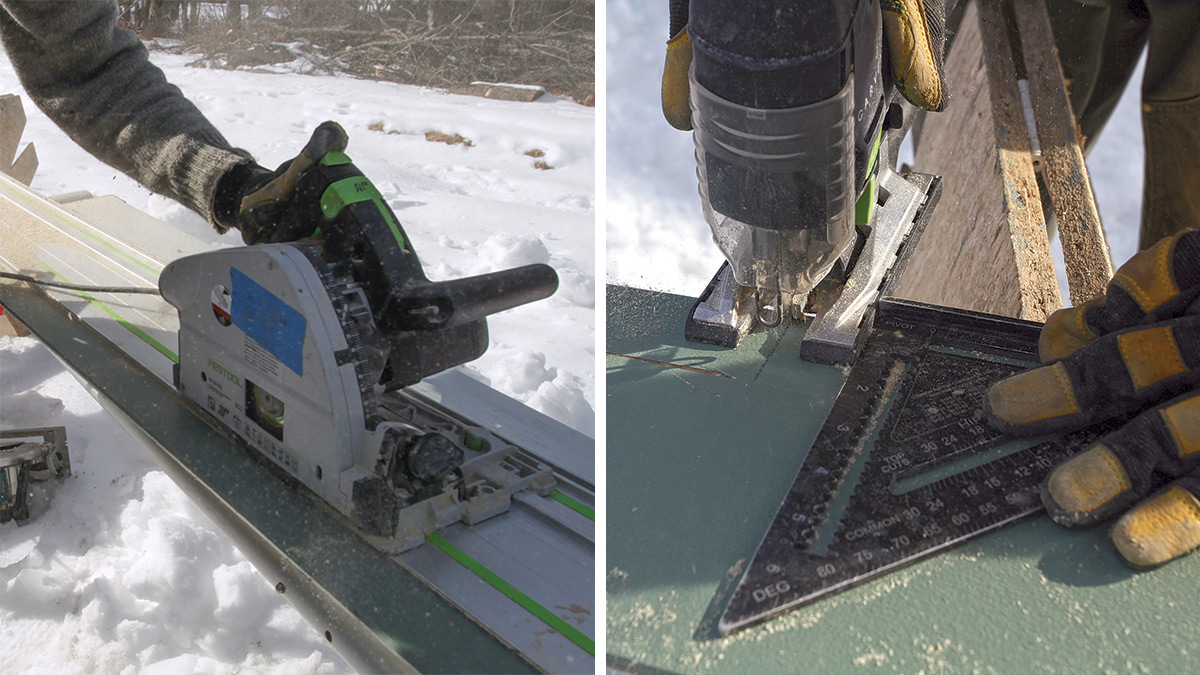
The lap version of SmartSide is a lot stronger than its fly-ash and fiber-cement rivals—a single person can carry a board or bundle over their shoulder without worrying about whether it’ll snap in half. Because it’s wood—basically a high-grade OSB with resins, waxes, and treatments to fend off water and rot—it cuts with standard wood blades, and you don’t need to take additional precautions for silica dust.

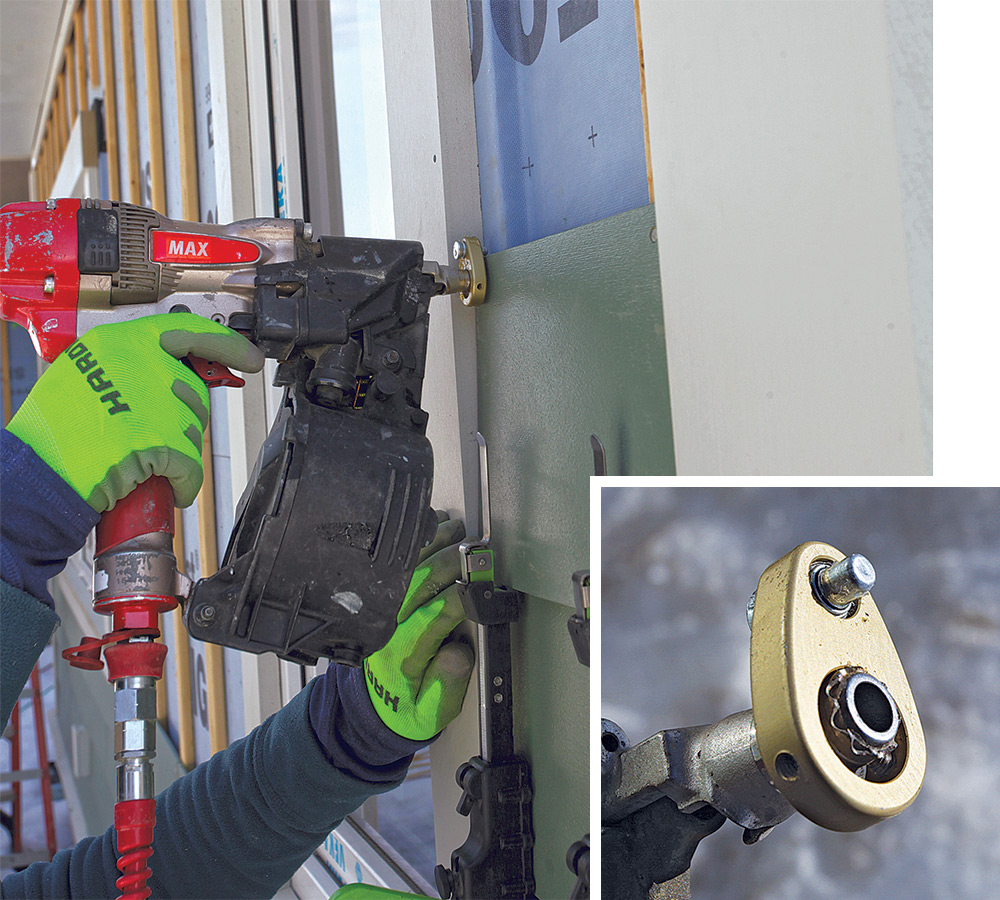
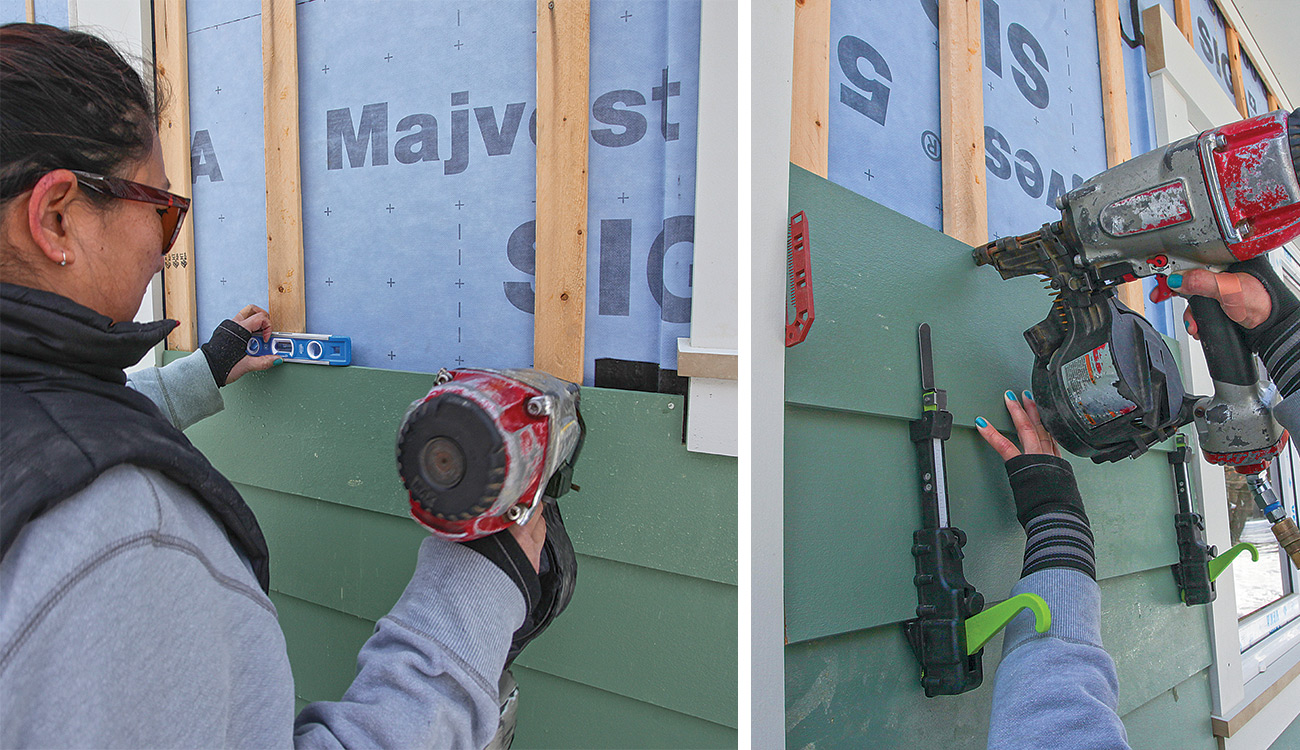
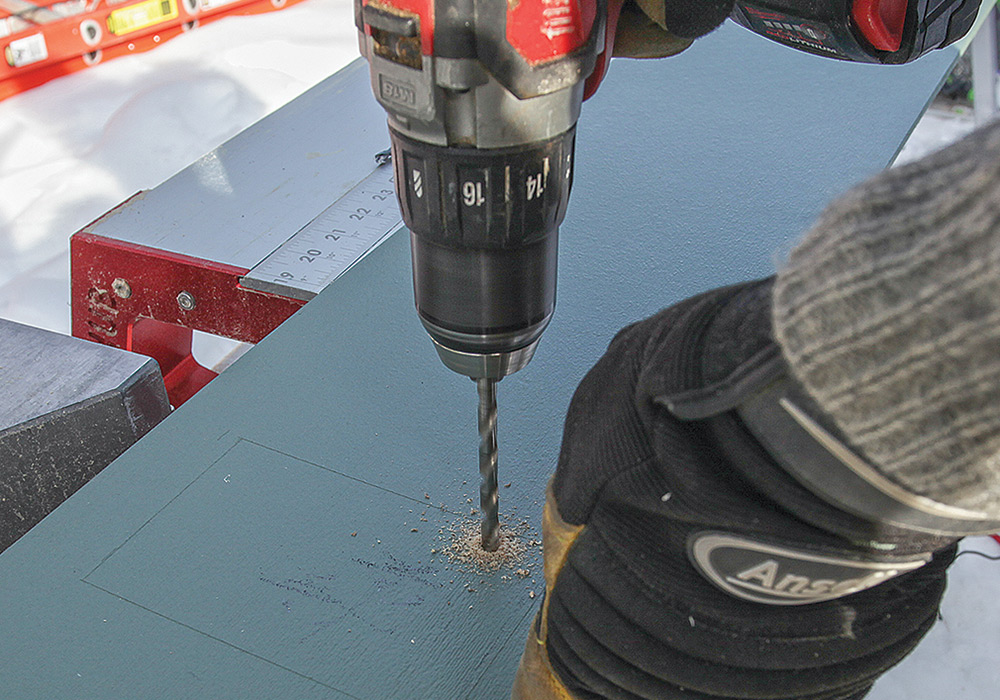
If there’s a downside to its strength, it’s that it can be incredibly hard to hand-nail. To ensure pieces stay where they’re supposed to while fastening, a nailer is pretty much necessary. Pay special attention to the nails—LP requires a minimum .113-in. shank, 8d hot-dipped galvanized nail with a .297-in.-diameter head, which is a special-order item in my neck of the woods.

nailing lap siding
Keep it down. Nail at least 3/8 in. from the ends and at least 3/4 in. down from the top edge of the siding, but not so far down that the next course won’t cover the nail head. An offset attachment for the nailer, like this EZi-Gauge, makes it easy to get the spacing consistently right. Siding gauges keep the course exposure even.

Unlike original clapboards (or fiber-cement or fly-ash versions), SmartSide isn’t beveled across its width. There is an obvious face and back, but no top or bottom—both edges are essentially the same. That means if one edge gets a ding, you can just flip it around and hang it with the good edge down. But it also means that the bottoms of courses get kicked out more than with traditional claps. You need to use minimum 5/4 trim to prevent the bottom edge of the siding from sticking out past it. To keep the kickout angle constant, a starter strip under the first course is essential.

use spacers for measurements
Avoid math. Pull measurements using spacers that account for the gaps at both ends of the siding, and read the tape where it crosses the spacer rather than the trim. For accuracy across the crew, use composite shims, which have an even thickness along their length (save for the tips), as spacers. Here a 1/4-in. and 1/8-in. shim are taped together.

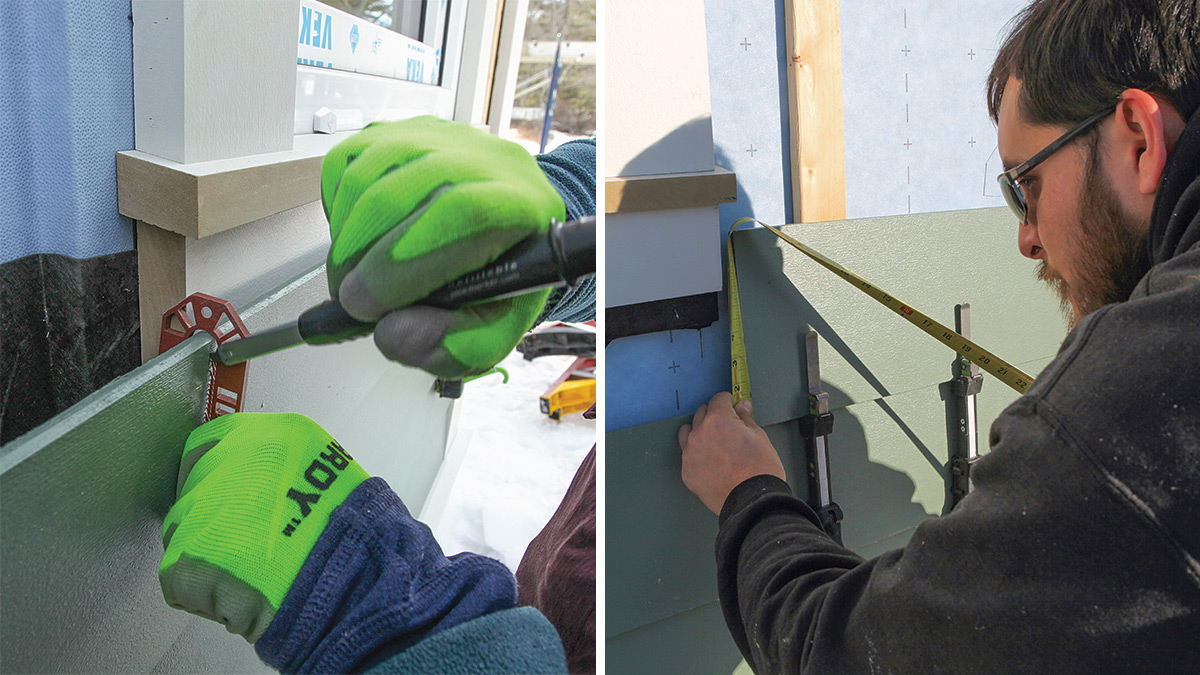
Another difference between this and solid-wood siding is the way you have to gap it. Because this is made from strands of wood, it has the potential to shrink and expand in all directions, while solid wood tends to move most tangential to the grain. While it’s best practice to gap solid-sawn claps at the ends and around penetrations to provide a space for sealant, SmartSide requires 3/16-in. gaps anywhere it butts into something—including butt joints between pieces of siding. As with any horizontal siding application, we stagger butt seams at least two studs away from each other and avoid creating a pattern with the seams.

checking for level siding
Leveled out. Check for level periodically to ensure everything stays on track. The siding gauges should keep everything parallel, but slight mistakes can easily compound if not caught.

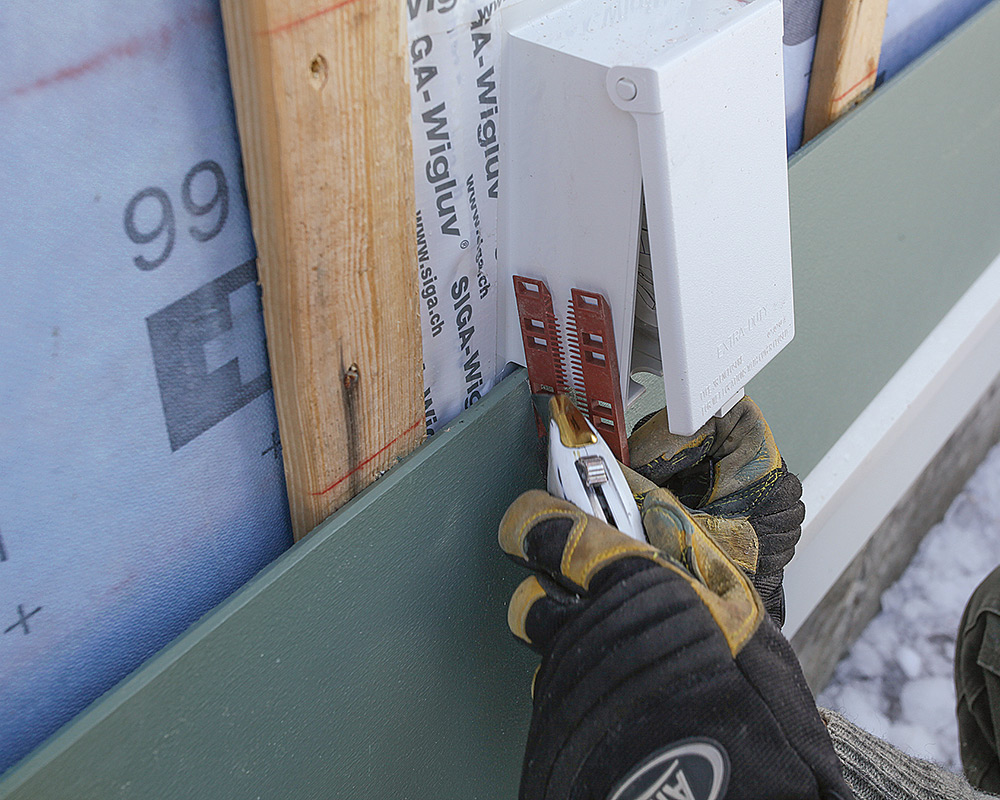
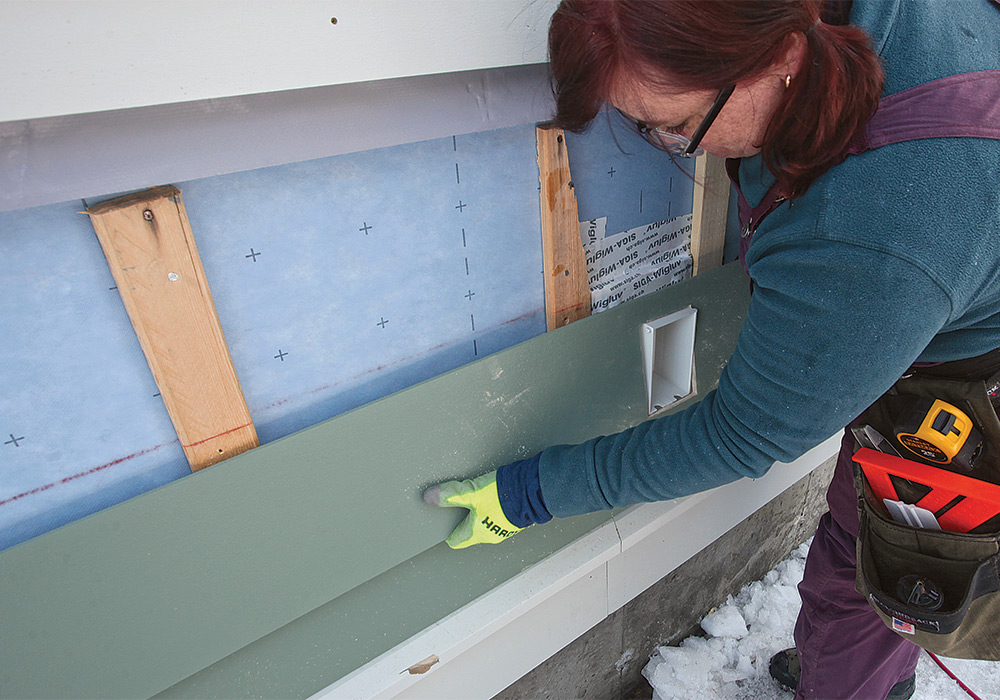
A lot of what can make or break a lap-siding job is done long before any trim goes on. On a blank wall, it might not be obvious to the eye that windows are set at different heights. But if it’s clad in lap siding—or any other material that runs horizontally—even minor inconsistencies will be highlighted. We want the placement of electrical-outlet boxes, sconces, hose bibs, and other penetrations to look intentional, so we make sure that they appear in the same siding course.

use shims to check the gap
Mind the gap. Use 3/16-in. shims to check the gap on both ends before nailing. Use the same shims to gap butt joints between pieces of siding.
nail gun to secure siding
Nailing cutouts. Where siding is cut to fit under windows, face-nail 8 in. o.c. using the same 8d nails used for blind-nailing. Flush nails can be painted; overdriven nails need sealant.

The SmartSide installed in this article is the 76 Series Smooth Finish Lap (8 in.). The standard version comes preprimed, but we had it custom-painted as well (LP also has prefinished options).

Set the course

There are two major schools of thought when it comes to laying out lap siding. The first is to lay out the courses on each wall so that they line up with the door and window trim, which usually requires adjusting the exposure of courses as you go up the wall. The eye typically has a hard time picking up these differences. On old New England houses, which usually started out as rectangles with no inside corners to speak of, this approach was long considered the “right way” of doing things.

But with more complicated buildings, especially ones with varying window and door sizes, this is next to impossible to achieve while maintaining the continuity of courses around corners. Unless things were planned to a T, it’s unlikely that the courses on one wall will wrap neatly around to the neighboring wall while falling perfectly in line with windows and doors. Corner trim can disguise minor discrepancies at outside corners, but inside corners are another story—trim there is usually narrow, so it’s obvious when the courses don’t line up.

mark for penetrations
Gap penetrations. To accurately mark for penetrations, position the piece of siding, then align a 3⁄16-in. spacer flush with the penetrating obstacle, and mark on both sides with a knife.

For these more complicated situations, the approach I use is what I call “set it and forget it.” The most basic example of how this works is this: Simply measure the distance from the bottom of the wall to the bottom of the frieze or soffit and divide this measurement by your desired exposure. You’re likely left with a fraction. You can either round the number you get up or down. If the fraction is under 1/2 in., I usually round down. If it’s 1/2 in. or greater, I round up. This rounded number is the number of actual courses you’ll install. To get the actual exposure, divide the height measurement by the number of courses.

mark siding for cutouts
Mark for cutouts. For penetration cutouts in the center of a piece, position the panel, then mark the sides. Measure up from the bottom of the course’s reveal to the penetration, subtract 3/16 in. from the measurement, and mark it on the siding. Measure the height of the penetrating obstacle, add 3/16 in., and make a mark for the top cut. Connect the lines with a straightedge, drill a relief hole to allow access for a fine-tooth jigsaw blade, and make the cutout.
measuring siding
drilling
cutting a piece of siding

Here’s an example: Say you have 8 ft. from the top of the water table to the bottom of your frieze. You have 8-in. lap siding, and the manufacturer requires at least 1 in. of overlap. So 7 in. is the maximum exposure. Divide 8 ft. by 7 in., and you get 13.714 courses. Round that up to 14. Then just divide the wall height by 14, and voila, you have your exposure—in this case 6-7/8 in. when rounded to the nearest 1/16th of an inch. Use the same exposure all the way around the house, and all corners will match up.

This method sounds easy, but it can be time consuming because pieces have to be cut to fit around door and window openings rather than simply adjusted up or down.

Installation basics

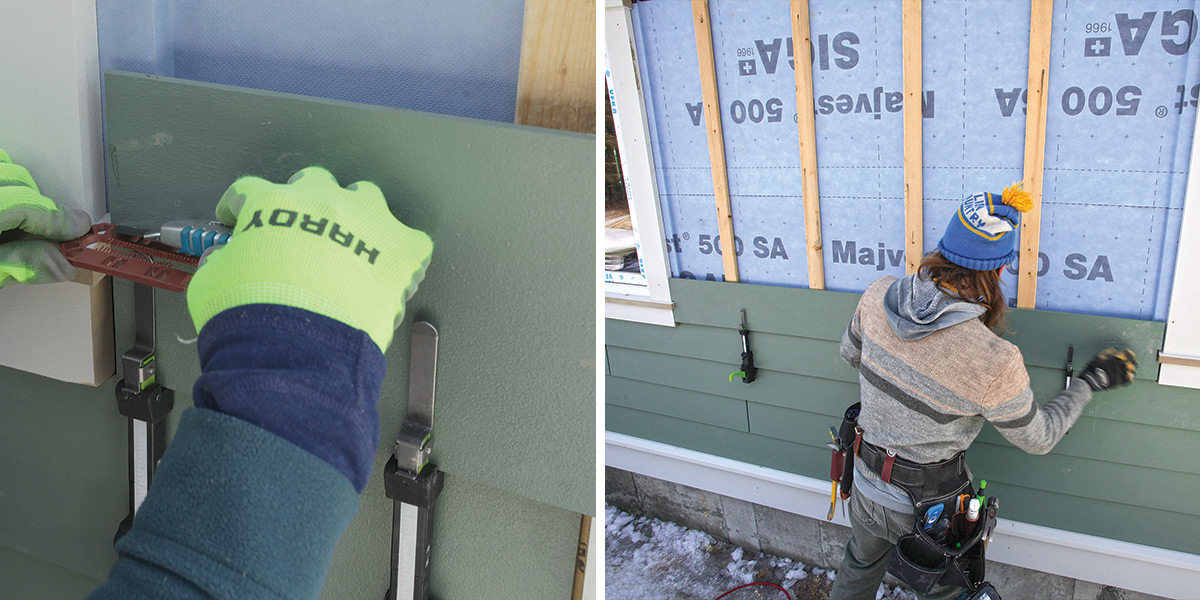
We use a laser level to establish control lines early on in the build, and use them to ensure the soffit is set level around the building. The control lines later get buried behind the peel-and-stick water-resistive barrier, so they aren’t visible here, but the soffit is. The soffit becomes the reference point for everything else that sits level, including the water table, which goes up before the siding. Corner trim—both inside and outside—needs to be plumbed in both directions, and also gets installed before the siding.

mark siding for cutouts around windows
Mark for trim. When marking siding for cutouts around window aprons, simply hook composite shims over the siding and mark the siding on both sides of the window. To get the depth of the cutout (or, rather, how much of the siding remains after making the cutout), set a scrap of siding into a pair of siding gauges, mark the bottom of the apron on the scrap (again, using a spacer), then measure up to the mark. (Alternatively, put a siding gauge in place under the trim, hold a shim against the trim, and measure from the shim to the seat of the gauge.)

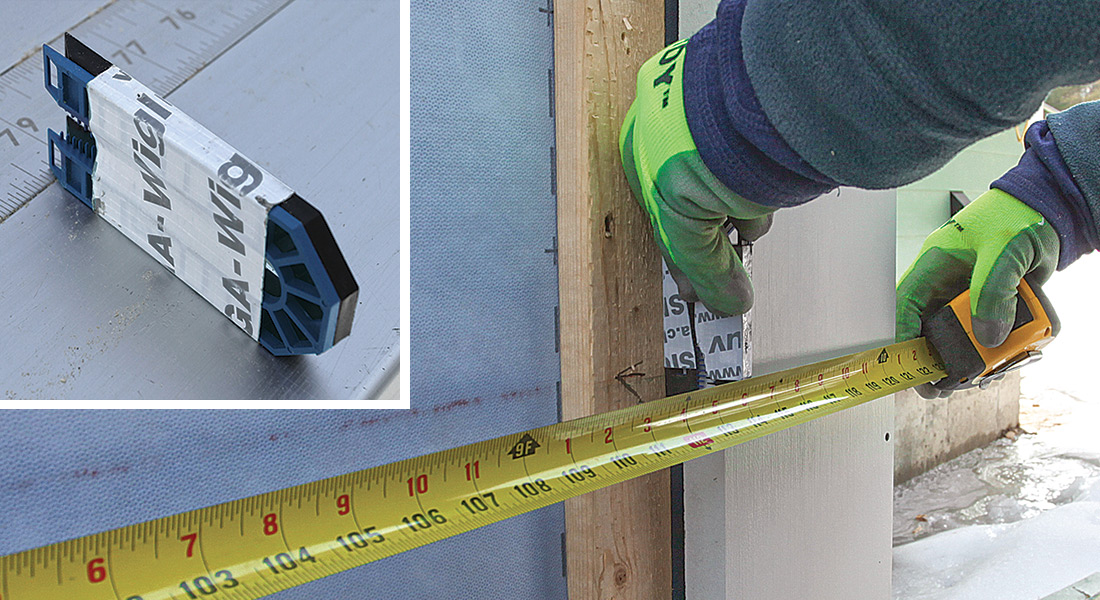
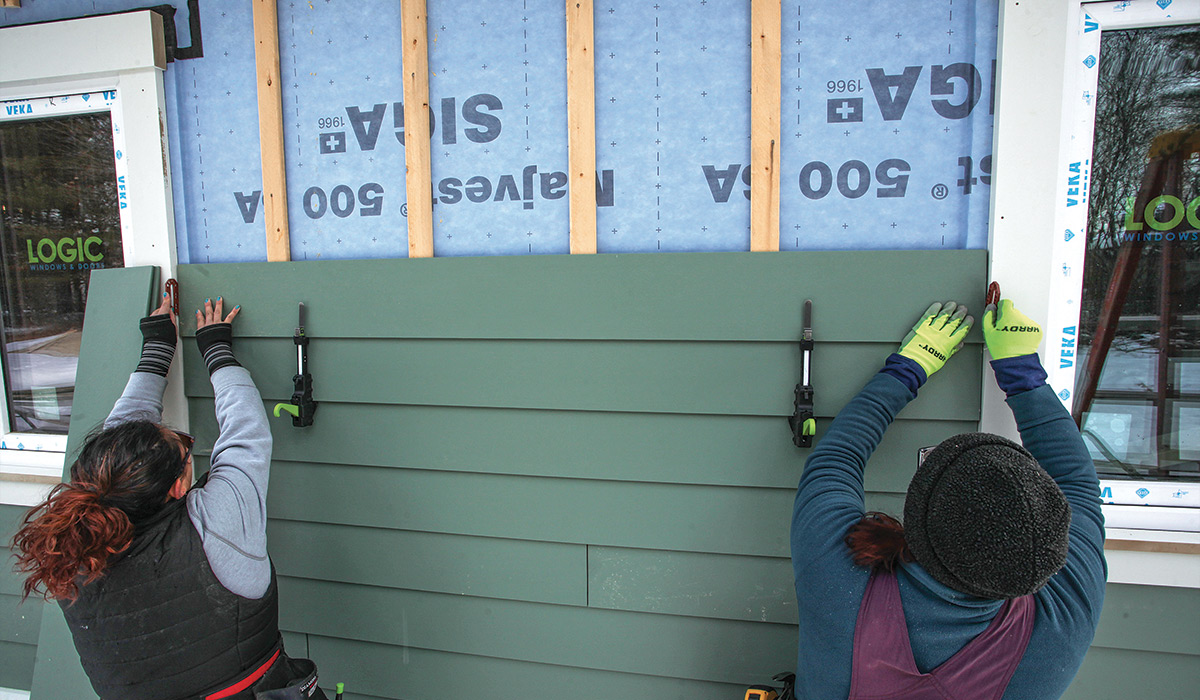
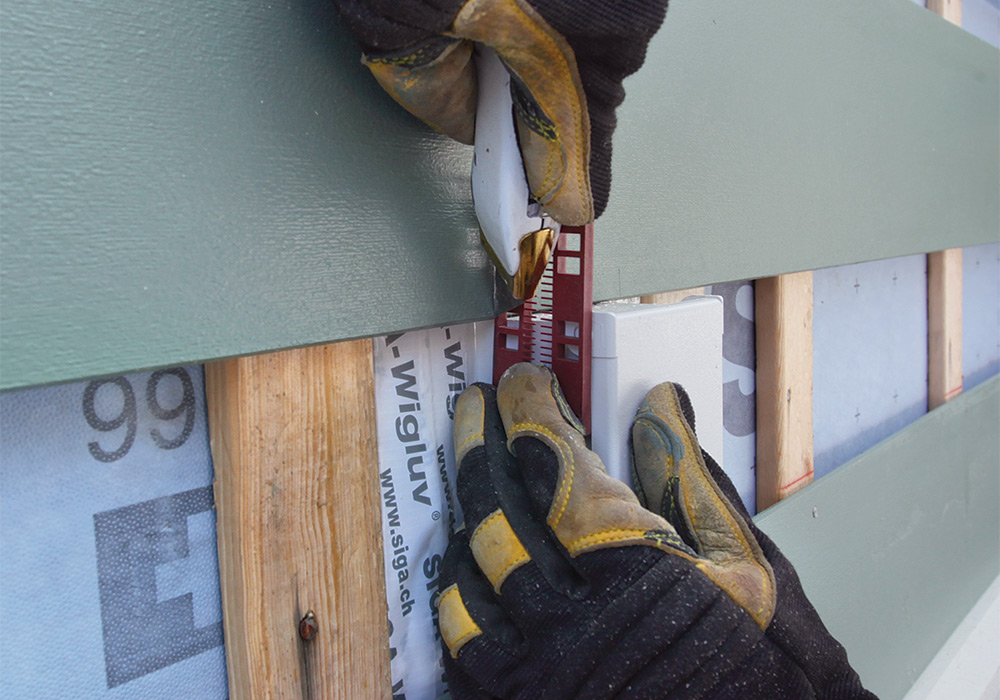
We snap level lines as reference for the top of the first two courses, but from there on, we use siding gauges to help keep everything on track. The ones used here, from SoloSider, are adjustable in 1/16-in. increments and hold pieces of siding in place at the correct exposure while marking for cutouts and nailing.

rip and jig lap siding with a track saw and jigsaw
Rip and jig. Use a track saw for long stopped cuts, but finish them up with a jigsaw to avoid overcutting. Use a square to guide the jigsaw for crosscuts to finish the cutout.

SmartSide should always be blind-nailed into studs with each course lapping the previous by at least 1 in. Maximum nail spacing generally depends on the thickness of the siding—for 3/8-in. siding, it’s 16 in. o.c.; for 7/16-in. it’s 24 in. o.c. It can’t be used in contact with masonry, and must be at least 6 in. above grade, but only has to sit 1 in. above the roofline, which makes for a clean transition at sidewall terminations.

cutting and marking the lap siding
Cut, then mark. When fitting pieces between oddly shaped obstacles or trim, cut the piece to its longest dimension first, then use gauges to hold it in place while marking the cutout. The same trick can be used to mark both ends.

Sealant is another big consideration. Anything that exposes the wood-strand core needs to be sealed. LP makes moldings that seal butt seams, but otherwise, all gaps, cuts, and exposed overdriven nails need to be sealed with an exterior elastomeric sealant. LP requires sealants that meet ASTM C920 and are a minimum of class 25—meaning they can stretch or compress one-quarter of the joint width. Higher classes can stretch and compress even more. We did this installation in late winter, but when it’s warmed up enough, we’ll come back and fill all of these joints and cover exposed nail heads under windows with color-matched OSI Quad Max.


From FineHomebuilding #292

To view the entire article, please click the View PDF button below.

More about lap siding:

Siding to Last a Lifetime – Rainscreen details that improve the durability of any lap-siding installation.

Good-Looking, Long-Lasting Lap Siding – Clever details and flawless installation means this rainscreen wall assembly will weather the biggest storms.

Re-side Over Lead-tainted Siding – Covering old siding may be the simplest way to deal with toxic paint–plus it could be an opportunity to add exterior insulation.

View PDF
Previous: Nailing Clapboard Siding: Top, Bottom, or Both? Next: Siding to Last a Lifetime

Guide

Siding & Exterior Trim

Chapter

Installing Siding

Sign up for eletters today and get the latest how-to from Fine Homebuilding, plus special offers.

Signing you up...

This site is protected by reCAPTCHA and the Google Privacy Policy and Terms of Service apply.
See all newsletters
See all newsletters

View Comments

  1. eagleknight | Feb 03, 2024 11:35pm | #1

    Do you like to use a different material for the trim around the windows to pair with Smartside lap siding?

Log in or create an account to post a comment.

Sign up Log in

Become a member and get full access to FineHomebuilding.com

Siding & Exterior Trim

Siding & Exterior Trim

Trusted, comprehensive guidance from the pros for choosing, installing, and repairing siding and exterior trim

View Project Guide

View All Project Guides »

Become a member and get unlimited site access, including the Siding & Exterior Trim Project Guide.

Start Free Trial

Choosing Siding
  • Materials
  • Design Options
Installing Siding
  • Siding Basics
  • Lap Siding
  • Shingle Siding
  • Board & Batten
  • Fiber Cement and Composite Siding
  • Vinyl Siding
  • Masonry Claddings
Choosing Exterior Trim
  • Trim Materials
  • Trim Design
Installing Exterior Trim
  • Trim Basics
  • Roof Eaves Trim
  • Corner Boards
  • Corbels & Brackets
  • Window & Door Trim
Repairing Siding & Trim
  • Trim Repairs
  • Siding Repairs

Fine Home Building

Newsletter Sign-up

  • Fine Homebuilding

    Home building tips, offers, and expert advice in your inbox.

  • Green Building Advisor

    Building science and energy efficiency advice, plus special offers, in your inbox.

  • Old House Journal

    Repair, renovation, and restoration tips, plus special offers, in your inbox.

Signing you up...

This site is protected by reCAPTCHA and the Google Privacy Policy and Terms of Service apply.
See all newsletters

Follow

  • Fine Homebuilding

    Dig into cutting-edge approaches and decades of proven solutions with total access to our experts and tradespeople.

    Start Free Trial Now
    • Facebook
    • Instagram
    • X
    • LinkedIn
  • GBA Prime

    Get instant access to the latest developments in green building, research, and reports from the field.

    Start Free Trial Now
    • Facebook
    • YouTube
  • Old House Journal

    Learn how to restore, repair, update, and decorate your home.

    Subscribe Now
    • Facebook
    • Instagram
    • X

Membership & Magazine

  • Online Archive
  • Start Free Trial
  • Magazine Subscription
  • Magazine Renewal
  • Gift a Subscription
  • Customer Support
  • Privacy Preferences
  • About
  • Contact
  • Advertise
  • Careers
  • Terms of Use
  • Site Map
  • Do not sell or share my information
  • Privacy Policy
  • Accessibility
  • California Privacy Rights

© 2025 Active Interest Media. All rights reserved.

Fine Homebuilding receives a commission for items purchased through links on this site, including Amazon Associates and other affiliate advertising programs.

  • Home Group
  • Antique Trader
  • Arts & Crafts Homes
  • Bank Note Reporter
  • Cabin Life
  • Cuisine at Home
  • Fine Gardening
  • Fine Woodworking
  • Green Building Advisor
  • Garden Gate
  • Horticulture
  • Keep Craft Alive
  • Log Home Living
  • Military Trader/Vehicles
  • Numismatic News
  • Numismaster
  • Old Cars Weekly
  • Old House Journal
  • Period Homes
  • Popular Woodworking
  • Script
  • ShopNotes
  • Sports Collectors Digest
  • Threads
  • Timber Home Living
  • Traditional Building
  • Woodsmith
  • World Coin News
  • Writer's Digest
Active Interest Media logo
X
X
This is a dialog window which overlays the main content of the page. The modal window is a 'site map' of the most critical areas of the site. Pressing the Escape (ESC) button will close the modal and bring you back to where you were on the page.

Main Menu

  • How-To
  • Design
  • Tools & Materials
  • Video
  • Blogs
  • Forum
  • Project Guides
  • Reader Projects
  • Magazine
  • Members
  • FHB House

Podcasts

  • FHB Podcast
  • ProTalk

Webinars

  • Upcoming and On-Demand

Podcasts

  • FHB Podcast
  • ProTalk

Webinars

  • Upcoming and On-Demand

Popular Topics

  • Kitchens
  • Business
  • Bedrooms
  • Roofs
  • Architecture and Design
  • Green Building
  • Decks
  • Framing
  • Safety
  • Remodeling
  • Bathrooms
  • Windows
  • Tilework
  • Ceilings
  • HVAC

Magazine

  • Current Issue
  • Past Issues
  • Magazine Index
  • Subscribe
  • Online Archive
  • Author Guidelines

All Access

  • Member Home
  • Start Free Trial
  • Gift Membership

Online Learning

  • Courses
  • Project Guides
  • Reader Projects
  • Podcast

More

  • FHB Ambassadors
  • FHB House
  • Customer Support

Account

  • Log In
  • Join

Newsletter

Get home building tips, offers, and expert advice in your inbox

Signing you up...

This site is protected by reCAPTCHA and the Google Privacy Policy and Terms of Service apply.
See all newsletters
See all newsletters

Follow

  • X
  • YouTube
  • instagram
  • facebook
  • pinterest
  • Tiktok

Join All Access

Become a member and get instant access to thousands of videos, how-tos, tool reviews, and design features.

Start Your Free Trial

Subscribe

FHB Magazine

Start your subscription today and save up to 70%

Subscribe

We hope you’ve enjoyed your free articles. To keep reading, become a member today.

Get complete site access to expert advice, how-to videos, Code Check, and more, plus the print magazine.

Start your FREE trial

Already a member? Log in

Privacy Policy Update

We use cookies, pixels, script and other tracking technologies to analyze and improve our service, to improve and personalize content, and for advertising to you. We also share information about your use of our site with third-party social media, advertising and analytics partners. You can view our Privacy Policy here and our Terms of Use here.

Cookies

Analytics

These cookies help us track site metrics to improve our sites and provide a better user experience.

Advertising/Social Media

These cookies are used to serve advertisements aligned with your interests.

Essential

These cookies are required to provide basic functions like page navigation and access to secure areas of the website.

Delete My Data

Delete all cookies and associated data