FHB Logo Facebook LinkedIn Email Pinterest Twitter X Instagram Tiktok YouTube Plus Icon Close Icon Navigation Search Icon Navigation Search Icon Arrow Down Icon Video Guide Icon Article Guide Icon Modal Close Icon Guide Search Icon Skip to content
Subscribe
Log In
  • How-To
  • Design
  • Tools & Materials
  • Restoration
  • Videos
  • Blogs
  • Forum
  • Magazine
  • Members
  • FHB House
  • Podcast
Log In

Fine Homebuilding Project Guides

Painting

Guide Home
  • Intro to Painting
  • Tools & Materials
  • Prep Work
  • Painting Walls, Ceilings, and Trim
  • Wallpaper
  • Windows and Doors
  • Spray Painting Interiors
  • Exterior Painting
How-To

Painting Ceilings and Walls

Follow these guidelines to paint a room methodically from top to bottom.

By Mike Litchfield
  • X
  • facebook
  • linkedin
  • pinterest
  • email
  • add to favorites Log in or Sign up to save your favorite articles
Use a brush to cut in a 2-in. to 3-in. border, then follow up with a roller. You can quickly paint the vast expanse of wall—and cover brushmarks—without getting wall paint on the crown molding.

Let’s begin with some general guidelines: As you paint, be methodical so you won’t need to touch up missed areas. Paint top to bottom: Do ceilings, walls, trim, and baseboards before doing doors and windows. Paint back to front. Many painters go to the deepest recess of a room—often, a closet—and work methodically toward a door. Paint inside to out. If you start painting in the backs of built-ins and cabinets, your final brushstrokes on the outermost edges will be clean and crisp.

Once you’ve prepped the surfaces, masked off baseboards, and spread drop cloths, it’s time to paint.


PRO TIP: Amateurs mistakenly paint from a 1-gal. paint can instead of a painter’s pail. Consequently, they dip into too much paint, which they then scrape off on the can lip. It’s better to dip into less paint and with two flicks of the wrist, dip-tap-tap the brush on both sides of a pail. This removes excess paint that might drip but leaves most of the paint on the brush, letting you paint farther.


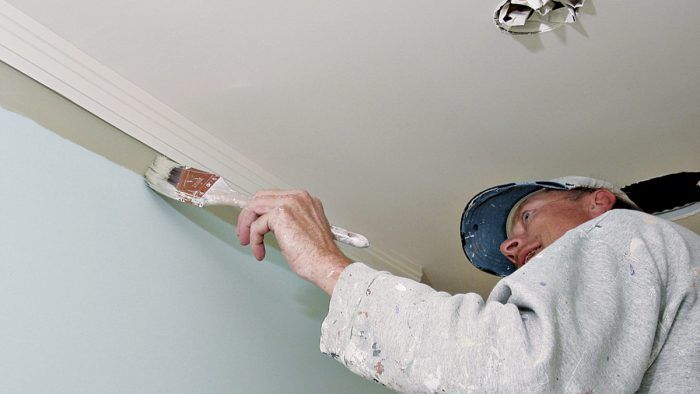
Painting the ceiling

Begin by using a brush to cut in a 2-in. to 3-in. border where the ceiling meets the walls and near all moldings. This cut-in border reaches where a roller can’t and thus allows you to roll out the rest of the ceiling without getting paint on the walls. Later, as you roll within 1/2 in. to 1 in. of the ceiling–wall intersection, you’ll cover the brushmarks, so the paint texture will look uniform. This operation goes much faster if one painter on a step bench cuts in, while the second painter rolls on paint, using an extension pole to reach the ceiling.

To avoid obvious lap marks, paint the ceiling in one session, working across the narrowest dimension of the room. Roll out paint in 3-ft. by 3-ft. sections—about one roller-load of paint. First, roll the paint in a zigzag pattern, which distributes most of the paint in three or four strokes, then go back and roll the paint evenly. When the roller is almost unloaded, slightly overlap adjacent areas already painted. Keep roller passes light, and don’t overwork an area. Once the paint is spread evenly and starting to dry, leave it alone so its nap marks can level out.


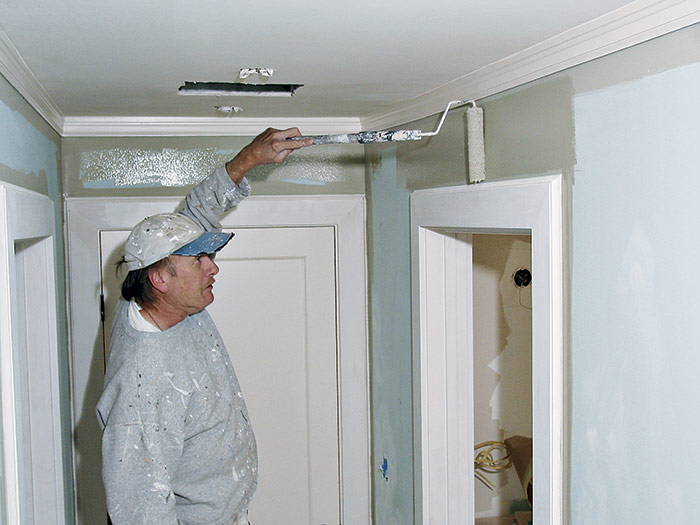
PRO TIP: If there are two painters, divide the job: The first painter leads the way with a brush to “edge” the corners, trim, and other hard-to-roll areas. The second painter follows, rolling over the edging to hide brushmarks, thereby giving the wall a uniform texture. The first painter should edge out 2 in. to 3 in. from the trim and corners, and the second painter rolls to within 1/2 in.


For a smooth finish, use a standard 9-in. roller cover with 3/8-in. to 1/2-in. nap. Thanks to the extension pole, you can reach the ceiling easily, without needing to stand directly under the roller and its fine paint rain. To minimize mist and drips, run the roller up and down the bucket ramp several times when loading. But don’t fret about small, stray spots on walls because you’ll cover them later when you roll the walls.


Primers and Paints*
SURFACE PRIMER AND PAINT COMMENTS
Drywall:
Unpainted Acrylic latex primer and paint Don’t sand between coats.
Painted with oil-based semigloss or gloss Oil-based (alkyd) or latex To switch to latex: sand oil-based paint, vacuum, prime with acrylic latex primer.
Painted with latex Acrylic latex Sand lightly before first new coat; not needed thereafter.
Plaster:
Unpainted Acrylic latex primer and paint Plaster must be cured before painting; dilute primer coat.
Painted with oil-based semigloss or gloss Oil-based or latex To switch to latex: sand oil-based paint, vacuum, prime with acrylic latex primer.
Painted with latex Acrylic latex Lightly sand before painting.
Interior trim:
Doors, unpainted Oil-based or latex primer and paint; semigloss finish Oil-based paint soaks into wood, dries harder, resists abrasion; sand between coats.
Unpainted Clear finishes, such as polyurethane and varnish Always seal bare wood or it will become grimy and dull.
Painted with oil-based semigloss or gloss Oil-based paint Sand between coats.
Painted with latex Acrylic latex Not as durable as oil-based paint.
Exterior:
Siding and trim, unpainted Acrylic latex primer and paint Latex stays flexible, allows some moisture migration.
Painted with oil-based semigloss or gloss Oil-based paint, or acrylic if properly primed Unless you strip siding, stick with oil-based paint.
Painted with latex Acrylic latex
* Oil-based here is synonymous with alkyd, now mentioned on most containers of paint and stain. Alkyds are synthetic resins that have largely replaced the traditional petroleum-oil base.
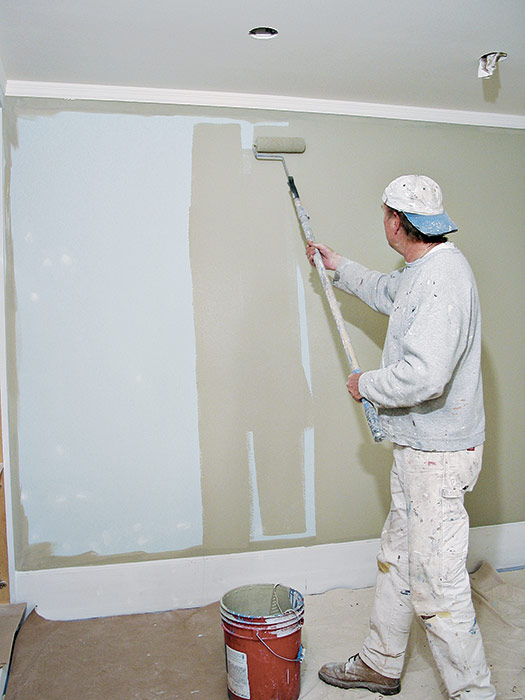
 

Painting the walls

The wall-painting process is nearly the same as painting ceilings—cutting in with a brush and rolling larger areas—except that you can load more paint on the roller. To reduce spatter, roll up on the first stroke; the excess will fall back to the roller. Continue rolling in a zigzag pattern to unload the roller before rolling out the paint. A 6-in. hot-dog roller can paint the areas over doors and windows that are too narrow for a standard 9-in. roller. Rolling is always faster than brushing because you don’t need to dip a roller in paint continually. If you’re careful around electrical outlets, you can also use a hot-dog roller there.

tight spaces over doors
Use a hot-dog roller to fill those tight spaces over doors, around windows, inside cabinets, and the like.


spread it out evenly
After unloading most of the paint on the roller in a zigzag pattern, spread it out evenly, top to bottom.


Lingering Paint Smells

As paint dries, it outgases (gives off gases), releasing water vapor or mineral spirits and additives into the air. The warmer the room and the better the ventilation, the sooner the smells will dissipate. Labels on paint cans indicate drying times. Typically, in a room that is 60ºF or warmer, acrylic latexes will be dry enough to recoat in two to four hours. Oil-based paints can be recoated in 24 hours. However, odors may linger because the paints need longer to cure: 8 to 10 days for latex, 28 to 30 days for oil-based paints.


With more paint on your roller, you can cover slightly larger expanses of wall, say, 3 ft. by 4 ft. If you start at the top of the wall and work down, you’ll roll over any drips from above. Cover brushmarks by rolling within 1/2 in. to 1 in. of the ceiling; this is important when applying darker hues because rolled-on paint reflects light differently than paint that’s been brushed on. Slightly overlap adjacent sections. To avoid unloading excess paint along outside corners, lighten up as you roll.

Finally, sand lightly between coats when you apply oil-based paint, especially enamels on cabinets or trim. On walls, use 220-grit sandpaper or a dry sanding block. It’s not necessary to sand latex paint, unless you’ve waited several weeks between coats; until latex is 100% dry, new coats adhere easily.

Previous: Rolling Interior Latex Wall Paint Next: The Challenges of Painting Kitchens and Baths

Guide

Painting

Chapter

Painting Walls, Ceilings, and Trim

Sign up for eletters today and get the latest how-to from Fine Homebuilding, plus special offers.

Signing you up...

This site is protected by reCAPTCHA and the Google Privacy Policy and Terms of Service apply.
See all newsletters
See all newsletters

View Comments

  1. rose_12HT | Jun 18, 2023 07:40am | #1

    amazing tips

Log in or create an account to post a comment.

Sign up Log in

Become a member and get full access to FineHomebuilding.com

Painting

Painting

Everything you need to know to get the perfect finish, from choosing the right paint to applying the final coat

View Project Guide

View All Project Guides »

Become a member and get unlimited site access, including the Painting Project Guide.

Start Free Trial

Intro to Painting
  • Painting Basics
  • Painting Inspiration
Tools & Materials
  • Paint
  • Brushes and Rollers
  • Caulks and Sealants
  • Spray Equipment
  • Prep and Cleanup
Prep Work
  • Getting Ready For Painting and Finishing
Painting Walls, Ceilings, and Trim
  • Painting Interior Surfaces
Wallpaper
  • How to Prep and Install Wallpaper
  • Removing Wallpaper
  • Wallcovering Choices
Windows and Doors
  • Painting Windows and Doors
  • Video Series: Finishing an Exterior Door
Spray Painting Interiors
  • How To Spray Walls, Trim, Cabinets, and More
Exterior Painting
  • Exterior Paint Prep
  • Exterior Painting Techniques

Fine Home Building

Newsletter Sign-up

  • Fine Homebuilding

    Home building tips, offers, and expert advice in your inbox.

  • Green Building Advisor

    Building science and energy efficiency advice, plus special offers, in your inbox.

  • Old House Journal

    Repair, renovation, and restoration tips, plus special offers, in your inbox.

Signing you up...

This site is protected by reCAPTCHA and the Google Privacy Policy and Terms of Service apply.
See all newsletters

Follow

  • Fine Homebuilding

    Dig into cutting-edge approaches and decades of proven solutions with total access to our experts and tradespeople.

    Start Free Trial Now
    • Facebook
    • Instagram
    • X
    • LinkedIn
  • GBA Prime

    Get instant access to the latest developments in green building, research, and reports from the field.

    Start Free Trial Now
    • Facebook
    • YouTube
  • Old House Journal

    Learn how to restore, repair, update, and decorate your home.

    Subscribe Now
    • Facebook
    • Instagram
    • X

Membership & Magazine

  • Online Archive
  • Start Free Trial
  • Magazine Subscription
  • Magazine Renewal
  • Gift a Subscription
  • Customer Support
  • Privacy Preferences
  • About
  • Contact
  • Advertise
  • Careers
  • Terms of Use
  • Site Map
  • Do not sell or share my information
  • Privacy Policy
  • Accessibility
  • California Privacy Rights

© 2025 Active Interest Media. All rights reserved.

Fine Homebuilding receives a commission for items purchased through links on this site, including Amazon Associates and other affiliate advertising programs.

  • Home Group
  • Antique Trader
  • Arts & Crafts Homes
  • Bank Note Reporter
  • Cabin Life
  • Cuisine at Home
  • Fine Gardening
  • Fine Woodworking
  • Green Building Advisor
  • Garden Gate
  • Horticulture
  • Keep Craft Alive
  • Log Home Living
  • Military Trader/Vehicles
  • Numismatic News
  • Numismaster
  • Old Cars Weekly
  • Old House Journal
  • Period Homes
  • Popular Woodworking
  • Script
  • ShopNotes
  • Sports Collectors Digest
  • Threads
  • Timber Home Living
  • Traditional Building
  • Woodsmith
  • World Coin News
  • Writer's Digest
Active Interest Media logo
X
X
This is a dialog window which overlays the main content of the page. The modal window is a 'site map' of the most critical areas of the site. Pressing the Escape (ESC) button will close the modal and bring you back to where you were on the page.

Main Menu

  • How-To
  • Design
  • Tools & Materials
  • Video
  • Blogs
  • Forum
  • Project Guides
  • Reader Projects
  • Magazine
  • Members
  • FHB House

Podcasts

  • FHB Podcast
  • ProTalk

Webinars

  • Upcoming and On-Demand

Podcasts

  • FHB Podcast
  • ProTalk

Webinars

  • Upcoming and On-Demand

Popular Topics

  • Kitchens
  • Business
  • Bedrooms
  • Roofs
  • Architecture and Design
  • Green Building
  • Decks
  • Framing
  • Safety
  • Remodeling
  • Bathrooms
  • Windows
  • Tilework
  • Ceilings
  • HVAC

Magazine

  • Current Issue
  • Past Issues
  • Magazine Index
  • Subscribe
  • Online Archive
  • Author Guidelines

All Access

  • Member Home
  • Start Free Trial
  • Gift Membership

Online Learning

  • Courses
  • Project Guides
  • Reader Projects
  • Podcast

More

  • FHB Ambassadors
  • FHB House
  • Customer Support

Account

  • Log In
  • Join

Newsletter

Get home building tips, offers, and expert advice in your inbox

Signing you up...

This site is protected by reCAPTCHA and the Google Privacy Policy and Terms of Service apply.
See all newsletters
See all newsletters

Follow

  • X
  • YouTube
  • instagram
  • facebook
  • pinterest
  • Tiktok

Join All Access

Become a member and get instant access to thousands of videos, how-tos, tool reviews, and design features.

Start Your Free Trial

Subscribe

FHB Magazine

Start your subscription today and save up to 70%

Subscribe

We hope you’ve enjoyed your free articles. To keep reading, become a member today.

Get complete site access to expert advice, how-to videos, Code Check, and more, plus the print magazine.

Start your FREE trial

Already a member? Log in

Privacy Policy Update

We use cookies, pixels, script and other tracking technologies to analyze and improve our service, to improve and personalize content, and for advertising to you. We also share information about your use of our site with third-party social media, advertising and analytics partners. You can view our Privacy Policy here and our Terms of Use here.

Cookies

Analytics

These cookies help us track site metrics to improve our sites and provide a better user experience.

Advertising/Social Media

These cookies are used to serve advertisements aligned with your interests.

Essential

These cookies are required to provide basic functions like page navigation and access to secure areas of the website.

Delete My Data

Delete all cookies and associated data