
A Revamped 1970s Kitchen
Space restrictions and the desire for clean lines inform every inch of this kitchen transformation.
Synopsis: This kitchen was in rough shape. Among the issues was a layout that made it hard for one person to cook, much less two. It was challenging to find an effective way to arrange the space that would allow for enough room between walls, cabinets, and the island. By using a few tricks and narrowing a few standard dimensions, the kitchen has been regrouped into zones that now allow multiple people in the space at one time, and provide room for storage, prep, cooking, and serving.
This 1976 home was one of the earliest projects designed and built by The Shelter Institute, a Maine company best known for building and teaching how to build timber-frame structures. Today’s Passive House consultants would appreciate the house’s orientation on the lot and overall design, though they would have lamented the large panes of clear glass that overheated the interior on all but the coldest of sunny days.
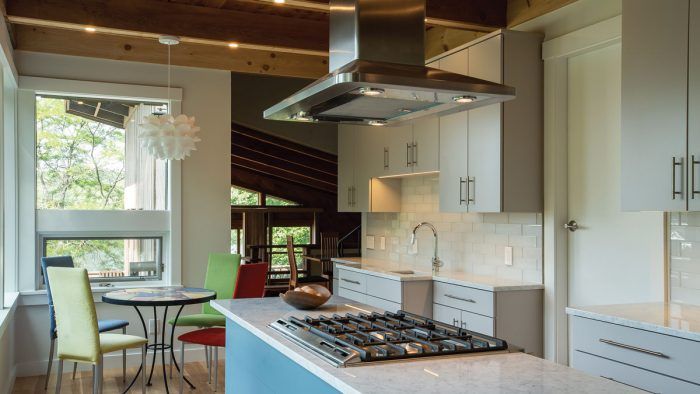
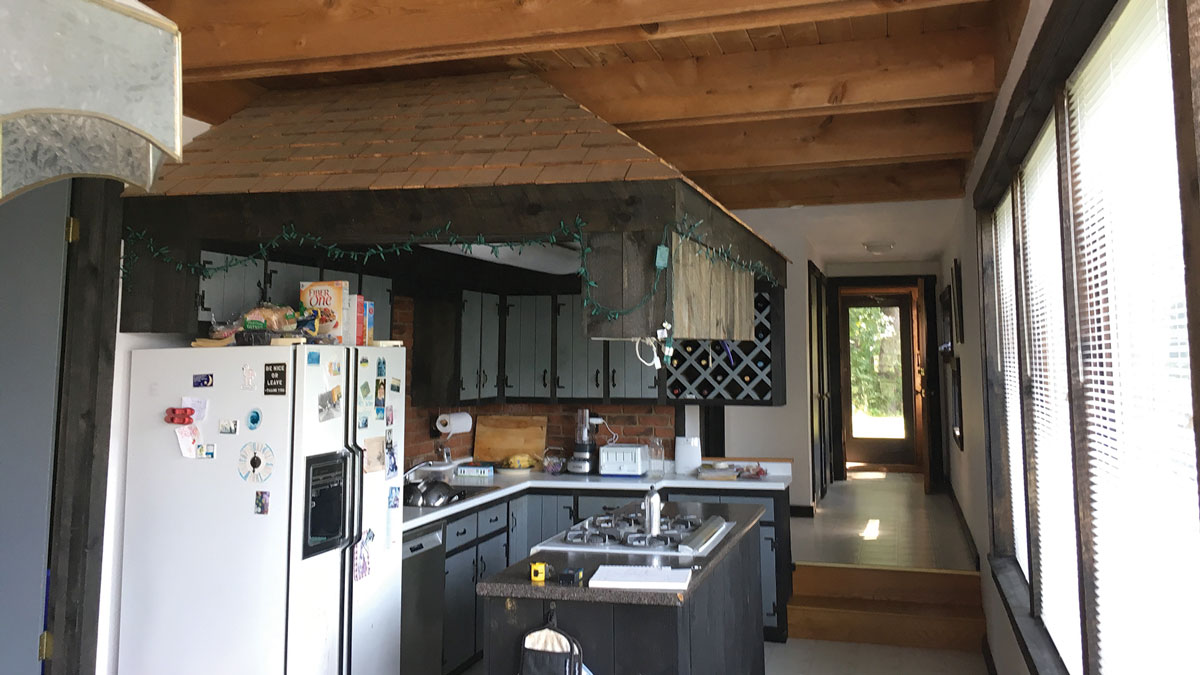
The home’s design has held up well on the whole, but the kitchen was in rough shape. It had a wood-shingled roof meant to evoke a tiki hut; dark-stained, rough-sawn cabinetry; a faux-brick backsplash; a layout that made it hard for one person to cook, much less multiple people; and a design that cut the cook off from any visitors. The floor was worn-out sheet vinyl, and there was not much storage. Although the room has lofty, nearly 10-ft. ceilings and a generous length, it is limited in width. The recirculating range hood was loud and ineffective, and the island and a rusting refrigerator created a choke point between the kitchen and a step-up pantry/laundry room. It was time for an update.
There were many goals for the new design: (1) Make the kitchen functional for two avid cooks; (2) Allow for socializing with guests while cooking; (3) Keep clutter off the counter; (4) Incorporate storage that includes room for wine bottles; (5) Use durable finishes; (6) Harvest lots of light; and (7) Generally delight the senses—all on a modest budget.
Making Every Inch Work
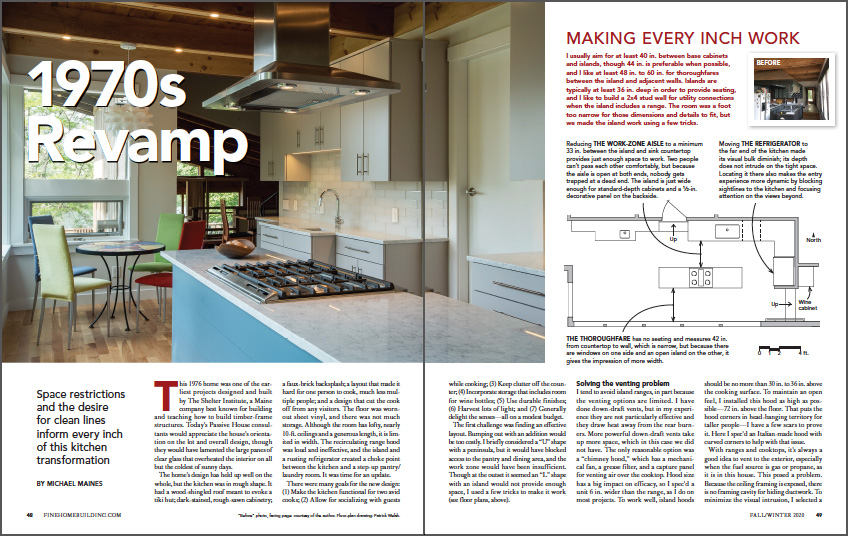
I usually aim for at least 40 in. between base cabinets and islands, though 44 in. is preferable when possible, and I like at least 48 in. to 60 in. for thoroughfares between the island and adjacent walls. Islands are typically at least 36 in. deep in order to provide seating, and I like to build a 2×4 stud wall for utility connections when the island includes a range. The room was a foot too narrow for those dimensions and details to fit, but we made the island work using a few tricks.

The first challenge was finding an effective layout. Bumping out with an addition would be too costly. I briefly considered a “U” shape with a peninsula, but it would have blocked access to the pantry and dining area, and the work zone would have been insufficient. Though at the outset it seemed an “L” shape with an island would not provide enough space, I used a few tricks to make it work (see floor plans, above).
Solving the venting problem
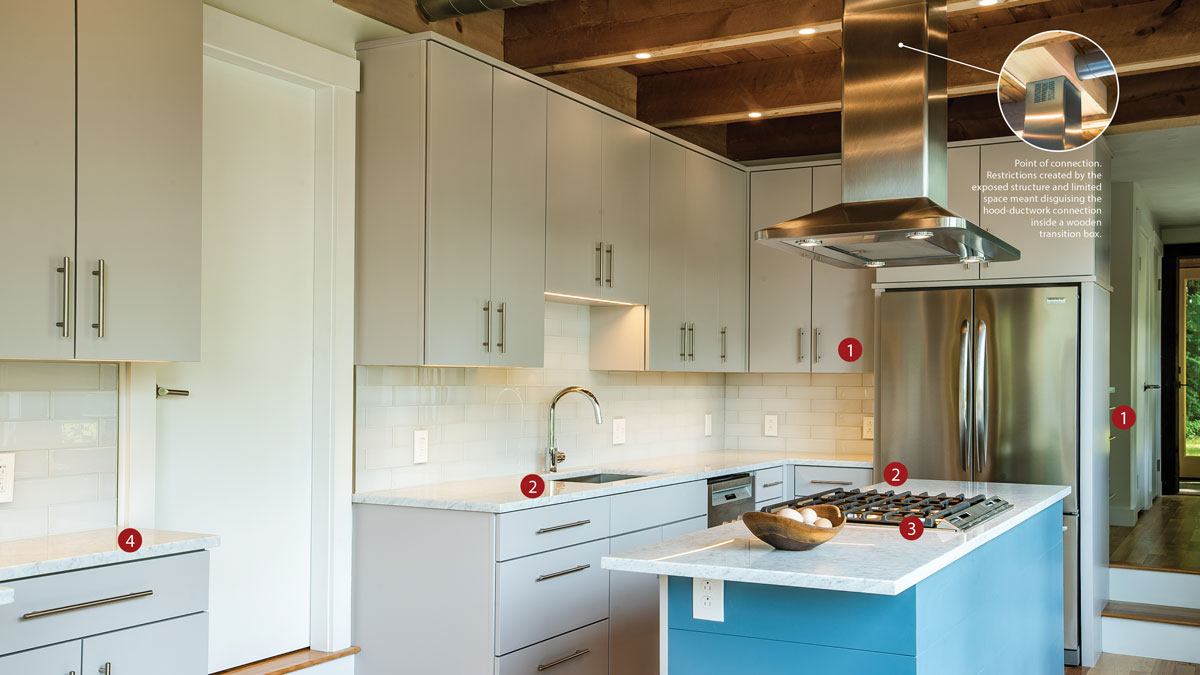
I tend to avoid island ranges, in part because the venting options are limited. I have done down-draft vents, but in my experience they are not particularly effective and they draw heat away from the rear burners. More powerful down-draft vents take up more space, which in this case we did not have. The only reasonable option was a “chimney hood,” which has a mechanical fan, a grease filter, and a capture panel for venting air over the cooktop. Hood size has a big impact on efficacy, so I spec’d a unit 6 in. wider than the range, as I do on
most projects. To work well, island hoods should be no more than 30 in. to 36 in. above the cooking surface. To maintain an open feel, I installed this hood as high as possible—72 in. above the floor. That puts the hood corners in head-banging territory for taller people—I have a few scars to prove it. Here I spec’d an Italian-made hood with curved corners to help with that issue.
With ranges and cooktops, it’s always a good idea to vent to the exterior, especially when the fuel source is gas or propane, as it is in this house. This posed a problem. Because the ceiling framing is exposed, there is no framing cavity for hiding ductwork. To minimize the visual intrusion, I selected a spiral duct—often used as an exposed architectural element in commercial spaces—and ran it to the back of the house. Initially, I imagined running the chimney hood to the ceiling and doing some custom metalwork to connect the spiral duct. I’ve modified hoods in various ways, and I’m comfortable with basic metalworking, but the Italian hood had only basic instructions included. Eventually, it became clear my plan wasn’t going to work. Instead, I put a transition box between two beams and connected the ductwork there. It’s structurally sound
and visually blends into the background.
Broadening the Work Triangle
When laying out the major kitchen elements, I always consider the traditional work triangle—the relationship between sink, cooktop, and fridge. But with modern cooking styles and multiple cooks, work triangles aren’t the only consideration. I prefer to group the workspace into zones.
1. The food storage zone is centered near the fridge. It includes wine storage behind the fridge, which works because it doesn’t need to be accessed frequently. Everyday items can go in the upper and lower cabinets next to the fridge, and long-term storage for infrequently used items is in the pantry and new buffet cabinets.
2. The main prep zone in most kitchens is between the sink and the cooktop. In this kitchen, because the range is on the island, the prep zone is both to the left of the sink and to the left of the range, where we included a pullout double trash can for easy access.
3. The cooking zone centers on the range, with cooking tools, oils, and spices in the base cabinets on either side.
4. The serving zone is often centered on the island, if the kitchen has one, but this island is not large enough or positioned well for it. To keep the serving zone away from the prep and cooking zones, the solution was to add a buffet at the breakfast area. It matches the kitchen details and includes a small sink for making coffee or other bar tasks, and for secondary prep in a pinch. To avoid compressing traffic flow and to reduce the visual mass, both ends of the base cabinets were stepped in for a breakfront effect.
Nailing key design details
The island accent panel proved tricky. We looked at a variety of colors and settled on a fun blue that looks good with the light gray cabinets and red birch flooring. Instead of using individual boards for the panel, we used 1⁄2-in. moisture-resistant MDF with grooves cut in to look like nickel gap. (Next time, I’ll use 3⁄4-in.—the 1⁄4-in. space savings seemed worth it at the time, but made fastening difficult.) When it came time to install the Carrara marble countertop, we ran into an issue—the strip along the backside of the range would be balancing on the top edge of the MDF. So, I fabricated an aluminum angle into a support with brackets at both ends and recessed it into the cabinet so it doesn’t interfere with the slide-in range.
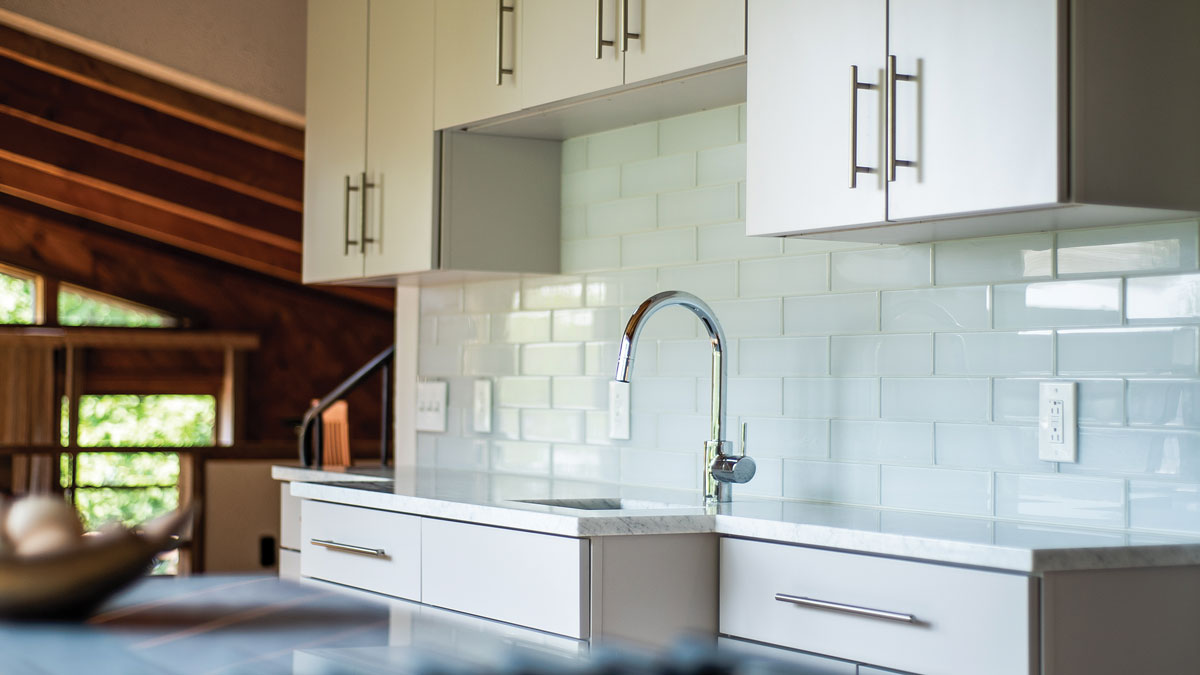
Lighting was another challenge. The existing ceiling joists were rough-sawn 2x10s installed in pairs with a 4-in. gap between them. That was just enough space for low-profile, high-output LED recessed lights to be installed in a new pine insert between each pair. The fixtures, Lithonia Lighting’s 3-in. Wafer downlights, provide 550 lumens each—enough to fill the space with ambient light even with the relatively dark ceiling and floor. Task lighting includes the range-hood lights and high-output LED strip lights set into receiver tracks with frosted-plastic diffusers under the upper cabinets. I’d never used that type of lighting over a sink, and I was worried that it might not provide enough light, but my clients are very happy with it.
We replaced the large windows with low-e dual-pane units. I tried to sell the homeowners on the added comfort of triple glazing, but the upcharge was not worth it to them. We removed the warped rough-sawn, black-stained trim in favor of smooth white trim, and we tried to find a cheery yellow for the walls, but the southeast exposure made any yellow look too bright. We ended up with off-white walls that provide a neutral frame for the views of the lake outside. We replaced the exterior solid wood doors with yellow-painted, fully glazed doors, which let in a lot of natural light.
The final decision was the backsplash. We settled on a slightly smoky, clear glass tile with a white-painted back to reflect the light coming in the windows and provide texture without darkening the space. We installed the tiles with a special stain-resistant grout that had to be pushed hard into the spaces because the edges of the tile are visible (so if not fully filled, it leaves a black line). The process added time and materials, but the finished backsplash looks great.
Throughout the project, every decision had to answer two questions in the affirmative: “Is it clean, crisp, and bright?” and “Is it right for the house?” By all accounts, yes.
Contributing editor Michael Maines is a residential designer and building science consultant in Palermo, Maine. Photos by Chris Battaglia, except where noted. “Before” photo: courtesy of the author. Floor-plan drawing: Patrick Welsh.
To this article as a PDF, please click the View PDF button below.
