FHB Logo Facebook LinkedIn Email Pinterest Twitter X Instagram Tiktok YouTube Plus Icon Close Icon Navigation Search Icon Navigation Search Icon Arrow Down Icon Video Guide Icon Article Guide Icon Modal Close Icon Guide Search Icon Skip to content
Subscribe
Log In
  • How-To
  • Design
  • Tools & Materials
  • Restoration
  • Videos
  • Blogs
  • Forum
  • Magazine
  • Members
  • FHB House
  • Podcast
Log In

Fine Homebuilding Project Guides

Framing

Guide Home
  • Introduction to Framing
  • Framing Tools, Techniques, and Materials
  • Framing Floors
  • Framing Walls
  • Framing Stairs
  • Framing Roofs
  • Efficient Framing Methods
  • Timber Framing
How-To

Calculating Stairs

Overall rise and run, riser height, and headroom are just some of the factors to work out for a safe and comfortable stair.

By Roe Osborn
  • X
  • facebook
  • linkedin
  • pinterest
  • email
  • add to favorites Log in or Sign up to save your favorite articles

Humans seem to have a built-in “stair-ometer” that tells us when stairs are comfortable to climb or when they’re uncomfortable or even unsafe. It’s the same instinct that tells us when we’re on a ladder or climbing a hill that’s too steep. That sense is a reaction to the ratio of the stairs’ overall rise (its height measured vertically) to its overall run (its length measured horizontally). As the slope of the stairs becomes steeper, they start to feel less safe.

Safety also depends on the dimensions of each step being uniform, and inspectors are very particular about this detail. More than a ⅛-in. difference in riser heights can mean that your stairs will fail a final inspection. But more important, that much difference is a safety hazard because it can (and probably will) cause someone to trip as he or she uses the stairs.

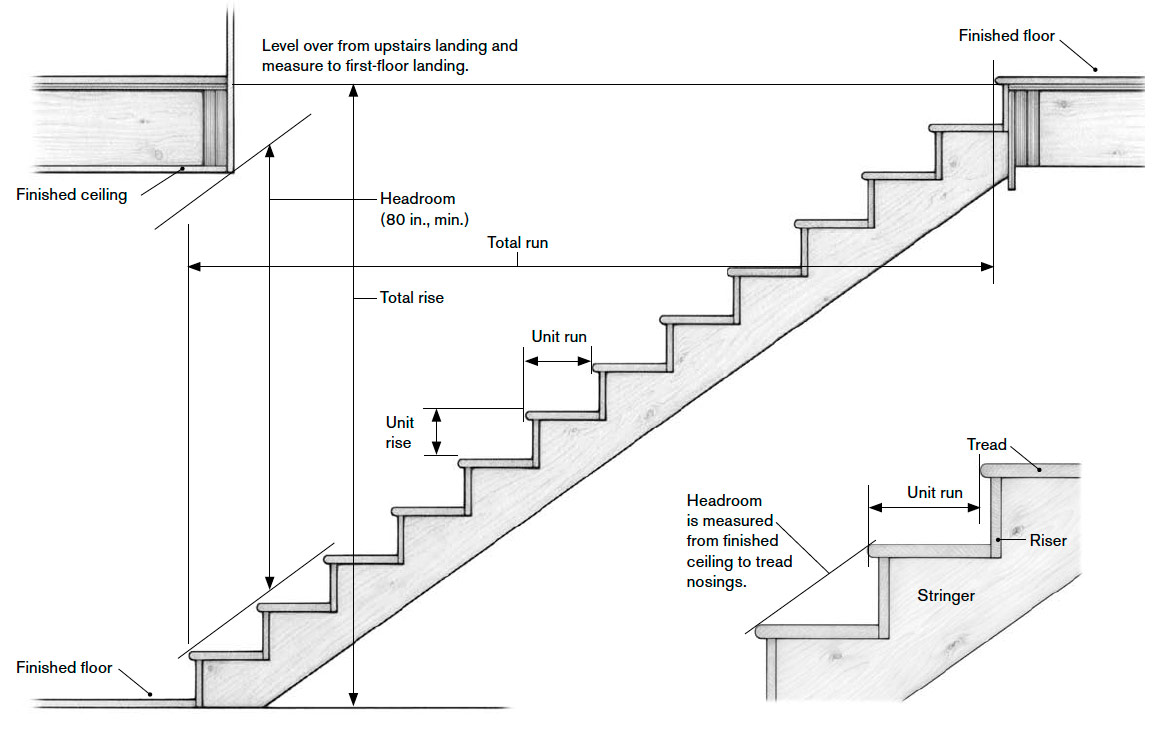
Another factor that affects the design of the stairs is the amount of headroom above the treads. The building code requires that the vertical distance between the tread nosing and any finished ceiling be a minimum of 80 in. This requirement often means making the stairs a little steeper to avoid a forehead-knocking beam, which can be done by shortening the overall run. But make sure the run-to-rise ratio is acceptable and not too steep to be approved.

Yet another factor to consider is whether the stairs are a straight, uninterrupted run or whether they include a landing. In this house, the stairs were designed to fit below the space below a dormer, making the floor plan of the stair chase almost square. The square chase gave the designer more latitude for laying out the rooms on the first and second floors than he would have had with a straight stair run and a narrow, rectangular stair chase.

Measure the overall rise

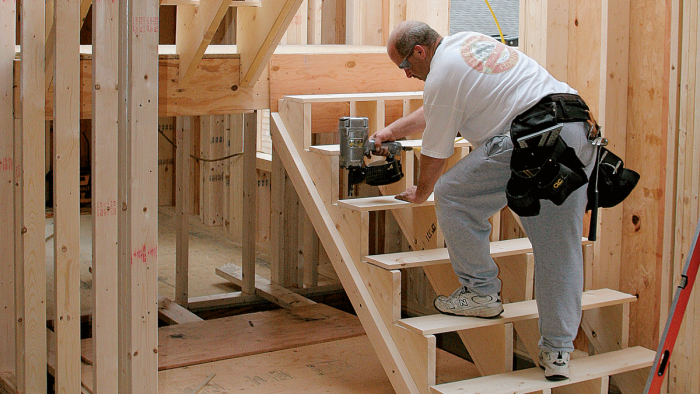
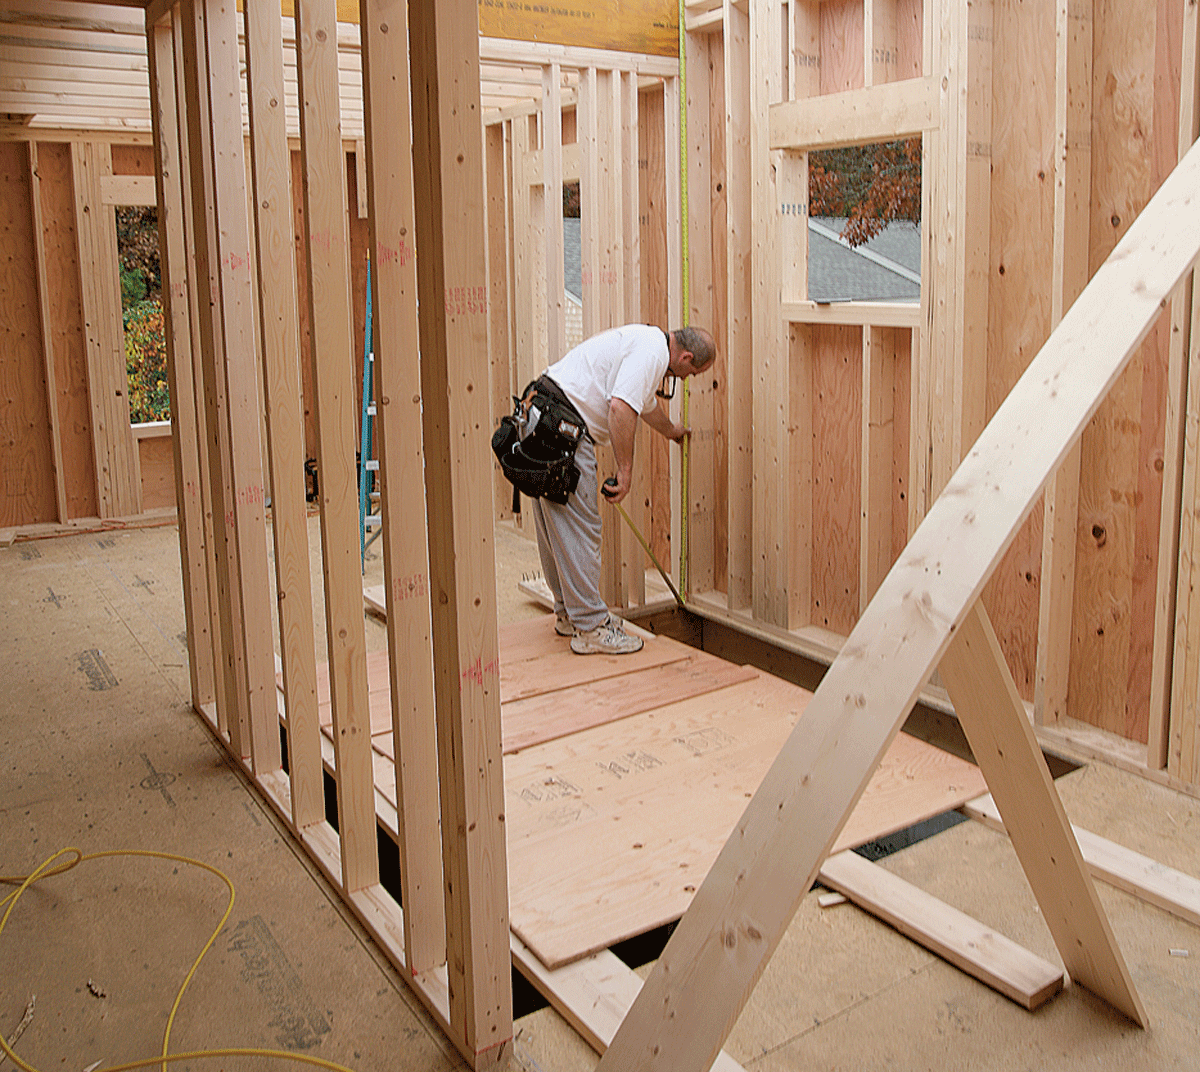
The first step in designing stairs is to determine their overall rise. This is the vertical distance from the surface of the finished floor at the top of the stairs to the surface of the finished floor at the bottom of the stairs. With these stairs, the top of the stairs was directly over the bottom so the measurement was straight up and down. If the stairs are a straight run, you need to level over from the top of the stairs to a point directly over the bottom of the stairs. This strategy gives you the exact overall rise of the stairs regardless of how level the floors are.

At this stage, the finish flooring isn’t in place, of course, but you still have to account for its thickness in your stair calculations. For this house, the finished flooring at both the top and bottom of the stairs would be ¾-in. hardwood, so the overall rise was the same as the distance between the surface of the sheathing on each floor. If 1-in.-thick tile had been specified for the first floor instead of hardwood, for example, that would have shortened the overall rise by ¼ in.

After taking the overall rise measurement, we checked the measurement on the opposite side of the chase and marked the height of the landing platform. Because the floors were dead level, we just measured down from the floor sheathing.

For new construction with perfectly level floors, the measurement for overall rise can be taken anywhere. Here, the measurement taken at the back of the chase also locates the height of the landing.

Understanding unit rise and run

The rise of each step, called the unit rise, is the vertical distance between the top of one tread and the top of the next tread. The run of each step, called the unit run, is the horizontal distance from the nosing (the front edge) of one tread to the nosing of the next tread (see “Basic Stair Dimensions”). Rise and run are not cast-in-stone numbers, however. To make every step identical and make the stairs begin and end at specific locations, the numbers have to be tweaked. The comfort aspect has to be weighed against other factors, such as tight quarters in the stair chase or limited headroom, to create the safest and most comfortable stairs for the particular situation.

Basic Stair Dimensions

Basic Stair Dimensions

There are many formulas for making sure that the unit run-to-rise ratio falls within acceptable parameters, but each is theoretical. The exact measurements for rise and run vary from staircase to staircase and should never be assumed without careful calculation based on measurements taken at the site. The optimal step size for stairs is a 7-in. rise and an 11-in. run. But those numbers won’t work for every situation, so here are some alternative formulas that are used routinely:

  • Rise plus run should equal between 17 in. and 18 in.
  • The rise times the run should equal approximately 75 in. ± 3 in.
  • Two times the rise plus one run should equal 25 in. ± 1 in.

The last formula is the one I use most often. Note that some communities set the maximum allowable rise at 7 in., so before you build your stairs, check your local codes carefully.

Calculate unit rise and unit run

Start your stair calculations by determining the number of rises. This is usually done by dividing the overall rise by 7. But the stairs in this house were not just a simple straight run, so we figured the number of rises a different way. Each stairway actually consisted of two flights: the first from a floor to a landing, and the second from the landing to the floor above. Code specifies that a landing has to be at least 36 in. wide (the minimum width of the main stairs). These stairs were 40 in. wide so we made the platform the same width. Subtracting 40 in. from the width of the chase to account for the landing gave us the overall run and restricted the number of treads for each flight to 6. The overall number of rises would then be 14 because we had to include the rise to the landing and the rise to the floor above.

Construction Calculators

Math isn’t my strongest suit, so I always use a calculator to figure out stuff like the rise and run of stairs. But if I used a standard calculator, I’d have to enter measurements as decimals and convert the answers back into fractions, a process guaranteed to generate some bizarre numbers. I use a construction calculator instead because I can enter all my measurements in feet and inches, and all the results are displayed the same way. Inexpensive models are available, but for a few bucks more you can get one that can also calculate the length of rafters and other complex house building problems. Even if you use it for only one house, a construction calculator is worth every cent.

The overall rise measured 113¾ in. between the first and second floors. To calculate the exact height of a single rise, we divided 113¾ in. by 14. The result is 8⅛ in., which is the height of each riser. A construction calculator really comes in handy for this procedure. Subtracting the width of the landing from the stair-chase opening, we figured the run of each step to be 9 in. While not optimum, that rise and run combination still fit the parameters of our three formulas:

  • 9 in. + 8⅛ in. = 17⅛ in.
  • 9 in. x 8⅛ in. = 73⅛ in. (reasonably close to 75 in.)
  • 2 × 8⅛ in. (16¼ in.) + 9 in. = 25¼ in.

Bottom line: The stairs would be slightly steeper than ideal but they would still be comfortable and safe to use.

Fine Homebuilding Recommended Products

Fine Homebuilding receives a commission for items purchased through links on this site, including Amazon Associates and other affiliate advertising programs.

Stabila Classic Level Set

Plumb and level are the hallmarks of good craftsmanship, so having a complete set of professional levels on the job is crucial to success.
Buy at Amazon

Stabila Extendable Plate to Plate Level

This level raises the bar for accuracy and quality. The extensions are designed to contact and plumb from bottom to top plates, avoiding studs that may be bowed.
Buy at Amazon

Sledge Hammer

Used to tap walls or sheathing into position, we all this the “persuader” on the job site. This is a demo model, so it can survive the job site and the back of the truck — a true must-have.
Buy at Amazon
Next: 2 Rules for Building Comfortable Stairs

Guide

Framing

Chapter

Framing Stairs

Sign up for eletters today and get the latest how-to from Fine Homebuilding, plus special offers.

Signing you up...

This site is protected by reCAPTCHA and the Google Privacy Policy and Terms of Service apply.
See all newsletters
See all newsletters

View Comments

  1. TarHeels94 | Feb 12, 2021 04:05pm | #1

    You listed a riser height of 8 1/8". I thought the maximum a riser could be is 7 3/4" but I am not a pro. I welcome your thoughts on this. Thanks!

Log in or create an account to post a comment.

Sign up Log in

Become a member and get full access to FineHomebuilding.com

Framing

Framing

Trusted, in-depth guidance from the pros for framing a durable, code-compliant house

View Project Guide

View All Project Guides »

Become a member and get unlimited site access, including the Framing Project Guide.

Start Free Trial

Introduction to Framing
  • House Framing Concepts, Tips, and More
Framing Tools, Techniques, and Materials
  • Tools
  • Techniques
  • Framing Lumber
  • Steel
Framing Floors
  • Floor Framing
  • Engineered Floors
  • Floor Sheathing
Framing Walls
  • Wall Framing Basics
  • Layout
  • Wall Assembly
  • Raising and Straightening Walls
  • Framing Rough Openings
  • Blocking
Framing Stairs
  • Stair Layout
  • Building Stairs
Framing Roofs
  • Roof-Framing Basics
  • Roof Design
  • Laying Out and Cutting Rafters
  • Framing Valleys
  • Working with Trusses
  • Dormers
  • Special Situations
Efficient Framing Methods
  • Advanced Framing
  • Double-Stud Walls
Timber Framing
  • Timber-Frame Construction
  • Timber-Frame Design

Fine Home Building

Newsletter Sign-up

  • Fine Homebuilding

    Home building tips, offers, and expert advice in your inbox.

  • Green Building Advisor

    Building science and energy efficiency advice, plus special offers, in your inbox.

  • Old House Journal

    Repair, renovation, and restoration tips, plus special offers, in your inbox.

Signing you up...

This site is protected by reCAPTCHA and the Google Privacy Policy and Terms of Service apply.
See all newsletters

Follow

  • Fine Homebuilding

    Dig into cutting-edge approaches and decades of proven solutions with total access to our experts and tradespeople.

    Start Free Trial Now
    • Facebook
    • Instagram
    • X
    • LinkedIn
  • GBA Prime

    Get instant access to the latest developments in green building, research, and reports from the field.

    Start Free Trial Now
    • Facebook
    • YouTube
  • Old House Journal

    Learn how to restore, repair, update, and decorate your home.

    Subscribe Now
    • Facebook
    • Instagram
    • X

Membership & Magazine

  • Online Archive
  • Start Free Trial
  • Magazine Subscription
  • Magazine Renewal
  • Gift a Subscription
  • Customer Support
  • Privacy Preferences
  • About
  • Contact
  • Advertise
  • Careers
  • Terms of Use
  • Site Map
  • Do not sell or share my information
  • Privacy Policy
  • Accessibility
  • California Privacy Rights

© 2025 Active Interest Media. All rights reserved.

Fine Homebuilding receives a commission for items purchased through links on this site, including Amazon Associates and other affiliate advertising programs.

  • Home Group
  • Antique Trader
  • Arts & Crafts Homes
  • Bank Note Reporter
  • Cabin Life
  • Cuisine at Home
  • Fine Gardening
  • Fine Woodworking
  • Green Building Advisor
  • Garden Gate
  • Horticulture
  • Keep Craft Alive
  • Log Home Living
  • Military Trader/Vehicles
  • Numismatic News
  • Numismaster
  • Old Cars Weekly
  • Old House Journal
  • Period Homes
  • Popular Woodworking
  • Script
  • ShopNotes
  • Sports Collectors Digest
  • Threads
  • Timber Home Living
  • Traditional Building
  • Woodsmith
  • World Coin News
  • Writer's Digest
Active Interest Media logo
X
X
This is a dialog window which overlays the main content of the page. The modal window is a 'site map' of the most critical areas of the site. Pressing the Escape (ESC) button will close the modal and bring you back to where you were on the page.

Main Menu

  • How-To
  • Design
  • Tools & Materials
  • Video
  • Blogs
  • Forum
  • Project Guides
  • Reader Projects
  • Magazine
  • Members
  • FHB House

Podcasts

  • FHB Podcast
  • ProTalk

Webinars

  • Upcoming and On-Demand

Podcasts

  • FHB Podcast
  • ProTalk

Webinars

  • Upcoming and On-Demand

Popular Topics

  • Kitchens
  • Business
  • Bedrooms
  • Roofs
  • Architecture and Design
  • Green Building
  • Decks
  • Framing
  • Safety
  • Remodeling
  • Bathrooms
  • Windows
  • Tilework
  • Ceilings
  • HVAC

Magazine

  • Current Issue
  • Past Issues
  • Magazine Index
  • Subscribe
  • Online Archive
  • Author Guidelines

All Access

  • Member Home
  • Start Free Trial
  • Gift Membership

Online Learning

  • Courses
  • Project Guides
  • Reader Projects
  • Podcast

More

  • FHB Ambassadors
  • FHB House
  • Customer Support

Account

  • Log In
  • Join

Newsletter

Get home building tips, offers, and expert advice in your inbox

Signing you up...

This site is protected by reCAPTCHA and the Google Privacy Policy and Terms of Service apply.
See all newsletters
See all newsletters

Follow

  • X
  • YouTube
  • instagram
  • facebook
  • pinterest
  • Tiktok

Join All Access

Become a member and get instant access to thousands of videos, how-tos, tool reviews, and design features.

Start Your Free Trial

Subscribe

FHB Magazine

Start your subscription today and save up to 70%

Subscribe

We hope you’ve enjoyed your free articles. To keep reading, become a member today.

Get complete site access to expert advice, how-to videos, Code Check, and more, plus the print magazine.

Start your FREE trial

Already a member? Log in

Privacy Policy Update

We use cookies, pixels, script and other tracking technologies to analyze and improve our service, to improve and personalize content, and for advertising to you. We also share information about your use of our site with third-party social media, advertising and analytics partners. You can view our Privacy Policy here and our Terms of Use here.

Cookies

Analytics

These cookies help us track site metrics to improve our sites and provide a better user experience.

Advertising/Social Media

These cookies are used to serve advertisements aligned with your interests.

Essential

These cookies are required to provide basic functions like page navigation and access to secure areas of the website.

Delete My Data

Delete all cookies and associated data