FHB Logo Facebook LinkedIn Email Pinterest Twitter X Instagram Tiktok YouTube Plus Icon Close Icon Navigation Search Icon Navigation Search Icon Arrow Down Icon Video Guide Icon Article Guide Icon Modal Close Icon Guide Search Icon Skip to content
Subscribe
Log In
  • How-To
  • Design
  • Tools & Materials
  • Restoration
  • Videos
  • Blogs
  • Forum
  • Magazine
  • Members
  • FHB House
  • Podcast
Log In

Fine Homebuilding Project Guides

Wiring

Guide Home
  • Working with Electricity
  • Tools and Materials
  • Receptacles and Switches
  • Lights and Fans
  • Rough-In
  • Outdoor Wiring
  • Panels and Subpanels
How-To

Wiring a GFCI or AFCI Receptacle

Follow these guidelines to install circuit-interrupter receptacles to protect either a single outlet or outlets downstream from risks of electric shock or fire.

By Mike Litchfield, Michael McAlister
  • X
  • facebook
  • linkedin
  • pinterest
  • email
  • add to favorites Log in or Sign up to save your favorite articles

Ground-fault circuit interrupters (GFCIs) and arc-fault circuit interrupters (AFCIs) offer different but critical code-required protections. In brief, GFCIs protect you against electrical shocks, and AFCIs protect against arc faults and reduce house fires. You can achieve GFCI or AFCI protection on a circuit by installing a GFCI or AFCI breaker or, as described below, by installing a GFCI or AFCI receptacle at the beginning of a circuit to protect receptacles downstream.

Note that GFCI and AFCI receptacles look similar, and wiring either type is essentially the same. So before you start your installation, check the label on the device to be sure you are installing the correct one. (For circuits that require both GFCI and AFCI protection, you can buy dual-function circuit breakers.)

Quality GFCI and AFCI receptacles
Quality GFCI and AFCI receptacles can be reliably wired by inserting stripped wire ends into terminal holes on the back of the device: Internal clamps grip the wire ends as screws are tightened down. Or you can loop and attach stripped wire ends directly to screw terminals on each side of the device. Note the “LOAD” and “LINE” descriptors; they are important.


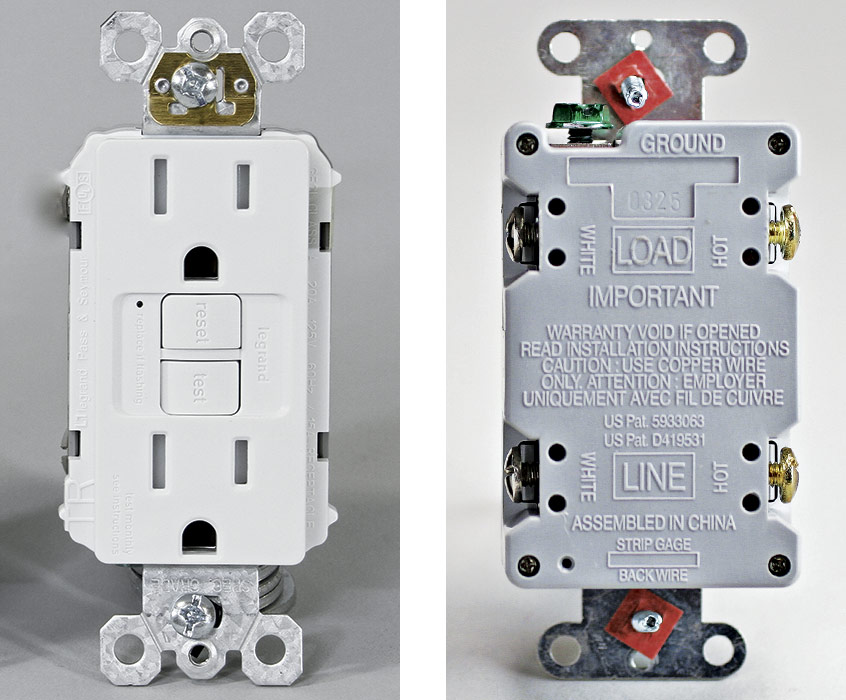
When wiring a GFCI or AFCI receptacle, it’s important to connect incoming wires (from the power source) to the terminals marked “line” on the back of the receptacle. Attach outgoing wires (to outlets downstream) to terminals marked “load.” To distinguish line and load wires during rough-in, write each term on small pieces of the cable sheathing and slip them over the appropriate wires before folding them into the box.

Protecting a single outlet

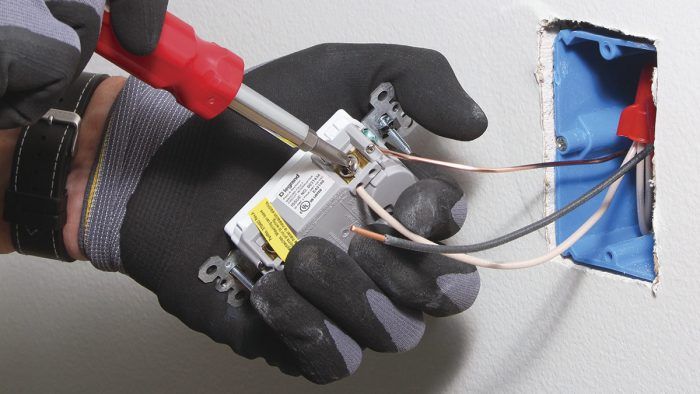
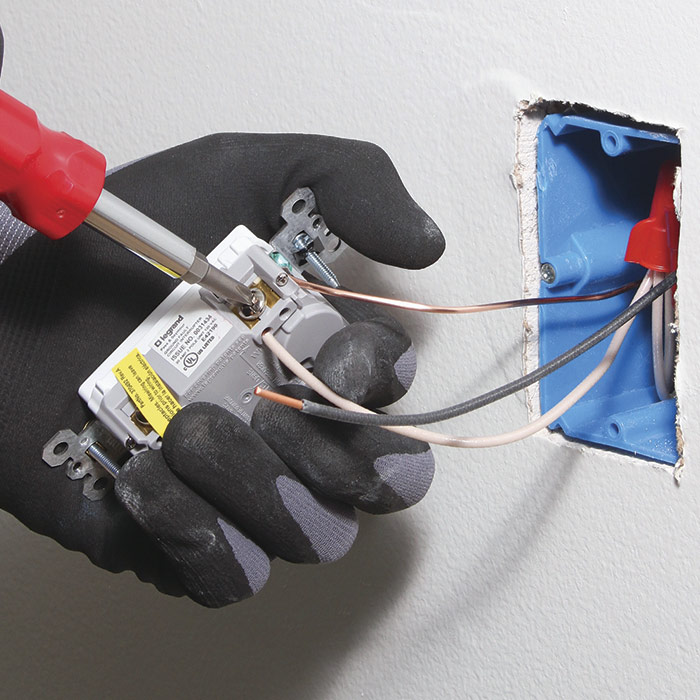
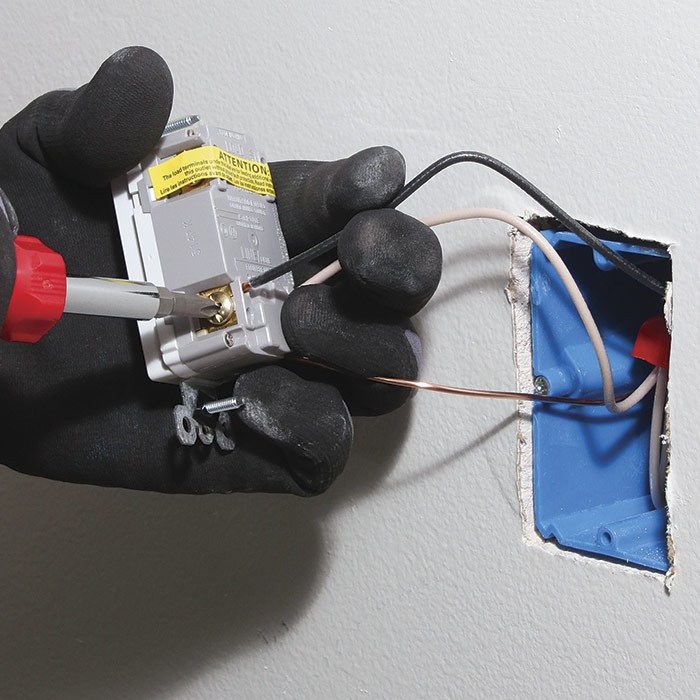
If the GFCI or AFCI is going to protect users at a single outlet 1, attach wires to only one set of screw terminals. The yellow tape across one set of screws indicates that they are load terminals. If you are hooking up the device to protect only a single point of use, leave the tape in place and connect wires only to the screw terminals marked “line.” After attaching the ground pigtail, screw down the silver screw to secure the neutral pigtail 2.

Connect the hot pigtail to the brass screw last 3 then push the device into the box carefully, hand-screw it to the box, and install a cover plate. Note: If you inserted wire ends into holes on the back of the receptacle, you must still tighten down the screw terminals on the sides of the device, which tightens internal clamps that hold the wires snug.

using pigtails from each wire group
1) By using pigtails from each wire group, you can wire a GFCI or AFCI to protect only its outlet and not outlets downstream.

Attach the ground pigtail
2) Attach the ground pigtail to the green ground screw, then insert the neutral pigtail into a neutral “LINE” terminal hole on the back of the device.

insert a hot pigtail into a hot “LINE” terminal hole
3) Finally, insert a hot pigtail into a hot “LINE” terminal hole on the back of device and tighten the corresponding screw.

GFCI or AFCI receptacle
A GFCI or AFCI receptacle protecting a single outlet has just three wires attached. Attach hot and neutral pigtails to “LINE” terminals.


protecting receptacles downstream
A GFCI or AFCI receptacle protecting receptacles downstream does not use pigtails for hot and neutral wires. Incoming wires from the power source attach to terminals marked “LINE”; outgoing wires attach to terminals marked “LOAD.”

Feeding the circuit through a GFCI or AFCI receptacle

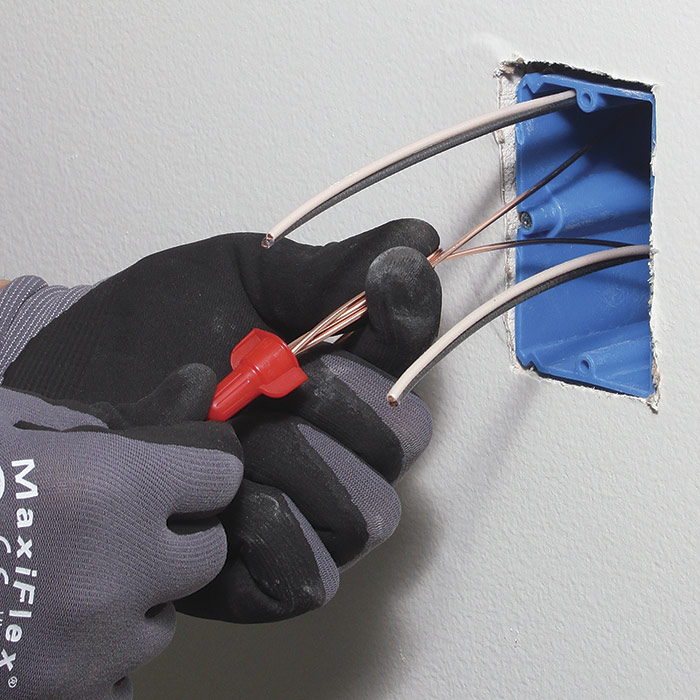
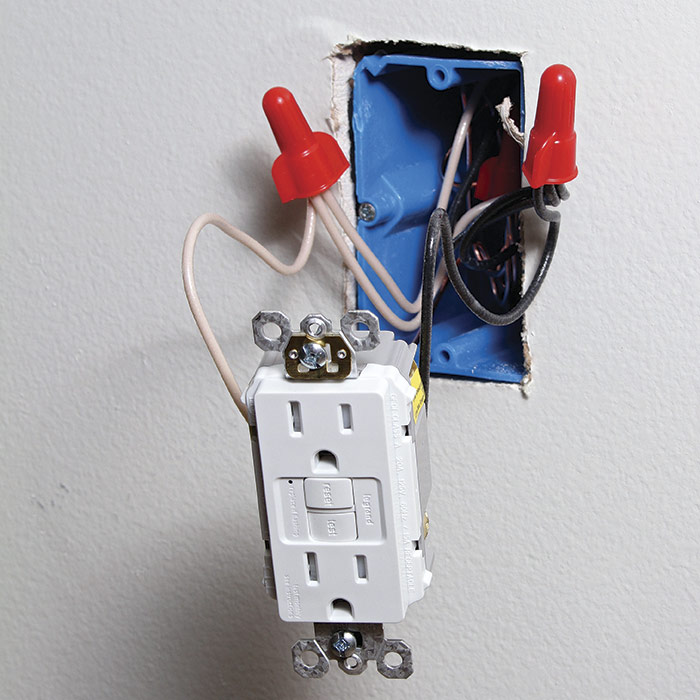
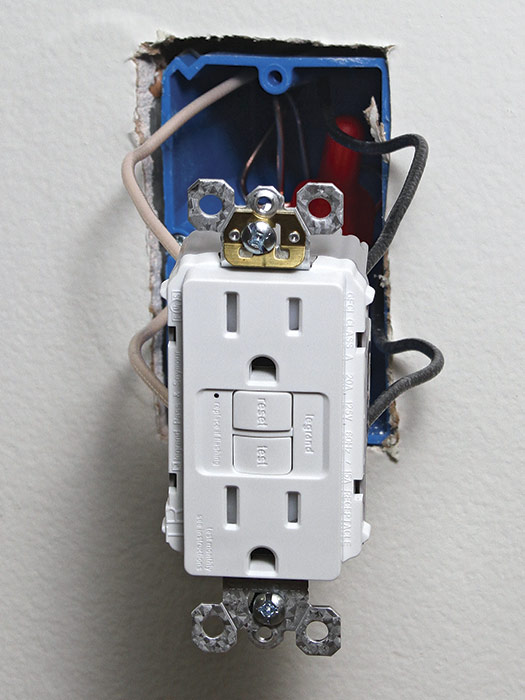
If you want to use a single GFCI or AFCI receptacle to protect downstream outlets, feed them from the “load” terminals of the receptacle. That is, connect incoming and outgoing cable wires directly to the device, rather than using pigtails. (You should, however, splice ground wires to ensure continuity: Screw the ground pigtail to the receptacle’s ground screw.) Again, it’s important to connect incoming wires (from the power source) to the terminals marked “line” and outgoing wires to terminals marked “load.” This is a code-approved way to offer protection downstream without using a breaker.

Attach the ground wire to the ground screw, neutral wires to silver screws, and hot wires to brass screws. If you instead inserted wire-ends into holes on the back of the receptacle, screw down all screws on the sides of the device, which tightens internal clamps holding the wires. Be patient as you push the receptacle into the box, folding wires as needed. Install the mounting screws and attach the cover plate.
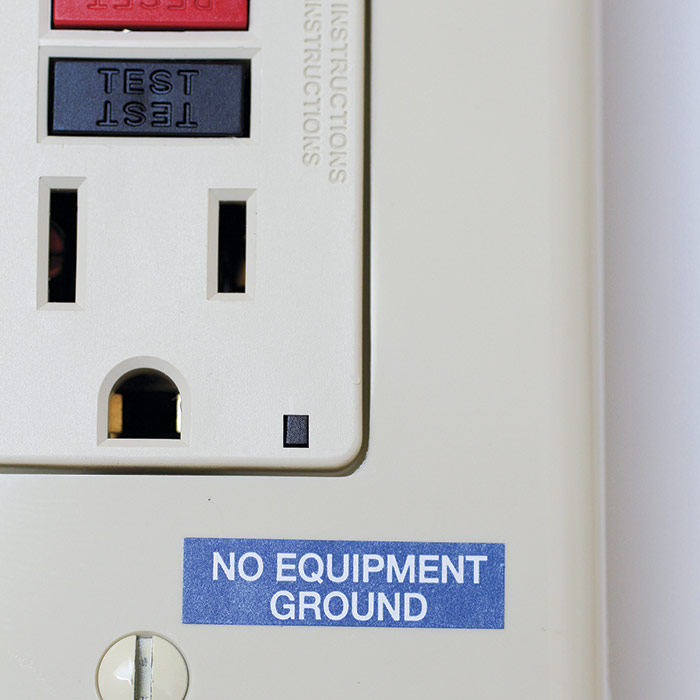
 

A GFCI protecting an ungrounded box must be labeled.

According to Code

A GFCI will operate properly and provide GFCI protection in a box without an equipment ground. If you install GFCI receptacles on an ungrounded circuit, however, the NEC requires that you label those receptacles as having “no equipment ground.”


Wiring Complete, 3rd Edition

Excerpted from Wiring Complete, 3rd Edition (The Taunton Press, 2017) by Michael Litchfield and Michael McAlister

Available in the Taunton Store and at Amazon.com.

Previous: Wiring a Duplex Receptacle Next: Wiring a Split-Tab Receptacle

Guide

Wiring

Chapter

Receptacles and Switches

Sign up for eletters today and get the latest how-to from Fine Homebuilding, plus special offers.

Signing you up...

This site is protected by reCAPTCHA and the Google Privacy Policy and Terms of Service apply.
See all newsletters
See all newsletters

Log in or create an account to post a comment.

Sign up Log in

Become a member and get full access to FineHomebuilding.com

Wiring

Wiring

Trusted, code-compliant guidance from the pros for working safely on any wiring project

View Project Guide

View All Project Guides »

Become a member and get unlimited site access, including the Wiring Project Guide.

Start Free Trial

Working with Electricity
  • Basics
  • Safety
  • Troubleshooting and Upgrades
Tools and Materials
  • Electrical Tools
  • Electrical Boxes
  • Cables and Wires
Receptacles and Switches
  • Materials
  • Wiring Receptacles
  • Wiring Switches
Lights and Fans
  • Lighting Design
  • Installing Lights
  • Fans
Rough-In
  • Planning
  • Installing Electrical Boxes
  • Running Cable
  • Retrofit Work
  • Making Connections in Boxes
  • Electrical Conduit
Outdoor Wiring
  • Basics
  • Outlets
  • Installing Lighting
Panels and Subpanels
  • Understanding Panels
  • Circuits
  • Installing a Subpanel

Fine Home Building

Newsletter Sign-up

  • Fine Homebuilding

    Home building tips, offers, and expert advice in your inbox.

  • Green Building Advisor

    Building science and energy efficiency advice, plus special offers, in your inbox.

  • Old House Journal

    Repair, renovation, and restoration tips, plus special offers, in your inbox.

Signing you up...

This site is protected by reCAPTCHA and the Google Privacy Policy and Terms of Service apply.
See all newsletters

Follow

  • Fine Homebuilding

    Dig into cutting-edge approaches and decades of proven solutions with total access to our experts and tradespeople.

    Start Free Trial Now
    • Facebook
    • Instagram
    • X
    • LinkedIn
  • GBA Prime

    Get instant access to the latest developments in green building, research, and reports from the field.

    Start Free Trial Now
    • Facebook
    • YouTube
  • Old House Journal

    Learn how to restore, repair, update, and decorate your home.

    Subscribe Now
    • Facebook
    • Instagram
    • X

Membership & Magazine

  • Online Archive
  • Start Free Trial
  • Magazine Subscription
  • Magazine Renewal
  • Gift a Subscription
  • Customer Support
  • Privacy Preferences
  • About
  • Contact
  • Advertise
  • Careers
  • Terms of Use
  • Site Map
  • Do not sell or share my information
  • Privacy Policy
  • Accessibility
  • California Privacy Rights

© 2025 Active Interest Media. All rights reserved.

Fine Homebuilding receives a commission for items purchased through links on this site, including Amazon Associates and other affiliate advertising programs.

  • Home Group
  • Antique Trader
  • Arts & Crafts Homes
  • Bank Note Reporter
  • Cabin Life
  • Cuisine at Home
  • Fine Gardening
  • Fine Woodworking
  • Green Building Advisor
  • Garden Gate
  • Horticulture
  • Keep Craft Alive
  • Log Home Living
  • Military Trader/Vehicles
  • Numismatic News
  • Numismaster
  • Old Cars Weekly
  • Old House Journal
  • Period Homes
  • Popular Woodworking
  • Script
  • ShopNotes
  • Sports Collectors Digest
  • Threads
  • Timber Home Living
  • Traditional Building
  • Woodsmith
  • World Coin News
  • Writer's Digest
Active Interest Media logo
X
X
This is a dialog window which overlays the main content of the page. The modal window is a 'site map' of the most critical areas of the site. Pressing the Escape (ESC) button will close the modal and bring you back to where you were on the page.

Main Menu

  • How-To
  • Design
  • Tools & Materials
  • Video
  • Blogs
  • Forum
  • Project Guides
  • Reader Projects
  • Magazine
  • Members
  • FHB House

Podcasts

  • FHB Podcast
  • ProTalk

Webinars

  • Upcoming and On-Demand

Podcasts

  • FHB Podcast
  • ProTalk

Webinars

  • Upcoming and On-Demand

Popular Topics

  • Kitchens
  • Business
  • Bedrooms
  • Roofs
  • Architecture and Design
  • Green Building
  • Decks
  • Framing
  • Safety
  • Remodeling
  • Bathrooms
  • Windows
  • Tilework
  • Ceilings
  • HVAC

Magazine

  • Current Issue
  • Past Issues
  • Magazine Index
  • Subscribe
  • Online Archive
  • Author Guidelines

All Access

  • Member Home
  • Start Free Trial
  • Gift Membership

Online Learning

  • Courses
  • Project Guides
  • Reader Projects
  • Podcast

More

  • FHB Ambassadors
  • FHB House
  • Customer Support

Account

  • Log In
  • Join

Newsletter

Get home building tips, offers, and expert advice in your inbox

Signing you up...

This site is protected by reCAPTCHA and the Google Privacy Policy and Terms of Service apply.
See all newsletters
See all newsletters

Follow

  • X
  • YouTube
  • instagram
  • facebook
  • pinterest
  • Tiktok

Join All Access

Become a member and get instant access to thousands of videos, how-tos, tool reviews, and design features.

Start Your Free Trial

Subscribe

FHB Magazine

Start your subscription today and save up to 70%

Subscribe

We hope you’ve enjoyed your free articles. To keep reading, become a member today.

Get complete site access to expert advice, how-to videos, Code Check, and more, plus the print magazine.

Start your FREE trial

Already a member? Log in

Privacy Policy Update

We use cookies, pixels, script and other tracking technologies to analyze and improve our service, to improve and personalize content, and for advertising to you. We also share information about your use of our site with third-party social media, advertising and analytics partners. You can view our Privacy Policy here and our Terms of Use here.

Cookies

Analytics

These cookies help us track site metrics to improve our sites and provide a better user experience.

Advertising/Social Media

These cookies are used to serve advertisements aligned with your interests.

Essential

These cookies are required to provide basic functions like page navigation and access to secure areas of the website.

Delete My Data

Delete all cookies and associated data