FHB Logo Facebook LinkedIn Email Pinterest Twitter X Instagram Tiktok YouTube Plus Icon Close Icon Navigation Search Icon Navigation Search Icon Arrow Down Icon Video Guide Icon Article Guide Icon Modal Close Icon Guide Search Icon Skip to content
Subscribe
Log In
  • How-To
  • Design
  • Tools & Materials
  • Restoration
  • Videos
  • Blogs
  • Forum
  • Magazine
  • Members
  • FHB House
  • Podcast
Log In

Fine Homebuilding Project Guides

Wiring

Guide Home
  • Working with Electricity
  • Tools and Materials
  • Receptacles and Switches
  • Lights and Fans
  • Rough-In
  • Outdoor Wiring
  • Panels and Subpanels
How-To

Making Up a Three-Way Switchbox

Strip the sheathing from the cable and then wire the switch (or switch loop) following these step-by-step directions.

By Mike Litchfield, Michael McAlister
  • X
  • facebook
  • linkedin
  • pinterest
  • email
  • add to favorites Log in or Sign up to save your favorite articles

Three-way switches allow you to operate a light from two locations. They’re often used at the top and bottom of a set of stairs or at two entrances to a room. If you get confused about which wire goes where, make a drawing of your own. See this wiring article for some clear illustrations of how a 3-way circuit looks.

In new wiring, wires are roughed in when the framing is still exposed. Here, 12/2 and 12/3 cables were fished in to feed a three-way switch that was added after the drywall was up.

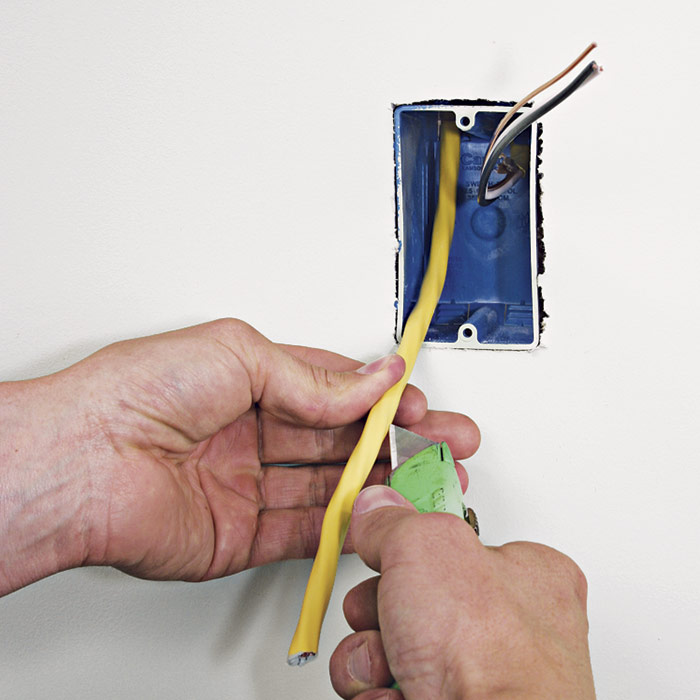
After stripping sheathing from the 12/2 cable, strip the 12/3 cable. Removing 12/3 sheathing is a little different: Start by lightly scoring the 12/3 cable along its length, up into the box 1. Then, when you reach the end of the cable, cut through the sheathing. Because you’ll soon be stripping the ends of individual wires, cutting through the sheathing end won’t compromise wire insulation.

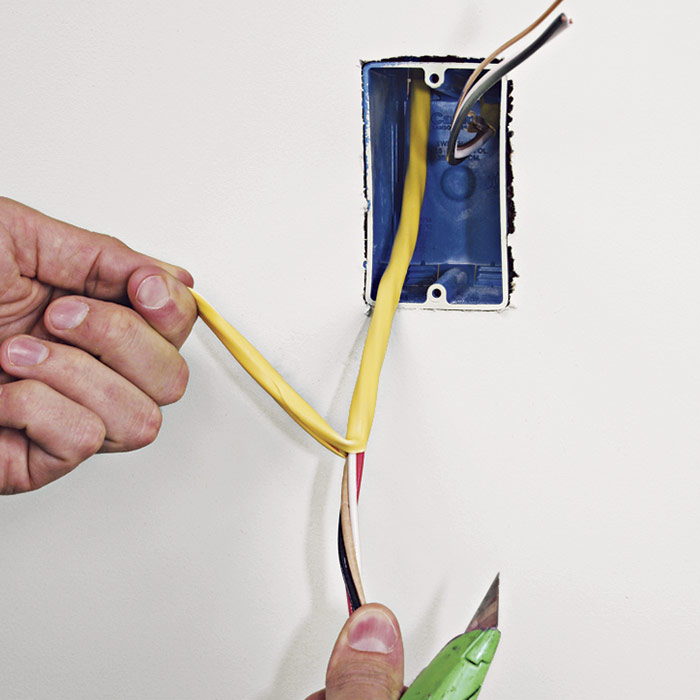
Starting at the cut-through sheathing at the end of cable, pull the sheathing free of the wires within 2. The sheathing will separate easily along the scored line. At the cable’s upper end in the box, carefully cut free the sheathing.

Score the 12/3 cable along its length.
1) Gently score the 12/3 cable along its length.

Pull the sheathing free.
2) Pull the sheathing free.

3  Twist the ground wires before splicing them.
3) Twist the ground wires before splicing them.

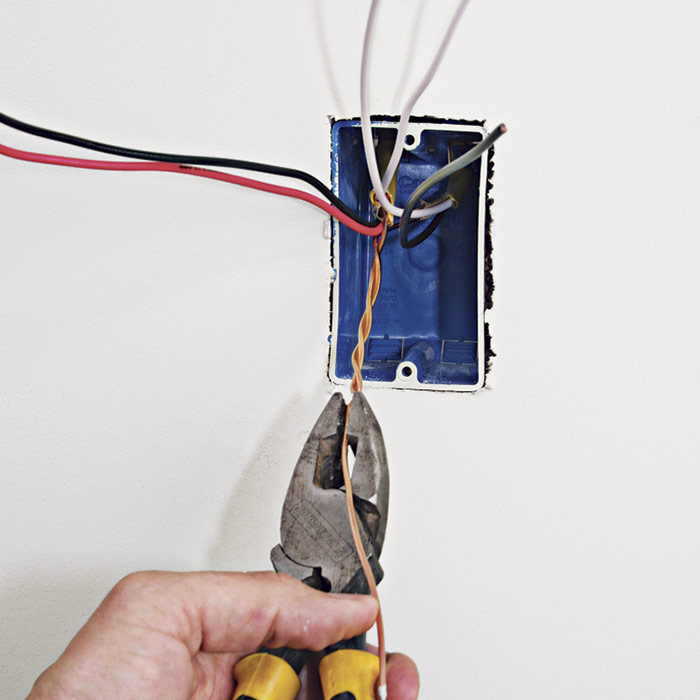
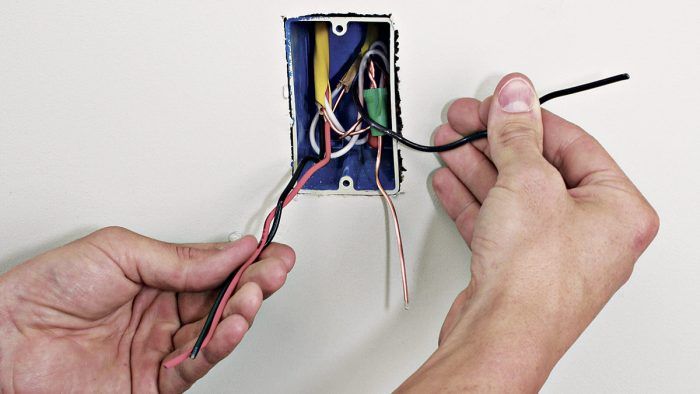
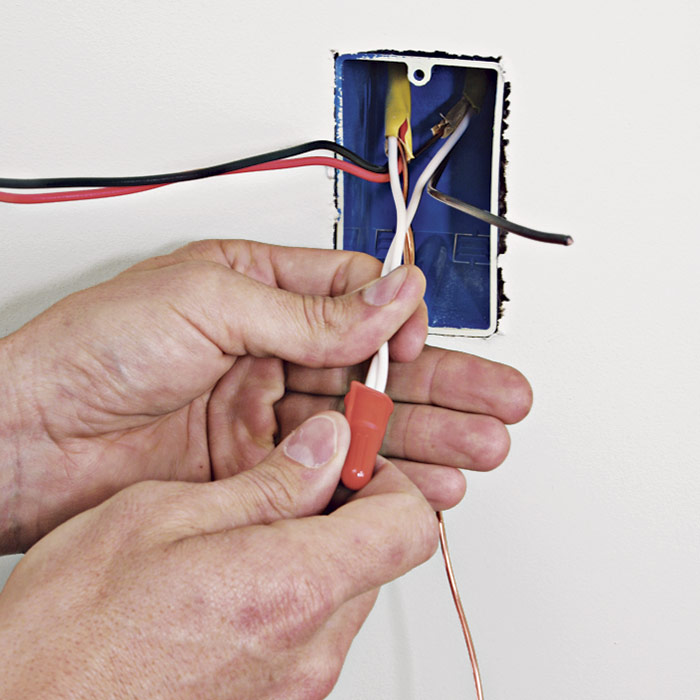
Twist together the ground wires before splicing them with a wire connector 3. To use a green wire connector, cut one of the leads shorter than the other so that it sticks out of the hole in the end of the wire connector. Then connect that ground lead to the switch’s green ground screw. Next, strip wire insulation from the neutrals, splice them, cap them with a wire connector, and push them into the box 4. (Neutrals don’t connect to standard switches.)

After professional electricians strip cable sheathing, many wrap individual wires in a distinct fashion so any other electrician will know which wires are travelers and which are switch-leg wires. Group and twist traveler wires clockwise, then wrap the switch-leg wire counterclockwise about the travelers. This way there’s no need to put tape or labels on the wires to identify them or to pull out all the cables and figure out which wire is what 5.

4  Splice and cap the neutrals.
4) Splice and cap the neutrals.

5  Wrap the switch-leg wires around the travelers.
5) Wrap the switch-leg wires around the travelers.


three-way switch wiring


Wiring a Three-Way Switch

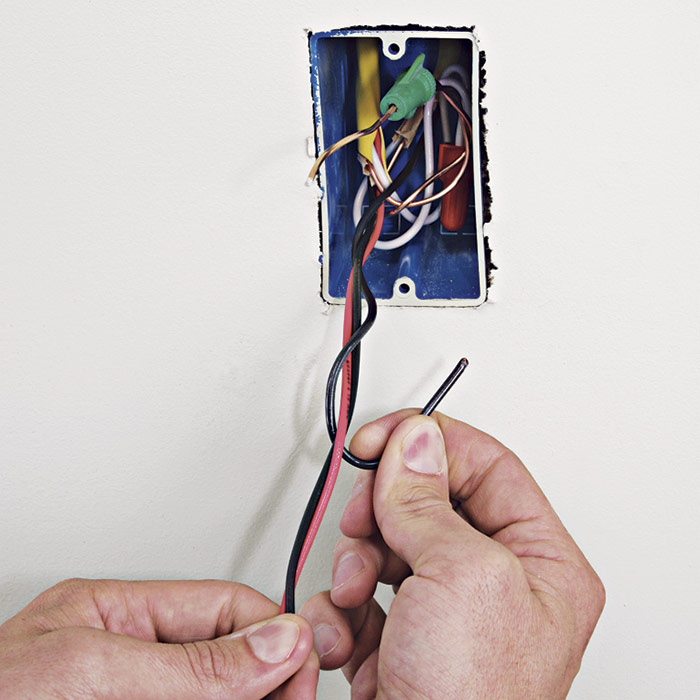
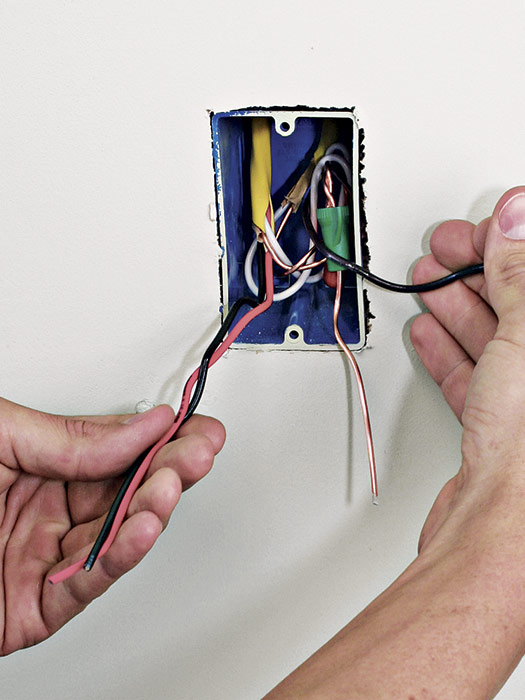
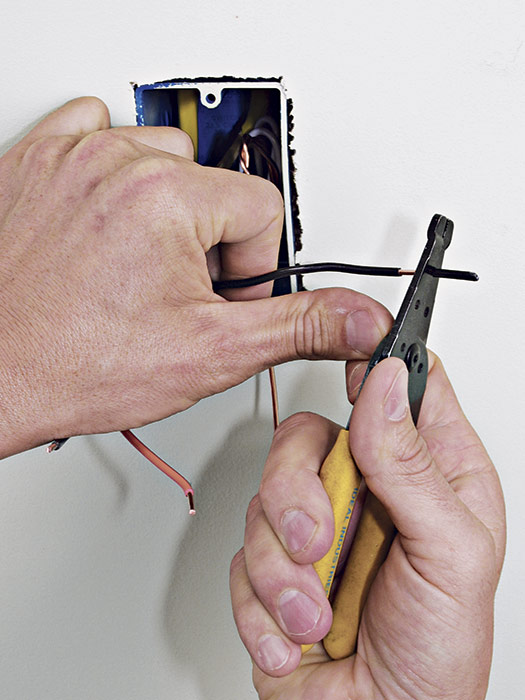
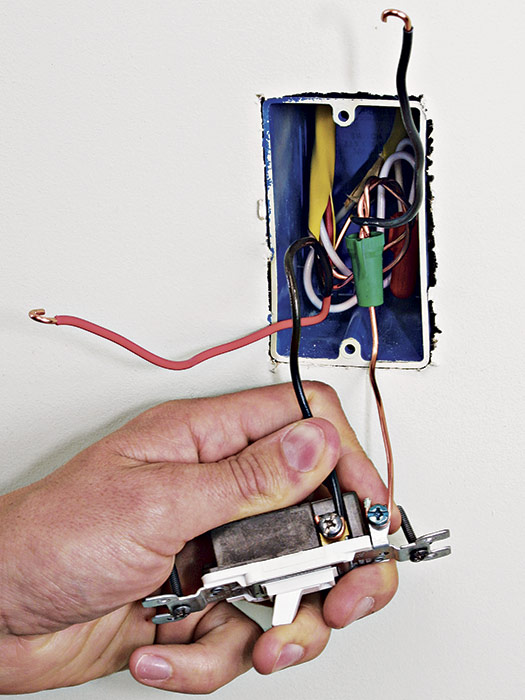
To wire a three-way switch, pull the conductors out of the outlet box. Unwrap the switch-leg wire from around the travelers and separate the wires so the travelers are on one side and the switch leg on the other 1. To strip wire ends, give the strippers a quick twist, use your thumb as a fulcrum to push the wire insulation off, and loop the wire ends 2.

1 Separate the traveler and switch-leg wires.
1) Separate the traveler and switch-leg wires.

2  Strip the ends of the wires and loop them.
2) Strip the ends of the wires and loop them.

3 Attach the ground, then a traveler.
3) Attach the ground, then a traveler.

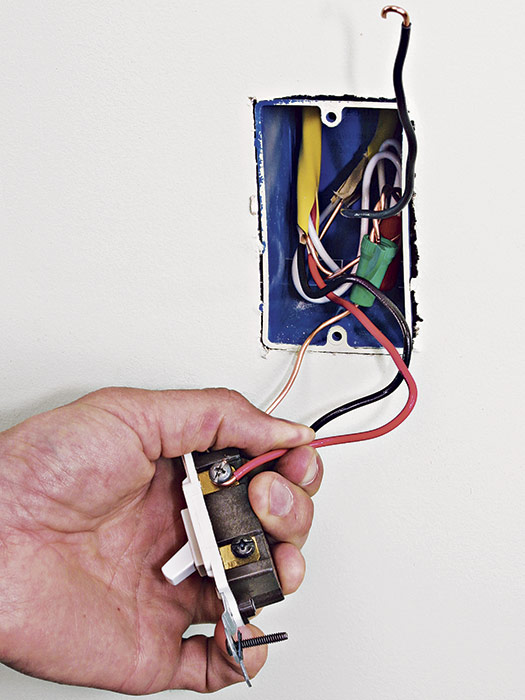
After attaching the bare ground wire to the green grounding screw on the device, attach the first traveler wire 3. Loop wires clockwise around the screw shafts, and they’ll be less likely to slip off when the screws are tightened. Flip the switch over and connect the second (red) traveler 4. (Note: It doesn’t matter which traveler wire goes where—you’ll still be able to turn lights off and on. The only critical connection is the common terminal.)

If you connect traveler wires in the same position on two three-way switches—say, you attach the red traveler to the first terminal, as just described—the lights will be off when switch toggles are both up or both down. This is a fine point and most people needn’t agonize about it: The three-way switches will still work as long as you attach traveler wires to traveler terminals.

4 Connect the second traveler.
4) Connect the second traveler.

5  Connect the hot conductor last.
5) Connect the hot conductor last.

6  Typical connections for a three-way switch.
6) Typical connections for a three-way switch.

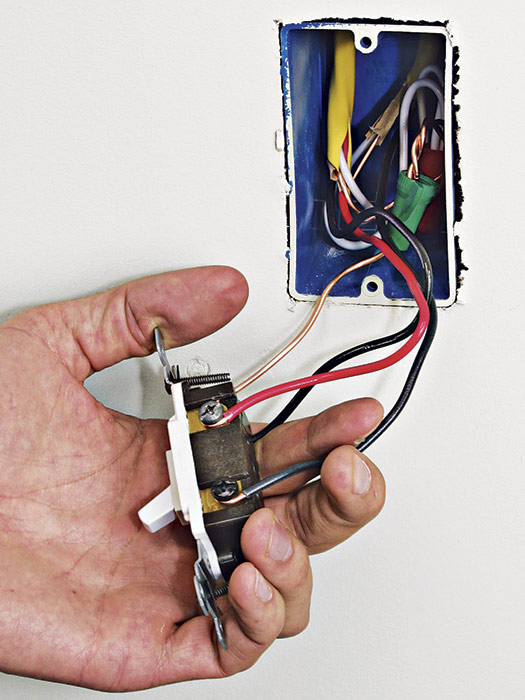
After attaching the second traveler, connect the hot conductor (switch leg or hot wire) to the common screw terminal, which is color coded black 5. Push the device into the box by hand, screw the device to the box, and install a cover plate.

Photo 6‚is a frontal view of the switch we just wired; it’s typical for a three-way that’s located between the power source and the light fixture it controls.

PRO TIP: When replacing a defective or outdated three- or four-way switch, use a felt-tipped marker to note which wires connect to which switch terminal before disconnecting the wires. Of course, turn off power to the switch before you begin.
This is a typical three-way switch with existing back-fed wiring.

Wiring a Three-Way Switch Loop

When an outlet or fixture box is closer to the power source than to the switch box, the wiring leg to the switch box is called a switch loop. When the switch is a three-way switch, a single 3-wire cable runs to it. In other words, the white wire taped black serves as a hot wire and runs from a splice in the fixture box, and the red and black wires are travelers. The white wire here is not a neutral; thus it is taped black to indicate that it is the hot conductor connected to the common terminal.


Wiring Complete, 3rd Edition

Excerpted from Wiring Complete, 3rd Edition (The Taunton Press, 2017) by Michael Litchfield and Michael McAlister

Available in the Taunton Store and at Amazon.com.

Previous: Wiring a Linear Slide Dimmer Next: How to Install a 3-Way Light Switch, Part 1

Guide

Wiring

Chapter

Receptacles and Switches

Sign up for eletters today and get the latest how-to from Fine Homebuilding, plus special offers.

Signing you up...

This site is protected by reCAPTCHA and the Google Privacy Policy and Terms of Service apply.
See all newsletters
See all newsletters

Log in or create an account to post a comment.

Sign up Log in

Become a member and get full access to FineHomebuilding.com

Wiring

Wiring

Trusted, code-compliant guidance from the pros for working safely on any wiring project

View Project Guide

View All Project Guides »

Become a member and get unlimited site access, including the Wiring Project Guide.

Start Free Trial

Working with Electricity
  • Basics
  • Safety
  • Troubleshooting and Upgrades
Tools and Materials
  • Electrical Tools
  • Electrical Boxes
  • Cables and Wires
Receptacles and Switches
  • Materials
  • Wiring Receptacles
  • Wiring Switches
Lights and Fans
  • Lighting Design
  • Installing Lights
  • Fans
Rough-In
  • Planning
  • Installing Electrical Boxes
  • Running Cable
  • Retrofit Work
  • Making Connections in Boxes
  • Electrical Conduit
Outdoor Wiring
  • Basics
  • Outlets
  • Installing Lighting
Panels and Subpanels
  • Understanding Panels
  • Circuits
  • Installing a Subpanel

Fine Home Building

Newsletter Sign-up

  • Fine Homebuilding

    Home building tips, offers, and expert advice in your inbox.

  • Green Building Advisor

    Building science and energy efficiency advice, plus special offers, in your inbox.

  • Old House Journal

    Repair, renovation, and restoration tips, plus special offers, in your inbox.

Signing you up...

This site is protected by reCAPTCHA and the Google Privacy Policy and Terms of Service apply.
See all newsletters

Follow

  • Fine Homebuilding

    Dig into cutting-edge approaches and decades of proven solutions with total access to our experts and tradespeople.

    Start Free Trial Now
    • Facebook
    • Instagram
    • X
    • LinkedIn
  • GBA Prime

    Get instant access to the latest developments in green building, research, and reports from the field.

    Start Free Trial Now
    • Facebook
    • YouTube
  • Old House Journal

    Learn how to restore, repair, update, and decorate your home.

    Subscribe Now
    • Facebook
    • Instagram
    • X

Membership & Magazine

  • Online Archive
  • Start Free Trial
  • Magazine Subscription
  • Magazine Renewal
  • Gift a Subscription
  • Customer Support
  • Privacy Preferences
  • About
  • Contact
  • Advertise
  • Careers
  • Terms of Use
  • Site Map
  • Do not sell or share my information
  • Privacy Policy
  • Accessibility
  • California Privacy Rights

© 2025 Active Interest Media. All rights reserved.

Fine Homebuilding receives a commission for items purchased through links on this site, including Amazon Associates and other affiliate advertising programs.

  • Home Group
  • Antique Trader
  • Arts & Crafts Homes
  • Bank Note Reporter
  • Cabin Life
  • Cuisine at Home
  • Fine Gardening
  • Fine Woodworking
  • Green Building Advisor
  • Garden Gate
  • Horticulture
  • Keep Craft Alive
  • Log Home Living
  • Military Trader/Vehicles
  • Numismatic News
  • Numismaster
  • Old Cars Weekly
  • Old House Journal
  • Period Homes
  • Popular Woodworking
  • Script
  • ShopNotes
  • Sports Collectors Digest
  • Threads
  • Timber Home Living
  • Traditional Building
  • Woodsmith
  • World Coin News
  • Writer's Digest
Active Interest Media logo
X
X
This is a dialog window which overlays the main content of the page. The modal window is a 'site map' of the most critical areas of the site. Pressing the Escape (ESC) button will close the modal and bring you back to where you were on the page.

Main Menu

  • How-To
  • Design
  • Tools & Materials
  • Video
  • Blogs
  • Forum
  • Project Guides
  • Reader Projects
  • Magazine
  • Members
  • FHB House

Podcasts

  • FHB Podcast
  • ProTalk

Webinars

  • Upcoming and On-Demand

Podcasts

  • FHB Podcast
  • ProTalk

Webinars

  • Upcoming and On-Demand

Popular Topics

  • Kitchens
  • Business
  • Bedrooms
  • Roofs
  • Architecture and Design
  • Green Building
  • Decks
  • Framing
  • Safety
  • Remodeling
  • Bathrooms
  • Windows
  • Tilework
  • Ceilings
  • HVAC

Magazine

  • Current Issue
  • Past Issues
  • Magazine Index
  • Subscribe
  • Online Archive
  • Author Guidelines

All Access

  • Member Home
  • Start Free Trial
  • Gift Membership

Online Learning

  • Courses
  • Project Guides
  • Reader Projects
  • Podcast

More

  • FHB Ambassadors
  • FHB House
  • Customer Support

Account

  • Log In
  • Join

Newsletter

Get home building tips, offers, and expert advice in your inbox

Signing you up...

This site is protected by reCAPTCHA and the Google Privacy Policy and Terms of Service apply.
See all newsletters
See all newsletters

Follow

  • X
  • YouTube
  • instagram
  • facebook
  • pinterest
  • Tiktok

Join All Access

Become a member and get instant access to thousands of videos, how-tos, tool reviews, and design features.

Start Your Free Trial

Subscribe

FHB Magazine

Start your subscription today and save up to 70%

Subscribe

We hope you’ve enjoyed your free articles. To keep reading, become a member today.

Get complete site access to expert advice, how-to videos, Code Check, and more, plus the print magazine.

Start your FREE trial

Already a member? Log in

Privacy Policy Update

We use cookies, pixels, script and other tracking technologies to analyze and improve our service, to improve and personalize content, and for advertising to you. We also share information about your use of our site with third-party social media, advertising and analytics partners. You can view our Privacy Policy here and our Terms of Use here.

Cookies

Analytics

These cookies help us track site metrics to improve our sites and provide a better user experience.

Advertising/Social Media

These cookies are used to serve advertisements aligned with your interests.

Essential

These cookies are required to provide basic functions like page navigation and access to secure areas of the website.

Delete My Data

Delete all cookies and associated data