FHB Logo Facebook LinkedIn Email Pinterest Twitter X Instagram Tiktok YouTube Plus Icon Close Icon Navigation Search Icon Navigation Search Icon Arrow Down Icon Video Guide Icon Article Guide Icon Modal Close Icon Guide Search Icon Skip to content
Subscribe
Log In
  • How-To
  • Design
  • Tools & Materials
  • Restoration
  • Videos
  • Blogs
  • Forum
  • Magazine
  • Members
  • FHB House
  • Podcast
Log In

Fine Homebuilding Project Guides

Wiring

Guide Home
  • Working with Electricity
  • Tools and Materials
  • Receptacles and Switches
  • Lights and Fans
  • Rough-In
  • Outdoor Wiring
  • Panels and Subpanels
How-To

Creating a Wiring Trench

Cutting a trench in drywall or plaster to run cable is faster than fishing cable behind finished surfaces.

By Mike Litchfield, Michael McAlister
  • X
  • facebook
  • linkedin
  • pinterest
  • email
  • add to favorites Log in or Sign up to save your favorite articles

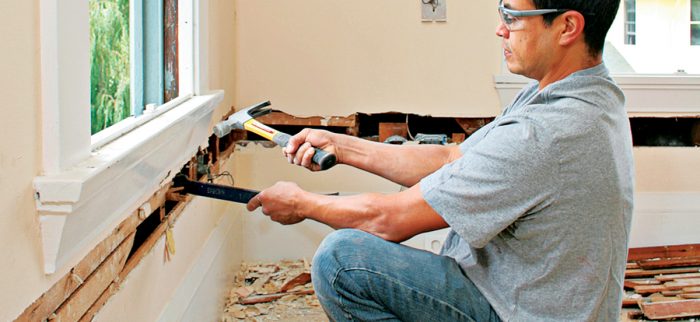
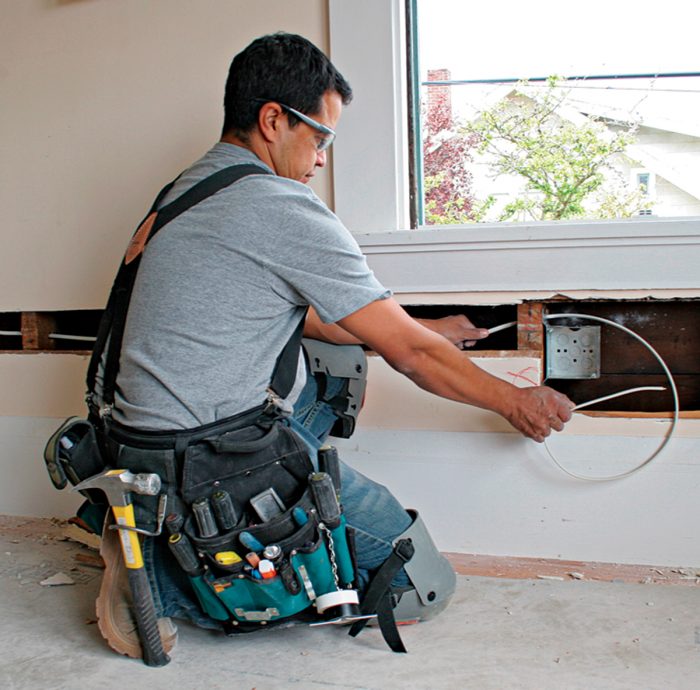
When adding multiple outlets or rewiring an entire room, cutting a wiring trench in finish surfaces instead of fishing cable behind them is much faster. Before cutting or drilling, however, turn off the power to the areas affected. Be sure to wear eye protection and a dust mask.

Safety Alert: Before you cut into any finish surface, ascertain that it’s not covered with lead paint.

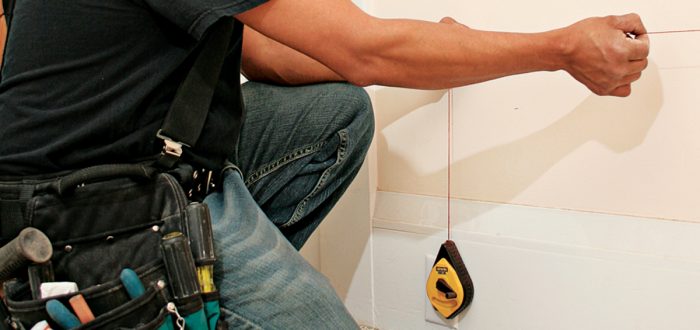
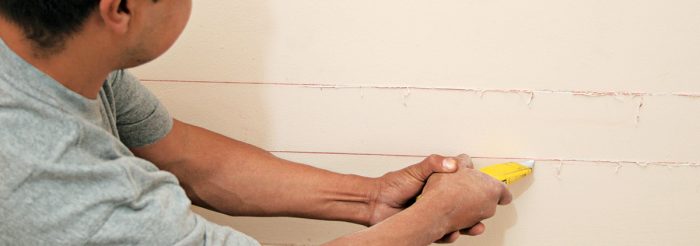
If there are no windows in the walls to be rewired, cut the trench about 3 ft. above the floor so you won’t have to kneel while working. If there are windows, cut the trench under the windows, leaving at least 1 in. of wall material under the windowsill to facilitate repairs. If there’s plaster, make the trench as wide as two strips of lath. Snap parallel chalklines to indicate the width of the trench 1. Then use a utility knife to score along each line 2. Scoring lines first produces a cleaner cut and easier repairs.

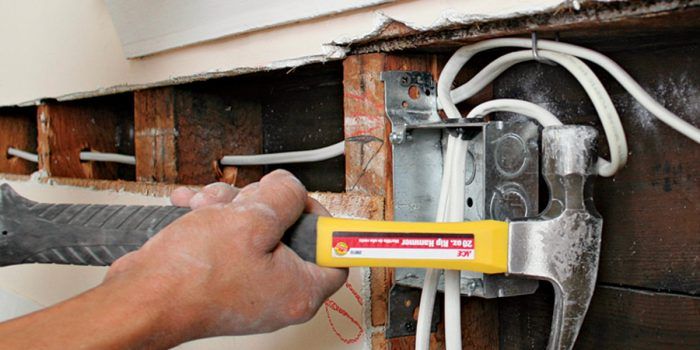
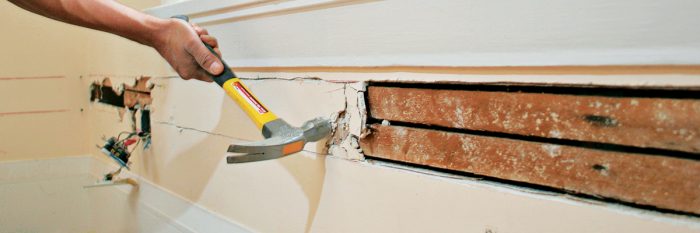
Next use a reciprocating saw with a demolition blade to cut through the plaster or drywall. Hold the saw at a low angle: You’ll be less likely to break blades or cut into studs 3. Using a hammer, gently crush the plaster between the lines 4. Use a utility bar (flat bar) to pry out the lath strips or drywall section. If you expose any cables in the walls, use a noncontact tester to make sure they’re not hot 5. Next, drill through the studs so you can run cable in the trench. Wherever there’s an outlet indicated, expand the trench width to accommodate the boxes.

Finally, pull any lath or drywall nails from stud edges 6. They’re easy to overlook because they’re small; if you pull them now, patching the trench will go smoothly.

Using a chalkline when creating a wiring trench
1 Use a chalkline to mark the top and bottom lines of the wiring trench.
Scooring the drywall alolng the chalklines with a utility knife
2 To ensure a clean cut line and make patching easier, use a utility knife to first score along the chalklines.
Cutting along the chalkline with reciprocating saw
3 Cut along the chalklines, holding the reciprocating saw at a low angle. Do not cut the lath.
Using a hammer on a plaster wall to expose wiring
4 If walls are drywall, simply pull out the isolated strips. If plaster, use a hammer to remove the plaster and expose the lath.
Use a hammer and a flat bar to pry the lath free from the studs.
5 Use a hammer and a flat bar to pry the lath free from the studs. Work slowly to minimize damage.
Pulling out nails stuck in studs
6 Pull out any nails still stuck in the studs; this will make later repairs easier.

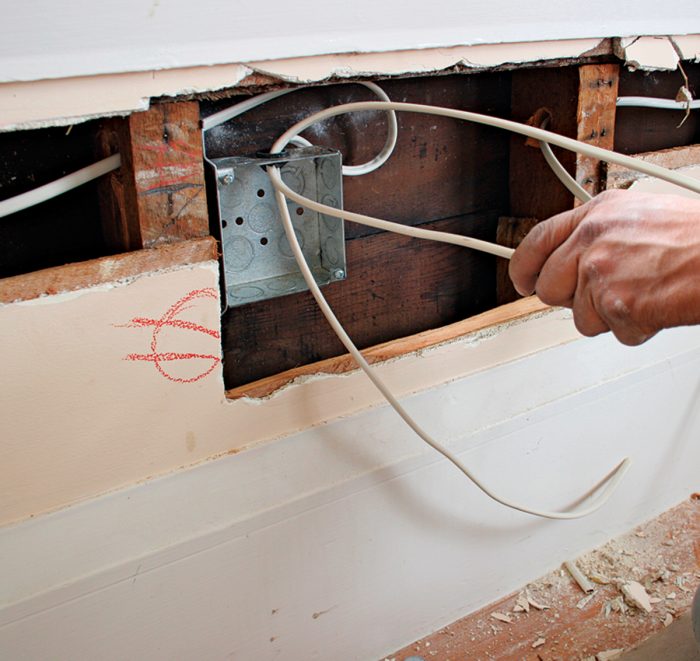
Pulling Cable to Retrofit Boxes

Once you’ve cut a wiring trench and drilled the holes, installing the boxes and pulling cable are straight-forward.

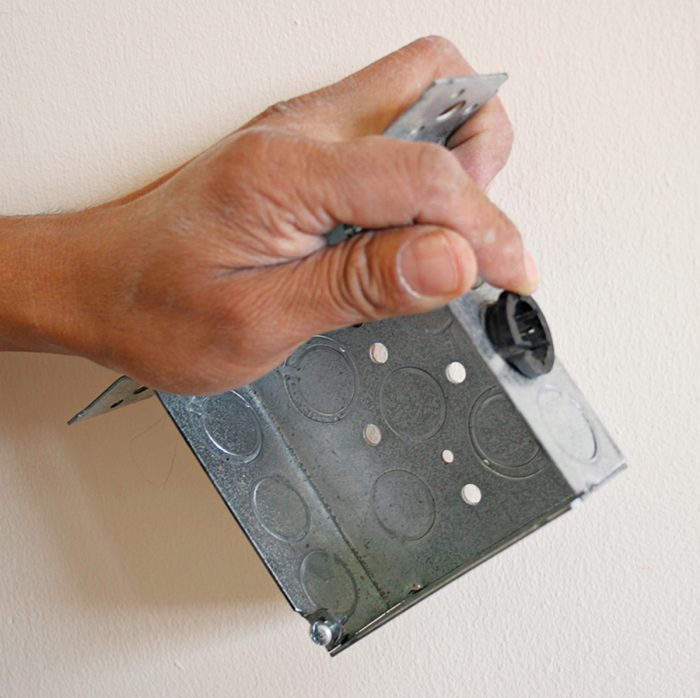
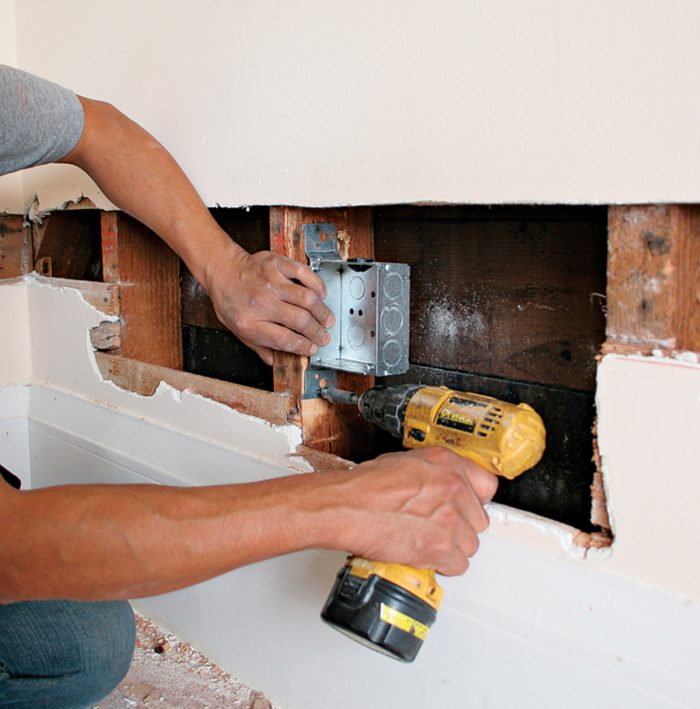
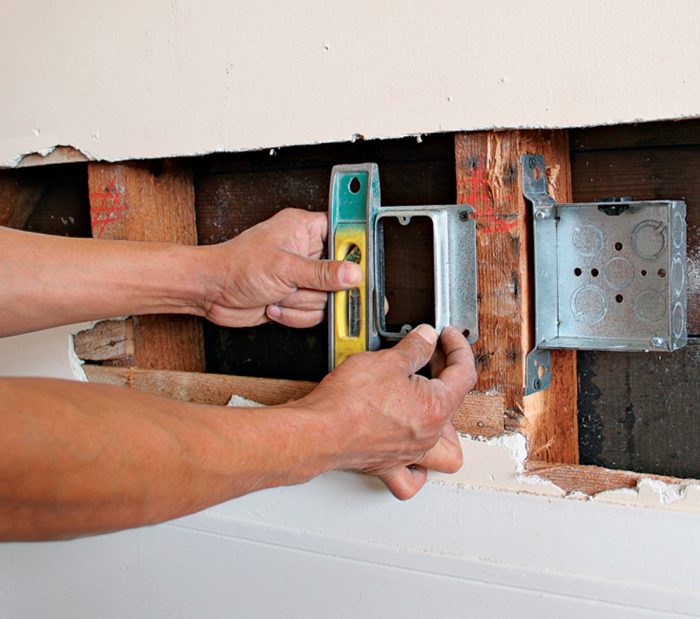
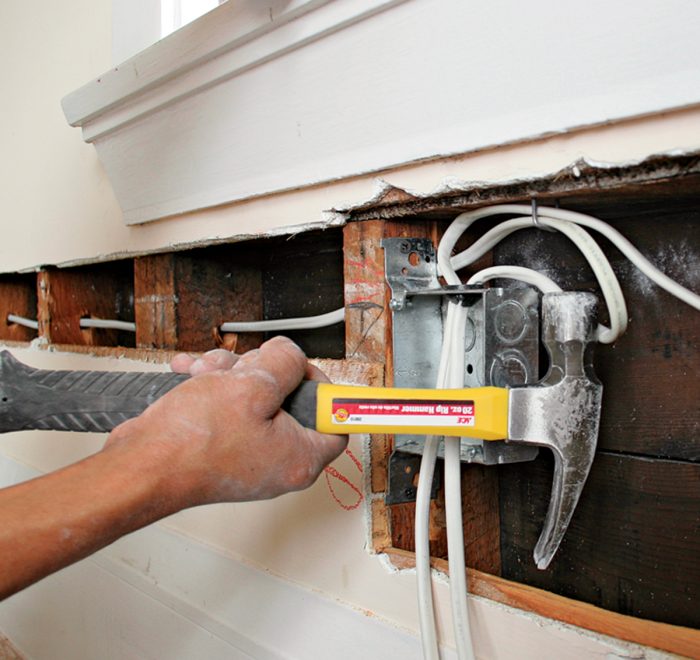
If you’re installing metal boxes, remove knockouts and insert cable connectors into their openings 1. Then screw boxes to studs; screwing is less likely to damage nearby finish surfaces 2. Be sure that the box will be flush to finish surfaces or, if you’ll install plaster rings later, flush to the stud edge. Whenever you install boxes side by side—as with the outlet and low-voltage boxes shown here—install them plumb and at the same height 3.

Installing cable in remodels can be tricky because space is tight and you must avoid bending cable sharply, which can damage wire insulation 4. Install nail plates wherever the edge of the hole is less than 1 1⁄4 in. from the stud edges. Feed cable through the cable connectors into the boxes 5. Finally, staple the cable to the framing within 8 in. of a single-gang box without clamps, or within 12 in. of other boxes. If there’s not room to loop the cable and staple it to a stud, it’s acceptable to staple it to other solid framing, such as the underside of a sill 6.

Removing knockouts on metal electrical boxes.
1 For metal boxes, start by removing knockouts and then insert a connector.
Screwing metal electrical box onto stud.
2 Screw the box to the side of a stud.
Install outlets that are side by side at the same height.
3 For the best appearance, install outlets that are side by side at the same height.
Run cable to each box.
4 Run cable to each box.
Feed the cable through cable connectors
5 Feed the cable through cable connectors
Staple the cable within 12 in. of each box.
6 Staple the cable within 12 in. of each box.


Wiring Complete, 3rd Edition

Excerpted from Wiring Complete, 3rd Edition (The Taunton Press, 2017) by Michael Litchfield and Michael McAlister

Available in the Taunton Store and at Amazon.com.

Previous: Snake Wire through Old Walls Next: Adding an Electrical Outlet to an Existing Run

Guide

Wiring

Chapter

Rough-In

Sign up for eletters today and get the latest how-to from Fine Homebuilding, plus special offers.

Signing you up...

This site is protected by reCAPTCHA and the Google Privacy Policy and Terms of Service apply.
See all newsletters
See all newsletters

Log in or create an account to post a comment.

Sign up Log in

Become a member and get full access to FineHomebuilding.com

Wiring

Wiring

Trusted, code-compliant guidance from the pros for working safely on any wiring project

View Project Guide

View All Project Guides »

Become a member and get unlimited site access, including the Wiring Project Guide.

Start Free Trial

Working with Electricity
  • Basics
  • Safety
  • Troubleshooting and Upgrades
Tools and Materials
  • Electrical Tools
  • Electrical Boxes
  • Cables and Wires
Receptacles and Switches
  • Materials
  • Wiring Receptacles
  • Wiring Switches
Lights and Fans
  • Lighting Design
  • Installing Lights
  • Fans
Rough-In
  • Planning
  • Installing Electrical Boxes
  • Running Cable
  • Retrofit Work
  • Making Connections in Boxes
  • Electrical Conduit
Outdoor Wiring
  • Basics
  • Outlets
  • Installing Lighting
Panels and Subpanels
  • Understanding Panels
  • Circuits
  • Installing a Subpanel

Fine Home Building

Newsletter Sign-up

  • Fine Homebuilding

    Home building tips, offers, and expert advice in your inbox.

  • Green Building Advisor

    Building science and energy efficiency advice, plus special offers, in your inbox.

  • Old House Journal

    Repair, renovation, and restoration tips, plus special offers, in your inbox.

Signing you up...

This site is protected by reCAPTCHA and the Google Privacy Policy and Terms of Service apply.
See all newsletters

Follow

  • Fine Homebuilding

    Dig into cutting-edge approaches and decades of proven solutions with total access to our experts and tradespeople.

    Start Free Trial Now
    • Facebook
    • Instagram
    • X
    • LinkedIn
  • GBA Prime

    Get instant access to the latest developments in green building, research, and reports from the field.

    Start Free Trial Now
    • Facebook
    • YouTube
  • Old House Journal

    Learn how to restore, repair, update, and decorate your home.

    Subscribe Now
    • Facebook
    • Instagram
    • X

Membership & Magazine

  • Online Archive
  • Start Free Trial
  • Magazine Subscription
  • Magazine Renewal
  • Gift a Subscription
  • Customer Support
  • Privacy Preferences
  • About
  • Contact
  • Advertise
  • Careers
  • Terms of Use
  • Site Map
  • Do not sell or share my information
  • Privacy Policy
  • Accessibility
  • California Privacy Rights

© 2025 Active Interest Media. All rights reserved.

Fine Homebuilding receives a commission for items purchased through links on this site, including Amazon Associates and other affiliate advertising programs.

  • Home Group
  • Antique Trader
  • Arts & Crafts Homes
  • Bank Note Reporter
  • Cabin Life
  • Cuisine at Home
  • Fine Gardening
  • Fine Woodworking
  • Green Building Advisor
  • Garden Gate
  • Horticulture
  • Keep Craft Alive
  • Log Home Living
  • Military Trader/Vehicles
  • Numismatic News
  • Numismaster
  • Old Cars Weekly
  • Old House Journal
  • Period Homes
  • Popular Woodworking
  • Script
  • ShopNotes
  • Sports Collectors Digest
  • Threads
  • Timber Home Living
  • Traditional Building
  • Woodsmith
  • World Coin News
  • Writer's Digest
Active Interest Media logo
X
X
This is a dialog window which overlays the main content of the page. The modal window is a 'site map' of the most critical areas of the site. Pressing the Escape (ESC) button will close the modal and bring you back to where you were on the page.

Main Menu

  • How-To
  • Design
  • Tools & Materials
  • Video
  • Blogs
  • Forum
  • Project Guides
  • Reader Projects
  • Magazine
  • Members
  • FHB House

Podcasts

  • FHB Podcast
  • ProTalk

Webinars

  • Upcoming and On-Demand

Podcasts

  • FHB Podcast
  • ProTalk

Webinars

  • Upcoming and On-Demand

Popular Topics

  • Kitchens
  • Business
  • Bedrooms
  • Roofs
  • Architecture and Design
  • Green Building
  • Decks
  • Framing
  • Safety
  • Remodeling
  • Bathrooms
  • Windows
  • Tilework
  • Ceilings
  • HVAC

Magazine

  • Current Issue
  • Past Issues
  • Magazine Index
  • Subscribe
  • Online Archive
  • Author Guidelines

All Access

  • Member Home
  • Start Free Trial
  • Gift Membership

Online Learning

  • Courses
  • Project Guides
  • Reader Projects
  • Podcast

More

  • FHB Ambassadors
  • FHB House
  • Customer Support

Account

  • Log In
  • Join

Newsletter

Get home building tips, offers, and expert advice in your inbox

Signing you up...

This site is protected by reCAPTCHA and the Google Privacy Policy and Terms of Service apply.
See all newsletters
See all newsletters

Follow

  • X
  • YouTube
  • instagram
  • facebook
  • pinterest
  • Tiktok

Join All Access

Become a member and get instant access to thousands of videos, how-tos, tool reviews, and design features.

Start Your Free Trial

Subscribe

FHB Magazine

Start your subscription today and save up to 70%

Subscribe

We hope you’ve enjoyed your free articles. To keep reading, become a member today.

Get complete site access to expert advice, how-to videos, Code Check, and more, plus the print magazine.

Start your FREE trial

Already a member? Log in

Privacy Policy Update

We use cookies, pixels, script and other tracking technologies to analyze and improve our service, to improve and personalize content, and for advertising to you. We also share information about your use of our site with third-party social media, advertising and analytics partners. You can view our Privacy Policy here and our Terms of Use here.

Cookies

Analytics

These cookies help us track site metrics to improve our sites and provide a better user experience.

Advertising/Social Media

These cookies are used to serve advertisements aligned with your interests.

Essential

These cookies are required to provide basic functions like page navigation and access to secure areas of the website.

Delete My Data

Delete all cookies and associated data