
Developing a Floor Plan
Drawing a wiring plan is a key part of the process if you're extending or adding a circuit or planning a major upgrade.

Drawing a set of project plans can help you anticipate problems, find optimal routes for running cable, minimize mess and disruption, and make the most of your time and money. A carefully drawn set of plans is also an important part of the code compliance and inspection process.
If you’re replacing only a receptacle, switch, or light fixture, you usually don’t need to involve the local building department. But if you run cable to extend a circuit, add a new circuit, or plan extensive upgrades, visit the building department to learn local code requirements and take out a permit. Your wiring plans should be approved by a local building inspector before you start the project.
Phone First
Call the building department and ask if local codes allow homeowners to do electrical work or if it must be done by a licensed electrician. You may be required to take a test to prove basic competency. This is also a good time to ask if the municipality has pamphlets that give an overview of local electrical code requirements.
Read Up
Make a rough sketch of the work you propose, develop a rudimentary materials list, and then apply for a permit. At the time you apply, the building department clerk may be able to answer questions generated by the legwork you’ve done thus far. This feedback often proves invaluable.
Inspectors Inspect
Inspectors are not on staff to tell you how to plan or execute a job, so make your questions as specific as possible. Present your rough sketch, discuss the materials you intend to use, and ask if there are specific requirements for the room(s) you’ll be rewiring. For example, must bedroom receptacles have AFCI protection? Must kitchen wall receptacles be GFCIs if they are not over a counter? Be specific.
Draw Up Plans
Based on the feedback you’ve gotten, draw detailed plans. They should include each switch, receptacle, and fixture as well as the paths between switches and the device(s) they control. From this drawing, you can develop your materials list. Number each circuit or, better yet, assign a different color to each circuit. When you feel the plans are complete, schedule an appointment with an inspector to review them.
Listen Well and Take Notes
Be low-key and respectful when you meet with the inspector to review your plans. First, you’re more likely to get your questions answered. Second, you’ll begin to develop a personal rapport. Because one inspector will often track a project from start to finish, this is a person who can ease your way or make it much more difficult. So play it straight, ask questions, listen well, take notes, and—above all—don’t argue or come in with an attitude.
On-Site Inspections
Once the building department approves your plans, you can start working. In most cases, the inspector will visit your site when the wiring is roughed in and again when the wiring is finished. Don’t call for an inspection until each stage is complete.
Electrical Notation
Start by making an accurate floor plan of the room or rooms to be rewired on graph paper using a scale of 1⁄4 in. = 1 ft. Indicate walls and permanent fixtures such as countertops, kitchen islands, cabinets, and any large appliances. By photocopying this floor plan, you can quickly generate to-scale sketches of various wiring schemes.
Use the appropriate electrical symbols to indicate the locations of receptacles, switches, light fixtures, and appliances.
Common Electrical Symbols

Especially when drawing kitchens, which can be incredibly complex, use colored pencils to indicate different circuits. You can also number circuits, but colored circuits are distinguishable at a glance. Use solid lines to indicate cable runs between receptacles and switches and dotted lines to indicate the cables that run between switches and the light fixtures or receptacles they control.
The beauty of photocopies is that you can experiment with different options quickly. As you refine the drawings, refer back to the list of requirements given earlier to be sure that you have an adequate number of receptacles, that you have GFCI receptacles over kitchen counters, that there are switches near doorways, and so on. Ultimately, you’ll need a final master drawing with everything on it. But you may also find it helpful to make individual drawings—say, one for lighting and one for receptacles—if the master drawing gets too busy to read.
If you have questions or want to highlight a fixture type, use callouts on the floor plan. As you decide which fixtures and devices you want to install, develop a separate materials list and use numbered keys to indicate where each piece goes on the master drawing. Finally, develop a list of all materials, so you’ll also have enough boxes, cable connectors, wire connectors, staples, and so on. In short, list all you need to do the job.
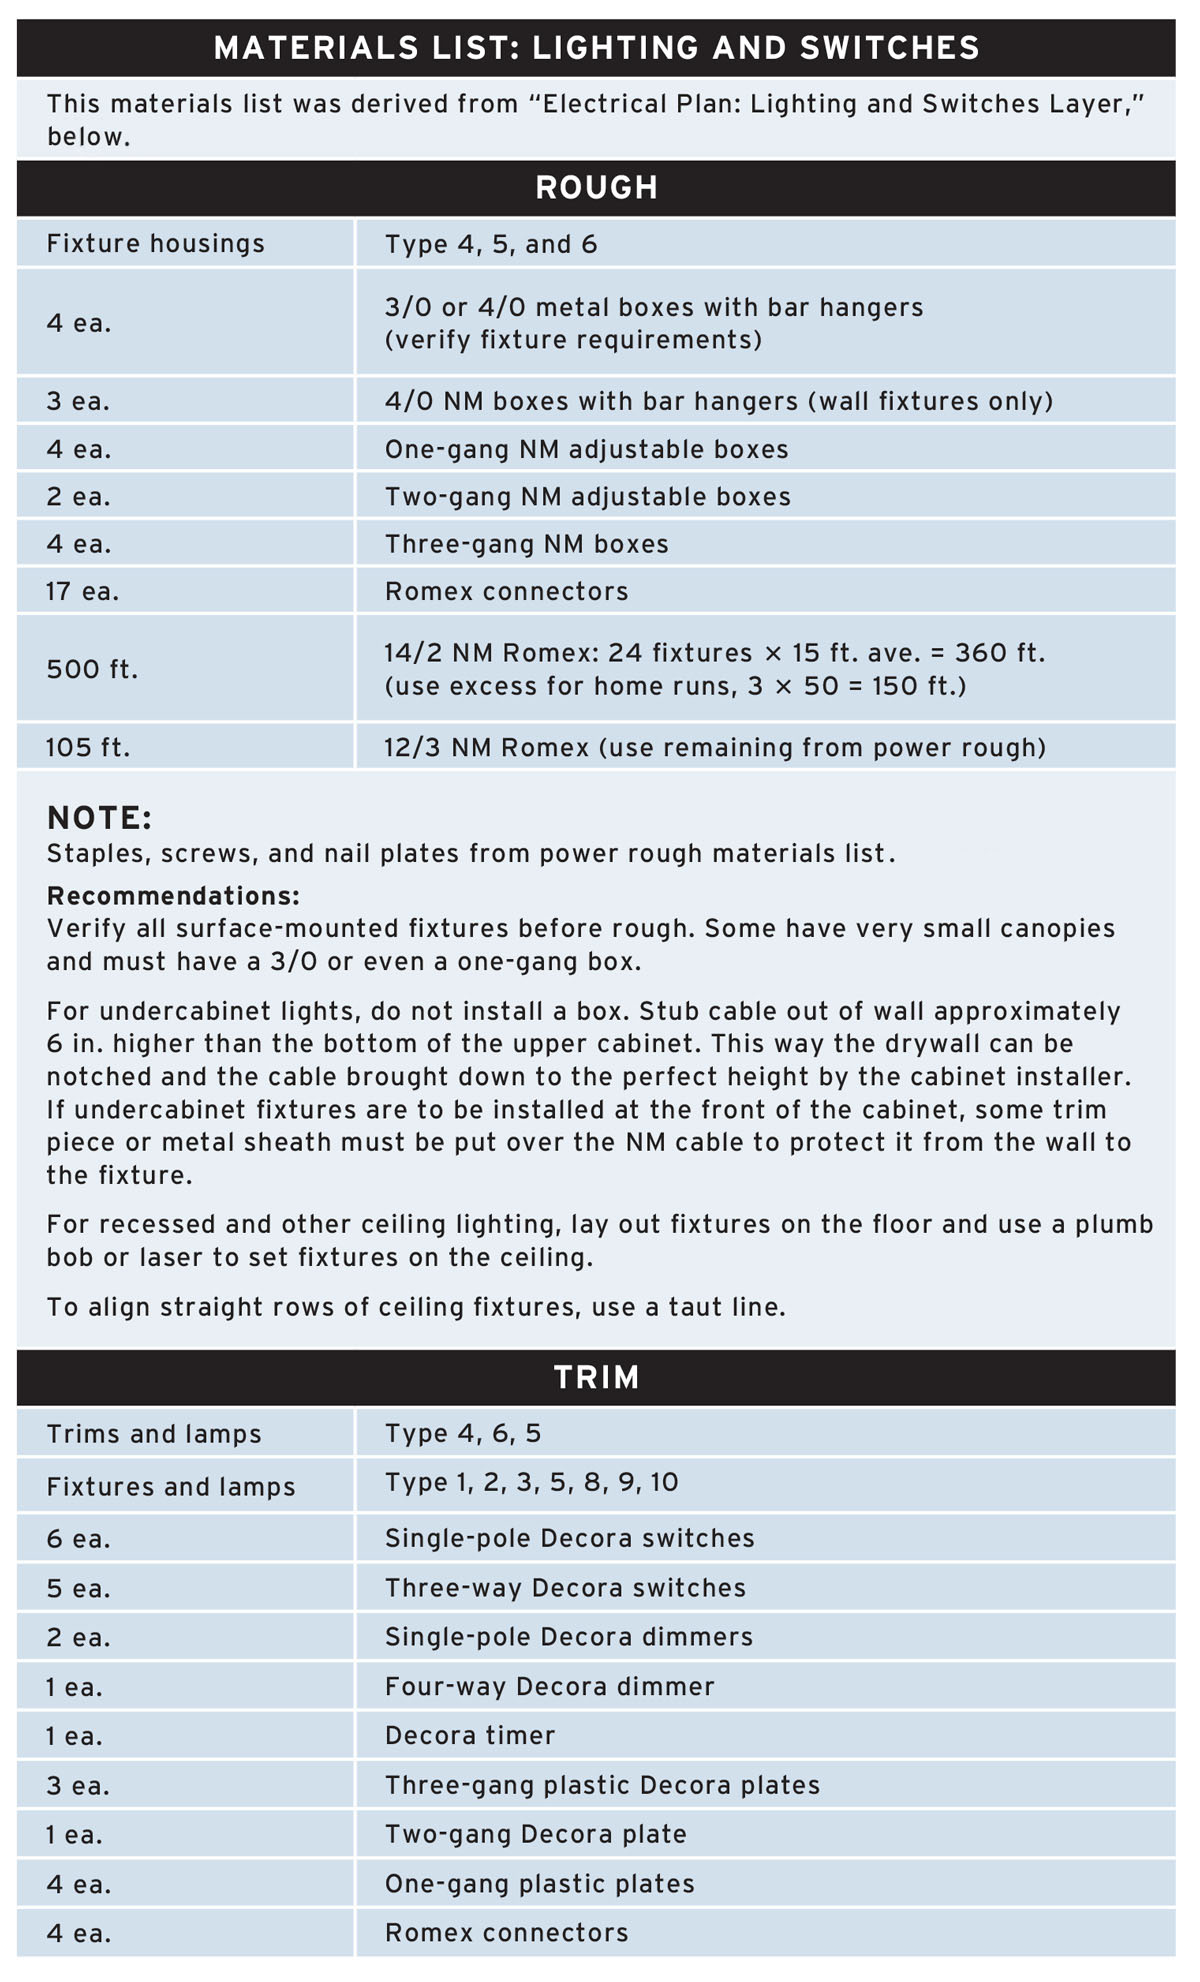
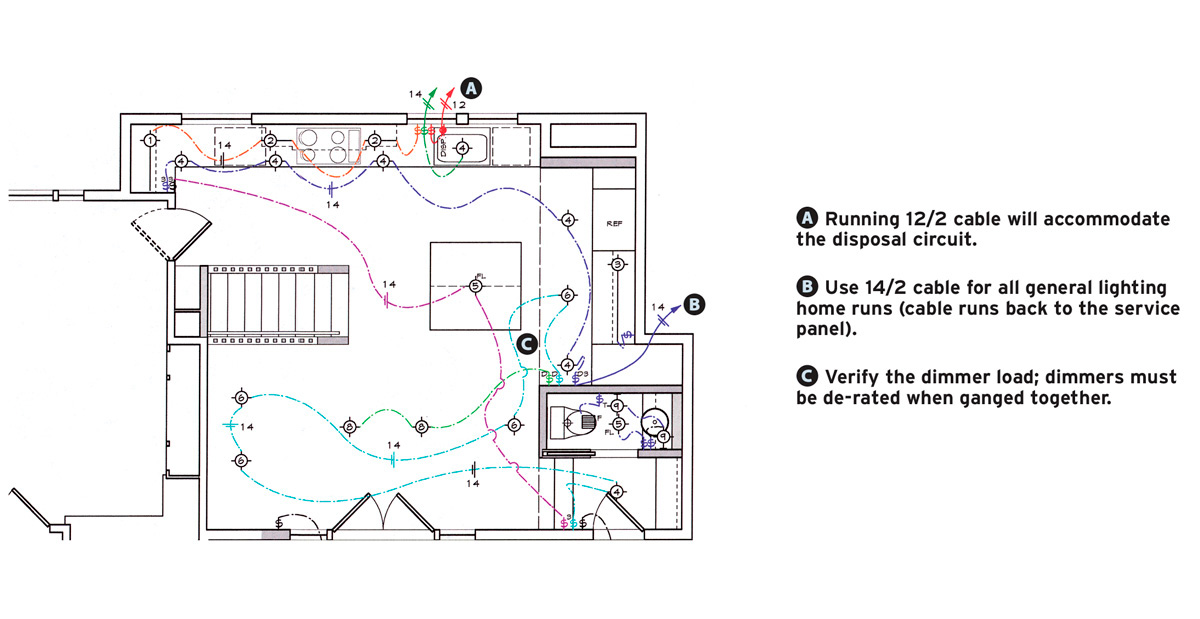
| Electrical Plan: Lighting and Switches Layer
A professional’s electrical floor plan may be daunting at first, but it will start to make sense as you become familiar with the symbols used. To make the plans easier to read, they have been divided into two layers: (1) lighting and switches and (2) power, which consists of receptacles and dedicated circuits. (There’s some overlap.) The circled letters are callouts that indicate areas warranting special attention. The circled numbers correspond to a master list of lighting fixtures that the electrician developed with the architect. Drawing switch legs and circuits in different colors makes a plan much easier to read.
|


 |
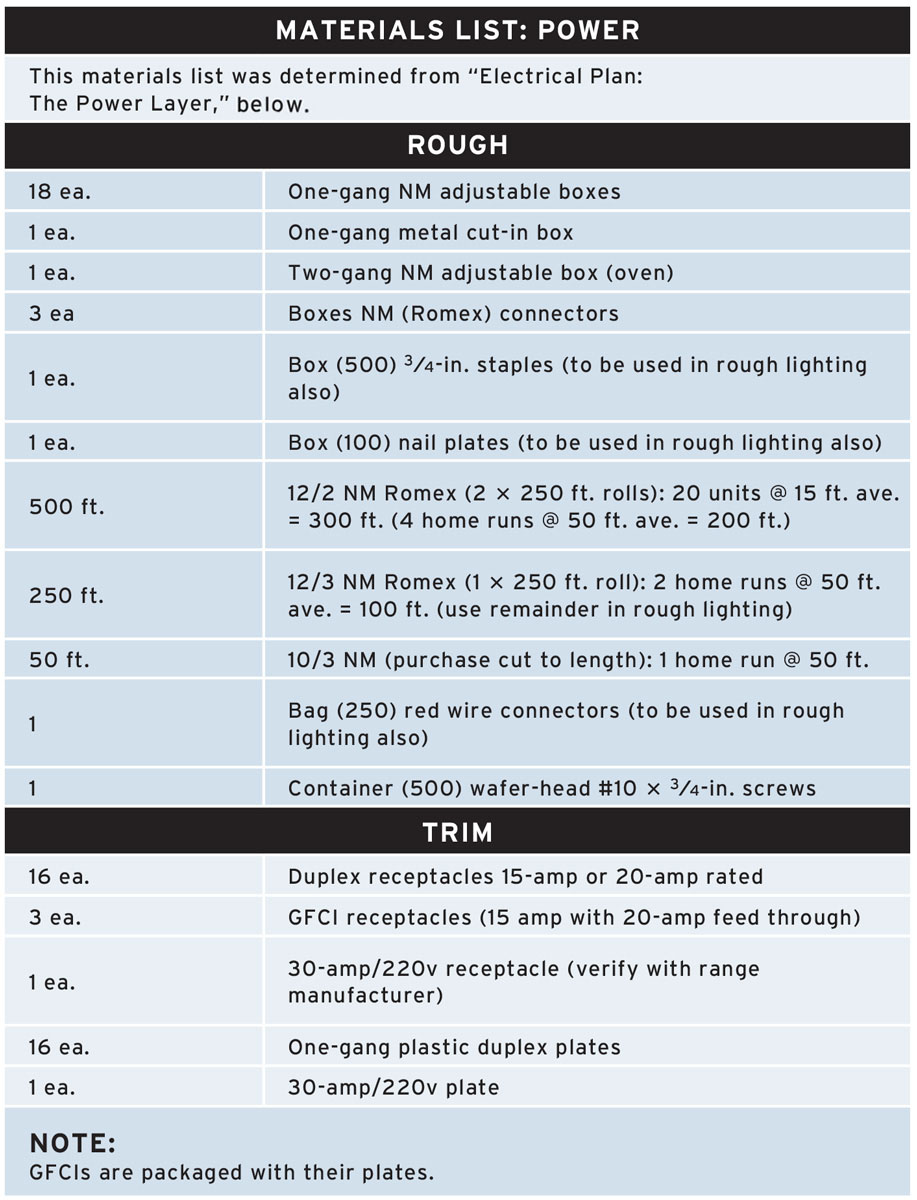
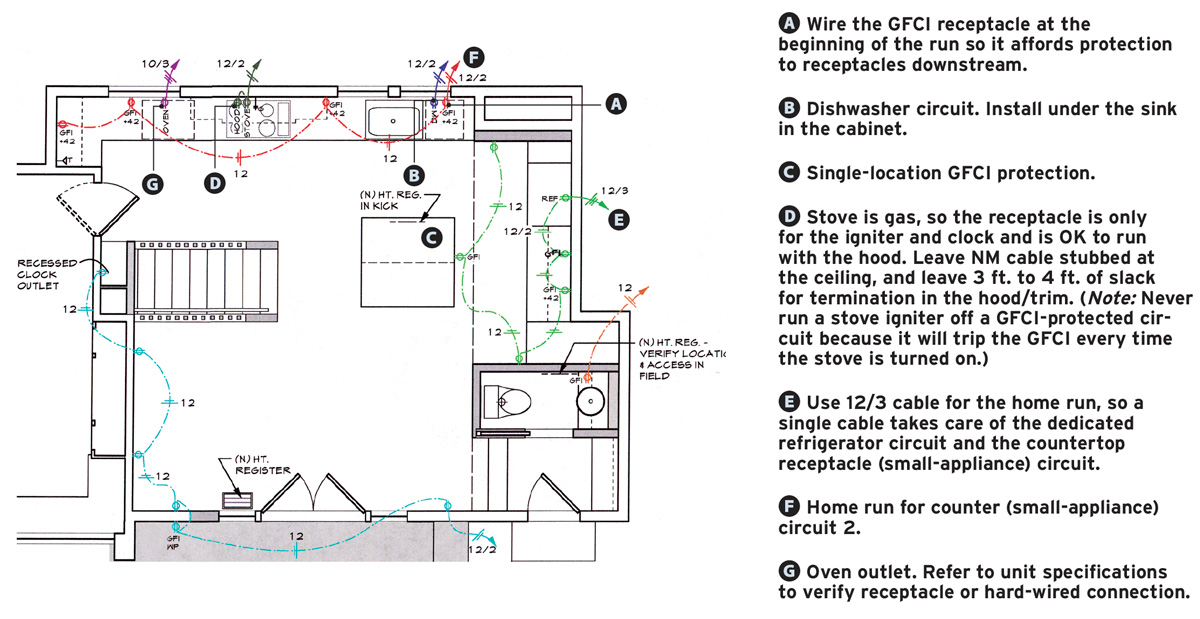
| Electrical Plan: The Power Layer
This kitchen remodel is typical in that it has many dedicated circuits (also called designated circuits) and, per code, at least two 20-amp small-appliance circuits wired with #12 cable. Circled letters are callouts that correspond to the lettered notes.
|


 |

Excerpted from Wiring Complete, 3rd Edition (The Taunton Press, 2017) by Michael Litchfield and Michael McAlister
Available in the Taunton Store and at Amazon.com.
