
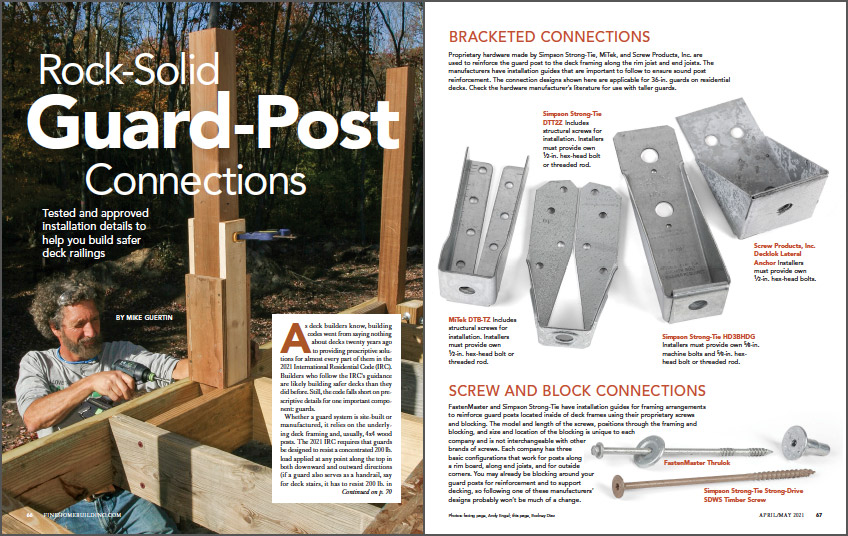
Rock-Solid Guard-Post Connections
Tested and approved installation details to help you build safer deck railings.
Synopsis: Veteran deck-builder and contributing editor Mike Guertin describes the prescriptive solutions in the 2021 International Residential Code for attaching guard posts to deck framing for a safe and secure guard system. Guertin describes the proprietary hardware used to reinforce the connections, and uses a series of detailed illustrations to demonstrate 12 different code-compliant post-to-frame attachments.
Also watch Mike’s detailed video where he shows several options for fastening Deck guardrails.
As deck builders know, building codes went from saying nothing about decks twenty years ago to providing prescriptive solutions for almost every part of them in the 2021 International Residential Code (IRC). Builders who follow the IRC’s guidance are likely building safer decks than they did before. Still, the code falls short on prescriptive details for one important component: guards.
Whether a guard system is site-built or manufactured, it relies on the underlying deck framing and, usually, 4×4 wood posts. The 2021 IRC requires that guards be designed to resist a concentrated 200 lb. load applied at any point along the top in both downward and outward directions (if a guard also serves as a handrail, say for deck stairs, it has to resist 200 lb. in any direction). Manufactured guards must be tested for code approval, and that testing includes safety factors of up to three times the 200 lb. required by code. Rarely does anyone test site-built guards to make sure they’re in compliance, but the new code provides some requirements and restrictions we can use to guide their construction.
The IRC now requires that guards have a continuous load path to the deck joists; they can’t connect to the rim joist alone. Where guards are connected to joists at the ends of a deck, the joists must be connected to inboard joists to help resist rotation. This is usually done with blocking, but the blocking connections can’t relay solely on fasteners driven into end grain.
Testing done at Virginia Tech in the early 2000s showed that the common ways builders were fastening guard posts to deck frames couldn’t meet the code-required load plus a two-and-a-half-times safety factor (the standard for some manufactured guard systems). It’s easy to understand why these old-school connections—many relying on fasteners into end grain—failed. Guard posts are essentially levers. A 200-lb. load applied horizontally at the top of a post translates to roughly 1400 lb. at the bottom of the shortest guard height allowed by code (36 in.). That leverage can easily pry the rim off the joists. This, not the connection between the guard post and framing, tends to be the weak point. But it’s easy to reinforce.
The examiners at Virginia Tech found that when using metal hardware that transfers the load from the posts to the deck joists, the posts and deck frame can handle the load—two-and-a-half-times safety factor included—without deflecting beyond the code limit. From the original few post-to-frame connection details developed at Virginia Tech, numerous combinations have arisen using the same principle: Reinforce the deck framing and the post at the connection.
This article illustrates 12 different post-to-frame arrangements. The details vary depending on whether the posts are installed inside or outside of the rim board and end joists. Most have been tested either by Virginia Tech or by hardware manufacturers, but their designs don’t address every possible scenario where you need a guard post. I have, on occasion, extrapolated a few post-to-frame attachments, and done my own unofficial testing to gauge their strength. You may also encounter unique post locations that don’t have a tested reinforcement design. You should be able to extrapolate a connection design from the ones shown here, or you can ask an engineer to design one.
Reinforcing guard posts to the deck frame using metal hardware or extra screws and blocking may seem like overkill, especially if your current post-connection practices seem rock solid. But unlike framing connections inside a house, deck-framing materials are subject to pronounced swings in moisture content that lead to swelling and shrinking, freeze/thaw cycles, and fastener corrosion that can loosen up connections. Collapses aren’t common occurrences, but if a guard does give way when people are leaning against it, they’re likely going to fall.
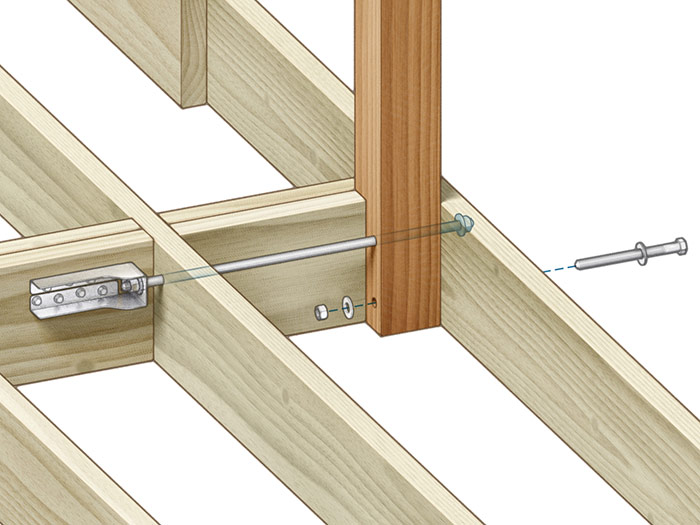
Bracketed Connections
Proprietary hardware made by Simpson Strong-Tie, MiTek, and Screw Products, Inc. are used to reinforce the guard post to the deck framing along the rim joist and end joists. The manufacturers have installation guides that are important to follow to ensure sound post reinforcement. The connection designs shown here are applicable for 36-in. guards on residential decks. Check the hardware manufacturer’s literature for use with taller guards.
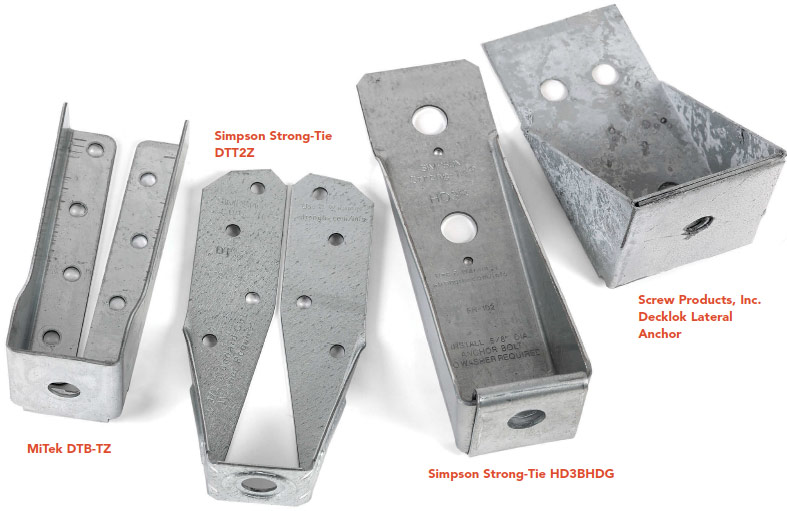
- MiTek DTB-TZ: Includes structural screws for installation. Installers must provide own 1⁄2-in. hex-head bolt or threaded rod.
- Simpson Strong-Tie: DTT2Z Includes structural screws for installation. Installers must provide own 1⁄2-in. hex-head bolt or threaded rod.
- Simpson Strong-Tie HD3BHDG: Installers must provide own 5⁄8-in. machine bolts and 5⁄8-in. hex-head bolt or threaded rod.
- Screw Products, Inc. Decklok Lateral Anchor: Installers must provide own 1⁄2-in. hex-head bolts.
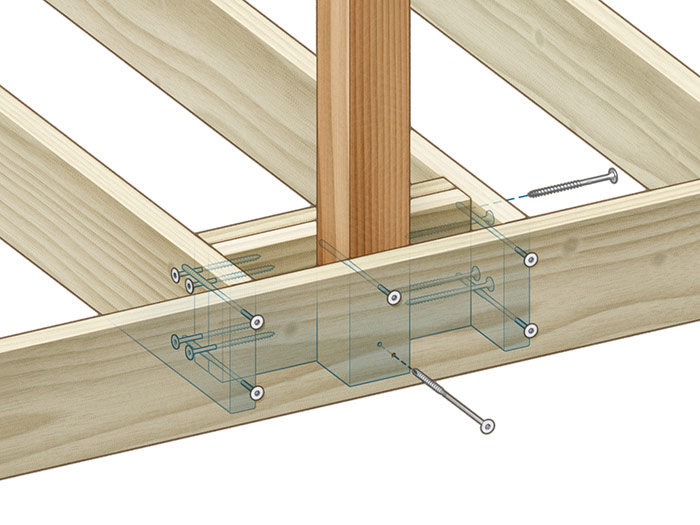
 Screw and Block Connections
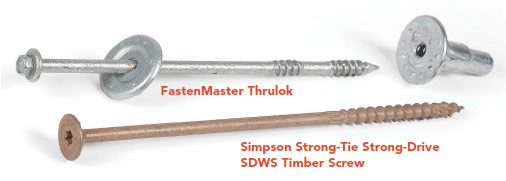
FastenMaster and Simpson Strong-Tie have installation guides for framing arrangements to reinforce guard posts located inside of deck frames using their proprietary screws and blocking. The model and length of the screws, positions through the framing and blocking, and size and location of the blocking is unique to each company and is not interchangeable with other brands of screws. Each company has three basic configurations that work for posts along a rim board, along end joists, and for outside corners. You may already be blocking around your guard posts for reinforcement and to support decking, so following one of these manufacturers’ designs probably won’t be much of a change.
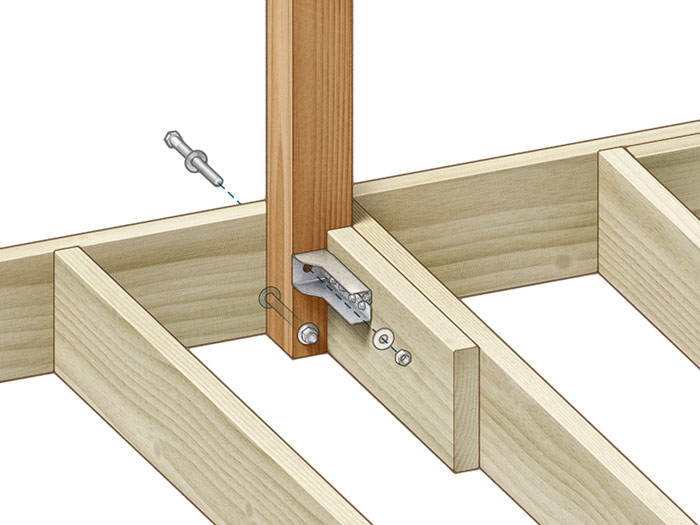
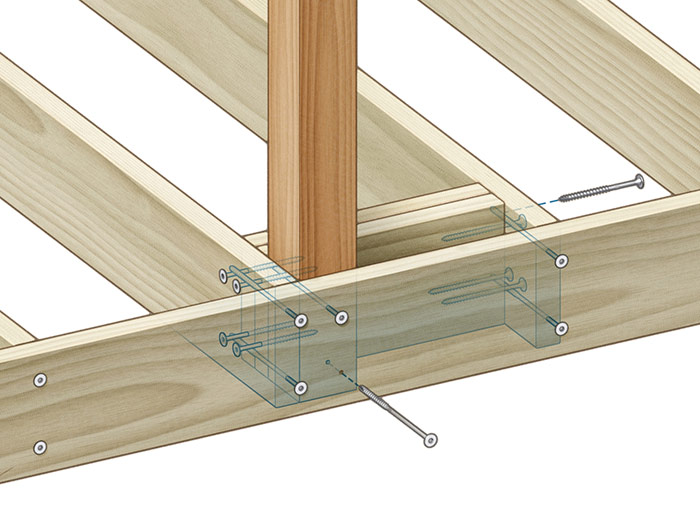
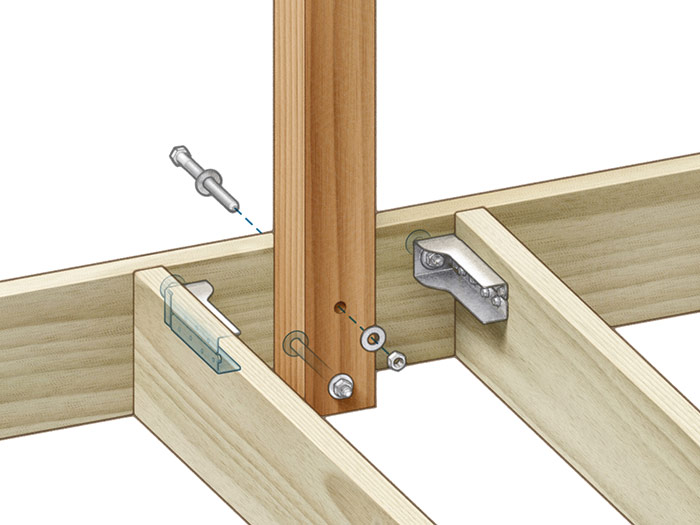
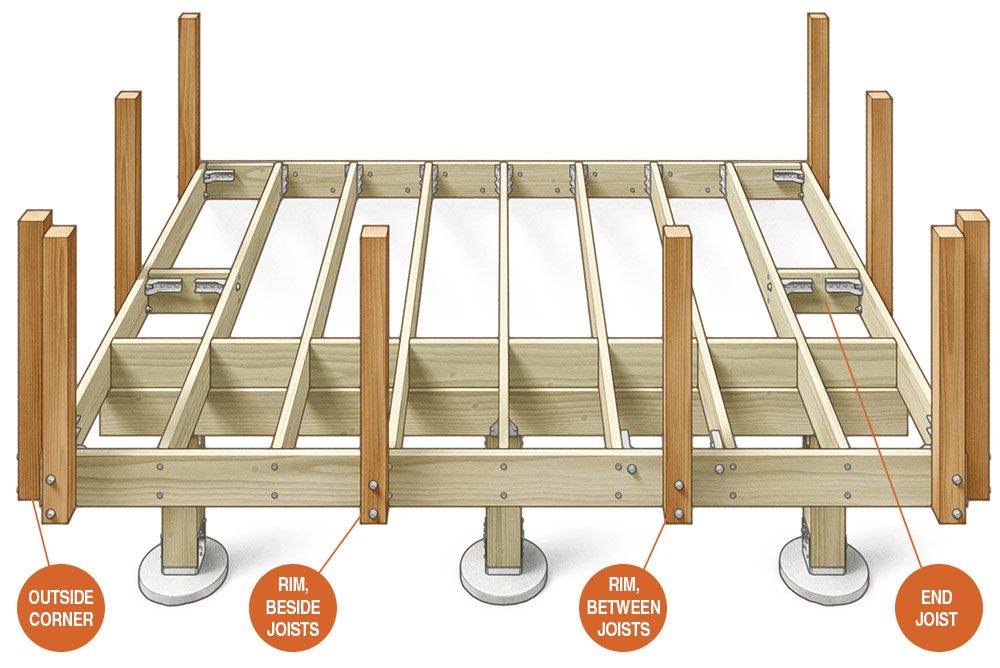
POSTS INSIDE OF DECK FRAMING
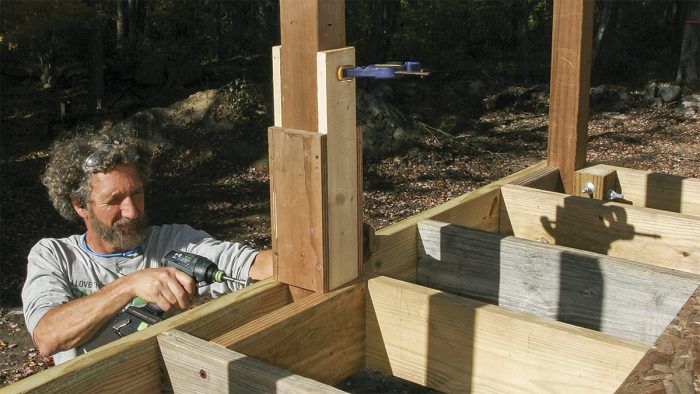
Mounting posts inside of framing gives you the most options in terms of fastening. Bolts and tension ties were my go-tos for a long time, but Simpson Strong-Tie now makes screws—the Strong-Drive SDWS Timber Screw (see p. 67)—that’s approved for guard-post connections inside of framing. According to Simpson, its installation details meet the 600-lb. ultimate load requirements that are now the standard for manufactured guards with wood components. FastenMaster’s Thrulok screw-bolts are another option, though check their installation guides for details; they differ from what’s illustrated here.
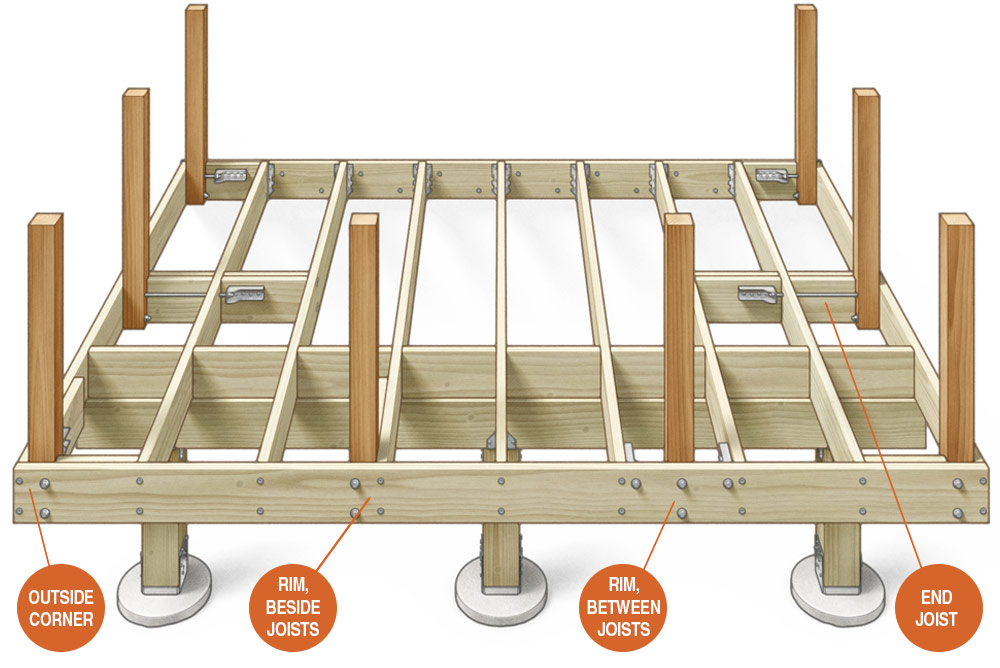
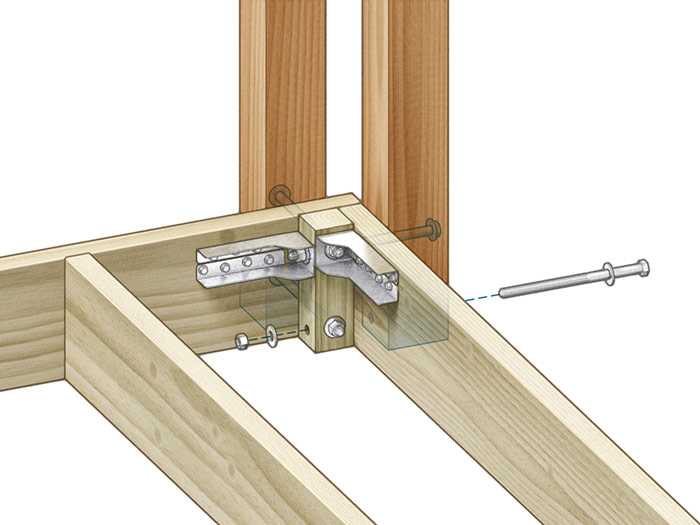
OUTSIDE CORNER: Tie rim and end joists in two directions
 |
 |
RIM, BESIDE JOISTS: Tie the rim to the adjacent joist or joists
 |
 |
RIM, BETWEEN JOISTS: Tie the rim to the joists on both sides of the post
 |
 |
END JOIST: Transfer the load to inboard joists with blocking
 |
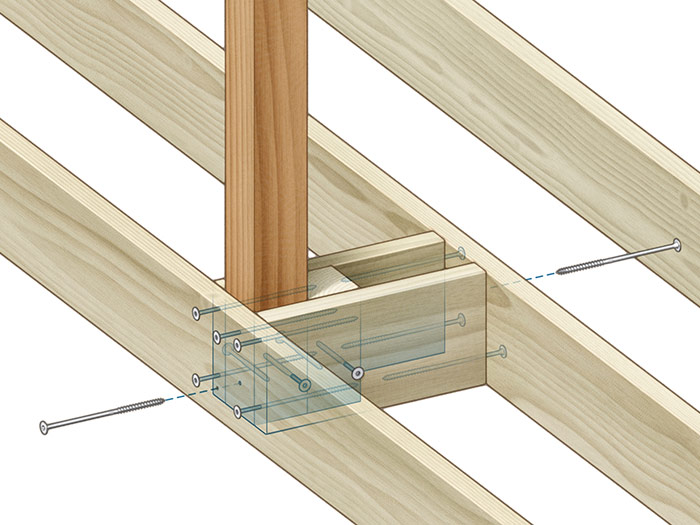 |
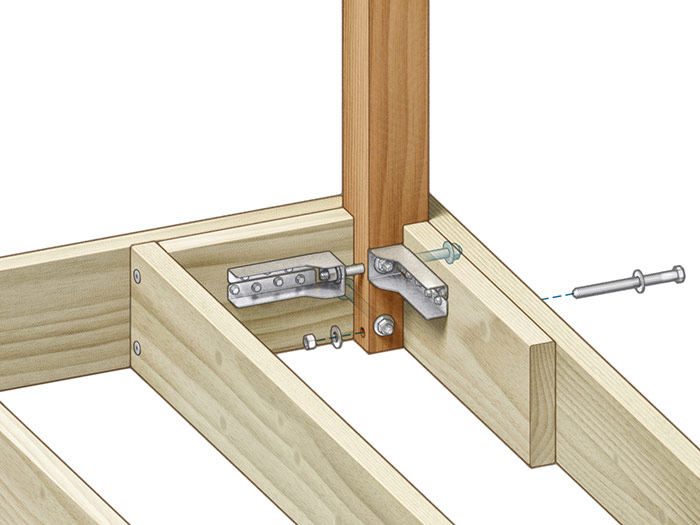
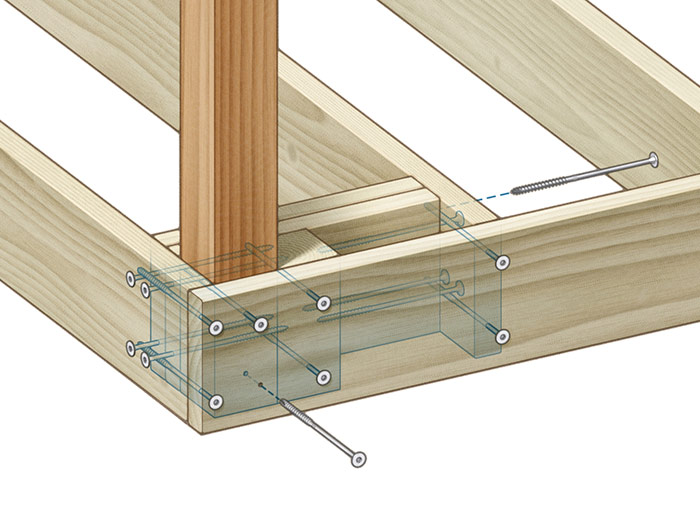
POSTS OUTSIDE OF DECK FRAMING
While it’s often easier to mount posts outside of the deck framing, going this route can limit your fastener and hardware choices. Simpson Strong-Tie doesn’t have details for using its Timber Screws for these connections, so tension ties are my go-to for solid outside-the-rim attachment. That’s not to say it can’t be done with screws, but you’d have to have an engineer design a solution.
CONNECTION DETAILS: What’s shown here are the basics, but you can extrapolate these connections to fit almost any scenario—from 45° outside corners to double- and single-post inside corners, and just about every other situation where posts get attached to deck frames.
OUTSIDE CORNER: Tie rim and end joists on two axes
 |
RIM, BESIDE JOISTS: Tie the rim to the adjacent joist 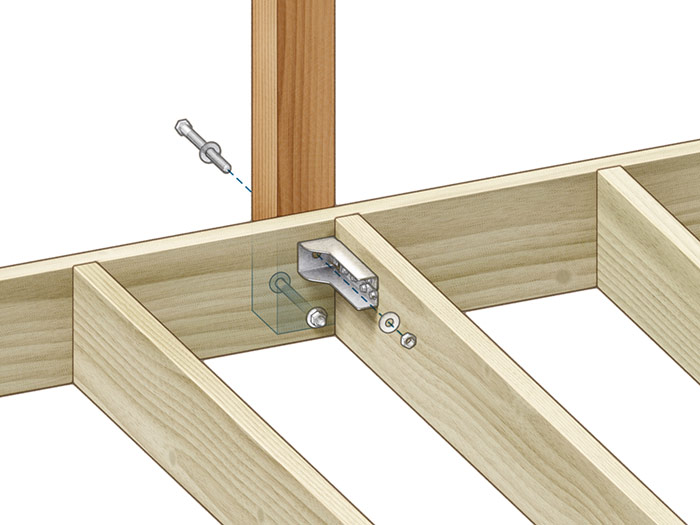
|
|
RIM, BETWEEN JOISTS: Tie the rim to the joists on both sides of the post 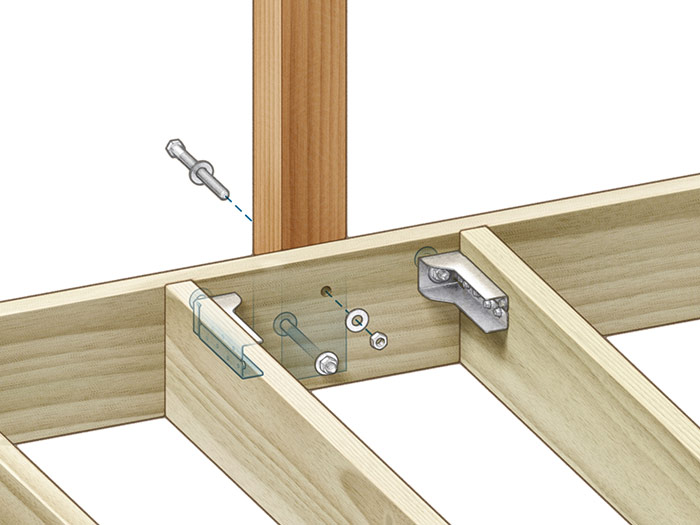 |
END JOIST: Transfer the load to inboard joists with blocking 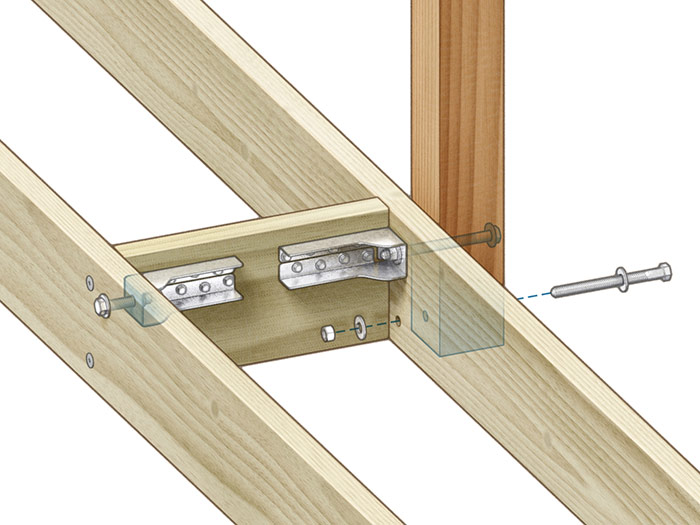
|
Mike Guertin is editorial advisor. Drawings by Christopher Mills.
From Fine Homebuilding #298
To view the article, please click the View PDF button below.
Related Links:
Fine Homebuilding Recommended Products
Fine Homebuilding receives a commission for items purchased through links on this site, including Amazon Associates and other affiliate advertising programs.
Flashing and Joist Tape

Drill Driver/Impact Driver
4-Gallon Piston Backpack Sprayer

